Table of Contents
Advertisement
Quick Links
Advertisement
Table of Contents

Related Manuals for WebGate HS1600F-D


Summary of Contents for WebGate HS1600F-D
- Page 2 HD-CCTV DVR Install & User Guide HD-CCTV DVR Manual. Thank you for purchasing a Webgate Digital Video Recorder. Before installation or operation please become familiar with the user manual and other referenced manuals mentioned in the booklet. User manual, software and hardware described here are protected by copyright by law. With the exception...
-
Page 3: Introduction
Product is made of metal you can hurt another human if you throw or used as a weapon. Keep away from the reach of children and install in a safe place. If Product does not operate properly, please contact the closest WEBGATE distributor for service. Tampering or disassembling the product will void the warranty. -
Page 4: Table Of Contents
Contents Introduction 2 Warning 2 Key Features 5 Specification by Models 6 Components 7 Product Description 8 Installation 13 Connecting other devices 16 Usage 23 Default setting 24 Menu usage 29 Menu structure 29 FUNC menu 29 Monitoring 29 Search and playback 34 Playback 34 Screen composition/names of the functions 35 Copy 36... - Page 5 System requirement 68 Installation 68 Login 68 Monitor 69 Playback 70 Webeye 71 Mobileviewer 71 Appendix 72 Problem solving [FAQ] 72 Compatible HDD 74 Factory default set-up values * 74 Product specification 78 Product Dimension 81...
-
Page 6: Key Features
Key Features Penta-Brid * Various video format from 1080P, 720P, 960H, NTSC/PAL up to DoubleReach can be displayed simultaneously. SD : D1 It supports real-time live monitoring and record/playback on various format and it records from 5 seconds before event and record up to 30fps per channel. -
Page 7: Specification By Models
Supports PTZ control and PRESET function Easy control of up to 255 DVR with a single remote control Specification by Models Model CASE DoubleReach NS04R RAID HS1600F-D Full SATA*5 + eSATA HSC1601F-D Middle SATA*2 + eSATA HSC801F-D Middle... -
Page 8: Components
Components Please check the below to make sure you have every part. HS1600F-D Remote Control & Batteries Mouse power cord Installation and user guide Rack Bracket Screws SW & user guide CD Quick installation guide HSC1601F-D / HSC801F-D Remote Control & Batteries... -
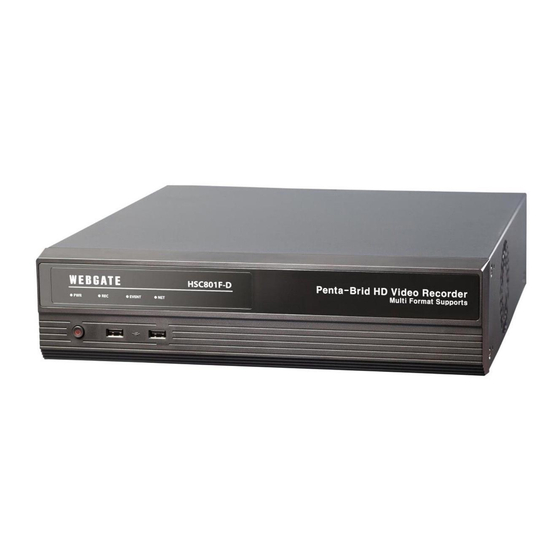
Page 9: Product Description
Product Description HS1600F-D Front view part name function description Power turns ON/OFF the power It turns on when power is ON Shows record status while recording EVENT Turns on if event is triggered Shows network connection status and it flickers if network is connected USB port USB port for flash memory or mouse. -
Page 10: Front View
HSC1601F-D / HSC801F-D Front view part name function description Power turns ON/OFF the power It turns on when power is ON Shows record status while recording. EVENT Turns on if event is triggered Shows network connection status and it flickers if network is connected USB port USB port for flash memory or mouse. - Page 11 part name function description Channel Input Camera input BNC port for 1080P, 720P, 960H, NTSC/PAL, DR cameras HDMI Output HDMI monitor connection output port Ethernet Ethernet : network connecting terminal (RJ-45) VGA Output VGA monitor connection output port. HSC801F-D Rear view part name function description Power Input...
-
Page 12: Remote Control
Remote control Can use every function of the DVR and control several DVRs with only one remote control. To be able to use the remote control, please create a user ID on the remote control ID section of system settings. (See the right picture for working angle of a remote control) RELAY ON BACKUP... - Page 13 Remote control B...
-
Page 14: Installation
5. Partition table must be removed for HDDs used in PC or other DVR models before installation. HDD installation HS1600F-D 1. Unscrew bracket screws that are fixing it to a DVR.. 2. Push HDD bracket to a direction shown in the right picture and... - Page 15 1. Lift HDD bracket to a direction shown in the right picture and separate from the bottom. 2. Place HDD in a HDD bracket and fasten 4 screws on each side. 3. Place HDD bracket fastened with screws in DVR and fasten it on the bottom with screws.
-
Page 16: Adding Hdd
2. Install HDD bracket with HDD into DVR then hold it with screw to fix it to the bottom part of DVR. <Note> Socket arrangement of SATA cable in main b’d is as follows. Two HDDs can be installed in DVR. Main b’d socket Disk manager INT A... -
Page 17: Connecting Other Devices
200M HD-SDI cable Depends on manufacturer and models. * The transmission distance will be almost doubled in case it is used with WEBGATE’s D1080 Series camera or DoubleReach™ Converter <warnings> Transmission distance will be affected by cable types and installation site environment ... -
Page 18: Connecting External Device
<Note> 1) Use Gigabit Ethernet Cable(Category-6) for Network cables to connect to DVR. Other cables are not compatible with Webgate DVR. 2) NS04R and DVR must be connected by cables and normal operation isn’t guaranteed if Hub is used. * For more information and setup of NS04R, please refer to “NS04R user manual”. - Page 19 Set ID configuration Set ID using Rotary switch located at rear panel. Set each different ID in case of over 2 NS04Rs are connected. Using tool such as Driver to set ID. For Group ID swich, it is set as ID in a unit of 10 when ID switch of NS04R is in a unit of 1.
-
Page 20: Connecting Relay
Connecting sensor input terminal Please see the picture for sensor input. The below picture is an example of connecting Dry Contact sensor type. Please refer to “Wire Handling” for more information. Connecting relay specifications Please see the below table for alarm output requirements. Output Ch. - Page 21 Connecting COM2/COM3 serial port external device Connecting serial communication terminal for PTZ device & Keyboard device Control PTZ devices and Keyboard devices by connecting them to DVR’s COM ports. Picture in the right shows how a camera and a keyboard device with PTZ function are connected to RS-232 COM1 &...
- Page 22 Connecting PTZ & Keybaord up to 255 DVRs can be connected using keyboard and PTZ control is possible for all channels connected to DVR. Also, multiple keyboards extension as Slave can be used limitless with Master Keyboard. In ths case, Master Keyboard has priority for all controls. Please refer the instruction manual for PTZ keyboard connection &...
- Page 23 Confituration using 1 serial ports When using 1 serial port, user can connect both of PTZ(DOME) and Keyboard to a port, and user can select a PTZ(DOME) through the keyboard. According to DVR’s COM port setting, connected controllable device can be selected, and by choosing a DVR ID, keyboard can control several DVRs.
-
Page 24: Usage
Usage Menu Structure Press [MENU] key on front panel or click [Main Menu] button under FUNC menu to enter the setup menu. To exit menu, press “X”. Main Menu Main menu Sub menu The selected tab is shown in bright color and the sub-menu box will show the chosen To move to the previous/next tab, use the [◀/▶] Dialogue set... -
Page 25: Default Setting
Default setting Check video When turned on, DVR starts booting automatically and shows screen after the booting. <reference> Auto login “ON” means login set without any login dialogue box, “OFF” means there will be dialogue box requiring password. (default – auto login ON, admin) Date &... -
Page 26: Recording Configuration
Recording configuration menu recording recording [continuous recording] [manual recording] [schedule recording] Continuous recording Continous recording will automatically begin after the booting is completed and continous/event recording will begin according to the chosen program values. Manual recording Push on the front to begin/end manual recording and manual/event FUNC [TOOLS –... -
Page 27: Relay Setting
Use of Input/Output device Setting sensors menu event sensor Please set each and every sensor. Select a sensor, and select a type and click [save] to complete the setting. Relay setting menu event event Select from normal event group, “sensor, motion detect, text, Video Loss”... -
Page 28: Hdd Registration And Format
< > warning Please call Webgate or Webgate dealers for HDD compatibility HDD replacement (1) turn off the DVR, take out a HDD and install a new HDD. (2) turn on the DVR again, open “Disk Manager”. Select the removed HDD, and press [Confirm] to remove the HDD from the list. -
Page 29: Network Configuration
If DVR is using dynamic IP, use DDNS function to get domain name to access to network regardless of IP change. Enter domain name on DDNS menu. For more information, please go to WNS(www.mycam.to), Webgate’s DDNS service website. If DVR is using dynamic IP, use WRS service to automatically find the product IP to access. Configure GROUP ID to activate WRS function. -
Page 30: Menu Usage
Menu usage Menu structure Refer to the below picture for The menu structure and read the explanation in each box per item for a set-up guide. FUNC menu To run Function menu, please, click the right button of mouse in live monitoring or playback status or push “Func” button on the front panel. -
Page 31: Single Screen
single screen click the channel number you want to view or click the left mouse button. Click [MULTI] button or click the left mouse button again to o return to multi-screen Multi screen Click [MULTI] for multi-screen display or press multi under func menu to choose multi-screen mode. -
Page 32: Ptz Control
Enlarged screen Using D-Zoom on a single screen, users can enlarge the section they want to view.. Click on [Zoom] button or icon in single / full screen or [FUNC] button then select Zoom button to activate Zoom mode. To expand or reduce, please use +, - button or use mouse wheel drag. The initial location of the enlarged screen is the center. -
Page 33: Camera Setup
When PTZ is on, through PTZ button on front or PTZ buttons under FUNC menu, users can use pan/tilt, zoom, focus, aux and preset functions. Focus Click “near”, “far” buttons to focus. zoom click “In”, “Out” buttons to create a preferred focal point. pan/tilt pan/tilt function for PTZ configuration channel Use “Up”, “Down”, “Left”, “Right”... - Page 34 Bookmark Add / Edit bookmark No, Time, Channel and Memo in [Tool-Bookmark] of FUNC menu while live or playback. Run bookmark icon “ “in Search, Copy, Thumbnail to load saved bookmarks. Screen Information Setup or change display information such as channel expression, color, size, status, show/hide/auto hide in [Information-Display] of FUNC menu.
-
Page 35: Search And Playback
Search and playback Playback Playback with Basic Screen In monitoring mode, Remote control Press [◀/▶] button to playback the recorded video in full screen If [PLAY] button is pressed, the last playback will run at 1x speed. If [FWD] button is pressed, playback starts from 1min earlier than recent time at 1x speed. ... -
Page 36: Screen Composition/Names Of The Functions
Screen composition/names of the functions Screen composition name function description Playback button Use buttons to control the playback. screen Displays the playback videos. log viewer Displays the log seen on timeline Calendar/time search Select a date on the calendar to view the data of the date. timeline Displays the info of the unit and search the playback sections. -
Page 37: Copy
Time search Enter the date and time you want to search and press enter to move to the entered date and time. Calendar search When calendar search is run, it marks the dates on which there were recordings. Select a date from calendar you want to search, and it moves to that date. - Page 38 Use USB stick to back up and use mini player or control center to playback. It is possible to select a part of channels depending on the choice of the channel list made by a user. Name function description type Select EXE using direction keys or mouse wheel.
-
Page 39: Configuration
Configuration System configuration Please set time/disk/authority. Date/time menu system date/time Set the product time in order to set recording settings. It is very important for DVR to have the right time zone in which it is used for protection of recorded videos. Default time zone is set at ‘UTC 00:00 Dublin”. -
Page 40: Disk
menu system date/time Network Time Protocal(NTP) NTP (Network Time Protocol) synchronizes the time of all connected device. To set DVR time to standard time open server which offers standard time on the network and client which is connected to open server to receive time and synchronize it with standard time. -
Page 41: Disk Manager
Recorded part for 2 days. Record during 10 days. Record during 10 days. Start record In progress of record Start record In progress of record [Picture 1] [Picture 2] Data deletion This function allows only recordings of preassigned date to be viewed. For example, if playback block is set at 3 days, then DVR will only save data for 3 days and will delete data more than 3 days old even if auto-deletion isn’t on. -
Page 42: Raid Manager
Disk Status Online : HDD is connected, Offline : HDD is not connected. What is RAID? Webgate’s DVR models(HD1600F-PDR, HD1600F-R, HD800F-PDR, HD400F-PDR) support RAID function via built-in hard disk. RAID(Redundant Array Independent Disk) can store the data using the pre allocated parity territory if ... -
Page 43: User Settings
User settings menu system user settings DVR users will either be manager or user. Managers can use all functions of DVR without limitation and can set up user settings. Up to 10 users can be registered and each user can only use functions for which they’ve been given access to. - Page 44 Utility menu system utility Utility sets up DVR name, remote control ID, and language. DVR alias Set the DVR alias when connected to network. language select a language for a system. DVR keyboard ID This menu sets the address of keyboard when using all functions of DVR by keyboard.
- Page 45 Configuration Import/Export Export – Saves Configuration data in DVR to USB Import – Apply exported Configuration data to relevant DVR or another DVR. Recording status Displays DVR recording status. System info Displays DVR system info...
-
Page 46: Network
Network Configure network info when DVR is connected to a network. Network settings menu network network Ethernet used to configure the relevant network info when DVR is connected to network. type Select Network type(Ethernet/xDSL). If DVR is connected to cable modem or lan, select “Ethernet. - Page 47 Bandwidth limitation. Bandwidth is to configure the maximum transmission speed. Its default value is unlimited and users don’t have to set bandwidth value if there is no need to limit the network data size of DVR. <warning> Please consult DVR manager if you want to modify bandwidth value. RTSP It is short for Real Time streaming Protocol) and streams real time live image of DVR...
- Page 48 DDNS menu network DDNS Through Webgate’s own DDNS service, WNS server, users can give a domain name to DVR. Using a PC, users can register for a membership create domain name even they don’t register www.mycam.to. If connected to DDNS correctly, users can connect to status and print connection successful message.
- Page 49 xDSL menu network network xDSL DVR is connected to xDSL line and use PPPoE type, please change type by xDSL and configure user ID and Password. User ID and Password should be same as xDSL. User ID/Passwor Configure user ID and Password when DVR is connected to xDSL.
-
Page 50: Device Settings
Device settings In Device setup, user can configure camera, monitor, audio, text, serial which are connected to DVR. Camera menu device camera At this menu, user can assign [camera name], and set each camera to use or not to use. If the operator do not want live monitoring and recording for the video connected channels, the channels must be set as nonuse. - Page 51 Menu Device PTZ Port Choose one of COM2/COM3/CoC*. Device Select a device that is connected to the port. Address Select the device’s address that is connected to the port. Baudrate Select the device’s baudrate that is connected to the port. * Please refer to page 5 for PoC/CoC PTZ ETC Preset, Auxiliary and home time can be set up...
- Page 52 Monitor menu device monitor Configure SEQ, MULTI and event pop up. alarm pop-up If specific channel uses MD, Sensor Input, it makes the relevant channel pop-up as single or multi screen. To use this function, event should be set to event schedule in recording set up and MD / Sensor configuration should be done also.
- Page 53 Audio menu device audio Configure audio channel, audio recording, volume, synchronization, mixing on this menu. Audio channel Slelect a channel for audio. Video channel Configure if selected audio will be synchronized and heard through the video channel. For example, if audio channel 1 is synchronized with video channel 4, then audio will be heard through video channel 4.
- Page 54 Time out If configured line is not full, after the last information, if there is no further information during certain time range, system deal with it as one information.
-
Page 55: Event Configuration
Event Configuration Event menu event event Event set up has 4 set up procedures, event, motion, sensor, and preset. event configures time range with event synchronization and can be configured as off, always, and custom “always” recognizes and reacts to event when it is configured. “custom”... -
Page 56: Sync Event
Sync event Configuration for Event synchronization Relay When events that have been selected in “Event Sources” occur, event notification by relay goes on for the time period set in “Action time” Buzzer Event notification by buzzer goes on for the time period set in “Action time”. - Page 57 E-Mail Configuration Recipient Address Input E-mail address with receiver’s E-mail info. E-mail format should be xxxx@xxxxxx.xxx and the users must only use combination of numbers and the English letters Sender’s E-mail address Sender’s E-mail address is set when user use E-mail for output selection and user setup E-mail address as xxxx@xxxxxx.xxx.
-
Page 58: Motion Detection
Motion detection menu event motion The Motion detection can be used to notify user of detected motion on each channel or all channel. Channel Configure All or each channel. Sensitivity Sensitivity can be configured from min.1 to max 10. Area Area configure detection when a motion is triggered. -
Page 59: Recording Set Up
Recording set up There are 4 modes for recording – schedule recording, manual recording, Continuous Recording, and Event Recording. Schedule Recording records automatically in accordance with the configured schedule and Manual Recording records via pushing button. FUNC [TOOLS – MANUAL RECORDING] Continuous Recording records continuously upon initial system boot up. -
Page 60: Event Recording
Schedule recoding It records according to the programmed schedule automatically. select “Schedule record” and configure day and time Check and select each program default value and select one of 9 programs from A to I. User can not set two different program to one schedule. - Page 61 Program menu recording program Using [Program], adjust frame rate and quality configure recording program for Continuous, Manual, and Schedule recording. Select Program to configure frame rate & resolution. For maximum performance, user can freely allocate the recording resource per channel.
-
Page 62: Web Viewer
Web Viewer WebViewer is Web application program loaded to monitor real-time image or to monitor the images recorded through Web browser to PC located remotely. System requirement Recommendation Items Core i5 3.0GHz Main Memory Video Memory 512MB or higher Display 1024MB PCI-E Graphic Card Support AGP Accelerate Support PCI-E 16X or highter Network... -
Page 63: Monitor
Monitor When it is authorized with User ID & Password input at Login page, it moves to monitor page. At Monitor page, monitor real time image of cameras connected to DVR, or it can control PTZ camera, Relay, and use Microphone function according to user’s authorization. -
Page 64: Sensor Indication
channel On/Off It is On/Off button for the Channel located to left in page. Click the channel wanted to On or Off. And Default is “On”. Sensor indication The icon indicates when sensor occurs in system When it sensors, relevant sensor icon comes to Red, and indicates sensor number of video. -
Page 65: Saving Video
If “Rec Stop” is pressed by clicking right mouse button, recroding stopped. Then, open the dialogue box to store recorded files. At this time, user can save it to the directory with any file name by user. Saved recording file is saved into “*.re4” file format. re4 file can playback through Control Center Playback program or Mini Player program. -
Page 66: Playback
Using Audio In case of Channel setup sync with Audio, press right mouse button on the image to activate pop-up menu to “Listen” and uncheck Mute. Audio Volue adjustment is available using slide bar. Playback This page is to playback recorded images, and user who has authority of ‘HDD’... -
Page 67: Move To Web Monitor
bmp file. Print Select image with mouse for the channel to print image saved, and then click ‘Print’ button. Window comes to input Memo, and click ‘OK’ button to print the image through the printer connected. Print material includes ‘Printing Date’, ‘Channel name’, ‘Recording Date’... -
Page 68: Calendar Search
Calendar search Recorded date is enabled in black color, and others unrecorded date disabled in grey. Click [Go to] button after select date & time so as to playback images on the date & time selected. ‘When clicking the ‘Go To’ button, it indicates for 24hours from the time selected at left bottom. -
Page 69: Java Viewer
JAVA Viewer Jave Viewer supports DVR monitoring function regardless of operating system. System requirement Recommendation Items Core i5 3.0GHz Main Memory Video Memory 512MB or higher Display 1024MB PCI-E Graphic Card Support AGP Accelerate Support PCI-E 16X or highter Network 100/1000 Ethernet NIC Windows 7 / Windows 8 / OS X Mavericks (version 10.9) Installation... -
Page 70: Monitor
Monitor When it is authorized with User ID & Password input at Login page, it moves to monitor page. At Monitor page, monitor real time image of cameras connected to DVR, or it can control PTZ camera, Relay, and use Microphone function according to user’s authorization. -
Page 71: Playback
Playback Click [ ] to run playback. Playback is page, where only Authorized or user account assigned with right for [playback/search] can use. Playback can be controlled by search, time shift button or click on time line. Calendar search Recorded date is enabled in black color, and others unrecorded date disabled in grey. -
Page 72: Webeye
Webeye Mobile viewer is an Application for Smart Phone. It is available to serach and install as free of charge with “WebEye” keyword in Apple App store & Google Android Store. Available to register up to 16 units Supports multi-stream function ... -
Page 73: Appendix
Appendix Problem solving [FAQ] solution problem & symptom If system power isn’t on, LED on the Check the power of system system front won’t operate Check power voltage in out Check or replace power supply if power doesn’t turn on after above procedure No video on some channels with black ... - Page 74 2) For alarm sound cancel : Event record mode - Alarm (Motion detection/Video loss) – It erases alarm output. 3) For event cancel : Event record mode - Alarm (Motion detection/Video loss) – It turn off mode. No response in Live screen even FUNC ...
-
Page 75: Compatible Hdd
will become high accordingly so HDD capacity will be reduced too. It will lead to short period time of recording Remote control doesn’t work. Point to remote control receiver Get new batteries. Compatible HDD Please ask to seller for the HDD list compatible with DVR. Factory default set-up values * System Time... - Page 76 IP Address 192.168.0.2 Net Mask 255.255.255.0 Gateway 192.168.0.1 UPnP Port Forwarding 4.2.2.1 / 0.0.0.0 / 0.0.0.0 Port Bandwidth Limit (Mbps) unlimited Video Streaming (RTSP) Port 554 / Auth On IP Filtering Guest xDSL Password ******** Status xDSL is not connected activate Turn off status...
- Page 77 Baudrate 2400 Sync Video Channel Cam1 Recording Parity bit none Stop bit Data bit Manual Header check header 1 None header 2 None delimiter 0D0A Time interval(ms) 1000 # of lines Evnet activate Turn on Event check always Event synchronization Relay 1 Turn on Normal event source...
- Page 78 ftp_user Password ******** channel Cam1 activate Turn on Motion Sensitivity Area All Select activate Turn on Sensor Sensor Normal Open Channel Cam1 Preset S1~S16 None Preset Motion None Text None Record Record Mode Countinuous Program Pre Event Duration Post Event Duration Record Program Program...
-
Page 79: Product Specification
Product specification HS1600F-D... - Page 80 HSC1601F-D...
- Page 81 HSC801F-D...
-
Page 82: Product Dimension
Product Dimension HS1600F-D... - Page 83 HSC1601F-D...
- Page 84 HSC801F-D...
-
Page 85: Open Source License Report On The Product
7. If, as a consequence of a court judgment or allegation of patent infringement or for any other reason (not limited to patent issues), conditions are imposed on you (whether by court order, agreement or Open Source License Report on the Product otherwise) that contradict the conditions of this License, they do not excuse you from the conditions of this License. - Page 86 A “covered work” means either the unmodified Program or a work based on the Program. be in a format that is publicly documented (and with an implementation available to the public in source To “propagate” a work means to do anything with it that, without permission, would make you directly or code form), and must require no special password or key for unpacking, reading or copying.
- Page 87 THERE IS NO WARRANTY FOR THE PROGRAM, TO THE EXTENT PERMITTED BY APPLICABLE LAW. EXCEPT any medium, provided that you conspicuously and appropriately publish on each copy an appropriate WHEN OTHERWISE STATED IN WRITING THE COPYRIGHT HOLDERS AND/OR OTHER PARTIES PROVIDE copyright notice and disclaimer of warranty;...
- Page 88 in or among countries not thus excluded. In such case, this License incorporates the limitation as if written 7. Disclaimer of Warranty. Unless required by applicable law or agreed to in writing, Licensor provides the in the body of this License. Work (and each Contributor provides its Contributions) on an "AS IS"...
- Page 89 without fee is hereby granted, provided that the above copyright notice appear in all copies and that both This library is free for commercial and non-commercial use as long as the following conditions are that copyright notice and this permission notice appear in supporting documentation, and that the name aheared to.
- Page 90 Manufacturer might service at user’s cost for following request made by customer. Customer notice. Please make regular schedule to check unit status (Daily check is recommended). Manufacturer will not take any responsibility on the physical/human damage caused by robbery, natural disaster.
- Page 91 For requesting service? Please inform details of malfunctions correctly. Free or non free repair will be decided based on details of warranty card. WebGate Division Daemyung Enterprise Co., Ltd. 6F Hanlim Venture Town B/D 689-6, Geumjeong Dong, Gunposi, Gyeonggido,Korea Main...
Need help?
Do you have a question about the HS1600F-D and is the answer not in the manual?
Questions and answers