Table of Contents
Advertisement
Advertisement
Table of Contents

Related Manuals for StarTech.com INFOSAFE SAT3540ER


Summary of Contents for StarTech.com INFOSAFE SAT3540ER
- Page 1 4 Drive eSATA Multi RAID Hard Drive Enclosure SAT3540ER...
- Page 2 StarTech.com, or an endorsement of the product(s) to which this manual applies by the third-party company in question. Regardless of any direct acknowl- edgement elsewhere in the body of this document, StarTech.com hereby acknowledges that all...
-
Page 3: Table Of Contents
Instruction Manual Instruction Manual Table of Contents Introduction ................... 1 Features ..................1 Package Contents ...............1 SAT3540ER Installation ..............4 Hardware Overview ..............4 Hardware Installation ..............6 Installing the SAT3540ER Manager Configuration Utility ....7 Getting Started ................10 Start the SAT3540ER Manager ...........10 Microsoft®... - Page 4 Instruction Manual Monitoring the SAT3540ER ............27 Monitor Drive Status ..............27 Review Event Logs ..............28 Configuring Email Notification .............29 Specifications ................31 Technical Support ................. 32 Warranty Information ..............32...
-
Page 5: Introduction
Instruction Manual Introduction Thank you for purchasing a StarTech.com InfoSafe 4 Drive eSATA Multi RAID Hard Drive Enclosure. This innovative storage solution supports the configuration and management of multiple storage devices connected to a single host, as well as a robust feature set - including easy to use RAID configuration, automated disk rebuilding, and virtualization capabilities. - Page 6 Instruction Manual SAT3540ER RAID Storage Policies Before you use the SAT3540ER Manager to configure the Storage Appliance, take a minute to study the following terms. The terms represent SAT3540ER configuration options or storage policies for mapping the physical to the virtual drives. You’ll choose from these policies during the configuration process.
- Page 7 Instruction Manual A storage policy configuration in which I/O processing is balanced evenly to all disks in a method known as striping, equivalent to RAID 0. Fast offers the best performance in terms of speed, but no data redundancy. Striping increases storage operation speed by using several disk drives in parallel.
-
Page 8: Sat3540Er Installation
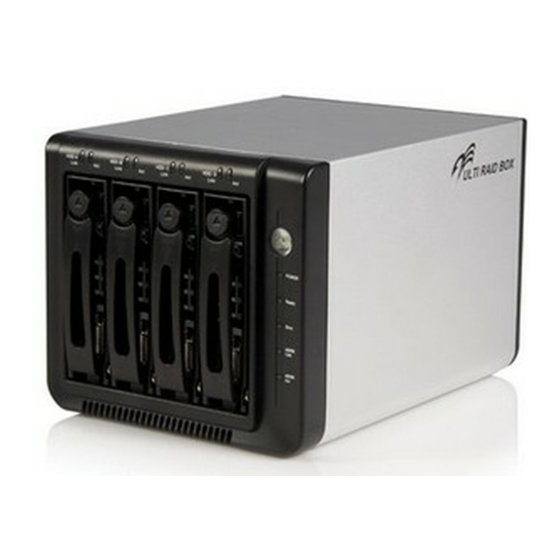
Instruction Manual SAT3540ER Installation Hardware Overview Power Receptor for the provided Power Adapter (12VDV, Maximum 8.23 Amps, 100-240V AC, 50-60Hz) Ports DC IN - Power DC jack. eSATA port - Connect your eSATA port to the computer being used. Buttons Fan SW - Fan ON/OFF switch. -
Page 9: Cooling Fan
Instruction Manual Front View Link/Activity LEDs (Drives A - D) Power LED Ready LED Error LED eSATA Link LED eSATA Activity LED Rear View DC In System Reset Cooling Fan eSATA Connection to host Fan Switch... -
Page 10: Hardware Installation
Instruction Manual Hardware Installation In order to run the SAT3540ER Manager, you must first install the Silicon Image PCIE card and its associated driver. The card provides a software and hardware link between the PC that functions as the host computer and the SAT3540ER Storage Appliance. -
Page 11: Installing The Sat3540Er Manager Configuration Utility
Instruction Manual Remove the screws holding in the plastic brace from the tray, then se- cure the hard drive into the trays with the previously removed screws. Repeat for each hard drive tray. Screw #4 Screw #3 Screw #2 Screw #1 Push the tray into the enclosure until the you feel some resistance when the drive SATA connector will be making contact with that of the SAT3540ER. - Page 12 Instruction Manual Accept to accept its terms. Read the license agreement and click Read Me file and click Next to continue. Review the Select the location on your computer to install the program and then click Next. Select the Program Folder into which the shortcuts should be placed and then click Next.
- Page 13 Instruction Manual Next to begin the installation process. The InstallShield® Click Wizard copies and sets up all the files required for the SAT3540ER Manager. Click Finish to conclude the installation. Programs section of The SAT3540ER Manager is installed in the the Start Menu under SteelVine, as shown below.
-
Page 14: Getting Started
Instruction Manual Getting Started Start the SAT3540ER Manager The SAT3540ER Manager starts with the Status window visible. The Configuration Wizard can be accessed from the Status window with a password. Microsoft® Windows The SAT3540ER Manager is installed in the Programs section of the Start Menu under SteelVine. -
Page 15: Sat3540Er Status Window
Instruction Manual • Use the Status window to monitor SAT3540ER status. • Access SAT3540ER Manager dialogs, such as the Configuration Wizard, by selecting menu options (or clicking toolbar buttons) and entering a password when prompted. The default password is admin. SAT3540ER Status Window System Status Drive Status... - Page 16 Instruction Manual • The Exp. S/N row shows the serial number of the hard disk drive within the bay during volume configuration. The daemon compares the ex- pected and actual Drive serial numbers to recognize a status change and displays the comparison results in the Status window. The lower table of the Status window notes capacity information for the individual hard disk drives and implemented volumes: •...
-
Page 17: Basic Configuration
Instruction Manual The toolbar of the Status window consists of these buttons: Button Tooltip Description Configure Box Opens the SAT3540ER Configuration Wizard. Specify Policy Launches the Rebuild Policy configuration Information dialog. Show Event Log Opens the Event Log viewer. Specify Opens the Firmware Manager. - Page 18 Instruction Manual The SAT3540ER Basic Configuration Wizard is accessible from the Status window and allows volume management. The Basic Configuration Wizard defines volumes based on a selected storage policy and does not allow volume counts or capacities to be modified. To protect against unintended changes, the SAT3540ER Manager prompts for a password the first time the Wizard is accessed.
-
Page 19: Volume Configuration
Instruction Manual Three buttons at the bottom of the Configuration Wizard control the affected change(s). Button Label Description Apply Causes the Wizard to download the changes to the SAT3540ER. Submits configuration changes to the SAT3540ER and closes the Configuration Wizard. Cancel Aborts the changes and closes the Configuration Wizard. - Page 20 Instruction Manual Choose the operating mode you wish to use, and select the corresponding radio button (please see pages 2-4 for further description of each mode).Note that the volumes table below the Storage Policy frame lists the volume label, implemented storage policy, and size.
- Page 21 Instruction Manual Partition the configured volume(s) to complete the implementation. For more information on how to partition drives, please consult the documentation that accompanied your hard drive or operating system at the time of purchase. Following drive configuration, you may wish to browse to the operating system Computer Management section, to ensure the changes have taken effect.
-
Page 22: Administering The Sat3540Er
Instruction Manual Administering the SAT3540ER Change Password The SAT3540ER Manager limits configuration access with a password prompt. The password information is stored locally on the server running the daemon. The default password is admin. File menu, select Change Password. From the Enter the current password (or use admin if you have not changed the default password). -
Page 23: Import Configuration File
Instruction Manual configuration files. • The Read Config File command from the File menu in the Basic Configuration Wizard imports a configuration file so that you can restore a previously saved configuration (storage policy). • The Save to Config File command from the File menu in the Basic Configuration Wizard exports an SAT3540ER configuration to a file. -
Page 24: Save A Configuration File
Instruction Manual 4. Click OK to implement the imported configuration. Save a Configuration File 1. Select Configure Box from the Edit menu, or click the Configure Box button in the Status window’s toolbar to open the Basic Configuration Wizard. 2. Select Save to Config File from the File menu, or click on the Save to a Configuration File button (denoted with a floppy disk icon) 3. -
Page 25: Manage Client Connection To The Daemon
Instruction Manual Manage Client Connection to the Daemon The SAT3540ER Manager consists of two modules: • Daemon • User interface The daemon module monitors SAT3540ER status and performs Safe volume rebuilds automatically. By default, the user interface attaches to a daemon running on the same PC to display the information gathered by the daemon. -
Page 26: Set Up A Remote Connection
Instruction Manual Set up a Remote Connection Status window, select Change Connection from the File menu. In the Enter the hostname or IP address of the PC hosting the daemon. Click The user interface will establish the requested connection and display the information gathered by the remote daemon in the Status window. -
Page 27: Configure Safe Volume Rebuild Storage Policy
Instruction Manual Configure Safe Volume Rebuild Storage Policy This SAT3540ER feature is provided to manage rebuilds of Safe volumes. When is a rebuild necessary? A rebuild is initiated to restore data redundancy for a Safe volume that has entered a vulnerable state. In a vulnerable state, one of the two mirrored disks goes offline or beomes inaccessible. - Page 28 Instruction Manual Once the daemon rebuilds to a designated Hot Spare, a designated Hot Spare will not exist and the SteelVine processor will rebuild to empty space. With Automatic Rebuild and Immediate Rebuild options selected, the daemon module of the SAT3540ER Manager automatically initiates an immediate rebuild.
-
Page 29: Configure A Rebuild
Instruction Manual Configure a Rebuild Specify Policy from the Edit menu of the Status window, or Select click on the Specify Policy button on the toolbar. Select one of the following policy options: • Manual Rebuild radio button requires a user to manually initiate a rebuild of the volume. -
Page 30: Firmware Installation (Upgrade)
Firmware Installation (Upgrade) New releases of firmware are sometimes made available on our web site (http://www.startech.com/downloads/ ). To perform a firmware upgrade: Select Specify Firmware from the Edit menu of the Status window. Firmware Selection dialog shows all of the SAT3540ER devices attached to the PC, the current firmware for each Storage Appliance, and the circuit board revision of each SAT3540ER. -
Page 31: Monitoring The Sat3540Er
Instruction Manual new firmware you wish to use or click the Browse button to locate the new firmware file. Install Firmware to begin the upgrade. Click Please note: Do not power off the SAT3540ER Storage Appliance during the download. The firmware download should take less than a minute to complete. -
Page 32: Review Event Logs
Instruction Manual Color State Definition Resolution Yellow Rebuilding The drive is being rebuilt Wrong Slot There’s a mismatch Install the correct between the Serial # and disk drive into the Purple Expected Serial # because bay. a hard disk drive has been installed into the wrong bay. -
Page 33: Configuring Email Notification
Instruction Manual Configuring Email Notification Email notifications offer a convenient way to stay informed as to the status of the SAT3540ER via e-mail. To configure e-mail notification: 1. Select Setup Email Notification from the Edit menu in the Status window. 2. - Page 34 Instruction Manual Similarly, this feature allows users to determine the reason (event) for the e-mail notification, as well as the contents of the email message the recipient will receive (as configured by the user based on the available Message Codes).
-
Page 35: Specifications
Instruction Manual Specifications Enclosure Type Aluminum Bus Interface SATA revision 2.0 Enclosure: Sil4726 Chipset ID Host Card: Sil3531 1 x eSATA External Connectors 1 x DC Power 1x 80mm Ball Bearing Fan Up to 4 x 1 Terabyte SATA hard Compatible Hard Drives drives Maximum Data Transfer Rate... -
Page 36: Technical Support
Limitation of Liability In no event shall the liability of StarTech.com Ltd. and StarTech.com USA LLP (or their officers, directors, employees or agents) for any damages (whether direct or indirect, special, punitive, incidental, consequential, or... - Page 37 StarTech.com has been making “hard-to-find easy” since 1985, providing high quality solutions to a diverse IT and A/V customer base that spans many channels, including government, education and industrial facilities to name just a few. We offer an unmatched selection of computer parts, cables, A/V products, KVM and Serv-...
Need help?
Do you have a question about the INFOSAFE SAT3540ER and is the answer not in the manual?
Questions and answers