Lexmark T630 User's Reference Manual
Lexmark printer user's reference manual
Hide thumbs
Also See for T630:
- Setup manual (67 pages) ,
- Quick reference manual (9 pages) ,
- Service manual (8 pages)
Table of Contents
Advertisement
Quick Links
Advertisement
Table of Contents

Related Manuals for Lexmark T630


Summary of Contents for Lexmark T630
- Page 1 T630, T632 User’s Reference www.lexmark.com...
-
Page 2: Table Of Contents
Avoiding jams ... 22 Sending a job to print ... 22 Canceling a print job ... 23 Canceling from the printer operator panel ... 23 Canceling a job from a computer running Windows ... 24 Printing the menu settings page ... 25 Printing a font sample list ... - Page 3 Using the output bins ... 78 Using the support extension in the standard bin ... 80 Chapter 4: Maintenance ... 81 Maintaining your printer ... 81 Determining the status of supplies ... 81 Conserving supplies ... 82 Ordering supplies ... 82 Ordering a print cartridge ...
- Page 4 Removing a used staple cartridge ... 105 Installing a new staple cartridge ... 106 Resetting the maintenance counter ... 108 Printer maintenance when printing on card stock ... 108 Printer maintenance when printing on labels ... 108 Chapter 5: Troubleshooting ... 109 Solving basic printer problems ...
- Page 5 260 Paper Jam Check Env Feeder ... 158 At entry into the envelope feeder ... 158 Between the envelope feeder and the printer ... 159 27x Paper Jam Check Bin x ... 160 In an optional output bin ... 161 Between output bins ...
- Page 6 Removing the envelope feeder ... 199 Removing an optional output bin ... 201 Removing the printer from the duplex unit, removing a duplex unit from a drawer and removing a drawer from another drawer ... 205 Understanding the operator panel ... 207 Indicator light ...
- Page 7 Contents Help Menu ... 263 Understanding the printer messages ... 264 Index ... 280...
-
Page 8: Notices
Notices • Edition notice • Trademarks • Licensing notice • Safety information • Cautions, warnings, and attentions • Electronic emission notices • Noise emission levels • Energy Star • Laser notice • Statement of limited warranty... -
Page 9: Trademarks
Eire, send to Lexmark International Ltd., Marketing and Services Department, Westhorpe House, Westhorpe, Marlow Bucks SL7 3RQ. Lexmark may use or distribute any of the information you supply in any way it believes appropriate without incurring any obligation to you. You can purchase additional copies of publications related to this product by calling 1-800-553-9727. - Page 10 Systems’ designation of a set of printer commands (language) and functions included in its software products. This printer is intended to be compatible with the PostScript 3 language. This means the printer recognizes PostScript 3 commands used in various application programs, and that the printer emulates the functions corresponding to the commands.
-
Page 11: Licensing Notice
• GNU General Public License The Lexmark modified GNU licensed software is free software; you can redistribute it and/or modify it under the terms of the licenses referenced above. These licenses do not provide you any rights to the Lexmark copyrighted software in this printer. -
Page 12: Safety Information
This product is designed, tested, and approved to meet strict global safety standards with the use of specific Lexmark components. The safety features of some parts may not always be obvious. Lexmark is not responsible for the use of other replacement parts. - Page 13 Class B computing device, use a properly shielded and grounded cable such as Lexmark part number 1329605 for parallel attach or 12A2405 for USB attach. Use of a substitute cable not properly shielded and grounded may result in a violation of FCC regulations.
-
Page 14: With A Network Card Installed
Federal Communications Commission (FCC) compliance information statement The Lexmark T family base printers, Types 4060-000 and 4060-200, and network printers, Types 4060-010 and 4060-210, have been tested and found to comply with the limits for a Class A digital device, pursuant to Part 15 of the FCC Rules. Operation is subject to the following two conditions: (1) this device may not cause harmful interference, and (2) this device must accept any interference received, including interference that may cause undesired operation. - Page 15 A declaration of conformity with the requirements of the directives has been signed by the Director of Manufacturing and Technical Support, Lexmark International, S.A., Boigny, France. This product satisfies the Class A limits of EN 55022 and safety requirements of EN 60950.
-
Page 16: Noise Emission Levels
Companies participating in this program introduce products that power down when they are not being used. This feature will cut the energy used by up to 50 percent. Lexmark is proud to be a participant in this program. -
Page 17: Statement Of Limited Warranty
Lexmark T630, T632 This Statement of Limited Warranty applies to this product if it was originally purchased for your use, and not for resale, from Lexmark or a Lexmark remarketer, referred to in this statement as “Remarketer.” Warranty Lexmark warrants that this product: •... - Page 18 Lexmark is legally liable. In no event will Lexmark be liable for any lost profits, lost savings, incidental damage, or other economic consequential damages. This is true even if you advise Lexmark or a Remarketer of the possibility of such damages.
- Page 19 Statement of limited warranty Additional rights Some states do not allow limitations on how long an implied warranty lasts, or do not allow the exclusion or limitation of incidental or consequential damages. If such laws apply, the limitations or exclusions contained in this statement may not apply to you. This warranty gives you specific legal rights.
-
Page 20: Chapter 1: Overview
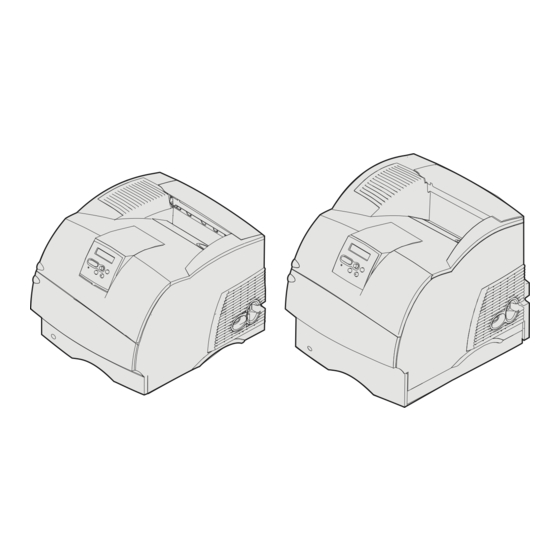
Overview Identifying printers Use the following illustrations to determine the features and options of the Lexmark™ T630 and T632. The features are not shaded in color, but the options are shaded. The illustrations also aid you in determining the installation sequence of options and the printer. For more about installation, refer to the Setup Guide. -
Page 21: Configured Models
The following illustrations show a standard network model configuration and a fully configured printer. If you attach print media handling options to the printer, it may look more like the fully configured model. For information on possible configurations, refer to the Setup Guide. Items denoted with an asterisk (*) are options. -
Page 22: Chapter 2: Printing
Printing This chapter covers tips for printing, how to print certain lists of information from your printer, and how to cancel a job. Tips for successful printing Tips on storing print media Store your print media properly. For more information, see... -
Page 23: Canceling A Print Job
Lexmark driver support, are available from the Lexmark Web site.You can also use the system drivers built into your operating system. Refer to the Setup Guide for more information about choosing and installing drivers. -
Page 24: Canceling A Job From A Computer Running Windows
Canceling a job from a computer running Windows Canceling a job from the taskbar When you send a job to print, a small printer icon appears in the right corner of the taskbar. Double-click the printer icon. A list of print jobs appears in the printer window. -
Page 25: Printing The Menu Settings Page
The menu settings page shows current settings (user default settings) for the menus, a list of installed options, and available printer memory. You can use this page to verify that all printer options are properly installed and the printer settings are correct. -
Page 26: Printing A Directory List
This will only work with the Lexmark custom drivers that came on the drivers CD which shipped with your printer. -
Page 27: Entering A Personal Identification Number (Pin)
Press and hold the Select and Return buttons while you turn the printer on. Release the buttons when Performing Self Test appears on the display. The printer performs its power-on sequence, and then Config Menu appears on the first line of the display. - Page 28 SAVED appears briefly on the display, and then is replaced by Config Menu on the first line and Size Sensing on the second line. Press and release Menu until you see Exit Config Menu, and then press Select. Activating Menu Changes appears briefly, followed by Performing Self Test. The printer returns to Ready.
-
Page 29: Chapter 3: Print Media Handling
The following paper characteristics affect print quality and reliability. We recommend that you follow these guidelines when evaluating new paper stock. For detailed information, refer to the Card Stock & Label Guide located on the Lexmark Web site at www.lexmark.com. -
Page 30: Recommended Paper
Moisture content The amount of moisture in the paper affects both print quality and the ability of the printer to feed the paper properly. Leave the paper in its original wrapper until you are ready to use it. This limits the exposure of the paper to moisture changes that can degrade its performance. -
Page 31: Unacceptable Paper
• Preprinted papers with chemicals that may contaminate the printer • Preprinted papers that can be affected by the temperature in the printer fuser • Preprinted papers that require a registration (the precise print location on the page) greater than ±0.09 in., such as optical character recognition (OCR) forms In some cases, you can adjust registration with your software application to successfully print on these forms. -
Page 32: Selecting Preprinted Forms And Letterhead
Flex paper back and forth. Do not fold or crease the paper. Straighten the edges on a level surface. Selecting preprinted forms and letterhead Use the following guidelines when selecting preprinted forms and letterhead paper for the printer: • Use grain long papers for best results. -
Page 33: Printing On Letterhead
Drilled paper can cause jams when multiple sheets feed through the printer. • Prepunched paper can include more paper dust than standard paper. Your printer may require more frequent cleaning and feed reliability may not be as good as that of standard paper. -
Page 34: Transparencies
Transparencies You can feed transparencies from the standard tray (250-sheet tray for the T630 or 500-sheet tray for the T632), optional 250- or 500-sheet trays, or the multipurpose feeder. Try a sample of any transparencies you are considering using with the printer before buying large quantities. -
Page 35: Envelopes
Envelopes You can load up to 10 envelopes in the multipurpose feeder and 85 envelopes in the envelope feeder. Try a sample of any envelopes you are considering using with the printer before buying large quantities. See Using and loading the multipurpose feeder envelope feeder for instructions on loading an envelope. -
Page 36: Labels
Labels Your printer can print on many labels designed for use with laser printers. These labels are supplied in letter size, A4 size, and legal size sheets. Label adhesives, face sheet (printable stock), and topcoats must be able to withstand temperatures of 205°C (401°F) and pressure of 25 pounds per square inch (psi). -
Page 37: Card Stock
See specifications for information on the preferred weight for the grain direction of print media. Try a sample of any card stock you are considering using with the printer before purchasing a large quantity. Print media types and weights When printing on card stock: •... -
Page 38: Identifying Print Media Sources And Specifications
Identifying print media sources and specifications The following tables provide information on standard and optional sources, as well as optional output bins, for your printer model, including the print media sizes you can select from the Paper Size menu and supported weights. - Page 39 Identifying print media sources and specifications Print media sizes and support Legend - indicates UAT - universally support adjustable tray Print media size Dimensions 210 x 297 mm (8.27 x 11.7 in.) 148 x 210 mm (5.83 x 8.27 in.) JIS B5 182 x 257 mm (7.17 x 10.1 in.)
- Page 40 Identifying print media sources and specifications Print media sizes and support (continued) Legend - indicates UAT - universally support adjustable tray Print media size Dimensions Universal 139.7 x 210 mm to 215.9 x 355.6 mm (5.5 x 8.27 in. to 8.5 x 14 in.) 69.85 x 127 mm to 215.9 x 355.6 mm...
- Page 41 Identifying print media sources and specifications Print media sizes and support (continued) Legend - indicates UAT - universally support adjustable tray Print media size Dimensions C5 Envelope 162 x 229 mm (6.38 x 9.01 in.) B5 Envelope 176 x 250 mm (6.93 x 9.84 in.) Other 98.4 x 162 mm...
- Page 42 Dual-web and integrated labels Printing label applications on the printer requires a special label fuser cleaner which prevents duplexing. The label fuser cleaner is included with a special label cartridge for label applications. See Ordering supplies for more information on obtaining a label fuser cleaner.
- Page 43 28 lb bond envelopes are limited to 25% cotton content. Includes envelopes fed from the multipurpose feeder only. Information on whether your vinyl label converter has passed Lexmark's criteria is available at Lexmark’s Web site (www.lexmark.com); search for “converter list.” You can also check Lexmark’s...
- Page 44 28 lb bond envelopes are limited to 25% cotton content. Includes envelopes fed from the multipurpose feeder only. Information on whether your vinyl label converter has passed Lexmark's criteria is available at Lexmark’s Web site (www.lexmark.com); search for “converter list.” You can also check Lexmark’s...
- Page 45 (grain long) or business paper Card stock— Index Bristol maximum (grain long) Cover Card stock— Index Bristol maximum (grain short) Cover Transparencies Laser printer Labels— Paper maximum Dual-web paper Polyester Vinyl Integrated Pressure forms sensitive area (must enter the printer...
- Page 46 Identifying print media sources and specifications Output support for the optional finisher Size Dimensions 210 x 297 mm (8.27 x 11.7 in.) 148 x 210 mm (5.83 x 8.27 in.) JIS B5 182 x 257 mm (7.17 x 10.1 in.) Letter 215.9 x 279.4 mm (8.5 x 11 in.)
- Page 47 Xerographic or business paper Card stock— Index Bristol maximum (grain long) Cover Card stock— Index Bristol maximum (grain short) Cover Transparencies Laser printer Labels — upper Paper limit Dual-web paper Polyester Vinyl Integrated Pressure sensitive forms area Paper base (grain long)
-
Page 48: Loading Print Media
Loading print media in standard and optional trays Your printer has two standard sources, the 250-sheet tray for the T630 or a 500-sheet tray for the T632, and the multipurpose feeder. Load the print media you use for the majority of your print jobs in the standard tray. - Page 49 Loading print media in standard and optional trays Complete these instructions to load print media into any of the standard or optional trays. Pull the tray out. Remove the tray completely. Squeeze the width guide tab and the side of the guide as shown. Slide the width guide to the far right side of the tray.
- Page 50 Loading print media in standard and optional trays Squeeze the length guide lever and slide the length guide to the correct position for the size of print media you are loading. Notice the size indicators on the left side of the tray. Size indicators Flex the sheets back and forth to loosen them, then fan them.
- Page 51 Loading print media in standard and optional trays Place the print media into the tray with the recommended print side face down for single- sided printing and face up for duplex printing. Do not fill paper above the load line. Overfilling the tray may cause jams.
-
Page 52: Loading Print Media In Optional Universally Adjustable Trays
400-sheet UAT You may use the 250-sheet UAT in place of the standard tray for the T630 or it may be inserted into an optional 250-sheet drawer. You may use the 400-sheet UAT in place of the standard tray for the T632 or it may be inserted into an optional 500-sheet drawer. -
Page 53: Loading Letterhead
Loading print media in optional universally adjustable trays Loading letterhead Letterhead must be loaded differently depending on what options you have installed. Without a finisher installed For simplex (single-sided) printing on letterhead, place the printed side face down as shown. For duplex printing on letterhead, place the printed side face up as shown. - Page 54 Loading print media in optional universally adjustable trays With a finisher installed For simplex printing on letterhead, place the printed side face down as shown. For duplex printing on letterhead, place the printed side face up as shown. Note: The Paper Loading menu item lets you print simplex jobs on letterhead (or other preprinted print media) that has been loaded specifically for duplex printing.
-
Page 55: Using And Loading The Multipurpose Feeder
• To prevent jams, do not add or remove print media when there is still print media in the multipurpose feeder or when the printer is printing from the multipurpose feeder. • Print media should be loaded with the recommended print side up and the top of the print media going into the multipurpose feeder first. - Page 56 Using and loading the multipurpose feeder The icons on the multipurpose feeder show you how to load the multipurpose feeder with paper, how to turn an envelope for printing, and how to load letterhead paper for simplex and duplex printing. A finisher affects how letterhead documents should be loaded for duplexing.
-
Page 57: Loading The Multipurpose Feeder
Using and loading the multipurpose feeder Loading the multipurpose feeder To load the multipurpose feeder: Push the lower release latch. The multipurpose feeder door drops open. - Page 58 Using and loading the multipurpose feeder Locate the metal bar in the recessed area on the multipurpose feeder. Pull the bar out far enough to accommodate the print media you will be using. Slide the width guide to the far right.
- Page 59 Using and loading the multipurpose feeder Prepare the print media for loading. • Flex paper or fan envelopes back and forth. Do not fold or crease the paper. Straighten the edges on a level surface. • Hold transparencies by the edges and avoid touching the print side. Fan the stack of transparencies to prevent jams.
- Page 60 Using and loading the multipurpose feeder Use the stack height limiter as a guide for stack height when loading print media. Load one type of print media in the multipurpose feeder. Do not mix types. Click a topic for loading instructions: –...
-
Page 61: Loading Paper And Transparencies
Using and loading the multipurpose feeder Loading paper and transparencies Load paper or transparencies with the left edge of the stack against the stack height limiter and with the recommended print side face up. b Continue with step 7 on page... -
Page 62: Loading Envelopes
Warning: Never use envelopes with stamps, clasps, snaps, windows, coated linings, or self- stick adhesives. These envelopes may severely damage the printer. The stamp is shown in the illustration only for placement. Note: If envelopes jam while printing, try reducing the number of envelopes in the multipurpose feeder. -
Page 63: Loading Letterhead
Using and loading the multipurpose feeder Loading letterhead Load letterhead according to the options installed on the printer. Click the topic that describes your printer configuration. • Neither a duplex unit nor a finisher attached • A duplex unit, but no finisher attached •... - Page 64 Using and loading the multipurpose feeder A duplex unit, but no finisher attached Load letterhead paper for duplex printing with the logo face down as shown. b Continue with step 7 on page Note: The Paper Loading menu item in the Paper Menu lets you print simplex jobs on letterhead (or other preprinted media) that has been loaded specifically for duplex printing.
- Page 65 Using and loading the multipurpose feeder Both a duplex unit and a finisher attached Load letterhead paper for duplex printing with the logo face down as shown. b Continue with step 7 on page Note: The Paper Loading menu item in the Paper Menu lets you print simplex jobs on letterhead (or other preprinted media) that has been loaded specifically for duplex printing.
- Page 66 Select the source, size, and type from your software application and select print media size and type from the printer operator panel. Make sure the Paper Size and Paper Type for the multipurpose feeder (MP Feeder Size and MP Feeder Type) are set to the correct value for the print media you are loading. (See...
-
Page 67: Closing The Multipurpose Feeder
Using and loading the multipurpose feeder Closing the multipurpose feeder Remove print media from the multipurpose feeder. Push the metal bar straight back to collapse the multipurpose feeder to its short-length position. Close the multipurpose feeder door. -
Page 68: Using And Loading The Optional Envelope Feeder
Fully open (extended to its full length) for long envelopes Warning: Do not place objects on the envelope feeder. Avoid pressing down on it or applying excessive force. Lift the envelope weight back toward the printer. It stays in place. - Page 69 Using and loading the optional envelope feeder Slide the width guide to the far right. Flex a stack of envelopes back and forth and then straighten the edges on a level surface. Press down the corners to flatten them. Fan the envelopes. This prevents the edges of the envelopes from sticking together and helps them feed properly.
- Page 70 Warning: Never use envelopes with stamps, clasps, snaps, windows, coated linings, or self- stick adhesives. These envelopes may severely damage the printer. See Envelopes for more information. Note: Do not try to load more envelopes by forcing them under the envelope weight. This results in jams.
-
Page 71: Using And Loading The Optional 2000-Sheet Drawer
Lower the envelope weight to touch the stack. Select the source, size, and type from your software application. Select the envelope size and type from the printer operator panel: Make sure the Paper Size for the envelope feeder (Env Feeder Size) is set to the correct envelope size you are loading. - Page 72 If you are loading paper for the first time, go to previously loaded. If you are unsure of the print media size, go to the printer operator panel and follow these steps: Make sure the printer power is on and the Ready message appears on the display.
- Page 73 Using and loading the optional 2000-sheet drawer Flex each stack of print media back and forth. Do not fold or crease the paper. Straighten the edges on a level surface. To prepare transparencies for loading, see Slightly bend the stack of print media as shown and place it on the elevator tray with the preferred print side facing down.
-
Page 74: Changing The Print Media Size For The 2000-Sheet Drawer
Your 2000-sheet drawer comes pre-configured for either letter or A4 size. To change the print media size prior to installation, proceed to now. If you are changing the print media size for a unit that is already attached to a printer and a power source, proceed with step Open the loading door. - Page 75 Using and loading the optional 2000-sheet drawer Count the clicks as you turn the knob clockwise to find the correct print media size. For example, one click sets the print media size to executive (EXEC). Print media size selector knob Note: Make a note of the color associated with the print media size you select.
-
Page 76: Linking Trays
For example, if you have the same size and type of print media loaded in tray 2 and tray 4, the printer selects print media from tray 2 until it becomes empty, and then the printer automatically feeds print media from the next linked tray —... -
Page 77: Using Duplex Bind
Using Duplex Bind When you select duplex bind printing in the printer driver or Duplex Bind in the Finishing Settings in the Local Printer Setup Utility, you must select either long edge or short edge binding, which are the values for this setting. The purpose of Duplex Bind is to define the way duplexed pages are bound, and how the printing on the back of the sheet (even-numbered pages) is oriented in relation to the printing on the front (odd-numbered pages). -
Page 78: Using The Output Bins
Using the output bins There is one standard bin on all printer models. There are several optional output bins available for your printer. Output bin print media support and connectivity with other output bins Each bin accommodates: Output Printer name... - Page 79 Output bin print media support and connectivity with other output bins Each bin accommodates: Output Printer name Print media Models High- • 1850 sheets T630 capacity T632 (75 g/m ) of output plain paper stacker • Envelopes Output • 650 sheets (75...
-
Page 80: Using The Support Extension In The Standard Bin
Using the support extension in the standard bin Using the support extension in the standard bin The standard bin on all models has a print media support which keeps print media from sliding into the gap been the standard bin and the upper front door when the door is opened. Underneath the support is an extension for use when printing on legal paper. -
Page 81: Chapter 4: Maintenance
Refer printing problems and maintenance tasks to this key operator. In the U.S., contact Lexmark at 1-800-539-6275 for information about Lexmark Authorized Supplies Dealers in your area. In other countries or regions, visit the Lexmark Web site at www.lexmark.com or contact the place where you bought your printer. -
Page 82: Conserving Supplies
To order supplies in the U.S., contact Lexmark at 1-800-539-6275 for information about Lexmark Authorized Supplies Dealers in your area. In other countries or regions, visit the Lexmark Web site at www.lexmark.com or contact the place where you bought your printer. -
Page 83: Maintenance Kit
12A7360 12A7362 12A7365 Sold at a special price with the understanding that you return your empty cartridges only to Lexmark. For regular priced cartridges without these terms, order using the regular cartridge part numbers listed. At approximately 5% coverage. Incompatible with a T630 printer. -
Page 84: Ordering A Charge Roll
For finisher maintenance information, refer to the StapleSmart™ Reference that came with your finisher. Ordering a charge roll We recommend ordering a new charge roll when toner fog or background shading appears on printed pages. Order Lexmark part number 99A1017. Ordering a transfer roller Order part number 56P1357. Ordering pick rollers Order part number 99A0070. -
Page 85: Ordering A Label Fuser Cleaner
Ordering a label fuser cleaner A special label fuser cleaner should be used for label applications to optimize feeding reliability. One is included in the print cartridge box when you order part number 12A7468 or 12A7469. You also may order this item separately using part number 56P1415.Label fuser cleaners are not recommended for duplex printing. -
Page 86: Storing The Print Cartridge
See Note: The manufacturer does not recommend that you use print cartridges from a third- party refiller. Print quality and printer reliability cannot be guaranteed if you do. For best results, use genuine Lexmark supplies. -
Page 87: Cleaning The Printer
Warning: Do not touch the transfer roller. CAUTION: The rear portion of the inside of the printer is hot due to the fuser. Allow time for the printer to cool before attempting to remove parts in this area. Transfer roller... -
Page 88: Installing The New Print Cartridge
Replacing the print cartridge Installing the new print cartridge Remove the new cartridge from the packaging. Remove the red plastic piece and foam. Save the packaging and foam to return the used print cartridge. For more information, see on page Packaging Warning: Do not touch the photoconductor drum on the underside of the print cartridge. - Page 89 Replacing the print cartridge Hold the print cartridge by the handle and insert it into the printer. Align the tabs on each side of the print cartridge with the slots on each side of the print cartridge cradle. Slide the print cartridge into the printer until it snaps into place.
-
Page 90: Replacing The Charge Roll
Order a new charge roll kit when toner fog or background shading appears on printed pages. See Ordering supplies for information on ordering a charge roll. Turn the printer off and unplug the printer power cord. Open the front doors and remove the print cartridge. Pull the upper front door halfway down. - Page 91 Pull down on the charge roll until it is loose. Pull the charge roll to the right to loosen the left side. Pull the charge roll straight out of the printer and set it aside. Remove any packaging from the new charge roll.
- Page 92 Replacing the charge roll Align the metal tab on left side of the new charge roll with its hole and insert it.
- Page 93 Lift the right side of the charge roll and insert it into its hole. Release the metal arm-like tab. Reinstall the print cartridge and close the front doors. Plug the printer power cord into a properly grounded electrical outlet. Reset the maintenance counter. See Resetting the maintenance...
-
Page 94: Replacing The Transfer Roller
Complete the following steps to replace the transfer roller. Refer to the documentation that comes with the transfer roller for detailed installation information. Turn the printer off and unplug the printer power cord. Open the front doors and remove the print cartridge. - Page 95 Replacing the transfer roller Pull the transfer roller to the left to loosen the right side and then pull it straight out of the printer. Set it aside. Remove any packaging from the new transfer roller.
- Page 96 Replacing the transfer roller Grasp the transfer roller on the left side as shown. Locate the small hole and insert the metal tab on the right side of the transfer roller into the hole.
- Page 97 Lower the transfer roller gently until the left metal tab fits into the slot. You may have to push it down for a secure fit. Reinstall the print cartridge and close the front doors. Plug the printer power cord into a properly grounded electrical outlet. Reset the maintenance counter. See Resetting the maintenance...
-
Page 98: Replacing The Pick Rollers
Replacing the pick rollers Remove the standard tray. Look underneath the printer for the pick roller arm and pull it down. Press on the end of the tab and pull the pick roller off the arm. Repeat step 3 on the other side to remove the other pick roller. - Page 99 Gently release the pick roller arm. Discard the used pick rollers. To install the new pick rollers: Remove the two pick rollers from the packaging. Pull the pick roller arm down. Locate the recessed area on the pick roller and align it with the tab on the arm. Note: There are two arrows on each pick roller.
- Page 100 Replacing the pick rollers Push the pick roller onto the arm with the tab aligned. Repeat step 3 on page 99 Gently release the pick roller arm. Insert the standard tray. step 4 to install the other pick roller.
-
Page 101: Replacing The Label Fuser Cleaner
Replacing the label fuser cleaner Replacing the label fuser cleaner Grasp the bar handle in the round hole on the fuser cover and pull to the left. Lift up on the fuser cover and remove it. - Page 102 Replacing the label fuser cleaner Grasp the handle, lift the fuser cleaner from its slot, and remove it. Discard it. Remove the new fuser cleaner from its packaging. Hold the fuser cleaner by the handle and align it with the slot. Push the handle down so the cleaner drops fully into the slot.
- Page 103 Replacing the label fuser cleaner Angle the fuser cover to align the side of the fuser cover with the side of the fuser opening. Lower the fuser cover on the right side until it almost meets the opening. Gently pull the handle back until the two tabs on the right end fit under the right side.
-
Page 104: Replacing The Staple Cartridge
Refer to the illustrations inside the stapler access door for more information. For information about ordering staple cartridges, see Note: If Staple Alarm is set to Single, the printer stops printing and the Load Staples message appears. Install a new staple cartridge or press and continue printing. -
Page 105: Removing A Used Staple Cartridge
Replacing the staple cartridge Removing a used staple cartridge Push the latch and swing the staple access door open. Grasp the staple cartridge holder by the colored tab and pull it out of the stapler. -
Page 106: Installing A New Staple Cartridge
Replacing the staple cartridge Pull the used staple cartridge down and out of the staple cartridge holder. Discard the used staple cartridge. Installing a new staple cartridge Remove the tape from the new staple cartridge. Slide the new staple cartridge up and into the staple cartridge holder until it snaps into place. - Page 107 Replacing the staple cartridge Push the staple cartridge holder straight into the stapler until it snaps into place. Close the staple access door.
-
Page 108: Resetting The Maintenance Counter
Press and hold the Select Release the buttons when Performing Self Test appears on the display. The printer performs its power-on sequence, and then Config Menu appears on the first line of the display. Press until you see Reset Maint Cnt and then press Menu Reset appears on the second line of the display. -
Page 109: Chapter 5: Troubleshooting
All options are properly installed. • If you have checked all of the above and still have a problem, turn the printer power off, wait for about 10 seconds, and then turn the printer power on. This often fixes the problem. -
Page 110: Solving Display Problems
Make sure you are using the correct cable. Use IEEE 1284-compliant parallel cable. We recommend Lexmark part number 1329605 (10 ft) or 1427498 (20 ft). If you use RS-232 Serial, verify that a null modem cable is used. - Page 111 Make sure you are using Windows 98, Windows 2000, Windows Me, USB port, but will not print. or another USB-capable operating system supported by Lexmark. Print media misfeeds or Make sure the print media you are using meets the specifications for multiple feeds occur.
- Page 112 Printer does not duplex • Make sure Duplex is selected in both the Finishing Menu and in the pages. printer driver. • Make sure you have enough printer memory installed. Solving printing problems Paper Type setting in the Paper Menu from the printer...
-
Page 113: Solving Print Quality Problems
• Verify that the print media is within the printer specifications. See Identifying print media sources and specifications details. If the problem continues, contact the Lexmark Customer Support Center at 1-859-232-3000 or http://support.lexmark.com. Toner appears on the back Toner is on the transfer roll. To help prevent this, do not load print media of the printed page. - Page 114 • Change the uneven edges or 1200 dpi. • If you are using downloaded fonts, verify that the fonts are supported by the printer, the host computer, and the software application. Toner Darkness setting in the Quality Menu. Print Resolution...
-
Page 115: Solving Option Problems
Make sure the print media handling option is marked with a colored triangle, indicating it is compatible with your printer. • Turn the printer off, wait for about 10 seconds, and turn the printer on. If this does not fix the problem, unplug the printer, and check the connection between the option and printer. •... - Page 116 Make sure the connection between each 5-bin mailbox or the connection between the 5-bin mailbox and the printer is secure. If the 5-bin mailbox is listed on the menu settings page, but print media jams when it exits the printer and enters the mailbox, it may not be properly installed.
- Page 117 If the output expander is listed on the menu settings page, but print media jams when it exits the printer and enters the output expander, it may not be properly installed. Reinstall each output expander.
-
Page 118: Solving Problems With The Optional 2000-Sheet Drawer
• The power cord is plugged into an outlet. • The outlet has power to it. Check to see if your printer is out of print media or has a jam. Remove the print media in the printer paper path and check the stack to ensure the print media has been loaded properly. -
Page 119: Solving Network Printing Problems
You need to know your printer model type and serial number. Refer to the label on the back of the printer near the power cord for this information. The serial number is also listed on the menu settings page you can print from the Utilities Menu. -
Page 120: Chapter 6: Clearing Jams
The following hints can help you avoid jams: • Use only recommended print media. See to the Card Stock & Label Guide available on Lexmark’s Web site at www.lexmark.com/publications for more information about which print media will provide optimum results for your printing environment. -
Page 121: Before Removing Jams
Make sure the guides are not placed too tightly against the stack of print media. • Make sure all cables that connect to the printer are correctly attached. Refer to the Setup Guide for more information. Before removing jams Remove any print jobs from any output bins before opening the upper front door to remove jams. -
Page 122: Identifying The Print Media Path
Identifying the print media path Identifying the print media path The following illustration shows the path that print media travels through the printer. The path varies depending on the input source (trays, multipurpose feeder, envelope feeder) and output bins (finisher, stacker, expander, mailbox) you are using. -
Page 123: Accessing Jam Areas
5-bin mailbox, rear door Output expander, rear door (High-capacity output stacker and finisher not shown) Printer rear door Optional duplex unit, rear door Lower front door (down when envelope feeder is installed) - Page 124 Identifying the print media path Use the following table to locate instructions for a particular jam: Jam message 200 and 201 Paper Jam Remove Cartridge 202 Paper Jam Open Rear Door 23x Paper Jam 231 Paper Jam Check Duplex 232 Paper Jam Check Duplex and 233 Paper Jam Check Duplex 234 Paper Jam Check Duplex, 235 Paper Jam Check Duplex, and 238 Paper Jam Check Duplex...
-
Page 125: And 201 Paper Jam Remove Cartridge
Note: To resolve the message, you must clear all print media from the print media path. Push the release latch and open the printer upper and lower front doors. CAUTION: The rear portion of the inside of the printer is hot. - Page 126 200 and 201 Paper Jam Remove Cartridge Gently push the feed roller release lever toward the back of the printer. Pull the print media up and toward you. Note: The print media may be covered with unfused toner, which can stain garments and skin.
- Page 127 200 and 201 Paper Jam Remove Cartridge To access print media from the printer rear door: Open the printer rear door. Remove any print media based on what part is visible. • If the middle section of print media is visible, grasp it on both sides and gently pull it straight out.
-
Page 128: Paper Jam Open Rear Door
Close the upper and lower front doors. 202 Paper Jam Open Rear Door Jams that cause a 202 Paper Jam message require opening the printer rear door. Note: To resolve the message, you must clear all print media from the print media path. -
Page 129: Before Reaching The Standard Output Bin
202 Paper Jam Open Rear Door Before reaching the standard output bin Open the printer rear door. Remove the print media based on what part is visible. • If the middle section of print media is visible, grasp it on both sides and gently pull it straight out. -
Page 130: While Exiting To The Standard Output Bin
If the print media does not move immediately when you pull, stop pulling. Remove the print cartridge, and then pull the print media out. Close the printer rear door. While exiting to the standard output bin Pull the print media straight out. -
Page 131: Paper Jam
The second line of the operator panel indicates the jam area. 231 Paper Jam Check Duplex Note: To resolve the message, you must clear all print media from the print media path. Open the printer rear door. Remove any print media based on what part is visible. 23x Paper Jam... - Page 132 If the end of the print media is visible, pull the print media straight out. If the print media does not move immediately when you pull, stop pulling. Remove the print cartridge, and then pull the print media out. Close the printer rear door. 23x Paper Jam...
- Page 133 Look under the duplex rear door for the edge of the print media to determine how the print media is jammed: • If only a short piece of print media is visible toward the rear of the printer, do not pull it out; it may be easier to access from inside the printer. See for instructions.
- Page 134 23x Paper Jam – Pull down and out if the print media is in this position. Close the duplex rear door. Make sure it snaps into place.
-
Page 135: Paper Jam Check Duplex And 233 Paper Jam Check Duplex
Look under the duplex rear door for the edge of the print media to determine how the print media is jammed: • If only a short piece of print media is visible toward the rear of the printer, do not pull it out; it may be easier to access from inside the printer. See for instructions. - Page 136 23x Paper Jam – Pull down and out if the print media is in this position. Close the duplex rear door. Make sure it snaps into place.
-
Page 137: Paper Jam Check Duplex, 235 Paper Jam Check Duplex, And 238 Paper Jam Check Duplex
If you cannot grasp it, see • If only a short piece of print media is visible toward the rear of the printer, do not pull it out; it may be easier to access from inside the printer. See for instructions. - Page 138 Close the duplex rear door. Make sure it snaps into place. Remove the standard tray. Locate the recessed areas on each side of the duplex front access cover. Slowly pull the duplex front access cover straight out. 23x Paper Jam...
- Page 139 Remove any sheets of print media lying in the duplex front access cover. Hold the duplex front access cover level while you slide it back into the duplex unit. Make sure it snaps into place. Slide the standard tray back into the printer. 23x Paper Jam step 8.
-
Page 140: Paper Jam Check Duplex
236 Paper Jam Check Duplex Note: To resolve the message, you must clear all print media from the print media path. Locate the recessed areas on each side of the duplex front access cover. Slowly pull the duplex front access cover straight out. If the edge of the print media is visible, pull the print media straight up and out. -
Page 141: Paper Jam Check Duplex
237 Paper Jam Check Duplex Note: To resolve the message, you must clear all print media from the print media path. Push the release latch and open the printer upper and lower front doors. CAUTION: The rear portion of the inside of the printer is hot. - Page 142 Lay the cartridge aside. Note: Do not leave the cartridge exposed to light for extended periods. Gently push the feed roller release lever toward the back of the printer. Pull the print media up and toward you. Note: The print media may be covered with unfused toner, which can stain garments and skin.
- Page 143 Reinstall the print cartridge. Close the upper and lower front doors. Locate the recessed areas on each side of the duplex front access cover. Slowly pull the duplex front access cover straight out. If the edge of the print media is visible, pull the print media straight up and out. If the print media is not visible, continue with access cover.
- Page 144 Remove any sheets of print media lying in the duplex front access cover. Hold the duplex front access cover level while you slide it back into the duplex unit. Make sure it snaps into place. Slide the standard tray back into the printer. 23x Paper Jam Interior view of duplex unit...
-
Page 145: Paper Jam Check Duplex
239 Paper Jam Check Duplex Note: To resolve the message, you must clear all print media from the print media path. Open the printer rear door. Remove any print media based on what part is visible. • If the middle section of print media is visible, grasp it on both sides and gently pull it straight out. - Page 146 If the end of the print media is visible, pull the print media straight out. If the print media does not move immediately when you pull, stop pulling. Remove the print cartridge, and then pull the print media out. Close the printer rear door. Open the duplex rear door. 23x Paper Jam...
- Page 147 Look under the duplex rear door for the edge of the print media to determine how the print media is jammed: • If only a short piece of print media is visible toward the rear of the printer, do not pull it out; it may be easier to access from inside the printer. See for instructions.
- Page 148 Close the duplex rear door. Make sure it snaps into place. Push the release latch and open the printer upper and lower front doors. CAUTION: The rear portion of the inside of the printer is hot. While grasping the print cartridge by the hand grip, pull the cartridge up toward the upper front door, and then pull it straight out toward you.
- Page 149 Gently push the feed roller release lever toward the back of the printer. Pull the print media up and toward you. Note: The print media may be covered with unfused toner, which can stain garments and skin. Reinstall the print cartridge.
- Page 150 If the edge of the print media is visible, pull the print media straight up and out. If the print media is not visible, continue with access cover. Slide out the standard tray. Remove any sheets of print media lying in the duplex front access cover. 23x Paper Jam step 16.
-
Page 151: Paper Jam Check Tray X
Hold the duplex front access cover level while you slide it back into the duplex unit. Make sure it snaps into place. Slide the standard tray back into the printer. 24x Paper Jam Check Tray x Jams in four areas result in a 24x Paper Jam message, where x represents the tray number where the jam has occurred. -
Page 152: On The Incline Surface Of A Tray Or Across Two Trays
24x Paper Jam Check Tray x On the incline surface of a tray or across two trays Pull the tray halfway out of the support unit. Remove the print media based on how it is jammed: • If the print media is lying on the incline or wall surface at the front of the tray, pull the print media straight out. -
Page 153: Across Three Trays
24x Paper Jam Check Tray x Across three trays This type of jam may occur if you are using legal-size print media in the trays or if you have a 250- sheet drawer installed with other optional drawers. Pull the tray out of the support unit. If only a short section of the print media is visible, do not pull down to remove the print media. -
Page 154: Across A Tray, The Duplex Unit, And The Standard Tray
24x Paper Jam Check Tray x Across a tray, the duplex unit, and the standard tray Pull the tray out of the support unit. If only a short section of the print media is visible, do not pull down to remove the print media. Slowly pull the duplex front access cover straight out from the duplex unit. - Page 155 If you see the edge of the print media in the standard tray: Pull the print media down and out. b Slide the tray all the way into the printer. Slide the duplex front access cover back into the duplex unit. Make sure it snaps into place.
- Page 156 24x Paper Jam Check Tray x d Gently push the feed roller release lever toward the back of the printer. Pull the print media out.
-
Page 157: Paper Jam Check Mp Feeder
Reinstall the print cartridge. Align the slides on the cartridge with the slots on the print cartridge cradle. Use the colored arrows inside the printer for placement. Guide the cartridge down as it snaps into place. g Close the printer upper and lower front doors. -
Page 158: Paper Jam Check Env Feeder
Since the envelope feeder feeds envelopes from the bottom of the stack, the envelope on the bottom is jammed. Lift the envelope weight. Flip the envelope weight back toward the printer. Remove the stack of envelopes from the envelope feeder. Slowly pull the jammed envelope straight out toward you. -
Page 159: Between The Envelope Feeder And The Printer
Flip the envelope weight back toward the printer. Remove the stack of envelopes from the envelope feeder. Push the envelope support to the closed position. Open the printer upper front door. Pull the envelope feeder up slightly and straight out of the printer. Set it aside. -
Page 160: Paper Jam Check Bin X
27x Paper Jam Check Bin x Pull the envelope straight out of the printer. Note: You may have to remove the print cartridge to get the envelope out. See the print cartridge Reinstall the envelope feeder. Make sure it snaps into place. -
Page 161: In An Optional Output Bin
27x Paper Jam Check Bin x In an optional output bin Print media jams as it exits to an optional output bin and: • A long section of the print media is visible • A short section of the print media is visible A long section of the print media is visible Pull the print media straight out. - Page 162 27x Paper Jam Check Bin x A short section of the print media is visible Try to pull the print media from the front of the bin. If you are not successful, complete the following steps. Push the output bin rear door latches in toward the center. The rear door opens and drops down.
-
Page 163: Between Output Bins
27x Paper Jam Check Bin x Between output bins Push the output bin rear door latches in toward the center. The rear door opens and drops down. Repeat for the output bin installed above the option where the jam has occurred. Note: If the jam occurs in a high-capacity output stacker, it may be necessary to open both of its rear doors. -
Page 164: Paper Jam
28x Paper Jam Jams in the optional finisher may result in a 28x Paper Jam message, where x represents specific jam areas. The second line of the operator panel indicates the jam area. Possible 28x Paper Jam messages include: • 280 Paper Jam Check Finisher •... -
Page 165: Paper Jam Check Finisher
281 Paper Jam Check Finisher Lift the front edge of the finisher output bin cover until it locks into vertical position. Remove the stack of print media. Close the finisher output bin cover. In the optional 2000-sheet drawer Open the loading door. Press the elevator button. -
Page 166: Clearing Stapler Jams
Remove the jam. Clear all print media from the print media path of the drawer and printer. Elevator down button Make sure the stack of print media is neat and aligned; otherwise, another jam may occur. Close the door. Allow a few seconds for the elevator to reach the top. -
Page 167: Staple Jam Check Stapler
282 Staple Jam Check Stapler Lift the front edge of the finisher output bin cover until it locks into vertical position. Remove the stack of print media. Clearing stapler jams... - Page 168 Press the latch to open the stapler access door. Firmly pull the colored tab to remove the staple cartridge holder from the stapler. Clearing stapler jams...
- Page 169 Use the metal tab to lift the staple guard, and then pull out the sheet of staples. Discard the entire sheet. Remove any loose staples from the staple guard. Look through the clear covering on the bottom of the cartridge holder to make sure no staples are jammed in the entry throat.
- Page 170 Push the cartridge holder firmly into the stapler until the cartridge holder clicks into place. Close the stapler access door. Priming Stapler appears on the operator panel display. Priming ensures the stapler is functioning properly. Close the finisher output bin cover. Clearing stapler jams...
-
Page 171: Staple Jam Check Stapler
283 Staple Jam Check Stapler Press the latch to open the stapler access door. Firmly pull the colored tab to remove the staple cartridge holder from the stapler. Clearing stapler jams... - Page 172 Use the metal tab to lift the staple guard, and then pull out the sheet of staples. Discard the entire sheet. Remove any loose staples from the staple guard. Look through the clear covering on the bottom of the cartridge holder to make sure no staples are jammed in the entry throat.
- Page 173 Push the cartridge holder firmly into the stapler until the cartridge holder clicks into place. Close the stapler access door. Priming Stapler appears on the operator panel display. Priming ensures the stapler is functioning properly. Clearing stapler jams...
-
Page 174: Chapter 7: Administration
The following sections are for a network administrator in charge of the printer. Disabling operator panel menus Since many people could be using the printer, an administrator may choose to lock the menus to keep others from changing menu settings from the operator panel. -
Page 175: Restoring Factory Default Settings
Restoring factory default settings Restoring factory default settings When you first enter the printer menus from the operator panel, you may notice an asterisk (*) next to a value in the menus. This asterisk indicates the factory default setting. These settings are the original printer settings. -
Page 176: Weight And Style
Understanding fonts Weight and style Typefaces are often available in different weights and styles. These variations modify the original typeface so you can, for example, emphasize important words in text or highlight book titles. The different weights and styles are designed to complement the original typeface. Weight refers to the thickness of the lines that form the characters. -
Page 177: Bitmapped And Scalable Fonts
The printer uses both bitmapped and scalable fonts. Bitmapped fonts are stored in printer memory as predefined patterns of bits that represent a typeface at a specific size, style, and resolution. The following illustration shows an example of a character from a bitmapped font. -
Page 178: Resident Fonts
Scalable fonts (also called outline fonts) are stored as computer programs that define the outlines of the characters in the font. Each time you print characters from a scalable font, the printer creates a bitmap of the characters at the point size you choose and saves it temporarily in printer memory. - Page 179 Resident scalable fonts (continued) PCL 6 emulation Arial Arial Italic Arial Bold Arial Bold Italic ITC Avant Garde Book ITC Avant Garde Book Oblique ITC Avant Garde Demi ITC Avant Garde Demi Oblique ITC Bookman Light ITC Bookman Light Italic ITC Bookman Demi ITC Bookman Demi Italic Clarendon Condensed Bold...
- Page 180 Resident scalable fonts (continued) PCL 6 emulation Helvetica Bold Helvetica Bold Italic Helvetica Narrow Helvetica Narrow Italic Helvetica Narrow Bold Helvetica Narrow Bold Italic CG Times CG Times Italic CG Times Bold CG Times Bold Italic Univers Medium Univers Medium Italic Univers Bold Univers Bold Italic Courier...
- Page 181 Resident scalable fonts (continued) PCL 6 emulation Palatino Bold Palatino Bold Italic SymbolPS Symbol Times Roman Times Italic Times Bold Times Bold Italic Times New Roman Times New Roman Italic Times New Roman Bold Times New Roman Bold Italic Univers Condensed Medium Univers Condensed Medium Italic Univers Condensed Bold Univers Condensed Bold Italic...
- Page 182 Understanding fonts Resident scalable fonts (continued) PCL 6 emulation PostScript 3 emulation Helvetica-Condensed-Bold Helvetica-Condensed-BoldObl Helvetica-Condensed-Oblique StempelGaramond-Bold StempelGaramond-BoldItalic StempelGaramond-Italic StempelGaramond-Roman Apple-Chancery Chicago Geneva Monaco NewYork Oxford Taffy MonaLisa-Recut Candid Bodoni Bodoni-Italic Bodoni-Bold Bodoni-BoldItalic Bodoni-Poster Bodoni-PosterCompressed CooperBlack CooperBlack-Italic Copperplate-ThirtyTwoBC Copperplate-ThirtyThreeBC Eurostile Eurostile-Bold Eurostile-ExtendedTwo Eurostile-BoldExtendedTwo GillSans...
- Page 183 Resident scalable fonts (continued) PCL 6 emulation Line Printer 16 POSTNET Barcode OCR-A OCR-B C39 Narrow C39 Regular C39 Wide Understanding fonts PostScript 3 emulation GillSans-BoldItalic GillSans-Condensed GillSans-BoldCondensed GillSans-Light GillSans-LightItalic GillSans-ExtraBold Goudy Goudy-Italic Goudy-Bold Goudy-BoldItalic Goudy-ExtraBold HoeflerText-Regular HoeflerText-Italic HoeflerText-Black HoeflerText-BlackItalic...
-
Page 184: Readability Disclaimer
Print media guidelines considerations to help optimize the readability of printer bar codes and OCR characters. For more information, refer to the Card Stock & Label Guide available on Lexmark’s Web site at www.lexmark.com/publications. It is also located on the drivers CD. -
Page 185: Downloadable Fonts
(called factory default settings). See information. The Local Printer Setup Utility is available on Lexmark’s Web site at www.lexmark.com. It may also be provided on the drivers CD for the printer. Check the drivers CD booklet to verify this. - Page 186 Detailed instructions for using the Local Printer Setup Utility can be found in the Local Printer Setup Utility Help. Make changes in the Local Printer Setup Utility to create settings that will apply to all print jobs. To change settings for an individual print job, make selections using the printer driver. These settings override settings made in the Local Printer Setup Utility.
-
Page 187: Using The Print And Hold Function
Using the Print and Hold function When sending a job to the printer, you can specify in the driver that you want the printer to hold the job in memory. When you are ready to print the job, you must go to the printer and use the operator panel menus to identify which held job you want to print. -
Page 188: Recognizing When Format Errors Occur
Repeat Print If you send a Repeat Print job, the printer prints all requested copies of the job and stores the job in memory so you can print additional copies later. You can print additional copies as long as the job remains stored in memory. -
Page 189: Reserve Print
Reserve Print If you send a Reserve Print job, the printer does not print the job immediately, but stores the job in memory so you can print the job later. The job is held in memory until you delete it from the Held Jobs menu. -
Page 190: Removing Optional Cards
A Job, Delete A Job, and Print Copies menu items. You can then choose to print or delete jobs matching the PIN you entered. (See printing the job, the printer deletes the confidential job from memory. Removing optional cards There are several types of optional cards that can be removed. See the following sections of instructions on how to remove them. -
Page 191: Removing Optional Printer Memory And Other Option Cards
Removing optional printer memory and other option cards Warning: Access the system board: Turn the printer power off, unplug the printer power cord, and disconnect all cables from the back of the printer. b Press the release latches to open the upper and lower front doors. - Page 192 Removing optional cards Press down on the side door latches and open the side door. d Loosen, but do not remove, the six screws on the shield. Note: You need a small Phillips screwdriver to loosen these screws. Use the tabs to slide the shield up until the top three screws fit into the three keyholes on the shield.
- Page 193 Locate the option card you want to remove. Warning: Electronic components are easily damaged by static electricity. Touch something metal on the printer before you touch the option card. Push each latch out at each end of the connector. Grasp the option card and pull it gently out of the connector.
-
Page 194: Removing An Optional Flash Memory Card Or Optional Firmware Card
Reattaching the shield and closing the Removing optional cards doors. The optional cards are easily damaged by static electricity. Touch something metal on the printer before you touch a card. step a on page 191 doors. through step f on page... -
Page 195: Removing An Option Card
Loosen and remove the two screws that secure the card. Save the screws. Removing optional cards Electronic components are easily damaged by static electricity. Touch something metal on the printer before you touch the option card. step a on page 191... - Page 196 If you need to install another option card, refer to the Setup Guide. If not, reinstall the cover plate. Align the cover plate on inside surface of the slot. Insert the two screws on the back of the printer so they pass through the cover plate and tighten them. Reattaching the shield and closing the...
-
Page 197: Reattaching The Shield And Closing The Doors
Reattaching the shield and closing the doors After you have installed any type of option card on the printer system board, follow these instructions to attach the shield and close the doors. Grasp the shield by the tabs and align the three keyholes on the shield with the top three screws. - Page 198 Removing optional cards Close the side door. Close the upper and lower front doors.
-
Page 199: Removing Options
Removing options Removing options If the printer location needs to change or the printer and print media handling options need to be shipped to a new location, all print media handling options must be removed from the printer. For shipping, pack the printer and print media handling options securely to avoid damage. - Page 200 Push the envelope support to the closed position. Open the printer upper front door. Pull the envelope feeder up slightly and straight out of the printer. Set it aside. Close both front doors. Refer to the Setup Guide when you are ready to reattach options.
-
Page 201: Removing An Optional Output Bin
If you are removing a finisher, skip to You must attach the top cover to the printer or topmost output bin when you finish removing optional output bins. In addition, it may be necessary to remove the wire bail from the top cover, depending on the type of output bin to which it is attached. - Page 202 Detach the output expander removable bin. If you are removing a 5-bin mailbox or high-capacity output stacker, skip to page 203. Lift the edge of the removable bin so the lower tabs come out of the slots on the output expander.
- Page 203 Removing options The output bin may have a wire bail attached. If so, remove the tips of the wire bail from the ends of the plastic bracket on the bottom of the optional output bin. Refer to the Setup Guide when you are ready to reattach the wire bail to an optional output bin.
- Page 204 Carefully lift the option straight up until it is completely disconnected from the option below it or from the printer. Set it aside. Warning: The edges of the mounting brackets could damage tabletops or fabrics. Refer to the Setup Guide when you are ready to reattach options.
-
Page 205: Removing The Printer From The Duplex Unit, Removing A Duplex Unit From A Drawer And Removing A Drawer From Another Drawer
250- or 500-sheet drawer, or removing a 250- or 500-sheet drawer from the optional 2000-sheet drawer. Ask someone to help you lift the printer by the handholds and set it aside. CAUTION: Make sure your fingers are not under the printer when you set it down. - Page 206 Carefully lift the optional drawer straight up until it is completely disconnected from the option below it. Set it aside. Refer to the Setup Guide when you are ready to reattach options. Removing options...
-
Page 207: Understanding The Operator Panel
You can change most printer settings from your software application or printer driver. Settings you change from the application or printer driver apply only to the job you are preparing to send to the printer. - Page 208 The numbers 1 through 6 appear beside the operator panel buttons in this illustration. You use these numbers to enter your personal identification number (PIN) after you send a confidential print job from the printer driver. A confidential job is one type of job from the Print and Hold jobs. For more information, see Using the Print and Hold The following information describes the functions of each button.
-
Page 209: Using The Operator Panel To Change Printer Settings
Using the operator panel to change printer settings If your printer is configured as a network printer available to a number of users, it is possible that Menus Disabled appears on the display when you press Menu from the Ready state. Disabling the menus prevents other users from using the operator panel to inadvertently change a printer user default that has been set by the administrator. -
Page 210: Menus Disabled
An asterisk (*) next to a value indicates the factory default setting. Factory defaults may differ for different countries. Factory defaults are the function settings in effect the first time you turn your printer on. These remain in effect until you change them. Factory defaults are restored if you select the Restore value for the Factory Defaults menu item in the Utilities Menu. -
Page 211: Using The Printer Menus
Using the printer menus Click here for a one-page overview of all the menus and their menu items. Select a menu from the following list for more information. Finishing Menu Help Menu Job Menu Network Menu Paper Menu Parallel Menu... - Page 212 Baud Honor Init Data Bits Parallel Mode 1 Parity Parallel Mode 2 Honor DSR MAC Binary PS Using the printer menus Utilities Menu Print Menus Print Net <x> Setup Print Fonts Print Directory Factory Defaults Remove Held Jobs Format Flash...
-
Page 213: Paper Menu
Paper Size Purpose: To identify the default print media size for each source. For trays with automatic size sensing, only the value detected by the hardware is displayed. Using the printer menus Paper Size Paper Source Paper Texture Paper Type... -
Page 214: Paper Type
Universal Select Universal when you load paper that does not match any of the other available sizes. The printer automatically formats the page for the maximum possible size. You can then set the actual page size from your application software. -
Page 215: Custom Types
Select sources through your software application by selecting type and size. • Automatically link sources. Any sources containing the same type and size of paper are automatically linked by the printer, if you have set the Paper Size and the Paper Type to the correct values. See also:... -
Page 216: Configure Bins
14 characters. If two or more bins share the same name, the name only appears once in the Output Bin value list. Configure Bins Purpose: To determine which output bin(s) the printer uses for a particular job. Using the printer menus =3.00–14.17 in. =76–360 mm (8.5 in.*) -
Page 217: Assign Type/Bin
Sends print jobs to the output bin designated for that user. Link Links two or more bins together as though they were one large bin. When one linked bin is full, the printer starts filling the next linked bin, and continues with each additional linked bin. Mail Overflow Sends print jobs to the output bin designated for that user until it is full, and then sends jobs to the designated overflow bin. -
Page 218: Envelope Enhance
Substitute Size Purpose: To have the printer substitute the specified size if the requested size is not loaded. Values: Printer prompts the user to load the requested size. Statement/A5 Prints A5 size jobs on statement size paper if only statement size paper is loaded, and prints statement size jobs on A5 paper if only A5 paper is loaded. -
Page 219: Paper Texture
Paper Weight Paper Weight Purpose: To identify the relative weight of the paper loaded in a specific source and ensure that the toner adheres properly to the printed page. Using the printer menus Bond Texture Envelope Texture Labels Texture Ltrhead Texture... -
Page 220: Paper Loading
Then select a value: Duplex Notifies the printer that the specified paper type is loaded properly for duplex printing. If the printer receives a single-sided job using that paper type, the printer inserts blank pages as necessary to print the job properly on preprinted forms. -
Page 221: Finishing Menu
Multipage Order Note: Values marked by an asterisk (*) are the factory default settings. Duplex Purpose: To set duplexing as the default for all print jobs. (Select Duplex from the printer driver to duplex only specific jobs.) Values: Off* Prints on one side of the paper. -
Page 222: Blank Pages
Copies Purpose: To set the number of copies you want for the printer default value. (Set the number of copies required for a specific job from the printer driver. Values selected from the printer driver always override values selected from the operator panel.) Values: 1...999 (1*) -
Page 223: Separator Sheets
Prints each page of a job the number of times specified by the Copies menu item. For example, if you set Copies to 2 and send three pages to print, the printer prints page 1, page 1, page 2, page 2, page 3, page 3. - Page 224 Values: Horizontal* Vertical Rev Horizontal Rev Vertical See also: Multipage Print Using the printer menus 6 Up Prints 6 page images per side. 9 Up Prints 9 page images per side. 12 Up Prints 12 page images per side. 16 Up Prints 16 page images per side.
- Page 225 Prints a solid line border around each page image. See also: Multipage Print Staple Job Purpose: To set stapling as the default for all print jobs. (Select stapling from the printer driver if you want to staple only specific jobs.) Values: Off* Does not staple print jobs.
-
Page 226: Utilities Menu
Staple Prime Src Purpose: To specify the source you want the printer to use when it primes the stapler. Prime Stapler is selected from the Job Menu. When a staple cartridge is replaced or a staple jam is cleared, the printer may need to prime the stapler by stapling a sheet of paper several times. -
Page 227: Print Menus
Network <x> Setup menu item in the Network Menu. See also: Network <x> Setup Print Fonts Purpose: To print a sample of all the fonts available for the selected printer language. Values: PCL Fonts Prints a sample of all printer fonts available for PCL emulation. PS Fonts Prints a sample of all printer fonts available for PostScript emulation. -
Page 228: Factory Defaults
– Display Language. – All settings in the Parallel Menu, Serial Menu, Network Menu, and • All downloaded resources (fonts, macros, and symbol sets) in printer memory (RAM) are deleted. (Resources residing in flash memory or on the hard disk are unaffected.) Do Not Restore User-defined settings remain. -
Page 229: Defragment Flash
To retrieve storage area lost when resources are deleted from flash memory. Values: Printer transfers all resources stored in flash memory to printer memory and then reformats the flash memory option. When the format operation is complete, the resources are loaded back into flash memory. -
Page 230: Job Menu
Hex Trace Purpose: To help isolate the source of a print job problem. With Hex Trace selected, all data sent to the printer is printed in hexadecimal and character representation. Control codes are not executed. To exit Hex Trace, turn the printer off or reset the printer from the Job Menu. -
Page 231: Confidential Job
Note: Values marked by an asterisk (*) are the factory default settings. Confidential Job Purpose: To print confidential jobs stored in printer memory. (When the confidential job prints, it is automatically deleted from printer memory.) First enter the Personal Identification Number (PIN) associated with your confidential job:... -
Page 232: Reset Printer
Cancel Job Purpose: To cancel the current print job. Note: Cancel Job is only displayed if the printer is processing a job or has a job in printer memory. See also: Canceling a print job Reset Printer... - Page 233 Note: Print Buffer is only available when you enter the Job Menu while Waiting is displayed. The Waiting state occurs if an incomplete job is sent to the printer or an ASCII job, such as a print screen command, is printing.
-
Page 234: Abort Restore
Menu button to scroll through the list. The printer can display up to five outgoing fax numbers in the outgoing fax queue. When more than five faxes are in the queue, the next fax job appears on the display as an outgoing fax is transmitted or canceled. -
Page 235: Toner Darkness
To improve the quality of grayscale printing at 300 and 600 dots per inch (dpi) in PostScript emulation. Values: Uses modified screening parameters to improve print quality of graphics. Uses standard screening parameters. Setup Menu Use the Setup Menu to configure a variety of printer features. Using the printer menus... -
Page 236: Printer Language
Note: Setting a printer language as the default does not prevent a software application from sending print jobs that use the other language. Power Saver Purpose: To specify the amount of time (in minutes) the printer waits after a job is printed before it goes into a reduced power state. Values: Disabled Disables Power Saver;... -
Page 237: Resource Save
Purpose: To specify the amount of time (in seconds) the printer waits before printing the last page of a print job that does not end with a command to print the page. The print timeout counter does not start until Waiting is displayed. -
Page 238: Auto Continue
See also: Print Buffer Wait Timeout Purpose: To specify the amount of time (in seconds) the printer waits to receive additional bytes of data from the computer. When this timeout expires, the print job is canceled. Values: Disabled Disables Wait Timeout. -
Page 239: Page Protect
Values: Printer reprints jammed pages. Printer does not reprint jammed pages. Auto* Printer reprints a jammed page unless the memory required to hold the page is needed for other printer tasks. Page Protect Purpose: To successfully print a page that may otherwise generate Complex Page errors. -
Page 240: Staple Alarm
Values: Off* An error message is displayed until someone replaces the toner cartridge. If an Auto Continue value is selected from the Setup Menu, the printer resumes printing after the specified timeout value. Single Printer stops printing, displays an error message, and sounds three quick beeps. -
Page 241: Job Accounting
Off* Printer does not store job statistics on disk. Printer stores job statistics for the most recent print jobs. Note: Job Accounting is only displayed when a hard disk is installed, is neither defective nor Read/Write or Write protected, and Job Buffer Size is not set to 100%. -
Page 242: Pcl Emul Menu
PCL Emul Menu Use the PCL Emul Menu to change printer settings that only affect jobs using the PCL emulation printer language. Select a menu item for more details: A4 Width Auto CR after LF Auto LF after CR Font Name... -
Page 243: Point Size
0.08 to 100 characters per inch (cpi) in increments of 0.01 cpi. For nonscalable monospaced fonts, the pitch is displayed, but cannot be changed. Note: Pitch is only displayed for fixed, or monospaced, fonts. Symbol Set Purpose: To choose a symbol set for a specified font name. Using the printer menus... -
Page 244: Lines Per Page
60* (country-specific factory default values) 64* (country-specific factory default values) The printer sets the amount of space between each line (vertical line spacing) based on the Lines per Page, Paper Size, and Orientation menu items. Select the correct Paper Size and Orientation before changing Lines per Page. -
Page 245: Auto Cr After Lf
Makes the logical page wide enough to print eighty 10-pitch characters. Tray Renumber Purpose: To configure your printer to work with printer drivers or applications that use different source assignments for the paper trays. First select a source: Assign Tray <x>... -
Page 246: Postscript Menu
Printer does not perform a carriage return after a line feed control command. Printer performs a carriage return after a line feed control command. Auto LF after CR Purpose: To specify whether the printer automatically performs a line feed after a carriage return control command. Values: Off* Printer does not perform a line feed after a carriage return control command. -
Page 247: Pdf Menu
Read/Write or Write protected, and Job Buffer Size is not set to 100%. PDF Menu Use the PDF Menu within the PostScript Menu to change printer settings that only affect jobs using Portable Document Format (PDF) files. Select a menu item for more details:... -
Page 248: Parallel Menu
Print the annotations in the PDF file. Parallel Menu Use the Parallel Menu to change printer settings affecting jobs sent to the printer through a parallel port (either Std Parallel or Parallel Opt <x>). Select a menu item for more details:... -
Page 249: Npa Mode
PS SmartSwitch PS SmartSwitch Purpose: To configure the printer so it automatically switches to PostScript emulation when a print job received through the parallel port requires it, regardless of the default printer language. Values: Printer examines data on the parallel interface and selects PostScript emulation if the data indicates that is the required printer language. -
Page 250: Parallel Buffer
Does not buffer print jobs to the hard disk. Buffers print jobs to the hard disk. Auto Buffers print jobs only if the printer is busy processing data from another input port. Note: Changing the Job Buffering menu item automatically resets the printer. Advanced Status Purpose: To enable bidirectional communication through the parallel port. -
Page 251: Parallel Mode
Honor Init Purpose: To determine whether the printer honors hardware initialization requests from the computer. The computer requests initialization by activating the INIT signal on the parallel interface. Many personal computers activate the INIT signal each time the computer is turned on and off. -
Page 252: Network Menu
Printer processes print jobs from computers using either Windows or Macintosh operating systems. Network Menu Use the Network Menu to change printer settings affecting jobs sent to the printer through a network port (either Standard Network or Network Opt <x>). Select a menu item for more details:... - Page 253 PCL SmartSwitch Purpose: To configure the printer so it automatically switches to PCL emulation when a print job received through the network port requires it, regardless of the default printer language. Values: Printer examines data on the network interface and selects PCL emulation if the data indicates that is the required printer language.
-
Page 254: Network Buffer
Values: Printer performs NPA processing. If data is not in NPA format, it is rejected as bad data. Printer does not perform NPA processing. Auto* Printer examines the data to determine the format and then processes it appropriately. Note: Changing this menu item automatically resets the printer. -
Page 255: Std Net Setup
Values for this menu item are supplied by the specific print server. Select the menu item to see the available values. Note: Refer to the documentation on the drivers CD for more information. USB Menu Use the USB Menu to change printer settings affecting a Universal Serial Bus (USB) port (USB Option <x>). Using the printer menus... - Page 256 Note: Values marked by an asterisk (*) are the factory default settings. PCL SmartSwitch Purpose: To configure the printer so it automatically switches to PCL emulation when a print job received through the USB port requires it, regardless of the default printer language. Values: Printer examines the data on the USB interface and selects PCL emulation if the data indicates that is the required printer language.
-
Page 257: Usb Buffer
To specify whether the printer performs the special processing required for bidirectional communication, following the conventions defined in the Network Printing Alliance (NPA) Protocol. Values: Printer performs NPA processing. If data is not in NPA format, it is rejected as bad data. Printer does not perform NPA processing. -
Page 258: Serial Menu
Printer processes print jobs from computers using either Windows or Macintosh operating systems. Serial Menu Use the Serial Menu to change printer settings affecting jobs sent to the printer through a serial port (Serial Opt <x>). Select a menu item for more details:... - Page 259 Printer Language PS SmartSwitch Purpose: To configure the printer so it automatically switches to PostScript emulation when a print job received through the serial port requires it, regardless of the default printer language. Values: Printer examines data on the serial interface and selects PostScript emulation if the data indicates that is the required printer language.
-
Page 260: Serial Protocol
Does not buffer print jobs to the hard disk. Buffers print jobs to the hard disk. Auto Buffers print jobs only if the printer is busy processing data from another input port. Note: Changing the Job Buffering menu item automatically resets the printer. Serial Protocol Purpose: To select the hardware and software handshaking values for the serial interface. -
Page 261: Robust Xon
Off* Printer waits to receive data from the computer. Printer sends a continuous stream of XONs to the host computer to indicate that the serial port is ready to receive more data. This menu item only applies to the serial port if Serial Protocol is set to XON/XOFF. -
Page 262: Honor Dsr
See also: Technical Reference Honor DSR Purpose: To determine whether the printer uses the Data Set Ready (DSR) signal. DSR is one of the handshaking signals for most serial interface cables. Values: Off* All data received by the serial port is treated as valid data. -
Page 263: Help Menu
Quick Reference Purpose: Provides a quick glance at major topics about the printer and gives easy instructions. Quick Reference pages are stored inside the printer. They provide information about loading print media, diagnosing and solving print problems, and clearing jams. We strongly recommend that you print the Quick Reference pages and store them near the printer. -
Page 264: Understanding The Printer Messages
The printer operator panel displays messages describing the current state of the printer and indicates possible printer problems you must resolve. This topic provides a list of all printer messages, explains what they mean, and tells you how to clear the messages. - Page 265 • Press Go to clear the message and continue printing. • In the case of a hardware failure, turn the printer off and back on. If the error recurs, turn the printer off, remove the specified device, and call for service.
- Page 266 Enabling Menus The printer is responding to a request to make the menus available to all users. Enter PIN: The printer is waiting for you to enter your four-digit personal identification =___ number (PIN). Fax <x> The printer is processing an incoming fax.
- Page 267 Understanding the printer messages Message What this message means Held Jobs may be lost The printer memory is too full to continue processing print jobs. Held Jobs May Not Be The printer memory cannot restore Print and Hold jobs from the printer Restored hard disk.
- Page 268 Load Manual A request for a manual feed job has been sent to the printer. The printer is ready for insertion of a single sheet into the manual feed slot. Load Staples The printer is trying to staple a print job, but the stapler is empty.
- Page 269 (PIN) you entered is not Retry? associated with any confidential print job. Not Ready The printer is not ready to receive or process data. Someone pressed Stop to take the printer offline. Ovrflow Bin Full The mailbox’s designated overflow bin is full.
- Page 270 Retry. Go/Stop? Priming Stapler The printer is preparing the stapler to staple print jobs. After the printer feeds a sheet of paper from the tray specified in the Staple Prime Source menu item, the stapler attempts to staple the page until it is successful.
- Page 271 Control strings are printed, not executed. • Turn the printer off and then on to exit Hex Trace mode and return to Ready status. • Reestablish communication by removing the specified device and reattaching it to the printer.
- Page 272 Understanding the printer messages Message What this message means Restore Held Jobs. Go/ Someone reset the printer or turned it on, and the printer detects Print and Stop? Hold jobs stored on the hard disk. Restoring Factory Defaults The printer is restoring the factory default printer settings.
- Page 273 The printer automatically clears the message in 30 seconds, and then disables the download emulator on the firmware card. Download the correct download emulator version from Lexmark’s Web site. Clear the paper path. See also: Clearing jams Clear the paper path.
- Page 274 37 Insufficient Collation The printer memory (or hard disk, if installed) does not have the free space Area necessary to collate the print job.
- Page 275 Understanding the printer messages Message What this message means 37 Insufficient Memory The printer memory is full and cannot continue processing current print jobs. 38 Memory Full The printer is processing data, but the memory used to store pages is full.
- Page 276 Setup Menu. – Install additional printer memory. See also: Setup Menu • Turn the printer off, and then press and hold Go while turning it on. The printer reads the code on the system card and bypasses the code on the firmware card.
- Page 277 The printer detects an unsupported option card in one of the connectors. Option in Slot X 56 Serial Port <x> Disabled Data has been sent to the printer through a serial port, but the serial port is disabled. 56 Parallel Port <x>...
- Page 278 What you can do Turn off and unplug the printer. Remove the additional output bins. Plug in the printer and turn it on. See also: Setup Guide Turn off and unplug the printer. Remove the excess hard disks from the printer.
- Page 279 88 Toner Low The printer has detected that the toner supply in the print cartridge is low. If you do not have a print cartridge on hand, order one now.
-
Page 280: Index
35 labels 36 letterhead 32 paper 29 transparencies 34 charge roll replacing 90 cleaning the printer 87 clearing jams 120 possible jam areas 122 clearing staple jams 166 Collation (Finishing Menu) 222 collation, enabling 222 complex page errors 239... - Page 281 disabling operator panel menus 174 disk See hard disk Display Language (Setup Menu) 239 Download Target (Setup Menu) 237 downloaded resources printing 228 resource save 237 storing 237 duplex binding 77, 221 enabling 221 Duplex (Finishing Menu) 221 Duplex Bind 77 Duplex Bind (Finishing Menu) 221 duplex function 76 duplex printing...
- Page 282 Job Buffering (USB Menu) 257 Job Menu 230 Abort Restore 234 Cancel Fax 233 Cancel Job 232 Confidential Job 231 Held Jobs 231 Prime Stapler 233 Print Buffer 233 Reset Active Bin 233 Reset Printer 232 label fuser cleaner 85...
- Page 283 32 guidelines 32 loading input tray 53 multipurpose feeder 63 page orientation 33 printing 33 Lexmark Authorized Supplies Dealers 81 Lines per Page (PCL Emul Menu) 244 linking 76 bins 217 trays 76 load line 51 loading print media...
- Page 284 Reattach <device> 271 Remove Paper <specified bin> 271 Res Reduced 271 Resetting Active Bin 271 Resetting Maint Cnt Value 271 Resetting the Printer 271 Restore Held Jobs. Go/Stop? 272 Restoring Factory Defaults 272 Restoring Held Job xxx/yyy 272 Restoring Held Jobs 272 See also jam messages Serial <x>...
- Page 285 messages (continued) Staples Empty 272 Staples Low 272 Std Bin Full 272 Toner Low 273 Tray <x> Empty 273 Tray <x> Low 273 Tray <x> Missing 273 USB <x> 273 Waiting 273 Multipage Border (Finishing Menu) 225 Multipage Order (Finishing Menu) 224 multipage print border settings 225 configuring 224...
- Page 286 178 symbol set 243 tray renumber 245 PCL SmartSwitch (Network Menu) 253 PCL SmartSwitch (Parallel Menu) 248 PCL SmartSwitch (Serial Menu) 258 PCL SmartSwitch (USB Menu) 256 PCL SmartSwitch, setting See also printer language network port 253 parallel port 248...
- Page 287 PDF Menu (PostScript Menu) 247 personal identification number See PIN PictureGrade (Quality Menu) 235 entering at the printer 27 entering from the driver 26 for confidential jobs 26 Pitch (PCL Emul Menu) 176, 243 Point Size (PCL Emul Menu) 176, 243...
- Page 288 (continued) taking offline (continued) with Stop button 208 Printer Language (Setup Menu) 236 printer messages Enter PIN 189 Menus Disabled 209 No Jobs Found. Retry? 190 printer testing Hex Trace mode 230 print defaults 227 print hardware statistics 227...
- Page 289 83 print cartridge 83 Prebate 83 regular 83 Symbol Set (PCL Emul Menu) 243 symbol sets, definition 184 taking printer offline 208 with Menu button 208 with Stop button 208 test printing Hex Trace mode 230 menus page 227...
- Page 290 Universal Setup (Paper Menu) 215 unsatisfactory papers 31 USB Buffer (USB Menu) 257 USB Menu 255 Job Buffering 257 MAC Binary PS 258 NPA Mode 257 PCL SmartSwitch 256 PS SmartSwitch 256 USB Buffer 257 USB port configuring buffer size 257 NPA mode 257 PCL SmartSwitch 256 PS SmartSwitch 256...
- Page 291 Lexmark and Lexmark with diamond design are trademarks of Lexmark International, Inc., registered in the United States and/or other countries. © 2002 Lexmark International, Inc. 740 West New Circle Road Lexington, Kentucky 40550 www.lexmark.com...
Need help?
Do you have a question about the T630 and is the answer not in the manual?
Questions and answers