Table of Contents
Advertisement
Quick Links
Advertisement
Table of Contents

Subscribe to Our Youtube Channel
Related Manuals for Insportline IN 8052 Vibrogym Katrina SE


Summary of Contents for Insportline IN 8052 Vibrogym Katrina SE
- Page 1 USER MANUAL – EN IN 8052 Vibrogym inSPORTline Katrina SE...
-
Page 2: Table Of Contents
CONTENTS PARTS ..................................3 SAFETY PRECAUTIONS ............................. 4 MAINTENANCE ..............................5 ASSEMBLY STEPS ............................... 6 WARNING AND NOTICE ............................ 8 PRODUCT INSTALLATION ..........................8 CONSOLE AND COLUMN DISPLAY OPERATION ..................10 EXERCISE POSITIONS ............................22 EXPLODED DRAWING ............................. 28 PARTS LIST ................................. 28 TERMS AND CONDITIONS OF WARRANTY, WARRANTY CLAIMS ............ -
Page 3: Parts
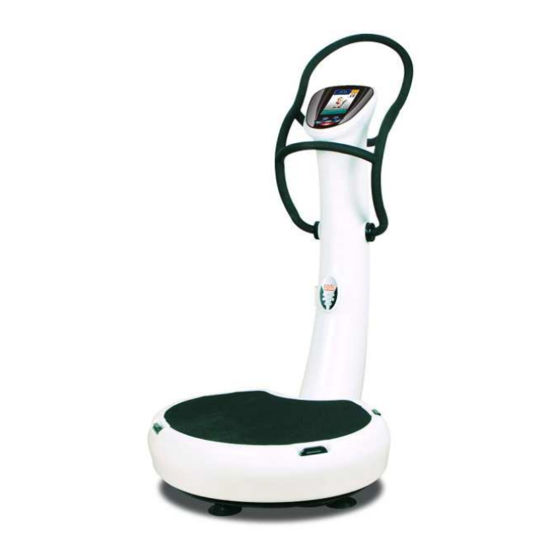
PARTS 1. 7” colored computer display 2. LED column display 3. Post column 4. Base frame 5. Controller 6. Hand straps 7. Exercise mat Read all precautions and instructions in this manual before using this equipment. Save this manual for future reference. -
Page 4: Safety Precautions
SAFETY PRECAUTIONS Thank you for your purchasing our products. Even though we go to great efforts to ensure the quality of each product, occasional errors, and /or omissions do occur. In any event should you find this product to be defective or missing a part please contact your place of purchase. Be sure to read the entire manual before assembly and operation. -
Page 5: Maintenance
MAINTENANCE Regular maintenance to keep the machine running in the best condition: 1. Please pay attention when in installation and please gently move and place, when the machine is tilted in contact with the ground, please use a soft material to pave the way so as not to scratch the surface of the paint between equipment and hard objects to avoid collision, direct damage to the equipment surface. -
Page 6: Assembly Steps
ASSEMBLY STEPS STEP 1 Please take the base frame and column out of box and connect cables. 1. Base frame 2. Base frame cable 3. Column cable 4. Column STEP 2 Please assembling post column and base frame with bolts / spring washers and washers to tight up. Please be aware not to cut the cable. - Page 7 1. Washer ø8 2. Bolt M8x60 1. Bolt M6x30 2. Handle bar cover 3. Handle bar STEP 4 Please connect the power cord on the back side of column. 1. Column 2. Power cord Assembling completed. 1. Display 2. Handle bar 3.
-
Page 8: Warning And Notice
WARNING AND NOTICE • Warning and notice for your safety The below is written for your safety, please read carefully and use the product properly. • Notice of electrical power and the way of using A patient and unhealthy person should exercise with this product after talking with a doctor. If you feel no good during using this product, must stop using. - Page 9 Place on a flat surface An accident happen caused by user’s own discretion without reading this manual, user can’t blame to the company. Please read this manual for your safety.
-
Page 10: Console And Column Display Operation
CONSOLE AND COLUMN DISPLAY OPERATION TIME Time displays from 00:20 to 10 minutes, 10 sec. UP and DOWN adjustment. SPEED/HZ From 20hz to 60hz, 1 hz UP and DOWN adjustment. Hz amplitude setting for High and Low PRESET PROGRAMS 8 Preset programs: P1: STRETCHING AND RELAXATION P2: WHOLE BODY EXERCISE P3: UPPER BODY EXERCISE... - Page 11 During workout: Push to increase During setting: Push the RETURN to speed go back last setting or to go back to last page. During setting: Push to increase TIME, Speed HZ, H/L and Program selection. During workout: Push to decrease During workout: Push PAUSE / speed.
-
Page 12: Operating Instructions
During workout: Push PAUSE / STOP to pause or stop the exercise or go back last page. OPERATING INSTRUCTIONS OPENING 1. Press UP to view last page. 2. Press down to view next page. 3. Each page will remind for 10 seconds and go to next page. 4. - Page 13 MANUAL PROGRAM 1. Press UP / DOWN to adjust Time Frequency and Level. 2. Press ENTER to confirm the setting and go to next step. 3. Press RETURN to go back last setting. 4. After TIME, FREQ. and LEVEL set, MANUAL PROGRAM SETTING COMPLETED.
- Page 14 PRESET PREVIEW PROGRAM 1. Press UP / DOWN or ENTER to view each exercise steps. 2. Press RETURN to back to last page PRESET PROGRAM. 3. Press START to start the exercise. 4. During operating, speed is adjustable by press UP and DOWN for 1 hz interval.
- Page 15 10 steps User Preview Programs 1. Press UP/ DOWN to view each User setting steps. 2. Press ENTER to edit each User programs setting. 3. Press RETURN back to User Program. 4. Press START to start this exercise. User Edit Program: 10 steps setting 1.
- Page 16 WORKOUT Display: 1. During workout HZ level can be adjusted by UP DOWN, 1 hz 2. Quick button on remote controller by press 30 hz, 40 hz , 50hz , the hz level will automatic goes to 30, 40, 50hz. 3.
- Page 17 REST mode: 1. Each Rest mode is 15 seconds. 2. REST mode is designed for the interval exercise so the user could standby for next position and the next workout position picture will be showed on display during the Rest Mode. PRECAUTIONS 1.
-
Page 18: Preset Programs
PRESET PROGRAMS P1-STRETCHING AND RELAXATION P2-WHOLE BODY EXERCISE Workout pose Muscle Freq. LEVEL Workout pose Muscle Freq. LEVEL Amp. group group Pose01 Pose01 Pose32 Pose04 Pose21 Pose07 Pose18 Pose25 Pose22 Pose05 Pose20 Pose03 Pose19 Pose06 Pose06 Pose26 Pose16 Pose21... - Page 19 Pose27 Pose27 P3-UPPER BODY EXERCISE P4-LOWER BODY EXERCISE Workout pose Muscle Freq. LEVEL Workout pose Muscle Freq. LEVEL Amp. group group Pose18 Pose02 Pose15 Pose21 Pose17 Pose09 Pose12 Pose08 Pose14 Pose20 Pose11 Pose07 Pose10 Pose19 Pose13 Pose23...
- Page 20 Pose31 Pose22 Pose32 Pose24 P5-PROGRAM 5 P6-PROGRAM 6 Workout pose Muscle Freq. LEVEL Workout pose Muscle Freq. LEVEL Amp. group Group Pose02 Pose05 Pose03 Pose08 Pose18 Pose26 Pose25 Pose25 Pose14 Pose04 Pose09 Pose11 Pose19 Pose30...
- Page 21 Pose08 Pose18 Pose31 Pose21 Pose24 Pose24 P7-PROGRAM 7 P8-PROGRAM 8 Workout pose Muscle Freq. LEVEL Workout pose Muscle Freq. LEVEL Amp. group group Pose01 Pose32 Pose19 Pose21 Pose10 Pose25 Pose06 Pose26 Pose14 Pose11 Pose12 Pose12...
-
Page 22: Exercise Positions
Pose25 Pose04 Pose08 Pose09 Pose32 Pose06 Pose22 Pose27 EXERCISE POSITIONS Pose01 (UP and DOWN) Stand on toes with slightly bent at hips knees with contracted abdominal. Pose02 Standing with feet shoulder width apart. Keeping the back straight and knees slightly bent and flexing hips until you feel desired tension in your quadriceps, hips. - Page 23 Pose04 Feet standing outward in the position wider than shoulder width bend the legs and sit back; you should feel tension inner thigh and hamstring. Pose05 (L and R) Standing forward with one leg in front of the other. Front leg should slightly bent, keep the back leg straight while pushing the rear heel into the plate with...
- Page 24 Pose09 (L and R) Step one foot on the plate while another feet on the floor. Bent knees and ankles and lower your body slowly until you feel tension in the hamstrings. Pose10 Place elbows on the plate with contracted abdominals, gently push your hips upward slowly.
- Page 25 Pose15 Placing hands on the plate shoulder width apart. Keep back straight with contracted abdominals. Pose16 Sit on the floor and place Mat between plate and your back with your legs bent. Place your elbows on plate for balance. You could adjust your back position for different contact point.
- Page 26 Pose21 (L and R) Lay sideway on plate with knees bent and elbow touches the floor to support your body. Pose22 (L and R) Place inner thigh on plate slightly bend while body resting on the floor. Pose23 Lying on plate in prone position with front of thighs on the plate with extra step or Mat for upper body support.
- Page 27 Pose27 Placing Mat under your hips with knees bent. Relax your upper body and gently bent forward. Pose28 Hold straps with both bent elbows in the same level, adjusting the tension by pull the straps. Pose29 Hold straps with both arms straight same level,...
-
Page 28: Exploded Drawing
EXPLODED DRAWING PARTS LIST Specification Non slip sticker Straps holder Frame housing Washer Bolt Motor Washer Spring washer Bolt Rubber feet Steel frame... - Page 29 Rubber cushion Support frame Display sticker Upper display housing Button PCB Screws Screws Spring washer Washer Inverter Column display sticker Screws Column display housing Column display PCB Washer Spring washer Bolt Transportation wheels Tube Power switch Power socket Switch housing Post column Screws Handle bar cap...
-
Page 30: Terms And Conditions Of Warranty, Warranty Claims
TERMS AND CONDITIONS OF WARRANTY, WARRANTY CLAIMS General Conditions of Warranty and Definition of Terms All Warranty Conditions stated hereunder determine Warranty Coverage and Warranty Claim Procedure. Conditions of Warranty and Warranty Claims are governed by Act No. 40/1964 Coll. Civil Code, Act No. 513/1991 Coll., Commercial Code, and Act No. - Page 31 +420 556 770 190, Mobile: +420 604 853 019, servis@insportline.cz Fax: +420 556 770 192, (Service +420 556 770 191) Web: www.insportline.cz, www.worker.cz, www.worker-moto.cz INSPORTLINE, s.r.o. Bratislavska 36, 911 05 Trencin, Slovakia CRN: 36311723, VAT ID: SK2020177082 Orders: +421(0)326 526 701, +421(0)917 649 192, objednavky@insportline.sk...
Need help?
Do you have a question about the IN 8052 Vibrogym Katrina SE and is the answer not in the manual?
Questions and answers