
Related Manuals for Baroness GM2800A


Summary of Contents for Baroness GM2800A
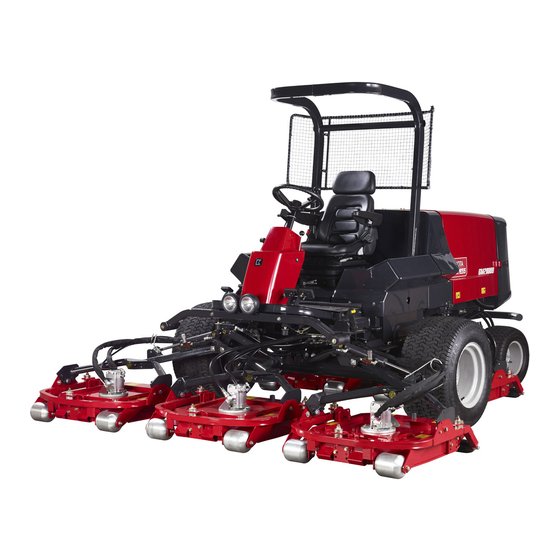
- Page 1 5-Deck Rotary Mower MOWER Owner's handling manual & parts catalogue "Required reading" Read this manual and the owner's manual for the engine before using the machine.
-
Page 2: Table Of Contents
3. Operation method of each part ..............17 4. Maintenance and storage ................3 Caution About the mechanical operation ..........17 To use the Baroness mower safely..............4 Warning Before starting engine ............. 17 Warnings for Safety ................. 4 Caution Starting and stopping the engine.......... - Page 3 4-3 Water temperature gauge................ 21 PARTS CATALOGUE ................32 Danger Fuel gauge................22 1. Frame parts A .................... 33 4-5 Charge lamp .................... 22 2. Frame parts B .................... 37 4-6 Glow lamp....................22 3. Cover parts ....................39 4-7 Oil pressure lamp (Engine oil pressure lamp) ......... 22 4.
-
Page 4: Introduction
The operator is responsible for operating this machine properly and safely. Thank you for purchasing the Baroness GM2800A, front 5-deck rotary mower. This manual describes the correct methods for handling, adjusting, and checking the For questions concerning maintenance or genuine parts, please contact your local machine. -
Page 5: Training
1. Training 2. Preparation Read the Operator's Manual and other training material carefully. Be Use clothing and equipment that are suitable for the job. Wear a helmet, familiar with the controls and safety indications and learn how to stop safety glasses, and ear protectors. Long hair, loose clothing, or jewelry the mower in an emergency. -
Page 6: Precautions During Operation
- 3 - Disengage the drive to each attachment except when mowing. 3. Precautions during operation Stop the engine, disengage the drive to each attachment, and remove the key under the following conditions: Do not start the engine in a closed space since there is a danger of Before refueling carbon monoxide poisoning. -
Page 7: To Use The Baroness Mower Safely
The following precautions are not included in the CEN standard, but they should always be If the fuel tank needs to be cleaned, clean it outdoors. followed to operate the Baroness mower safely. Take care not to pinch your fingers while making adjustments to the mower. -
Page 8: Please Be Sure To Observe For Safe Operation
- 5 - Please be sure to observe for safe operation. 2. Before operating the machine Warning The precautions that are described here are the important contents concerning safety. Be sure to follow these safety precautions. Do not carry passengers. Failure to follow these precautions can cause injury or death, or damage to the The riding capacity of this machine is one person. -
Page 9: Danger
3. Inspection and maintenance before Warning and after operating the machine Perform inspect and maintenance on a flat and stable place. Set lower the mower unit and inspect and maintenance on a flat and stable place on Danger which the machine will not overturn or move. Failure to follow this precaution can cause the machine to overturn and cause an Add oil and refuel when the engine is cold. -
Page 10: Warning When Transporting The Machine
- 7 - 4. When transporting the machine Be sure to check the parking brake lever. Check that the brake operation is not faulty and that the parking brake lever is not remarkably loose nor does it have remarkable play. Warning Failure to follow this precaution can cause an accident. -
Page 11: When Moving And Taking The Machine On Or Off A Field
5. When moving and taking the machine 6. When operating the machine on or off a field Warning Warning Not permitted in the public road Do not substitute weight for people or cargo. Do not load people or cargo as a substitute for weight. Do not operate the machine on public roads. -
Page 12: Danger
- 9 - Inspect and perform maintenance immediately if unusual vibration 7. After operating the machine and storage occurs. If unusual vibration occurs, stop the engine immediately, then inspect the cause and repair it if necessary. Danger Failure to follow this precaution can cause an accident or injury, or the machine to malfunction. -
Page 13: Vibration Level
Be sure to inspect the electrical components and wires. Regularly have the engine speed tested at a Baroness dealer to check the engine Inspect if the electrical cables are touching other parts, if the cover is disconnected, or if for safety and accuracy. -
Page 14: Names Of Various Sections
- 11 - Names of various sections Mower unit raise/lower lever Bonnet Throttle lever Seat Parking brake lever adiator Operation panel Differential lock lever Tilt lever Oil cooler Fuel filler hole Forward pedal Oil level gauge Backward pedal Brake pedal Headlight (work lamp) Deck #2... -
Page 15: Warning Label And Operation Label Description
Warning label and operation label description Attach the warning labels and operation labels in the locations that are close to dangerous : Cutting hands or feet parts and in which the labels can be easily seen. Danger If a label is damaged or peels off, attach a new label to the machine. If you do not stop rotating the mower and the engine is not turned off, there is a risk that you will get injured. -
Page 16: Features Of Gm2800A
- 13 - Features of GM2800A Since the five sets of 27-inch rotary mower decks are arranged independently, even it Model GM2800A has the large cutting width of 280 cm, the tracking of the undulation is good and operation is possible without damaging the ground. -
Page 17: Handling Instructions
Inspection of the radiator and coolant level Handling instructions Perform the inspection when the engine is cold. The radiator Caution 1. Inspection before use cap is the pressure type. If the radiator cap is removed when the engine is high temperature, the steam blows off and it may cause burns. -
Page 18: Inspection And Refilling Of Engine Oil
- 15 - Inspection and refilling of engine oil Inspection of the hydraulic oil Level the engine and raise the mower unit. Put the engine on the level surface, and check the level of the oil by the dipstick. It will Always check whether the hydraulic oil level be the proper quantity, if the oil level is is at the center of oil level gauge, and supply... -
Page 19: Inspection Of The Engine And Its Surroundings
Inspection of the engine and its surroundings 2. Fastening of each portion Many parts are fastening by bolts. Bolts and nuts may be loosened some time after initial Please refer to "Operating and instruction manual" for engine for handling operation. Be sure to tighten them by the specified torque. of the engine. -
Page 20: Operation Method Of Each Part
- 17 - 6) Fully turn the ignition key to rightward 3. Operation method of each part promptly when the glow lamp turns off, the starter will operate and the engine will start. Release it as soon as engine starts. Caution About the mechanical operation Engine oil... -
Page 21: Danger
Brake pedal Danger Cautions on fuel handling Turning characteristics at the operation and travelling performance in inclined field are It is highly flammable. Do not smoke when handling fuel. improved by introducing the independent right and left brake pedals. If the brake pedal of the Never fill the fuel tank indoors, and while engine is running or the turning direction is stepped on, it can turn in smaller radius. -
Page 22: Adjustment Of Seat
- 19 - 3-10 Adjustment of seat 3-12 Switches, levers on the operation panel a. Blade rotation switch The seat can be adjusted forward and b. 2WD-4WD changeover switch backward by the seat lever c. Headlight switch Angle adjustment of the reclining backrest d. -
Page 23: Caution
3-14 2WD - 4WD changeover switch 3-16 Throttle lever The 2WD-4WD changeover switch is in the If the throttle lever is pulling up to the top operation panel. When the switch is turned to (HIGH), the engine speed becomes high, and "2WD", it will become two-wheel drive (front if the throttle lever is lowering to the bottom wheel drive), and when it is turned to "4WD",... -
Page 24: Caution
- 21 - 3-18 Differential lock switch 4. Measuring instrument It is located in the right side on the steering column. Instruments of operation panel It is the switch that operates the differential lock of the both front wheels. a. Tachometer & hour meter If the switch is moved to the upper or lower b. -
Page 25: Danger
Fuel gauge Glow lamp It indicates current fuel level. If the fuel gauge Refer to " Starting and stopping the approaches E(Empty), supply fuel (diesel) engine". immediately. The capacity of the fuel tank is approximately 51 Liters. Engine oil Charge Glow pressure Never fill gasoline (Petrol) into the tank. -
Page 26: Mowing Operation
- 23 - 2. Cutting height adjustment by using 5. Mowing operation adjustment plate (3 places per one deck) 1) Loosen the bolts (a total of 6) fastening Adjustment of the cutting the cutting height adjustment plate and the height rotary deck. -
Page 27: Caution
Mowing operation 6. Maintenance of the main unit 1) Pull up the throttle lever and set engine speed to MAX (2,600rpm). (Refer to 3-16 Change of engine oil 2) Release the mower lock lever. (Refer to 3-19 3) Move the mower unit raise/lower lever to the "DOWN" position, and lower the mower Refer to the engine's instruction manual for handling of the engine. -
Page 28: Caution
- 25 - 4) Drain and replace the hydraulic oil if you notice the presence of water or foam in the oil Replacement of fuses (emulsifying), or contamination (lack of transparency). 5) Use the Shell Tellus 46 or equivalent products for the hydraulic oil. 1) Fuse box. -
Page 29: Danger
Inspection of battery Opening and closing the engine hood (R, L) Detach the rubber catch and pull up the Refer to the Battery's instruction manual. engine hood. Hook the engine-hood support on the carrier of the housing inner side; check that the engine hood does not close. -
Page 30: Caution
- 27 - Opening and closing the seat undercover 6-10 Checking operation of the proximity sensor/relay Raise the tilt steering column to the upper There are two proximity sensors. position first, and then move the seat to the It detects the raising and lowering position rear end position. -
Page 31: Maintenance Of The Mower Unit
2) Insert the pin with grip in the fixed hole 7. Maintenance of the mower unit for the maintenance. Grinding and balancing of the rotary blade 1) Grind the edge of the blade on the rotary blade by a grinder. 2) After grinding, use it after maintaining right-and-left balance by using a knife balancer system. -
Page 32: Cautions For Maintenance
Use correct/appropriate parts in good condition. Repair or replace worn or damaged parts immediately. 3. Fix the #4 and #5 deck. Do not modify any mechanical equipments/parts. Use Baroness 1) Start the engine and raise the deck. genuine equipments or parts for safety. -
Page 33: Maintenance Schedule
<Specifications for periodic maintenance> Maintenance schedule Higher than the API service Use the required tools suitable for the purpose of the maintenance. Engine oil capacity MAX: 9.7 L MIN: 7 L classification CD class Including 1 L in reserve tank Coolant capacity Total capacity 12 L Before... -
Page 34: Adjustment Of The Other Functions
- 31 - 9. Adjustment of the other functions 10. Long-term storage Adjustment of the neutral position of piston pump Please refer to the Engine/Battery operation manuals for details. Stay the machine at flat and stable place, then turn the engine off and set the parking brake, lower the mower unit, and remove key from ignition 1) Jack up the machine and put on a stable switch. -
Page 35: Parts Catalogue
MOWER PARTS CATALOGUE Ordering parts All parts in this parts catalogue are controlled by computer. For prevention of delivery of wrong parts, advise us of the catalogue No., code No., and part name. (Example) Catalogue No. Code No. Part Name GM2800-0624ZD step (R) - 32 -... -
Page 36: Frame Parts A
- 33 -... - Page 37 Cat No. Code No. Part Name Remark Cat No. Code No. Part Name Remark - 34 -...
- Page 38 - 35 -...
- Page 39 Cat No. Code No. Part Name Remark Cat No. Code No. Part Name Remark - 36 -...
-
Page 40: Frame Parts B
- 37 -... - Page 41 Cat No. Code No. Part Name Remark Cat No. Code No. Part Name Remark - 38 -...
-
Page 42: Cover Parts
- 39 -... - Page 43 Cat No. Code No. Part Name Remark Cat No. Code No. Part Name Remark - 40 -...
-
Page 44: Front Wheel Parts
- 41 -... - Page 45 Cat No. Code No. Part Name Remark Cat No. Code No. Part Name Remark - 42 -...
-
Page 46: Rear Wheel Parts
- 43 -... - Page 47 Cat No. Code No. Part Name Remark Cat No. Code No. Part Name Remark - 44 -...
-
Page 48: Brake Parts
- 45 -... - Page 49 Cat No. Code No. Part Name Remark Cat No. Code No. Part Name Remark - 46 -...
-
Page 50: Forward/Backward Pedal Parts
- 47 -... - Page 51 Cat No. Code No. Part Name Remark Cat No. Code No. Part Name Remark - 48 -...
-
Page 52: Engine Parts A
- 49 -... - Page 53 Cat No. Code No. Part Name Remark Cat No. Code No. Part Name Remark - 50 -...
- Page 54 - 51 -...
- Page 55 Cat No. Code No. Part Name Remark Cat No. Code No. Part Name Remark - 52 -...
-
Page 56: Engine Parts B
- 53 -... - Page 57 Cat No. Code No. Part Name Remark Cat No. Code No. Part Name Remark - 54 -...
- Page 58 - 55 -...
- Page 59 Cat No. Code No. Part Name Remark Cat No. Code No. Part Name Remark - 56 -...
-
Page 60: Hydraulic Parts A
- 57 -... - Page 61 Cat No. Code No. Part Name Remark Cat No. Code No. Part Name Remark - 58 -...
- Page 62 - 59 -...
- Page 63 Cat No. Code No. Part Name Remark Cat No. Code No. Part Name Remark - 60 -...
-
Page 64: Hydraulic Parts B
- 61 -... - Page 65 Cat No. Code No. Part Name Remark Cat No. Code No. Part Name Remark - 62 -...
-
Page 66: Hydraulic Parts C
- 63 -... - Page 67 Cat No. Code No. Part Name Remark Cat No. Code No. Part Name Remark - 64 -...
-
Page 68: Hydraulic Parts D
- 65 -... - Page 69 Cat No. Code No. Part Name Remark Cat No. Code No. Part Name Remark - 66 -...
-
Page 70: Hydraulic Parts E
- 67 -... - Page 71 Cat No. Code No. Part Name Remark Cat No. Code No. Part Name Remark - 68 -...
-
Page 72: Hydraulic Parts F
- 69 -... - Page 73 Cat No. Code No. Part Name Remark Cat No. Code No. Part Name Remark - 70 -...
-
Page 74: Hydraulic Parts G
- 71 -... - Page 75 Cat No. Code No. Part Name Remark Cat No. Code No. Part Name Remark - 72 -...
- Page 76 - 73 -...
- Page 77 Cat No. Code No. Part Name Remark Cat No. Code No. Part Name Remark - 74 -...
-
Page 78: Hydraulic Parts H
- 75 -... - Page 79 Cat No. Code No. Part Name Remark Cat No. Code No. Part Name Remark - 76 -...
-
Page 80: Lift Arm Front Parts
- 77 -... - Page 81 Cat No. Code No. Part Name Remark Cat No. Code No. Part Name Remark - 78 -...
-
Page 82: Lift Arm Rear Parts
- 79 -... - Page 83 Cat No. Code No. Part Name Remark Cat No. Code No. Part Name Remark - 80 -...
-
Page 84: Deck Parts
- 81 -... - Page 85 Cat No. Code No. Part Name Remark Cat No. Code No. Part Name Remark - 82 -...
-
Page 86: Accessory Parts
- 83 -... - Page 87 Cat No. Code No. Part Name Remark Cat No. Code No. Part Name Remark - 84 -...
Need help?
Do you have a question about the GM2800A and is the answer not in the manual?
Questions and answers