
Subscribe to Our Youtube Channel
Related Manuals for Baroness LM56GB


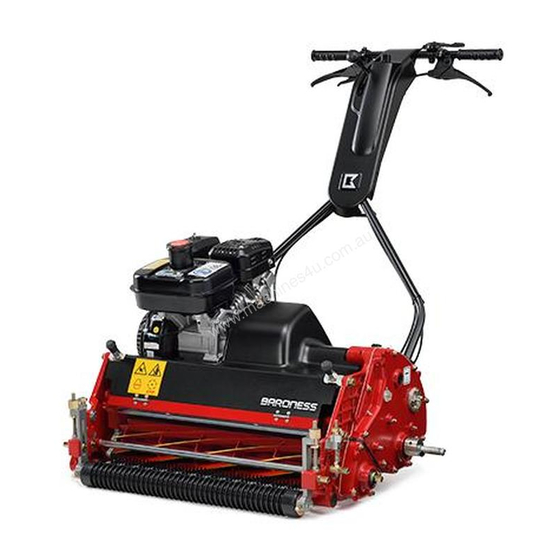
Summary of Contents for Baroness LM56GB
- Page 1 Owner's Operating Manual Greens Mowers Required reading Read this manual and the Owner's Manual for the engine before using the machine. Serial No.31593- (LM56GB) Serial No.31054- (LM66TB) Original Instructions Ver.1.5...
-
Page 2: Table Of Contents
CONTENTS WARNING CONTENTS ………………………………………………………………………………… Brake lever ……………………………………………………… 15 Warning for Safety ………………………………………………………………………… 5-7 Throttle lever ………………………………………………………………………… 15 Greeting ……………………………………………………………………………………… 5-8 [IMPORTANT]Adjustment of engine clutch ……………………………………… 15 Safety precautions ………………………………………………………………………… 5-9 Clutch cover ………………………………………………………………………… 16 Part names ………………………………………………………………………………… 5-10 Travelling wheel …………………………………………………………………… 16 Location of Labels for LM56GA and LM66TA ……………………………………………... -
Page 3: Warning For Safety
Warning for Safety Greeting Warning marks indicate important items for safety. Thank you very much for purchasing BARONESS GREEN MOWER. This Owner's Handling Manual explains the method of correct handling, adjustment, Observe them strictly. and maintenance of the mower. Thoroughly read the manual before operation. - Page 4 Safe Operating Practices ■ Check that operator's presence controls, safety switches, and shields are attached The following instructions include the ones from the CEN standard EN 836:1997,ISO standard 5395:1990, and ANSI B71.4-2004. and functioning properly. Do not operate unless they are functioning properly. ■...
-
Page 5: Maintenance And Storage
4.Maintenance and Storage ■ Stop the engine; ● before refuelling ● before removing the grass catcher; ■ Disengage drives on level ground, lower the attachments, set parking brake, stop ● before making height adjustment unless adjustment can be made from the engine and disconnect spark plug wire. -
Page 6: Safety Precautions
3) Do not operate the machine in such cases. Safety precautions WARNING ● Do not operate the machine when you are tired. If you get tired during machine The lawn mower has a rotating blade reel cylinder (sharp blade), and the safety of operation, stop the work and take a rest. - Page 7 7) Precautions to take during operation 8) Precautions as to inspection ● Check that there is no person or any object that may be broken ● Place the machine on the level ground for inspection and repair. DANGER CAUTION around the machine during operation. Check that all parts are at rest.
-
Page 8: Part Names
Part names Releasing stopper lever Throttle lever Engine switch Handle Main clutch lever Engine switch cord Brake lever Engine Engine clutch cover Head lamp (option) Blade reel Drum wheel Travelling wheel Wheel Shaft Grass catcher Groomer clutch lever Front groomer Front roller... -
Page 9: Location Of Labels For Lm56Ga And Lm66Ta
Location of Labels for LM56GA and LM66TA Right-side of the main unit : BRAKE Mark K4203000970 : Engine oil Warning Mark WARNING K4205001300 : Noise caution Mark It is strongly advised that the operators of this machine wear ear defenders for their protection. - Page 10 : Clutch Mark : Use only unleaded gasoline. : Read the owner's manual. WARNING K4203001040 : Keep a safe distance from the machine. DANGER WARNING : Do not open or remove safety shields while DANGER : Stay clear of the hot surface. engine is running.
-
Page 11: Features Of Lm56Ga/Lm66Ga/Lm66Ta
Features of LM56GB 66GB 66TB Front groomer Dethatching reel Dethatching brush Number of Number of Turning Working width Working width Working width blades blades diameter ● The lightest green mower of all models of this class (cm) (cm) (cm) (cm) ●... -
Page 12: Handling
Handling Installing the stand 1) Temporarily secure the left side of the stand to the frame with the bolt, washer (inside), and nut (outside). 1. Assembly and adjustment of main unit 2) Put the spring on the projection of the frame and the projection at the right edge of the stand. -
Page 13: Confirmation Of The Operation Of Clutch Lever And Brake Lever
Confirmation of the operation of clutch lever and brake lever Check that the clutch and brake operate completely. When adjustment is necessary, make adjustment according to "5-8. [Important] Adjustment of engine clutch section." Latch Connection of engine switch cord Roller bracket When assembling the handle, check the connection of the engine switch cord. -
Page 14: Fastening Of Each Portion
3. Fastening of each portion 4.Engine starting sequence Many parts are fastened by bolts. Bolts and nuts may be loosened some time after WARNING Before starting engine initial operation. Fasten them to the specified torque. Carefully read the gasoline engine operation manual before starting the engine. The handle cover is equipped with an engine switch. -
Page 15: Caution Stopping The Engine
5.Machine operation CAUTION Stopping the engine *Remember the method for stopping the engine in an emergency. Before operation DANGER Main clutch lever ● Check that each portion - especially the brake and clutch - operates 1) Do not grip the main clutch lever. satisfactorily before starting machine operation. -
Page 16: Groomer Clutch Lever
Groomer clutch lever Throttle lever The lever is at the top of the groomer gear case on the outside of the right frame. The throttle lever is on the left side of the handle. The lever controls There are three changeover positions - "Normal rotation" (in the same direction as the the engine speed. -
Page 17: Clutch Cover
5-13 Clutch cover [IMPORTANT] Greasing fasten The clutch cover is on the left side of Periodically fill up respective grease nipples. fastenbolt the engine, covering the engine clutch. Exercise special care when greasing the sections where needle bearings are used. open It is secured by turning the fastenbolt (Intermediate shaft of the right and left gears and the intermediate shaft of the groomer) -
Page 18: Setting The Mowing Height Gauge And Blade Thickness
4) [IMPORTANT] Adjustment of front roller height 5-14 Setting the mowing height gauge and blade thickness Bring the mowing height gauge into contact with the front roller and drum (as shown 1) Set the mowing height gauge at the desired height. The minimum mowing height below), and adjust the height of the bottom blade. -
Page 19: Blade Engagement
6. Blade engagement [IMPORTANT] Engagement 1) Lightly engage the blade reel cylinder and bottom blade uniformly on both sides. Check that the engine is at rest before making adjustment. Grind and adjust the blade reel cylinder and bottom blade entirely so that a 2) Uniformly adjust the bottom blade on the right and left sides. -
Page 20: Cylindrical Grinding And Installation Of Blade Reel Cylinder
Center of cutter pin 1) Replace the bearings and reel shaft seals on both sides of the blade reel cylinder. Use the bearing 30204JRP6 that has the smallest error. Cam adjustment 2) Sufficiently apply grease (EXCELITE EPNO2) to the bearing and seal. (Apply grease to the bearing while turning the roller.) The bottom blade rises 3) Method to fasten nut after installing the blade reel cylinder... -
Page 21: Attaching/Detaching The Bottom Blade Base
Attaching/detaching the bottom blade base Specification for maintenance Remove the bottom blade base arm, and then remove the bottom blade base. Attach the bottom blade base, and then attach the bottom blade base arm. Qty of engine oil 0.6dm (0.6L) Plug NGK BR4HS Bottom blade base arm... -
Page 22: Caution
Precautions for engine operation 9) When the machine is to be stored for a long time exceeding 5 CAUTION months, remove gasoline from the engine. For the engine, refer to the engine operation manual. 1) Use gasoline for automobiles as the fuel of the engine. 10) Engine maintenance schedule To keep the engine in satisfactory status at all times, be sure to conduct maintenance and inspection according to the following... - Page 29 MEMO...
- Page 30 1-26, Miyuki-cho, Toyokawa, Tel : (0533)84-1390 Head Office Aichi-Pref. 442-8530 Japan. Fax : (0533)89-3623 LM56GB--UM--GBZ/15K-00-SPEC...
Need help?
Do you have a question about the LM56GB and is the answer not in the manual?
Questions and answers