Table of Contents
Advertisement
Advertisement
Table of Contents

Related Manuals for US Cutter Copam


Summary of Contents for US Cutter Copam
-
Page 2: Table Of Contents
Contents Welcome ................................... 3 Cutter Parts ..................................4 Front View ..................................4 Detail of Carriage Arm ..............................5 Right Side View ................................5 Back View ..................................6 Detail of Pinch Roller ..............................6 Control Panel .................................. 7 Measure Screen ................................7 Paper Size Screen ................................ - Page 3 Cutting a Simple Design in SignCut ......................... 41 Converting a Raster Image to Vector Image in Inkscape ..................43 Specifications ................................47 Troubleshooting ................................. 48 - 2 -...
-
Page 4: Welcome
This manual is here to help provide a starting point in the learning process of the Copam cutters or to vinyl cutting in general. Please read it thoroughly and follow the steps carefully to help insure a trouble free experience with your new machine. -
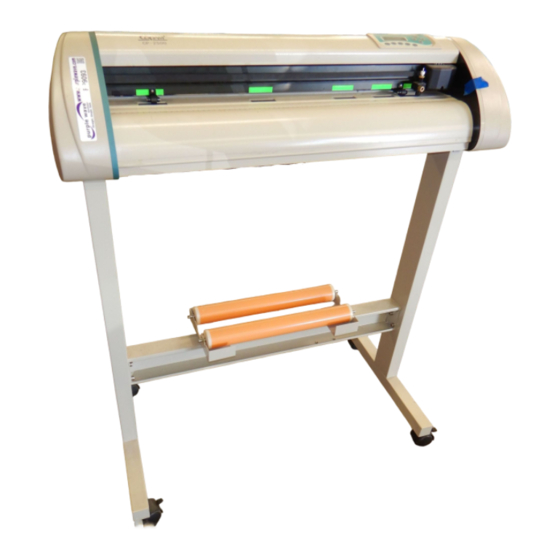
Page 5: Cutter Parts
Cutter Parts Before you start cutting, you should familiarize yourself with the cutter and its basic parts and functions: Front View Control Panel Used to provide input directly to the cutter. Covered in detail in the “Control Panel” (page 7) section of this manual. Carriage Arm Holds the Blade (or Pen) Carriage. -
Page 6: Detail Of Carriage Arm
Detail of Carriage Arm Blade/Pen Carriage Holds the Blade or Pen Slot Carriage in place. Locking Knob Allows access to the Blade/Pen Carriage Slots for exchanging/replacing Carriages. Right Side View Parallel Cable Port* Used to connect a parallel cable from the cutter to a computer. -
Page 7: Back View
Back View Pinch Rollers Holds the media tightly to the feed roller below. Back view shown in detail below. Detail of Pinch Roller (Back View) Tension Screw Adjusts the tension of how tightly the pinch roller is held to the feed roller below. -
Page 8: Control Panel
Control Panel Measure Screen The Measure Screen is the first screen that you will see when starting up the cutter. Select your media type from the menu and then confirm your selection. The cutter will then measure your material and report the cuttable area (in millimeters) on the Paper Size Screen (Next). -
Page 9: Function Select Screen
Function Select Screen The Function Select Screen is the main screen for the cutter. From this screen you can access the Measure and Setup Screens, make test cuts, make a repeat cut of the last cut made by the cutter, or adjust the origin of the of the next cut to be made. -
Page 10: Setup Screen
Setup Screen The Setup screen allows you to view/adjust the main settings for the cutter. You can adjust the speed at which the cutter moves while cutting, the amount of force used to make cuts, and the blade offset which compensates for slight variations in blade sizes. -
Page 11: Jog Screen
Jog Screen The Jog Screen is where the cutter, and the material loaded in the cutter, can be moved to create a new starting location for the next cut to take place from. The X and Y values on this screen will show the amount of movement that has taken place in relation to the initial origin of the cutter. -
Page 12: Pause Screen
Pause Screen The Pause Screen is accessed by pressing the pause button while to cutter is cutting. From the Pause Screen you can enter the Setup Screen to change the main settings of the cutter, cancel the current cut, or exit the pause screen and continue cutting. -
Page 13: Setting Up
Setting up If you are setting up for the first time please take a moment to refer to the Packaging Guide to take account off all the included components and accessories. For help with Stand Assembly, please refer to the included instructions. Selecting a Location for the Cutter The first step to setting up your cutter is finding a good location for the machine. - Page 14 If you are using a Serial or Parallel Cable to connect your cutter to a computer then no further setup is necessary. Simply connect one end of the cable to the cutter and the other end to a computer and setup is complete.
-
Page 15: Installing Signblazer Software
Ignore the warning of only being able to install SignBlazer on one computer. This does not apply since you will be using trial mode and updates are no longer available for the SignBlazer software. When asked what cutter you want to use, select the model that matches your Copam cutter (2500, 4050 or 4500). -
Page 16: Installing Signcut Software
When asked what port your cutter uses, select the Port that corresponds with your setup. If using a USB connection you will need to select the COM port that corresponds with your setup (Noted above from the “Finding Your COM Port” section of the manual). Make sure that your Baud Rate option is set to 9600. -
Page 17: Installing A New Blade
Installing a New Blade Unscrew the Set Brass Ring Remove the Insert the Screw the Adjust the Adjust the cap from the on Blade protective blade into cap back carriage cap Brass Ring Blade Carriage to the cover from the top of onto the until the blade until it fits... -
Page 18: Replacing A Worn Blade
Loosen the locking knob on the Place Blade carriage into the Tighten the locking knob on the carriage arm. carriage arm. carriage arm. Replacing a Worn Blade First remove the blade carriage from the carriage arm, Unscrew the cap of Carefully pinch the the blade carriage blade on both sides... -
Page 19: Installing A Pen Carriage
Installing a Pen Carriage (Optional) Many new users will benefit from practice “cutting” with the optional pen carriage until they are comfortable with normal operations of the cutter and cutting software. Your Pen Carriage should come assembled and appear as it does in this image. If it does not, please refer to the pen replacement section below for assembly instructions. - Page 20 Remove the top cap, the pen and the spring. Replace the pen and/or spring as necessary. Slide the spring onto the pen from the top and insert it back into the pen carriage. Replace the carriage cap and screw into place. Once you are familiar with the cutter and its basic functions, install the blade carriage (next).
-
Page 21: Preparing For Cutting
Preparing for Cutting If you are going to cut from a scrap or single sheet instead of a roll, then skip the next step on placing a roll. All other steps will be the same. Place the roll of media on top of the stand rollers. Release the Pinch Rollers by pulling up on the Pinch Roller Release Levers. - Page 22 Feed the media through the back of the machine, underneath the pinch rollers (if working from a single sheet instead of a roll, the material can also be fed from the front). Adjust the pinch rollers so there is one roller located on each side of the material (and, on models with 3 or more rollers, one roller near the center).
- Page 23 Leave a gap of between ½”-1 ½” from the edge of the roller and the edge of the material on both sides. Make sure that the pinch rollers are only lowered where there is a Feed Roller below. The front of the pinch roller should always be placed along a Feed Roller Guide to made sure that there is a Feed Roller below.
- Page 24 If you would like to change the position of where the cut will be made: Enter the Jog Screen of the cutter (directions for changing menu screens are located in the Control Panel section of the manual starting on page 7). Adjust the vinyl to where you want the cut to start by using the Up and Down Arrow Keys on the Control Panel.
- Page 25 Now hold the Enter button until the origin of the cutter is set. This is the location where the next cut will begin. When choosing a starting location on your cutter, remember that the process will start in the bottom right area of the design.
-
Page 26: Step By Step Instructions
Step By Step Instructions Starting SignBlazer for the First Time Open the SignBlazer Software (The Default location will be in the Programs Folder under “SignBlazer Elements for USCutter”). Navigate to this folder and select “SignBlazer Elements for USCutter”. SignBlazer will attempt to download update files. - 25 -... - Page 27 When it fails, cancel the update process (By Pressing the Cancel button on the error window and then OK on the confirmation window) and the program will start regularly. To override the update process in the future, refer to the Troubleshooting listing titled “When starting the SignBlazer Software it fails to find updates”, located in the Troubleshooting section of the manual (starting on page 48).
-
Page 28: Making A Simple Cut In Signblazer
Now SignBlazer is open and you are looking at the main SignBlazer screen. Making a Simple Cut in SignBlazer You can create images from scratch using the various tools in SignBlazer. For this tutorial, we will be drawing a simple square just to show the steps of making a cut from SignBlazer. Select the Square tool at the top of the window. - Page 29 Now draw a square by clicking first in the main And then moving the mouse to determine the size window… of the square desired, and clicking a second time. Now to cut this simple shape from the cutter: Select Cutter from the top selection menu. This will take you to the cutter screen of SignBlazer Elements where you can see a representation of how your cut will be made when sent to the cutter as well as various cutter options.
-
Page 30: Importing In Signblazer
Since this is a simple cut, no adjustments need to be made here. We can tell the software we are ready to cut by pressing the cut button in the top selection menu… and then pressing “Cut Tile” in the Cut Tile window: When you are finished, you can go back to the main SignBlazer screen by pressing the Finish button in the top selection menu. - Page 31 You can import to SignBlazer one of two ways: Using the Clipboard You can import from the clipboard by first copying or cutting an image opened from another software program, and then placing it into SignBlazer by selecting Clipboard Paste from the Edit drop down menu. Images imported via Clipboard Paste may not retain the same dimensions that they held in another software program.
- Page 32 Then Select the image to import, And select the OK button. If you are having trouble locating your file, make sure that the file type is selected from the “List Files of Type” menu, or that “All Graphic Files” is selected. If the file imported is already a vector image then it is now ready to cut or be further edited within SignBlazer.
-
Page 33: Converting A Raster Image To Vector Image In Signblazer
Converting a Raster Image to Vector Image in SignBlazer The difficulty of converting a raster image to a vector image will vary greatly depending on the amount of contrast in the image. The portion of the image to be cut should be darker than the background or surrounding area and should have a significant amount of contrast and separation from the rest of the image. - Page 34 The “Convert Image to monochrome” window will appear. Now you can adjust the Threshold Level slider. Where you place the slider will determine how much of the image will be included in the monochrome conversion (which is to become the image that will be cut). Anything darker than the level set on the Threshold slider will be included in the cut and anything lighter will not.
- Page 35 And press the OK button on the Vectorise Image window. You are now left with 1 monochrome image and 1 vectorized image. This may be difficult to see as they are probably layered directly on top of one another. If you grab one image and drag it you will see the other image left behind.
-
Page 36: Starting Signcut And Inkscape For The First Time
Starting SignCut and Inkscape for the First Time Open the SignCut software (The Default location will be in the Programs Folder under “SignCut Productivity Pro”). Navigate to this folder and select “SignCut”. The first time that you run SignCut you will be prompted with a Setup Wizard. Follow the onscreen instructions, entering your License number that you received when you registered and downloaded SignCut. - Page 37 Then Select your Manufacturer, Cutter model and Connection method. Setup will then be completed and you will be taken to the main SignCut screen. We can now let SignCut run in the background while we do our design work in Inkscape (or another preferred vector image software).
-
Page 38: Creating A Simple Design In Inkscape
Creating a Simple Design in Inkscape You can create images from scratch using the various tools in Inkscape and then cut them from SignCut. For this tutorial, we will be drawing a simple square just to show the steps of sending files from Inkscape to SignCut and then making a cut. - Page 39 surrounding the shape with a square symbol in two of the corners and a circle in another like the image below. If the shape is not selected, make sure you are still using the square tool and click on the shape to select it. Select the Fill tab from the Fill and Stroke panel.
- Page 40 Now from the Stroke Paint tab select “No Paint”. The object is now ready to be saved so that it can be opened and cut from SignCut. Select File>Save As from the top menu. Select a name and location for your file (Here we have chosen the name “rectangle” and are going to save to our desktop).
- Page 41 Then select “Encapsulated Postscript (*.eps)” from the drop down menu at the bottom of the window. For a simple design you will most likely not need to check any of the boxes in the Encapsulated Postscript window. Uncheck all boxes and select “Ok”. In the next section, “Cutting a Simple Design in SignCut”...
-
Page 42: Cutting A Simple Design In Signcut
Cutting a Simple Design in SignCut In SignCut Select File>Open. Locate your file in the window and select “Open”. You will see the shape that you created in the main window of SignCut. Please make sure that your cutter is on and ready to cut before proceeding. See the “Preparing for Cutting” section of the manual (page 20). - Page 43 Select the color that you would like to cut from the color selections on the right. If you are following from the previous section, “Creating a Simple Design in Inkscape” you should have only one color. If you are working from another file you could have many different colors. Since we are making a simple cut, no other settings or options need to be adjusted here.
-
Page 44: Converting A Raster Image To Vector Image In Inkscape
Converting a Raster Image to Vector Image in Inkscape If you already have designs finished that need to be cut and are in a vector format, such as .ai, .eps, .svg etc. you can cut them by following the instructions in the previous section, “Cutting a Simple Design in SignCut”. If they are in a raster image format then they can be converted to vector for cutting depending on their level of detail. - Page 45 Then click on the image. You can tell an image is selected when it shows a dotted border and multiple sets of arrows surrounding its parameter. With the image selected, select Path>Trace Bitmap from the top menu. The “Trace Bitmap” window will appear. Make sure the Brightness cutoff radio button is selected.
- Page 46 Then close the Trace Bitmap window by pressing the close button on the top right of the window. If you are unsure what amount to use you can try a variety of numbers and preview how the vector image will look by pressing the Update button below the Preview window.
- Page 47 The object is now ready to be saved so that it can be opened and cut from SignCut. Select File>Save As from the top menu. Select a name and location for your file (Here we have chosen the name “USC_logo” and are going to save to our desktop).
-
Page 48: Specifications
Specifications Maximum Paper Feed Width CP-2500(24 inch model) - 24 inches (610mm) CP-3050(35 inch model) - 36 inches (915mm) CP-4050(48 inch model) - 48 inches (1220mm) CP-4500(54 inch model) - 54 inches (1370mm) Maximum Cutting Width CP-2500(24 inch model) - 23.2 inches (592mm) CP-3050(35 inch model) - 35 inches (890mm) CP-4050(48 inch model) - 46.9 inches (1190mm) CP-4500(54 inch model) - 53.2 inches (1350mm) -
Page 49: Troubleshooting
Troubleshooting Problem Solution The cutter is unresponsive to Communication issues can arise if the cutter was powered on while communications from the the software is trying to send data to the cutter. This is most computer and software. common when using SignBlazer software. Exiting the cutter screen of SignBlazer and returning to the main SignBlazer screen may resolve this issue. - Page 50 When starting the SignBlazer This is a regular occurrence of the SignBlazer software and should Software it fails to find not be considered a problem. All features of the software will updates. continue to work in trial mode without updates. To deactivate the update process, redirect the SignBlazer shortcut (of either the desktop icon or start menu selection that you use to open the SignBlazer software).
Need help?
Do you have a question about the Copam and is the answer not in the manual?
Questions and answers