Advertisement
Quick Links
Download this manual
See also:
User Manual
C A B L E M O D E M / R O U T E R W I T H
W I R E L E S S - N Q U I C K S T A R T
This Quick Start describes how to connect the Cable Modem/Router with Wireless-
N to a cable modem service as an Internet gateway for computers and/or other local
wireless or Ethernet-capable devices. More detailed information, including
information about advanced features, is in the User Manual on the CD.
Package Contents
•
Cable modem/router
•
Power cord
•
Ethernet RJ-45 cable
•
CD with User Manual
Before Installing Your Cable Modem
Your cable service provider needs to know your modem's MAC ADDRESS, which is
printed on a label on the bottom of your modem. You can provide this when you
order cable modem service; or if you already ordered service, by calling the cable
company BEFORE installing your modem. You may also be asked for your cable
modem's model name and number, which is ZOOM 5350. If you need the modem's
serial number, you can find it near the MAC address on the modem's label.
System Requirements
• You need to connect the cable modem to a cable modem service that uses any
of the popular DOCSIS standards – 3.0, 2.0, or 1.1. If you need to get cable
modem service, please speak with your cable service provider.
• To use this Quick Start, you need a computer, an iPad or another tablet.
If your cable service provider provided a cable modem starter kit, please continue
below. If you don't have or choose not to use the cable modem starter kit from your
service provider, go to How to connect to a computer if you don't have or
choose not to use a cable modem starter kit.
If your cable service provider provided a cable modem starter kit
Some cable service providers supply a cable modem starter kit that can be useful
when you install your cable modem. The kit may include a coaxial cable for
connecting between a wall jack and your cable modem. (These are also available at
most electronics retailers.) The kit will include instructions, and may also include a
CD with software. If you receive a kit like this, we recommend that you read the kit's
instructions and use them to install your Zoom cable modem/router. This modem is
DOCSIS 3.0 certified by CableLabs, and connects like a normal cable modem.
You will need to plug in the modem's power cord, connect to cable modem service
using a coaxial cable, and then connect to a computer using either the included
Ethernet cable or the wireless feature (see Using the Cable Modem/Router to
Make a Wireless Connection).
Note: Please refer to the Hardware Connection section if you would like to see a
diagram of the back of the cable modem and a description of the connections.
After you have installed your cable modem and it has synchronized itself with the
cable network, your cable modem can connect your computer to the Internet.
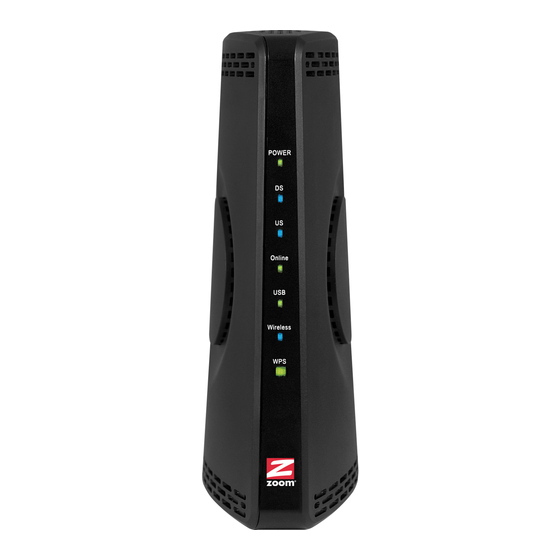
Note: Allow 5 to 30 minutes to power up the first time because the cable
modem/router must locate and connect to the appropriate channels for
communication. You'll see the DS, US, and/or Online modem lights flashing until the
Online light stays steady green to signal success.
Now open your browser and go to a familiar Web site to check that the cable
modem is working.
If you want to connect the modem/router wirelessly to some device, see
Connecting the Cable Modem/Router Wirelessly to Some Device.
If you want to connect additional computers/devices using the
modem/router's Ethernet/LAN ports, please see Read This Only if You
Are Connecting Additional Computers and/or Other Devices to the
Cable Modem/Router's Ethernet ports.
If you want to configure advanced options, please refer to the User Manual
on the CD.
How to connect to a computer if you don't have or choose
not to use a cable modem starter kit
1
Be sure your computer is on and the cable modem is unplugged.
Note: Please refer to the Hardware Connection section if you would like to see
a diagram of the back of the cable modem and a description of the connections
as you read the following steps.
2
Connect one end of the coaxial cable to the cable outlet or splitter. Connect the
other end of the coaxial cable to the Cable connector on the rear panel of the
cable modem. Hand-tighten the connectors to avoid damaging them.
You can connect a coaxial cable between an open cable service wall jack
and the cable modem. (If no wall jack is available, you can use a coaxial
T connector or splitter.)
Alternatively, there may already be a coaxial cable that is connected to
service and that has an open end for connecting to the cable modem.
3
Plug the power cord into the AC IN connector on the rear panel of the cable
modem and into the electrical outlet. This turns the cable modem on. Check if
the Power LED lights up.
4
For initial setup we recommend that you connect the provided Ethernet cable to
any Gigabit Ethernet port (GE / LAN 1, 2, 3, or 4) on the rear panel of the
cable modem/router and connect the other end to the Ethernet port on your
computer. If you want to connect your computer wirelessly instead, see
Connecting the Cable Modem/Router Wirelessly to Some Device.
™
Note: Allow 5 to 30 minutes to power up the first time because the cable
modem must locate and connect to the appropriate channels for
communication. You'll see the DS, US, and/or Online modem lights flashing
until the Online light stays steady green to signal success.
Now open your browser and go to a familiar Web site to check that the cable
modem is working.
If you want to connect the modem/router wirelessly to some device, see
Connecting the Cable Modem/Router Wirelessly to Some Device.
If you want to connect additional computers/devices using the
modem/router's Ethernet/LAN ports, please see Read This Only if You
Are Connecting Additional Computers and/or Other Devices to the
Cable Modem/Router's Ethernet ports.
If you want to configure advanced options, please refer to the User Manual
on the CD.
Please note the following:
•
Do not block the modem/router vents in any way.
•
Do not use the modem where it's very hot or very cold.
•
Place the cable modem/router in a vertical orientation (using the "feet" at the bottom
of the unit to create a stable placement). The Power LED on the front panel should
be at the top of the unit.
Hardware Connection
GE/ LAN 1-4
USB RESET Cable AC IN
Port
Description
GE 1-4
Four 10/100/1000 auto-sensing RJ-45 ports.
(Gigabit Ethernet 1-4
Connect devices on your LAN (Local Area
Network) such as a computer, hub or switch to
also known as LAN
these ports.
1-4)
USB
The USB port is for manufacturer's use only.
Use this button in the unlikely event that you
want to restore the default factory settings. This
RESET
button is recessed to prevent accidental resets of
your cable modem/router.
Cable
Connect your coaxial cable line to this port.
AC IN
Connect the supplied power cord to this port.
Connecting the Cable Modem/Router Wirelessly to Some Device
®
Your cable modem/router has wireless-N for WiFi
compatible connection to your
computer and/or other devices. The cable modem/router comes set up by default
with WPA/WPA2 security, and this can be changed if you like.
For those computer(s) and/or device(s) that support WPS, see Using WPS to set
up your wireless network. (Windows 7 SP1 (Service Pack 1) or the latest updates,
or Windows Vista SP2 (Service Pack 2) support WPS.) For those computer(s)
and/or device(s) that do support WPA/WPA2 but that don't support WPS, enter the
default SSID and Pre-Shared Key below in the wireless network portion of the
device's configuration menus.
Note: Typically, tablets like the iPad and e-readers don't support WPS but do
support WPA/WPA2.
Default Wireless Security Settings
The default SSID is: ZOOM
The default Pre-Shared Key is: zoom#### where #### represents
the last 4 characters of the Cable MAC address of the unit, which
can be found on the label on the bottom of the cable modem/router.
Note: If you want to change the default SSID and Pre-Shared Key, please refer
to the User Manual on the CD for instructions.
In the unlikely event that one or more of your devices only supports WEP security, please
refer to the User Manual on the CD for instructions on how to configure WEP security.
Using WPS to set up your wireless network
If all the WiFi compatible wireless devices on your network support WPS:
1
Press the WPS LED pushbutton on the front panel of the router for 5 seconds.
The WPS LED should blink green.
2
Within 2 minutes (before the WPS LED light turns off), press the WPS button on
the device that you're linking wirelessly to the modem/router. The button may be
a physical pushbutton on the device or a button on a page of the device's
wireless network configuration menus.
3
Congratulations! You should now have a secure connection between the
router and a device. Now is a good time to check that your device's Internet
connection is working. Open your browser and go to a familiar Web site. If you
are able to connect, continue with the next step below.
If you are not able to connect to the Internet, go to
4
If you have other devices whose WPS security you need to set, repeat steps 1
through 3 for each device. When they are all set, go to step 5.
5
Your basic setup for local wireless devices is complete.
Note: If you want to change the default SSID and Pre-Shared Key, please refer to
the User Manual on the CD for instructions.
Read This Only if You Are Connecting Additional Computers and/or
Other Devices to the Cable Modem/Router's Ethernet/LAN ports
You can plug up to four computers, game consoles, or other Ethernet-capable devices into
the cable modem's LAN ports. For information about your specific device, please refer
Troubleshooting Tips
.
Advertisement

Related Manuals for Zoom 5350


Summary of Contents for Zoom 5350
- Page 1 WPA/WPA2 but that don’t support WPS, enter the modem's model name and number, which is ZOOM 5350. If you need the modem's modem and into the electrical outlet. This turns the cable modem on. Check if default SSID and Pre-Shared Key below in the wireless network portion of the serial number, you can find it near the MAC address on the modem's label.
- Page 2 Quick Start for each computer or other device. Your Zoom cable modem has several lights on its front panel to help you monitor the We encourage you to register your product and to notice the many support options available cable modem/router’s status.
Need help?
Do you have a question about the 5350 and is the answer not in the manual?
Questions and answers