SORG Mio User Manual
Hide thumbs
Also See for Mio:
- User manual (36 pages) ,
- Service record (32 pages) ,
- Instructions for use manual (44 pages)
Table of Contents
Advertisement
Quick Links
Advertisement
Table of Contents

Related Manuals for SORG Mio


Summary of Contents for SORG Mio
- Page 1 User Manual & Service Book...
- Page 2 Technical alterations and misprints excepted. SORG Rollstuhltechnik GmbH + Co.KG Benzstraße 3-5 68794 Oberhausen-Rheinhausen © by SORG Rollstuhltechnik GmbH + Co.KG Fon +49 7254 9279.0 Benzstraße 3-5, 68794 Oberhausen-Rhein hausen. Fax +49 7254 9279.10 All texts and pictures are subject to copyright Mail info@sorgollstuhltechnik.de...
-
Page 3: Table Of Contents
Mio Inhaltsverzeichnis 5.10 Reuse 5.11 Tyre change 6. Technical data 1. General Preamble 6.1 Measures and dimensions 1.1 Preamble 6.2 Meaning of labels 1.2 Reception 7. Warranty 1.3 Specifications 1.4 Application 8. Service book 1.6 Wheelchair overview 8.1 Maintenance due every 6 months 2. -
Page 4: General Preamble
User manual Mio... -
Page 5: Preamble
1.1 Preamble PleASe nOTe This user manual is intended for both you and Mio will be your child’s reliable companion in their your rehabilitation engineer. It contains instruc- everyday life. For this purpose, your child has to tions on the correct adjustment of the medical aid... -
Page 6: Reception
1.2 reception 1.3 Specifications Each SORG wheelchair is mounted and tested Mio is a small, lightweight activity wheelchair. for functional efficiency and freedom from defects It is available in two rigid frame versions (Ret- by our specialists and is then packaged in special ro and Taurus) with adjustable seat inclination, paperboard containers by our shipping experts. -
Page 7: Application
Frame size 2 (22“ wheel) Frame size 3 (24“ wheel) 1.4 Application Mio is suitable for both indoor and outdoor use. It is designed exclusively for the walking im- paired or abatic child or adolescent to whom the wheelchair has been adjusted by a qualified spe- cialist, for individual use in self-transportation or transportation with an assistant. -
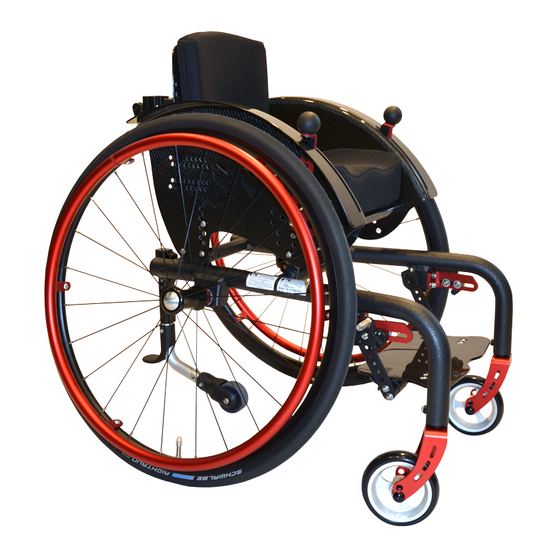
Page 8: Wheelchair Overview
User manual Mio 1.6 Wheelchair overview The most important components 1. Frame 2. Seat plate 3. Seat cushion 4. Locking brake - operating element 5. Wheel guards 6. Side part 7. Back cushion 8. Locking brake - pressing element 9. Foot rest holder 10. -
Page 9: Safety Instructions
Profile wheels with integrated handrims or spoke your new Mio into service. It is of utmost impor- covers (optional devices) reduce the risk of finger tance that both the user and their assistant are injuries. -
Page 10: How To Avoid Tipping
User manual Mio 2.3. How to avoid tipping initial stability test and do not lean out too far. Avoid using the foot rest when getting in or ATTenTIOn out of your wheelchair for it might tip forward. If The locking brake cannot usually be used... -
Page 11: Heat And Water
Mio 2.6 Driving in road traffic the inside while using lifts and lifting plates and while surmounting offsets. Keep in mind that as a driver/passenger in ATTenTIOn your wheelchair you are a “participant in public Before pulling a person seated in a traffic”... -
Page 12: Adjustments
The following indications on the adjustments plete thigh rests (with a two finger distance bet- of Mio affect its usage safety! Every technical ween seat and hollow of knee) evenly on the se- device inherits safety risks in everyday usage. -
Page 13: Leg Support Hinged
Mio 3.1.2 leg support hinged, Adjustment of the angle By changing the distance between the footrest central mounting and the carrier pipes (image 3, pos. 1), you may change the angle of the footrest by ± 15°. Adjustment of the lower leg length • loosen screws (pos. 1) -
Page 14: Seat Height & Seat Inclination
User manual Mio 3.2 Seat height & seat inclination ATTenTIOn When adjusting the seat height on the By modifying the seat angle support, the seat front, you should always make sure that height may be altered by 4.5 cm in 1.5 cm-steps. - Page 15 Mio b. Setting off the back support angle • remove screw joints (image 2, pos. 1) and image 1 distance bushes (image 2, pos. 2) on both sides • mount distance bushes between side part (image 2, pos. 3) and side part retainer (image 2, pos.
-
Page 16: Centre Of Gravity
User manual Mio 3.4 centre of gravity ATTenTIOn even if the anti-tipper is activated and image 1 there is actually no danger, a beginner may be unsettled or even demotivated if the wheelchair’s adjustments make it too prone to tipping! -
Page 17: Seat Depth
3.8 Adjustment of caster and rear sides and place seat plate (image 3, pos. 2) in- wheel to the desired position • tighten screw joints firmly Because of its firm wheel base, Mio is free of adjustments concerning the caster–rear wheel– constellation. -
Page 18: Standard Brake
• if necessary, loosen screw joints of the cable Each Mio is equipped with two cable brakes in the brake (image 2, pos. 1) clothing guards. They exclusively serve the purpo- • adjust brakes so the distance between the... -
Page 19: Attendant Brake (Optional)
Mio 3.9.2 Attendant brake (optional) 3.10 Anti-tippers The anti-tippers prevent your wheelchair tip- ping backwards unintentionally. Correct adjust- image 1 ments are hence very important for the function of the anti-tipper. The correct distance to the ground is 2-5 cm. -
Page 20: Head Rest (Optional)
User manual Mio 3.11 Head rest (optional) Further adjustments can be done via the small Our head rests may be adjusted in height, wheel at the back of the anti-tipper. depth and angle. image 1 image 2 • loosen screws (image 1, pos. 1) on both sides • remove screws (image 1, pos. -
Page 21: Abduction Wedge (Optional)
Mio 3.12 Abduction wedge (optional) 3.13 Pelvic belt The abduction wedge is supposed to keep the thighs apart. For children with too much tonicity Mounting of the pelvic belt in their legs this is often beneficial in order to at- image 4 tain better overall tonicity. -
Page 22: Handling/Operation
Back height adjustment The following indications on the operation cf. chapter 3.7, p. 17 of Mio in everyday life are directed to you as a user of the wheelchair and are supposed to help Seat depth adjustment you to use the individual functions of the techni- cf. -
Page 23: Extendable Push Handles / Push Bar (Optional)
Mio 4.2 extendable push handles / Single-hand push handle (optional) push bar (optional) We offer three options to push Mio: image 3 - extendable push handles - single-hand push handle - push bar image 1 When playing with other children, it is strongly... - Page 24 • close control lever (left hand side image 1, push handle/push bar for the wheelchair pos. 1) may tip backwards due to the altered cen- tre of gravity. PleASe nOTe Keep in mind that the swivel arm may influ- ence Mio’s proneness to tipping.
-
Page 25: Anti-Tipper
Mio 4.3 Anti-tipper 4.4 Wheels with quick-release- axles The anti-tipper is stored in a rotatable position within the frame adapter (image 1, pos. 1). The quick-release-axles provide that all of our rear wheels are easily demountable and attachab- le without using any tools. -
Page 26: Foot Rest, Hinged (Optional)
User manual Mio 4.5 foot rest, hinged (optional) Angle adjustment ATTenTIOn To get into your wheelchair, if possible, hin- By altering the distance between the ge the footrest backwards (after having arrested foot rest and the guide pipes (image 3, pos. -
Page 27: Locking Brake
Mio 4.7 locking brake ATTenTIOn Do not eVer let your child get into the wheelchair via the foot rest for it may tip 4.7.1 locking brake, standard forwards and harm your child considerably. Each wheelchair is usually equipped with two (exception as described in 2.3.) -
Page 28: Therapy Table (Optional)
User manual Mio 4.8 Therapy table (optional) The therapy table can be adjusted to a wide variety of needs. image 1 Height adjustment Loosen screw (image 1, pos. 1), place therapy table into desired position, tighten screw firmly. Depth adjustment Loosen clamping lever (image 1, pos. -
Page 29: Outdoor Front End (Optional)
Mio 4.9 Outdoor front end (optional) image 3 Improves the handling characteristics for pas- sive and active driving outdoors. image 1 image 4 • activate locking brake • tilt wheelchair slightly • insert cone tube (image 2, pos. 1) of the outdoor-front-end into the holding plate (image 2, pos. -
Page 30: Safety Of Transportation
ATTenTIOn Please arrest Mio via suitable measures (e.g. ATTenTIOn belts) in the vehicle in order to prevent it (or parts risk of injury through impermissible usa- of it) from injuring the passengers in case of sud-... -
Page 31: Disinfection
Mio with a touch up applicator available in the specia- nufacturer are to be minded and followed strictly. lised trade (apart from metallic and dormant co- lours). PleASe nOTe Before disinfecting your wheelchair, ple- PlASTIc PArTS ase clean all pads and handles in the way indicated. -
Page 32: Checklist And Maintenance
User manual Mio 5.4 checklist and maintenance WHen WHAT cOMMenTS Before each use check wheels/quick-release- Conduct yourself or with the help of an experi- axles for firm fit enced assistant. You must not be able to pull the wheel out of the quick-release- axle. -
Page 33: Checklist Yearly Inspection
Mio WHen WHAT cOMMenTS Every check frame for cracks, cor- To be conducted by the medical supply store! rosion and damage months (de- Please remove seat and back unit as well as pending leg support and side guards / clothing guard driving perfor- for better exterior visual control. -
Page 34: Service
User manual Mio Plastic and textile parts may be recycled as well. 5.6 reparations Please do never conduct reparation and/or 5.10 reuse maintenance work yourself, but turn trustfully to Before every reuse, the wheelchair must un- your medical supply store. The staff there is intro-... -
Page 35: Technical Data
Mio between tyre cover and rim Casters: 4“, 5“, 5.5“ • check fit of the valve Types: transparent with LEDs • first, inflate the tyre just as much so you can Solid rubber black, alu rims still impress it with your thumb PU grey, synthetic rims • check the fit of the tyre on the rim. -
Page 36: Meaning Of Labels
User manual Mio 6.2 Meaning of labels The elements of the type plate on the axis of Miro have the following meanings: This product conforms to the EC guidelines 93/42/EEC for medical aids. -
Page 37: Warranty
Medical Aid Act and possess the respective CE marking (customized products excluded). II. extent of warranty SORG grants a period of warranty of 5 years Durability after first use on replacement parts and diago- nal braces, considering the conditions in section... - Page 38 • if SORG assesses that the instructions of main- scription explaining how the incident came about. tenance and usage have not been followed;...
-
Page 39: Warranty Form
Mio WArrAnTY fOrM Please fill in and, if necessary, make a copy and send in. Our staff has constructed and examined this Please glue in the duplicate of the type plate he- wheelchair most thoroughly for you! For this we bail with our signature. -
Page 40: Service Book
User manual Mio 8. Service book 8.1 Maintenance due every 6 months Maintenance at check and readjust all screw joints including spokes; check and, issue: where needed, readjust locking brakes/drum brakes; check and readjust all frame parts and welded joints... -
Page 41: Yearly Inspection
Mio 8.2 Yearly inspection Yearly maintenance According to check list on p. 33 f. Date, Stamp medical supply store, Signature Date, Stamp medical supply store, Signature Date, Stamp medical supply store, Signature Date, Stamp medical supply store, Signature... -
Page 42: Retailer Information
User manual Mio Retailer information Your specialized trade Company Stamp...
Need help?
Do you have a question about the Mio and is the answer not in the manual?
Questions and answers