
Related Manuals for SORG Jump beta


Summary of Contents for SORG Jump beta
- Page 1 Instructions for use Jump beta Jump beta Jump beta Sport and BSA frames Sport and BSA frames Instructions for use Instructions for use 2024-10-16 Instructions for use Jump beta Unique people, unique solutions 1 of 52...
- Page 2 Imprint SORG Rollstuhltechnik GmbH + Co. KG Benzstrasse 3-5 68794 Oberhausen-Rheinhausen / Germany Phone +49 7254-9279-0 +49 7254-9279-10 E-Mail info@sorgrollstuhltechnik.de www.sorgrollstuhltechnik.de Revision status 2024-10-16 Technical status Technical changes and misprints reserved. The pictures in this Instructions for use can differ from the actual equipment components.
- Page 3 3.7.2 Foldable footrest with locking mechanism 3.7.3 Detachable and swivelling leg support (Jump beta BSA) 3.8 Handling brake 3.8.1 General information regarding brakes 35 3.8.2 Wheel lock 3.8.4 Reverse-roll locking 3.8.3 Drum brake 2024-10-16 Instructions for use Jump beta 3 of 52...
- Page 4 4 of 52 Instructions for use Jump beta 2024-10-16...
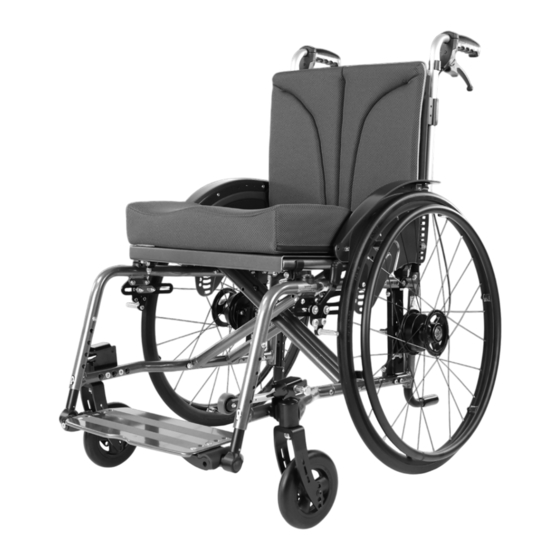
- Page 5 4 desk side guard 5 seat cushion 6 wheel lock 7 frame BSA 8 continuous leg support 9 caster fork 10 caster 11 anti-tipper 12 rear wheel 13 handrim 14 quick-release axle 2024-10-16 Instructions for use Jump beta 5 of 52...
- Page 6 2 General information 2.1 Preface A warm welcome to the SORG family – many thanks for the trust you have placed in us and for choosing our product. This wheelchair has been individually tailored to meet your specific requirements. You will find the usage and adjustment instructions below so that you can use the wheelchair in everyday life without tools.
- Page 7 Steps to be taken on both sides 2024-10-16 Instructions for use Jump beta 7 of 52...
- Page 8 2 General information 2.2.2 Intended purpose The Jump beta is a light and manoeuvrable active wheelchair designed for indoor and outdoor use. km/h The wheelchair is designed solely for the transport of the person for whom it has been specially adapted by a qualified specialist dealer.
- Page 9 The risks listed as examples below may occur when dismantling the following parts/ accessories: • Cushions: lack of hygiene / pressure points • Headrest: loss or missing headrest during transport • Driving wheels: loss of the back (use of wheelchair not possible) 2024-10-16 Instructions for use Jump beta 9 of 52...
- Page 10 90° max 7° Inclines, downward gradients and obstacles 90° max 7°/ 12% max 7°/ 12% 10 of 52 Instructions for use Jump beta 2024-10-16...
- Page 11 The Jump beta in the Sport and BSA variants has been successfully tested in accordance with ISO 7176-19 and is therefore approved for use as a seat in a motor vehicle provided that it is fitted with the necessary restraint systems.
- Page 12 ISO 7176-19. No transport with the wheelchair facing sideways! Immediately contact your authorised dealer after a collision to check the carriage, frame and brakes and have any damage repaired by a specialist without delay. 12 of 52 Instructions for use Jump beta 2024-10-16...
- Page 13 > 42°C When configuring the wheelchair, pelvic restraints (lap belts as positioning aids) can be option- ally purchased via the SORG order sheets or by ordering from the replacement parts catalogues. Your specialist dealer will carry out the assembly. The product may interact with electromagnetic fields (e.g. shop antitheft devices) in individual cases.
- Page 14 In combination of wheelchair and electric auxiliary drive, certain strains occur that can lead to damage to the wheelchair. Slowly approach abstacles and carefully overcome them so that little force is applied to the casters, rear wheels and the wheelchair as a whole. 14 of 52 Instructions for use Jump beta 2024-10-16...
- Page 15 (2) After insertion, the locking ball (A) must be visibly protruding. Pull at least 1x after each insertion to test whether the quick-release axle is engaged. It should no longer be possi- ble to pull the wheels outwards. 2024-10-16 Instructions for use Jump beta 15 of 52...
- Page 16 3.1 Handling driving wheel 3.1.4 Double hand rim-wheels Insert: 90° (3a) (3b) Remove: Proceed accordingly in reverse order (2a) (2b) 16 of 52 Instructions for use Jump beta 2024-10-16...
- Page 17 Incorrectly adjusted swivel casters or excessive speed can cause the casters to flutter. Immediately slow down at the first sign of fluttering and have the swivel casters readjusted by a specialist dealer. 3.2.2 Caster track lock Unlock: 90° Lock: 90° 2024-10-16 Instructions for use Jump beta 17 of 52...
- Page 18 Only activate the (seating unit) tilt mechanism or angle adjustment with the brakes applied. 3.3.2 Fixed seat plate (SeatFix) Insert (remove: proceed accordingly in reverse order): 18 of 52 Instructions for use Jump beta 2024-10-16...
- Page 19 3.3 Handling seat and back 3.3.3 Fixed seat plate with locking mechanism (SeatFix) Lock: 180° 180° Unlock: 180° 180° 2024-10-16 Instructions for use Jump beta 19 of 52...
- Page 20 3.3 Handling seat and back 3.3.4 Firm curved back plate Lock: (3a) 90° (3b) Unlock: (2a) (2b) 90° 20 of 52 Instructions for use Jump beta 2024-10-16...
- Page 21 3.3 Handling seat and back 3.3.5 Back with raster Shift: The anti-tipper must always be activated before a new back angle position is used. (3a) (3b) Fold down (straighten: proceed accordingly in reverse order): 2024-10-16 Instructions for use Jump beta 21 of 52...
- Page 22 3.3.6 Back with gas pressure spring Shift: 3.3.7 Back extension Pull out (lower: proceed accordingly in reverse order): The lowerable back extension is not suitable as a headrest in a motor vehicle! 22 of 52 Instructions for use Jump beta 2024-10-16...
- Page 23 3.4 Handling side guard 3.4.1 General information regarding side guard Open/ swivel away and remove: Close: Proceed accordingly in reverse order: 3.4.2 Arm rests Set height: 2024-10-16 Instructions for use Jump beta 23 of 52...
- Page 24 (4a) (4b) (1a) The notch (A) of the stabiliser bar must be seated up to the stop in the guide of the eccentric clamp (B) and this must be firmly closed. 24 of 52 Instructions for use Jump beta 2024-10-16...
- Page 25 3.5 Handling folding up and unfolding 3.5.2 of seat and back cover Fold up (unfold: proceed accordingly in reverse order): 2024-10-16 Instructions for use Jump beta 25 of 52...
- Page 26 3.5 Handling folding up and unfolding 3.5.3 of SeatFix and/or firm curved back plate Fold up (unfold: proceed accordingly in reverse order): 26 of 52 Instructions for use Jump beta 2024-10-16...
- Page 27 It must not be possible to move the pushing aids in the intake with the eccentric clamp(s) in the closed position. Set the eccentric clamp: (2b) (2a) reinforce tensioning force reduce tensioning force (4a) (4b) 2024-10-16 Instructions for use Jump beta 27 of 52...
- Page 28 3.6 Handling pushing aid 3.6.2 Push handles Set height: (4a) (4b) Insert (remove: proceed accordingly in reverse order): (4a) (4b) 28 of 52 Instructions for use Jump beta 2024-10-16...
- Page 29 3.6 Handling pushing aid 3.6.3 Handle bar Swivel up (swivel out: proceed accordingly in reverse order): (3b) (3a) The handle bar is only intended for pushing, not for pulling or overcoming obstacles. 2024-10-16 Instructions for use Jump beta 29 of 52...
- Page 30 3.7 Handling leg support 3.7.1 General information regarding leg supports Types of leg supports and their handling: Model 1: Model 2: Model 3: Model 4: Model 6 Jump beta BSA: Model 5: 30 of 52 Instructions for use Jump beta 2024-10-16...
- Page 31 Outdoor attachment Lock (unlock: proceed accordingly in reverse order): As the occupant, make sure that you do not lean too far out of the wheelchair when handling the locking mechanism. Lock (unlock: proceed accordingly in reverse order): 90° 2024-10-16 Instructions for use Jump beta 31 of 52...
- Page 32 3.7 Handling leg support 3.7.3 Detachable and swivelling leg support (Jump beta BSA) Attach (detach: proceed accordingly in reverse order): 32 of 52 Instructions for use Jump beta 2024-10-16...
- Page 33 3.7 Handling leg support Swivel out (swivel back: proceed accordingly in reverse order): Set lower leg length: 2024-10-16 Instructions for use Jump beta 33 of 52...
- Page 34 3.7 Handling leg support Swivel up (swivel out: proceed accordingly in reverse order): 90° (4b) (4a) 90° Swivel out: Proceed accordingly in reverse order: (1a) (1b) 34 of 52 Instructions for use Jump beta 2024-10-16...
- Page 35 3.8.2 Wheel lock The knee lever and cable control brakes are wheel locks and are not suitable for slowing down when moving. Locking the wheel with the knee lever brake: (2a) (2b) 2024-10-16 Instructions for use Jump beta 35 of 52...
- Page 36 3.8 Handling brake Locking the wheel with the cable control brake: (2a) (2b) (3b) (3a) Locking in open or closed position: First set the brake to the desired position (braked/unbraked). 90° Unlock: 90° 36 of 52 Instructions for use Jump beta 2024-10-16...
- Page 37 Lock: (2a) (2b) Release: 3.8.4 Reverse-roll locking Not suitable in combination with auxiliary drives. max 7°/ 12% Activate (deactivate: proceed accordingly in reverse order): 2024-10-16 Instructions for use Jump beta 37 of 52...
- Page 38 Only rotate the anti-tipper 180° from deactivated position to active position. Avoid full revo- lutions in one direction, since otherwise the tension spring inside the anti-tipper will be dam- aged, which may result in the anti-tipper losing its functionality. 38 of 52 Instructions for use Jump beta 2024-10-16...
- Page 39 3.10 Handling headrest 3.10.1 General information regarding headrest Set distance: Set height: 2024-10-16 Instructions for use Jump beta 39 of 52...
- Page 40 3.11 Handling abduction wedge 3.11.1 General information regarding abduction wedge Set distance: Set height: 40 of 52 Instructions for use Jump beta 2024-10-16...
- Page 41 3.12 Handling therapy table 3.12.1 General information regarding therapy table Set depth/ insert / remove: 3.13 Handling lateral truss pad 3.13.1 General information regarding lateral truss pad Open/close: 2024-10-16 Instructions for use Jump beta 41 of 52...
- Page 42 Pay attention to the max. load of the wheelchair, this also applies to the steering max. and pushing aid. km/h Mount (dismount: proceed in reverse order at Fig. 4): (2b) (2a) 90° (6a) (6b) 90° 42 of 52 Instructions for use Jump beta 2024-10-16...
- Page 43 3.15 Handling one-hand steering aid 3.15.1 General information regarding one-hand steering aid Note: Not with model Jump beta BSA Activate (deactivate: proceed accordingly in reverse order): The swivel casters must be set to the “straight ahead” position - this is the only way to activate or deactivate one-hand steering.
- Page 44 3.15 Handling one-hand steering aid Set: 44 of 52 Instructions for use Jump beta 2024-10-16...
- Page 45 Never carry the wheelchair over an obstacle using the sun shade. It is not suitable for protection against rain. Fold in (fold out: proceed accordingly in reverse order): Detach (attach: proceed accordingly in reverse order): 2024-10-16 Instructions for use Jump beta 45 of 52...
- Page 46 • Pack detachable textile parts in foil or the like, if necessary • Secure the wheelchair against rolling away and contamination • Storage in a dry place without aggressive environmental influences 46 of 52 Instructions for use Jump beta 2024-10-16...
- Page 47 For safety reason and to maintain product liability, an inspection by your retailer is required at least once a year. This must be carried out and documented according to the following checklist. 2024-10-16 Instructions for use Jump beta 47 of 52...
- Page 48 Locking mechanisms (tripod springs of push handles, quick-release axles, eccentric clamps, etc.) checked for functionality, antitipper checked for firm fit and fuctionality. Oiling: moving parts and bearings oiled Final check: functional check of all mechanical adjusting devices carried out. 48 of 52 Instructions for use Jump beta 2024-10-16...
- Page 49 5 Technical data 5.1 Data and measurements Model: Jump beta (Sport/ BSA) Type: 485 Aid index no.: 18.50.03.1079 All measurements ±5% Dimensions Remarks Designation Seat width (SW) Sport frame 300-500 mm optional per SW + max. 20 mm growable BSA frame...
- Page 50 5.2 Meaning of labels The meaning of the individual labels can be directly derived from the text at the corresponding position. A new nameplate can be obtained from SORG Rollstuhltechnik if the original one is lost or dam- aged. Type plate:...
- Page 51 Date/ Retailer's signature yearly inspection conducted according to Stamp: check list (operating year 4) Remarks: Date/ Retailer's signature yearly inspection conducted according to Stamp: check list (operating year 5) Remarks: Date/ Retailer's signature 2024-10-16 Instructions for use Jump beta 51 of 52...
- Page 52 Instructions for use Jump beta SORG Rollstuhltechnik GmbH + Co. KG Benzstrasse 3-5 68794 Oberhausen-Rheinhausen / Germany Germany Phone +49 7254 9279-0 Fax +49 7254 9279-10 info@sorgrollstuhltechnik.de Company stamp www.sorgrollstuhltechnik.de...
Need help?
Do you have a question about the Jump beta and is the answer not in the manual?
Questions and answers