SORG mio User Manual
Hide thumbs
Also See for mio:
- User manual (42 pages) ,
- Service record (32 pages) ,
- Instructions for use manual (44 pages)
Table of Contents
Advertisement
Quick Links
Download this manual
See also:
User Manual
Advertisement
Table of Contents

Related Manuals for SORG mio


Summary of Contents for SORG mio
- Page 1 User Manual User Manual...
-
Page 2: Imprint
COPYRIGHT © by SORG Rollstuhltechnik GmbH + Co. KG Benzstraße 3-5, 68794 Oberhausen-Rheinhausen. texts and pictures in this user manual underlie the international copyright protection and are not allowed to be published without our consent – not even in excerpts! -
Page 3: Table Of Contents
Angle adjustable back and seat tilt Technical Data Casters 4.7.1 Measurements and dimensions 2.10. Loading and transporting 4.7.2 Meaning of labels 2.10.1 Transport in public transportation 4.7.3 Measurements Mio 2.10.2 Transport in other vehicles DOCUMENTATION YEARLY 2.11 Other risks INSPECTION Handling Wheels 3.1.1 Quick release axle wheels... -
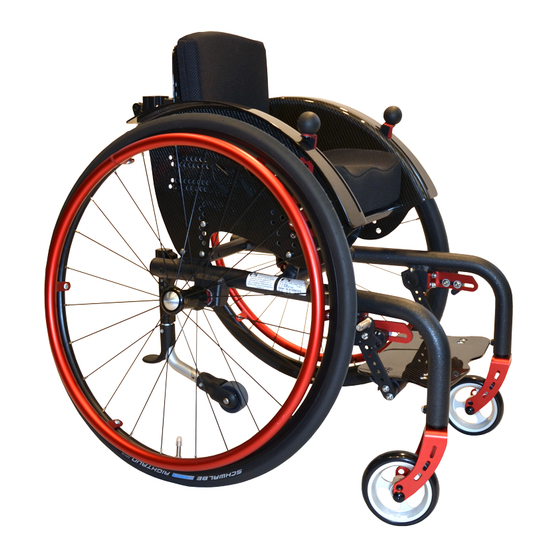
Page 4: Wheelchair Overview
Overview Mio back cushion (for curved back plate model 3) active side guard with built-in cable brake brake lever (for cable brake) anatomically formed seat firm seat plate taurus frame (with small abduction) caster adapter caster fork caster 10. -
Page 5: Preamble
The seat-back-unit can be precisely set according to necessary, should modification be needed during use. the shoulder-rear wheel-position for an ideal gripping point. Mio is also suitable as a base for a seat shell As any other aid, a wheelchair is a technical device build. -
Page 6: Application
1.6 APPLICATION ATTENTION Under the following circumstances and/or symptoms, the active and/or passive use of the Mio ATTENTION must be thoroughly discussed with the doctor or The wheelchair serves solely to actively or passively therapist in charge of treatment. transport the person to whom the wheelchair has •... -
Page 7: Reception
User Manual 1.7 RECEPTION 1.9 SERVICE AND MAINTENANCE PLEASE NOTE READ DELIVERY According to § 33 subparagraph 1, clause 4, Each wheelchair is mounted, tested for functionality [German] SGB V, the responsibility of maintenance, repairs and replacement lies with the benefactor. and correctness in our works and packaged into After agreement with your benefactor, be sure to special cardboard boxes by our shipping experts. -
Page 8: Safety Instructions
2 Safety Instructions Let someone help you getting in and out if possible/ necessary. Let the helping person know of possible 2.1 GENERAL INDICATIONS hazards such as tripping, edges and your degree of disability. ATTENTION The risk of injuries is on all rotatable and turnable ATTENTION parts. -
Page 9: Starting And Slowing Down
User Manual 2.2.2 Starting and slowing down ATTENTION Avoid jerky starts. The wheelchair could tip backwards. Thus, when possible, lean your upper body forward when starting. With children we always recommend to use the tilt safety whenever possible. ATTENTION While driving, braking occurs through controlled pressure applied to the hand rims from your palms/ fingers. -
Page 11: Up And Downhill
User Manual 2.2.4 Up and downhill ATTENTION Keep in mind the higher strain in order to drive or brake going up or downhill (see 2.2.1). ATTENTION (1) If possible, tilt your upper body, when driving up or downhill, in the direction of the hill. ATTENTION Only go up ramps or hills with an incline or descent greater than 6% with assistance. -
Page 12: Changing Seats Independently
2.3 CHANGING SEATS INDEPENDENTLY (1) In order to transfer independently drive as close as possible (forwards or in a 45°angle) to the other seating area and assure yourself of the firm fixation. If ATTENTION possible, flip the side part back. Lock the wheel lock Changing seats independently is dangerous and and hold on to the new, nonslip seat requires experience. -
Page 13: Grabbing Objects
User Manual 2.4 GRABBING OBJECTS Carefully test the tilt behavior of the wheelchair to the side, front and back with the help of an experienced and strong helper. ATTENTION (1) Do not grab objects behind the wheelchair reaching over the back of the chair, DANGER OF FLIPPING OVER. -
Page 14: Overcoming Obstacles
2.5 OVERCOMING OBSTACLES ATTENTION A WHEELCHAIR IS NOT FOR CARRYING. IT WAS NOT DESIGNED NOR TESTED OR BUILT FOR THIS: For this reason avoid stairs whenever possible! Instead to overcome height differences use ramps or elevators. ATTENTION (1) NEVER overcome stairs etc. with the wheelchair ALONE. - Page 15 User Manual ATTENTION Do not drive towards, for example, curbsides without braking, DANGER OF TIPPING OVER! ATTENTION (1) In order to overcome height differences or when using an elevator and lifting platforms, you generally have to deactivate the anti-tipper. You could become restricted in maneuverability.
-
Page 16: Wheel Lock
2.6 WHEEL LOCK 2.7 ANTI-TIPPER ATTENTION ATTENTION The knee lever brake is a wheel lock and NOT We recommend inexperienced and young users to designed to brake during the drive. While driving, use the anti-tipper whenever possible. (especially downhill) you could bring the wheelchair to a sudden full stop, whereby you could fall out of �... -
Page 17: Angle Adjustable Back And Seat Tilt
User Manual 2.8 ANGLE ADJUSTABLE BACK AND SEAT TILT ATTENTION (1) With an angle adjustable back or seat tilt the anti-tipper is to be activated starting from a setting of 90°. ATTENTION For active use the back or seat tilt must be in an upright (90°) position. -
Page 18: Loading And Transporting
2.10. LOADING AND TRANSPORTING Let someone help you get in and out of the public transportation, • so that you don’t get stuck in the crack be- or the transport of your wheelchair in a car please tween the door and the sidewalk, consider the following points: • so that you don’t panic • so that your claim for the marked seat possibly... -
Page 19: Other Risks
User Manual 2.11 OTHER RISKS ATTENTION The position of the driving wheels in the axle plate ATTENTION can only be changed by a qualified specialty store! It After a collision, contact your rehab service station influences the focus (tilt ability) and the functionality to check the carriage, frame and Bowden cables of the knee lever brake. -
Page 20: Handling
3 Handling 3.1 WHEELS 3.1.1 Quick release axle wheels All of our rear and 12” wheels are equipped with quick release axles for fast removal. (1) To release or apply the quick release axle, push the lock button (A) in the middle of the wheel nub and release it after the action. -
Page 21: Double Hand Rim
User Manual 3.1.3 Double hand rim Moving a wheelchair with a dual hand rim requires a lot of practice. Familiarize yourself, with the help of an experienced carer and in familiar surroundings, with the technology of this type of particular way of driving. (1) When transporting etc. -
Page 22: Special Hand Rims
3.3 SPECIAL HAND RIMS 3.4 SEAT 3.3.1 Knob hand rims The seat is tightly screwed on to the frame. The settings for the individual grip point are done by your ATTENTION INJURY RISK! Regard that the knob hand rims turn when you are rehab technician. -
Page 23: Push Aids
User Manual 3.7 PUSH AIDS Detaching (2+3 previous page): • open the eccentric clamp (A), • push the stand spring (B) inward so that it can ATTENTION glide through the bracket (C), All push aids (push handles/push bails) are only •... -
Page 24: Angle Adjustment Push Aids
3.7.2 Angle adjustment push aids Adjusting the angle on the push bail: • (1) push the locking knobs (A) on both sides at the same time, • adjust the bail, while pushing the locking knobs (A), in the desired position •... -
Page 25: Leg Supports
User Manual 3.8 LEG SUPPORTS � INDICATION The leg support is ideally set when the whole thigh, to about 4 fingers (hand without thumb) width in front of the hollow of the knee, lies equally on the seat while the leg is standing at a right angle on the footrest. -
Page 26: Brakes
3.9 BRAKES 3.9.3 Knee lever brake (wheel lock) (3+4) To lock the wheel lock: • push both control levers (A) forward until ATTENTION they snap into the new position and the THE KNEE LEVER BRAKES ARE ONLY TO BE brake pressing bolts (A) lie tightly on the USED FOR PLACING THE WHEELS IN A RESTING tire cover. -
Page 27: Anti-Tipper
User Manual 3.10 ANTI-TIPPER 3.11 HEAD RESTS (1) To activate There are two versions of the head rest - with a • push the anti-tipper (A) down using the tread square-type tube (2) or a special section tube (3). element (B), Both kinds can be adjusted to the user in the same •... -
Page 28: Abduction Wedge
3.12 ABDUCTION WEDGE 3.14 THORAX TRUSS PADS (3) Both kinds of thorax truss pads can open The abduction wedge is mounted under the SeatFix. and close. To do so, push the red button (A) and The height can be adjusted in 1,5cm intervals, the simultaneously push the truss pad frame back or distance is infinitely variable. -
Page 29: Push Aid For Outside
User Manual 3.15 PUSH AID FOR OUTSIDE (OUTDOOR FRONT END) (1) With the Outdoor Front End it is made possible to drive on uneven surfaces. Additionally, spasm causing vibrations when driving are visually reduced. Mounting the Outdoor Front End • Close the wheelchair’s wheel locks. •... -
Page 30: Repairs And Maintenance
4. Repairs and Maintenance 4.3 DISPOSAL 4.1. REPAIRS � INDICATION The wheelchair can only be disposed of after ATTENTION consultation and approval from your benefactor. Do not conduct any reparations and/or maintenance work yourself. Contact your medical As a general rule, the disposal of the wheelchair supply store. -
Page 31: Maintenance
User Manual FRAME First inflate the tire with just enough air so you can The frame and wheels must be cleaned regularly with still push in with your thumb. Check the fit of the tire a damp cloth and mild cleaning agent. Please dry well on the rim. -
Page 32: Service/Inspection
4.6 SERVICE/INSPECTION Check functionality of the quick release axles. 4.6.1 Check list Check tires, air pressure and valve, replace if needed. A yearly inspection from a qualified medical store is Check caster bearing, caster fork and caster inevitable for the safe use of the wheelchair and for mounting bracket for condition, proper functioning a long lifespan. - Page 33 User Manual WHEN? WHAT? COMMNENTS Before each use Check wheels/quick ATTENTION release axles for firm fit. Too low air pressure and/or dirty tires as well as adverse You must not be able to pull weather circumstances can reduce the brake efficiency the wheel out of the quick drastically and put you in danger.
-
Page 34: Technical Data
4.7 TECHNICAL DATA 4.7.3 Measurements Mio 4.7.1 Measurements and dimensions Misprints and technical changes reserved. Dimension tolerance ±5° Abbreviations: Indication Measurements Comment SW = seat width SD = seat depth 2-cm-intervals 18 to 30 cm seat width (SW) BH =back height... -
Page 35: Documentation Yearly Inspection
User Manual 4.8 DOCUMENTATION YEARLY INSPECTION Work done according Additional work carried out date, signature, to check list stamp medical supply store,... - Page 36 Your Specialized Retailer company stamp SORG Rollstuhltechnik GmbH + Co. KG Benzstraße 3-5 D-68794 Oberhausen-Rheinhn. Tel +49 7254 9279-0 Fax +49 7254 9279-10 info@sorgrollstuhltechnik.de www.sorgrollstuhltechnik.de Technical changes and misprints reserved.
Need help?
Do you have a question about the mio and is the answer not in the manual?
Questions and answers