Table of Contents
Advertisement
Quick Links
Service Record Mio Carbon (Design 2018)
Mio Carbon
Mio Carbon
In the following all individual adjustments of the wheelchair are
described. These adjustments require tools and specialised
knowledge. Please leave the adjustments to a qualified rehab
2020-09-01
Design 2018
Design 2018
Service Record
Service Record
Service Record Mio Carbon (Design 2018)
consultant.
Unique people, unique solutions.
ENG
1 of 28
Advertisement
Table of Contents

Subscribe to Our Youtube Channel
Related Manuals for SORG Mio Carbon


Summary of Contents for SORG Mio Carbon
- Page 1 Service Record Mio Carbon (Design 2018) Mio Carbon Mio Carbon Design 2018 Design 2018 Service Record Service Record In the following all individual adjustments of the wheelchair are described. These adjustments require tools and specialised knowledge. Please leave the adjustments to a qualified rehab consultant.
- Page 2 © by SORG Rollstuhltech- nik GmbH+Co. KG Benzstraße 3-5, 68794 Oberhausen-Rhein hausen / Germany. Our terms and conditions can be found on our order forms and at www.sorgrollstuhl- technik.de/impressum. Service Record Mio Carbon (Design 2018) 2 of 28 2020-09-01...
-
Page 3: Table Of Contents
3.8.1 Classification 3.8.2 Vertical setting 3.8.3 Horizontal setting 3.8.4 Fine adjustment of the truss pad holder 21 3.8.5 Adjusting to the user 3.9 Assembly group outdoor front end 3.9.1 Settings Service Record Mio Carbon (Design 2018) 2020-09-01 3 of 28... -
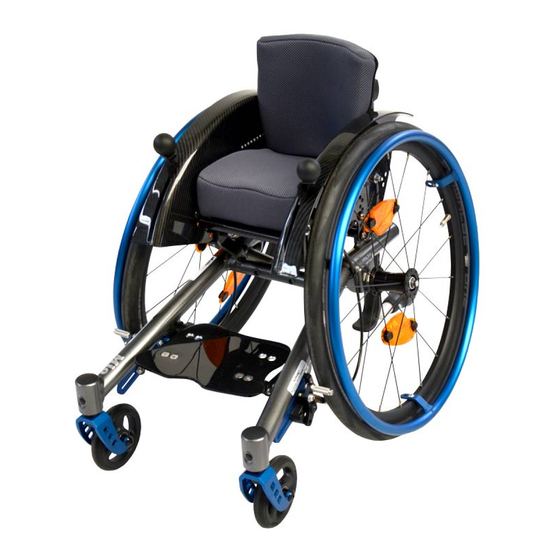
Page 4: Wheelchair Overview
4 frame 5 caster fork 6 caster 7 foot plate 8 rear wheel 9 hand rim 10 back 11 stabiliser bar 12 skirt guard 13 rear wheel 14 anti tipper Service Record Mio Carbon (Design 2018) 4 of 28 2020-09-01... -
Page 5: General Information
Phillips screw driver • flat head screw driver • plastic mallet • side cutter • threadlocker (fluid) • bicycle inner tube repair kit • work bench/jaw vise with rubber pads Service Record Mio Carbon (Design 2018) 2020-09-01 5 of 28... -
Page 6: Explanation Of Symbols
Service Record Mio Carbon (Design 2018) 6 of 28 2020-09-01... -
Page 7: General Safety Instructions
Slowly approach abstacles and carefully overcome them so that little force is applied to the casters, rear wheels and the wheelchair as a whole. Service Record Mio Carbon (Design 2018) 2020-09-01 7 of 28... -
Page 8: Assembly Groups
(B), • replace the safety nuts with new ones and retighten all the screws. When changing the casters, make sure that the Casters is mounted in the previous hole. Service Record Mio Carbon (Design 2018) 8 of 28 2020-09-01... -
Page 9: Assembly Group Seat
34,5 cm 37,0 cm 39,0 cm 41,5 cm without slight strong 36,0 cm 38,5 cm 40,5 cm 43,0 cm without slight A5 - strong 40,0 cm 42,0 cm 45,5 cm Service Record Mio Carbon (Design 2018) 2020-09-01 9 of 28... -
Page 10: Widening The Seat
(3) Leave the back supporting angle (C) con- nected to the side guard and remove only the back of the firm curved back plate. (3) Completely remove screw connections (A) on both sides Service Record Mio Carbon (Design 2018) 10 of 28 2020-09-01... -
Page 11: Side Guard/ Spacer Bushing
(B) of the back support brackets (C). • Reinstall screw connections and tighten tightly. 3.2.6 Adjust quick-release axle Correct the distance of the wheels to the side part. Proceed as described above. Service Record Mio Carbon (Design 2018) 2020-09-01 11 of 28... -
Page 12: Seat Depth
3.2.8 Move seat plate • (1) Loosen screw connections (A) on both sides, • move the seat plate to the desired po- sition, • Tighten screw connections again. Service Record Mio Carbon (Design 2018) 12 of 28 2020-09-01... -
Page 13: Move Seat Supporting Angle
Please proceed cautiously and only with the help of an experienced escort step by step to the maximum and by the user (!) Desired point of tilting. Please read the safety instructions carefully. Service Record Mio Carbon (Design 2018) 2020-09-01 13 of 28... -
Page 14: Assembly Group Back
• Tighten screw connections in the corre- sponding holes again., Try new setting only with the help of a helper! Service Record Mio Carbon (Design 2018) 14 of 28 2020-09-01... -
Page 15: Assembly Group Leg Support
Reinstall screws (D) and tighten tightly. To move the leg support: • Remove screws (D) on both sides, • Put leg support in the alternative holes (F) and • Reinstall screws (D) and tighten tightly. Service Record Mio Carbon (Design 2018) 2020-09-01 15 of 28... -
Page 16: Assembly Group Side Guards
3.5 Assembly group side guards 3.5.1 Adjust the side guards The side guards at Mio Carbon can not be changed. Adjustment of clothing protection (1) The clothes guard (A) can be adjusted in height: • loosen all screws (B) on both sides, •... -
Page 17: Assembly Group Brake
When the brake is open, the maximum distance between the brake pressure pin and tires is de- termined as follows: Standard KHB 21 mm Pull-to-lock brake 11 mm KHB with backstop approx. 10 mm cable control brake 6 mm (technical changes reserved) Service Record Mio Carbon (Design 2018) 2020-09-01 17 of 28... -
Page 18: Bowden Cable Brake
Afterwards absolutely check the func- tionality of the brakes! The wheelchair with occupant (maximum load) must stand secu- rely with the brakes applied on a ramp with a gradient of 12% (= 7 °). Service Record Mio Carbon (Design 2018) 18 of 28 2020-09-01... -
Page 19: Assembly Group Anti-Tipper
If the center of gravity of the wheelchair is set to passive, then the anti-tipper must be fitted to the outside of the pipe instead of inside to protect the chair against tipping over. Service Record Mio Carbon (Design 2018) 2020-09-01 19 of 28... -
Page 20: Assembly Group Truss Pads
(3) Additionally, with truss pad size II the height can be adjusted be displacing the cushions. Re- move the screws (A), place the cushion on the holes (B), replace and retighten the screws (A). Service Record Mio Carbon (Design 2018) 20 of 28... -
Page 21: Horizontal Setting
(3A). The ball joint is then fixated by tighten the four screws (B). Service Record Mio Carbon (Design 2018) 2020-09-01 21 of 28... -
Page 22: Assembly Group Outdoor Front End
To dismantle the outdoor front end please proceed in reverse / analogue order. The outdoor front end may only be mounted if there is no user in the wheelchair. Service Record Mio Carbon (Design 2018) 22 of 28 2020-09-01... -
Page 23: Reapairs/Maintenance/Reinstatement
If necessary, pack removable textile parts in foil or similar • Secure the wheelchair from rolling away and getting dirty • Store in a dry environment without aggressive environmental influences. Service Record Mio Carbon (Design 2018) 2020-09-01 23 of 28... -
Page 24: Lifespan
For safety reason and to maintain product liability, an inspection by your retailer is required at least once a year. This must be carried out and documented according to the following checklist. Service Record Mio Carbon (Design 2018) 24 of 28... - Page 25 Locking mechanisms (tripod springs of push handles, quick-release axles, eccentric clamps, etc.) checked for functionality, anti-tipper checked for firm fit and fuctionality. Oiling: moving parts and bearings oiled Final check: functional check of all mechanical adjusting devices carried out. Service Record Mio Carbon (Design 2018) 2020-09-01 25 of 28...
-
Page 26: Technical Specifications
3 years at not excessive demand wheelchair life cycle of the wheelchair 5 years Normative requirements The wheelchair meets the requirements of ISO 7176-8 and the require- ments against ignition. Service Record Mio Carbon (Design 2018) 26 of 28 2020-09-01... -
Page 27: Meaning Of Labels
5.2 Meaning of labels The meaning of the individual labes is explained in the texts at the respective place. If the type plate is damaged or gets lost, a new one can be ordered from SORG Rollstuhltechnik. Type plate: manufacturer address... - Page 28 Service Record Mio Carbon (Design 2018) SORG Rollstuhltechnik GmbH + Co. KG Benzstraße 3-5 68794 Oberhausen-Rheinhausen Germany Fon +49 7254 9279-0 Fax +49 7254 9279-10 info@sorgrollstuhltechnik.de www.sorgrollstuhltechnik.de company stamp...
Need help?
Do you have a question about the Mio Carbon and is the answer not in the manual?
Questions and answers