Table of Contents
Advertisement
Quick Links
Advertisement
Table of Contents

Related Manuals for Black Box ServSwitch ACU1600A


Summary of Contents for Black Box ServSwitch ACU1600A
- Page 1 SEPTEMBER 2001 ACU1600A...
- Page 2 Order toll-free in the U.S.: Call 877-877-BBOX (outside U.S. call 724-746-5500) FREE technical support 24 hours a day, 7 days a week: Call 724-746-5500 or fax 724-746-0746 SUPPORT Mailing address: Black Box Corporation, 1000 Park Drive, Lawrence, PA 15055-1018 INFORMATION Web site: www.blackbox.com • E-mail: info@blackbox.com...
- Page 3 ServSwitch system that’s just right for you. The ServSwitch ™ family from Black Box—the one-stop answer for all your KVM- switching needs! This manual will tell you all about your new ServSwitch™ Wizard Multimedia KVM Extender unit, including how to install, operate, and troubleshoot it. For an introduction to the Extender, see Chapter 2.
- Page 4 TRADEMARKS USED IN THIS MANUAL BLACK BOX and the logo are registered trademarks, and ServSwitch and ServSwitch Wizard are trademarks, of Black Box Corporation. Apple and Macintosh are registered trademarks of Apple Computer, Inc. Compaq is a registered trademark of Compaq Computer Corporation.
- Page 5 FCC/IC STATEMENTS FEDERAL COMMUNICATIONS COMMISSION AND INDUSTRY CANADA RADIO-FREQUENCY INTERFERENCE STATEMENTS This equipment generates, uses, and can radiate radio-frequency energy, and if not installed and used properly, that is, in strict accordance with the manufacturer’s instructions, may cause interference to radio communication. It has been tested and found to comply with the limits for a Class A computing device in accordance with the specifications in Subpart J of Part 15 of FCC rules, which are designed to provide reasonable protection against such interference when the equipment is...
- Page 6 SERVSWITCH™ WIZARD MULTIMEDIA KVM EXTENDER EUROPEAN UNION DECLARATION OF CONFORMITY This equipment has been tested and found to comply with the limits for a class A computing device in accordance with the specifications in the European standard EN55022. These limits are designed to provide reasonable protection against harmful interference.
- Page 7 NOM STATEMENT NORMAS OFICIALES MEXICANAS (NOM) ELECTRICAL SAFETY STATEMENT INSTRUCCIONES DE SEGURIDAD 1. Todas las instrucciones de seguridad y operación deberán ser leídas antes de que el aparato eléctrico sea operado. 2. Las instrucciones de seguridad y operación deberán ser guardadas para referencia futura.
- Page 8 SERVSWITCH™ WIZARD MULTIMEDIA KVM EXTENDER 12. Precaución debe ser tomada de tal manera que la tierra fisica y la polarización del equipo no sea eliminada. 13. Los cables de la fuente de poder deben ser guiados de tal manera que no sean pisados ni pellizcados por objetos colocados sobre o contra ellos, poniendo particular atención a los contactos y receptáculos donde salen del aparato.
-
Page 9: Table Of Contents
TABLE OF CONTENTS Contents Chapter Page 1. Specifications ..................... 9 2. Introduction ..................... 12 2.1 Features and Benefits of the Extender ..........13 2.2 The Complete Extender Package ............ 15 2.3 The Extender Illustrated ..............16 2.4 Safety Concerns ................. 17 3. - Page 10 6.1 Things to Try ..................54 6.2 Resetting the Extender (Hardware Reset) ........57 6.3 Displaying the Extender’s Firmware Revision ......... 57 6.4 Calling Black Box ................58 6.5 Shipping and Packaging ..............58 Appendix A: Guidelines for Twisted-Pair Cabling ........59 Appendix B: Serial Pinouts ................
-
Page 11: Specifications
CHAPTER 1: Specifications 1. Specifications Cable Required — Between Units A and B: Four-pair (eight-wire) Category 5 or higher unshielded twisted-pair (UTP); shielded twisted-pair (STP) can also be used at shorter distances Compliance — CE (EN55022 Class A); FCC Part 15 Subpart J Class A, IC Class/classe A Standards —... - Page 12 SERVSWITCH™ WIZARD MULTIMEDIA KVM EXTENDER Maximum Distance — Between Units: Up to 200 m (655 ft.) of unshielded twisted-pair cable or 100 m (325 ft.) of shielded twisted-pair cable; From Unit A without optional power supply: 2 m (6 ft.) to any attached keyboard, monitor, or mouse;...
- Page 13 CHAPTER 1: Specifications Connectors — All side-mounted on both Units A and B (user/ peripheral connections optional on Unit A, CPU connections optional on Unit B): (2) HD15 female: (1) to monitor, (1) to CPU’s video port; (4) 6-pin mini-DIN female: (1) to keyboard, (1) to mouse, (1) to CPU’s keyboard port, and (1) to CPU’s mouse port;...
-
Page 14: Introduction
SERVSWITCH™ WIZARD MULTIMEDIA KVM EXTENDER 2. Introduction The ServSwitch™ Wizard Multimedia KVM Extender is a high-performance keyboard-, monitor-, and mouse-extension device that supports a wide range of PC compatible hardware and software platforms. It also supports audio and ® serial extension, and it supports switching between remote and optional same-site connections. -
Page 15: Features And Benefits Of The Extender
CHAPTER 2: Introduction Primary Local Control Station Control Station Direct connection Direct connection Extender Extender Unit B Unit A Extension cable(s) Extension cable(s) Local CPU Primary CPU Figure 2-1. Attachment and control in an Extender system. 2.1 Features and Benefits of the Extender Here are some of the useful features of the ServSwitch Wizard Multimedia KVM Extender and some of the ways those features benefit you: •... - Page 16 SERVSWITCH™ WIZARD MULTIMEDIA KVM EXTENDER • Emulates the presence of a keyboard and mouse at both the local and remote sites. This means that the connected computer(s) can boot up automatically at any time. • Supports keyboard modes 1, 2, and 3, as well as both “prompt” and “stream” mouse modes, for maximum compatibility.
-
Page 17: The Complete Extender Package
5 ft. (1.5 m) long and one 10 ft. (3 m) long. • Four 2.5-m (8.2-ft.) stereo audio cables, all with 3.5-mm stereo plugs. (These will work fine with mono equipment). • This manual. If you didn’t receive everything, or if anything arrived damaged, contact Black Box right away. -
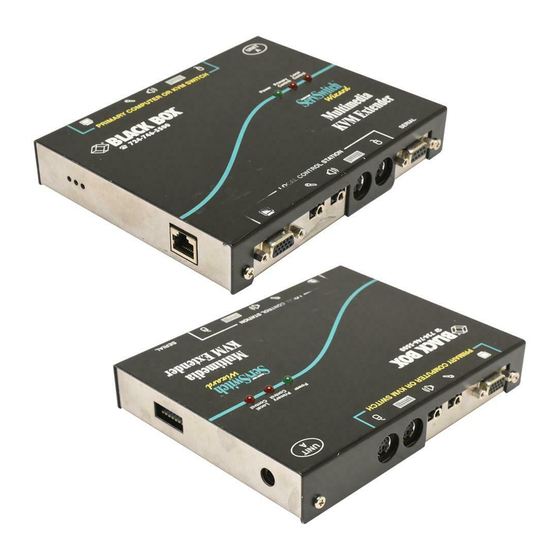
Page 18: The Extender Illustrated
SERVSWITCH™ WIZARD MULTIMEDIA KVM EXTENDER 2.3 The Extender Illustrated Connectors for cables running to the Connector for optional power supply primary CPU’s I/O ports: (5 VDC, at least 500 mA) From left to right, the video, microphone, Main LEDs: Power (green) and speaker, keyboard, and mouse ports Primary and Local Control (red) DIP switch for... -
Page 19: Safety Concerns
CHAPTER 2: Introduction 2.4 Safety Concerns As you prepare to install the ServSwitch Wizard Multimedia KVM Extender, please keep these things in mind, particularly if you purchase and use its optional power supply: • The Extender is for use in dry, oil-free indoor environments only. •... -
Page 20: Installation
SERVSWITCH™ WIZARD MULTIMEDIA KVM EXTENDER 3. Installation 3.1 What You Will Need These things must be in place before you can install your ServSwitch™ Wizard Multimedia KVM Extender: • Four-pair (eight-wire) twisted-pair cabling rated to at least Category 5. This should be long enough to reach from your Extender’s Unit A to its Unit B, up to a maximum of 200 meters (655 feet). -
Page 21: Placement
CHAPTER 3: Installation • A suitable mouse driver for your PC(s). Supported types are: - PS/2 or RS-232 two-button mouse driver by any manufacturer. - Microsoft mouse drivers, including those for the IntelliMouse. (You might be able to use other mouse drivers with IntelliMouse compatible data formats, but these might or might not work—trial-and-error testing might be necessary.) - Logitech mouse drivers, including those for two-button, three-button, and... -
Page 22: Connecting Your Devices
SERVSWITCH™ WIZARD MULTIMEDIA KVM EXTENDER 3.3 Connecting Your Devices First make sure the power supply is unplugged and disconnected from Unit B of the ServSwitch Wizard Multimedia KVM Extender. If you are powering the Extender’s Unit A with an optional power supply, make sure that Unit A is unplugged and disconnected as well. -
Page 23: Connecting Serial Equipment/Ports (Optional)
If you’ll be using a serial device with an attached cable at either end of your Extender link, you might be able to plug it into the Extender’s DB9 female “SERIAL” connector through an adapter or gender changer (call Black Box for technical support). On Unit A, this connector is next to the “LOCAL CONTROL STATION”... - Page 24 SERVSWITCH™ WIZARD MULTIMEDIA KVM EXTENDER Required primary CPU Optional power supply would be connected here UNIT A To attached serial Audio cables device (optional) and CPU- Extension Cable (all included) Category 5 interconnection Optional local control cable station (monitor, microphone, speakers, keyboard, Optional and mouse)
- Page 25 CHAPTER 3: Installation 6-Pin 6-Pin mini-DIN mini-DIN HD15 10" (25.4 9" (22.9 Cross-section: Central video strand Keyboard and mouse strands molded to sides Figure 3-2. The CPU-Extension Cables.
-
Page 26: Interconnecting The Extender Units
SERVSWITCH™ WIZARD MULTIMEDIA KVM EXTENDER 3.4 Interconnecting the Extender Units Run eight-wire (four-pair) twisted-pair cabling rated to at least Category 5 between the RJ-45 jacks on the sides of Units A and B of your ServSwitch Wizard Multimedia KVM Extender. This cable should be no longer than 200 meters (655 feet). Other specifications for this cabling are given in Appendix A. - Page 27 CHAPTER 3: Installation • If you want to try to power Unit A without using the power supply: Turn ON the CPU or KVM switch attached to Unit A. Then check either of Unit A’s green Power LEDs (the main one is on the top panel and the auxiliary one is on the side). If these LEDs are flashing, Unit A is not getting enough power to operate properly.
-
Page 28: Configuration
SERVSWITCH™ WIZARD MULTIMEDIA KVM EXTENDER 4. Configuration To configure your ServSwitch™ Wizard Multimedia KVM Extender system, you’ll need to configure first the attached PCs, as directed in Section 4.1, then the Extender itself, as directed in the rest of this chapter. IMPORTANT NOTES Before you operate the Extender for the first time, you must fine-tune its video-compensation amplifiers—the picture will look awful unless you... -
Page 29: Configuring Your Pcs
CHAPTER 4: Configuration 4.1 Configuring Your PCs Configure your PCs in the same way that you would if your keyboard, mouse, monitor, speaker, and/or microphone were all connected directly to them, but keep these things in mind: • The Extender emulates Microsoft compatible serial, IntelliMouse, and PS/2 mice, so make sure that your PC software is configured for a Microsoft mouse of the correct type. -
Page 30: Configuring The Extender
SERVSWITCH™ WIZARD MULTIMEDIA KVM EXTENDER 4.2 Configuring the Extender The ServSwitch Wizard Multimedia KVM Extender has a large number of configuration options. You’ll set different options using one of two different methods: • Various basic options are controlled with the eight-position DIP switches on Units A and B. - Page 31 CHAPTER 4: Configuration Top of Unit B Bottom of Unit B Possible Settings of DIP-Switch Positions 6 through 8: All OFF: Hotkeys = [Ctrl] + [Alt] (default) DIP-Switch Positions 1 through 6 & 7 OFF, 8 ON: 5 are reserved for future use; Hotkeys = [Ctrl] + [Shift] leave them set to OFF 6 &...
- Page 32 SERVSWITCH™ WIZARD MULTIMEDIA KVM EXTENDER Use different numbered positions of the DIP switch on the Extender’s Unit A, shown in Figure 4-2 on the next page, to set other options for your Extender system: • Set position 1 to ON to reset the Extender (see Section 6.2). For normal operation, leave this switch set to OFF.
- Page 33 CHAPTER 4: Configuration Top of Unit A Bottom of Unit A Possible Settings of DIP-Switch Positions: 7 & 8 both OFF: Position 1 OFF: Inactivity timeout is Extender operates 2 seconds (default) normally (default) 7 OFF, 8 ON: Position 1 ON: Inactivity timeout is Extender stops operating, 10 seconds (default)
-
Page 34: Using Configuration Mode
SERVSWITCH™ WIZARD MULTIMEDIA KVM EXTENDER 4.2.2 U SING ONFIGURATION If hotkeys are currently enabled (see Section 4.2.1), you can put the Extender in configuration mode by pressing the currently selected hotkeys along with the [Enter] key at the primary control station’s keyboard only. For example, if the currently selected hotkey combination is the default pairing of [Ctrl] and [Alt], press [Ctrl] + [Alt] + [Enter] to activate configuration mode. - Page 35 CHAPTER 4: Configuration 2. Press the [Home] key on the primary keyboard to set video compensation to “none.” The picture on the primary monitor will probably become fuzzy. 3. Use any of these keys to “tune” the Extender’s video compensation: [Home] sets video compensation to zero.
-
Page 36: B Issuing Other Configuration-Mode Keyboard Commands
SERVSWITCH™ WIZARD MULTIMEDIA KVM EXTENDER 4.2.2.B Issuing Other Configuration-Mode Keyboard Commands While the Extender is in configuration mode, it is also possible to enter a number of other keyboard commands that you can use to configure advanced options on the Extender. (There are also commands for such functions as displaying the Extender’s firmware revision, restoring a disconnected mouse port, and resetting all of the keyboard-controlled configuration options to their factory-default states.) Most of these commands consist of pressing a letter key followed by a number... - Page 37 CHAPTER 4: Configuration • Set RS-232 data format (see Sections 4.3 and 5.11): [S] [1] [Enter] = 1 stop bit (default) [S] [2] [Enter] = 2 stop bits [S] [3] [Enter] = No parity (default) [S] [4] [Enter] = Even parity [S] [5] [Enter] = Odd parity [S] [7] [Enter] = 7 data bits (default) [S] [8] [Enter] = 8 data bits...
-
Page 38: Configuring For A Serial Mouse
SERVSWITCH™ WIZARD MULTIMEDIA KVM EXTENDER 4.3 Configuring for a Serial Mouse It is possible to connect a serial mouse and a CPU’s serial mouse port to the Extender’s serial ports. If you do this, you must issue the hotkey command [H] [1] [Enter] to force the Extender to use serial-mouse protocol unless the Extender is still set to its factory-default configuration. -
Page 39: Resetting The Extender To Its Factory-Default Configuration
CHAPTER 4: Configuration The password is not case-sensitive and can be any combination of keystrokes, including function keys but excluding [Ctrl], [Alt], [Shift], and [Enter]. (For example, the password [F4] [F] [R] [E] [D] [Home] would be valid.) The length of the password can be from 1 to 40 characters, although for better security we recommend that the password be at least four characters long. -
Page 40: Operation
SERVSWITCH™ WIZARD MULTIMEDIA KVM EXTENDER 5. Operation This chapter explains the general operation of the ServSwitch™ Wizard Multimedia KVM Extender. We recommend that you read this chapter carefully before starting to use the Extender; also make very sure you have read the important notes at the start of Chapter 4! 5.1 Power-Up Status Under normal circumstances, the ServSwitch Wizard Multimedia KVM Extender is... -
Page 41: The Extender's Leds
CHAPTER 5: Operation 5.2 The Extender’s LEDs The ServSwitch Wizard Multimedia KVM Extender’s Units A and B each have two sets of three LEDs on them. The main set of LEDs is on the top panel of each Unit, so they can be read easily when the Unit is installed on a desktop or surface- mounted with the included Velcro strips. -
Page 42: How The Extender Uses The Keyboard Leds
AC outlet being turned OFF/not working, power supply being broken, the Unit’s Power LEDs being defective, or the Unit’s main board being defective. If you can’t determine the cause of this problem, call Black Box for technical support. 5.3 How the Extender Uses the Keyboard LEDs The ServSwitch Wizard Multimedia KVM Extender also uses the LEDs on the attached keyboards to indicate various conditions. - Page 43 CHAPTER 5: Operation • Control-lockout indication—unison flashing. As shown in Figure 5-2 below, the Extender flashes all three LEDs on either keyboard at the same time (all three ON, then all three OFF, repeating indefinitely) to show that the other control station has exclusive control of the primary CPU.
-
Page 44: Switching Between Cpus At The Primary Control Station
SERVSWITCH™ WIZARD MULTIMEDIA KVM EXTENDER 5.4 Switching Between CPUs at the Primary Control Station If you have the optional local CPU connected to Unit B as well as the primary CPU connected to Unit A, you can switch between the two CPUs at the primary control station only. -
Page 45: Contending For Control Of The Primary Cpu
CHAPTER 5: Operation 5.5 Contending for Control of the Primary CPU If you have the optional local control station connected to Unit A as well as the primary control station connected to Unit B, the users at these stations contend for keyboard and mouse control of the primary CPU (the one attached to Unit A). - Page 46 SERVSWITCH™ WIZARD MULTIMEDIA KVM EXTENDER station’s users can reclaim control if they are the first to select the primary CPU. But if a user at the local station is the first to select the primary CPU after the timeout expires, users at the primary station must then wait until the local user relinquishes control.
-
Page 47: Things To Keep In Mind About The Keyboards And Mice
CHAPTER 5: Operation 5.6 Things To Keep in Mind About the Keyboards and Mice PC bootup sequence: When your PC CPUs are powered on, they communicate with any attached keyboards and mice and load the setup parameters required by their particular operating systems. It is necessary for the Extender to be attached and powered on during this sequence so that it can give the CPUs the required responses and keep track of all the modes and settings requested by each of the connected CPUs. -
Page 48: Keyboard Control: Hotkey Commands
SERVSWITCH™ WIZARD MULTIMEDIA KVM EXTENDER 5.7 Keyboard Control: Hotkey Commands You can control several functions on the ServSwitch Wizard Multimedia KVM Extender—including CPU selection, screen blanking, locking, and entering configuration mode—from the keyboard, using commands triggered with the Extender’s currently selected hotkey combination. All of the hotkey-control commands are invoked by holding down the one or two hotkeys and then pressing a command key. - Page 49 CHAPTER 5: Operation station); if it expires before you reselect the primary CPU (which will reset the timer), the primary CPU will become available for either station to select. (In fact, if you are at the local station and have exclusive control of the primary CPU—see Section 5.5—this is the only way you can relinquish control.) You can re-enable video by selecting one of the “real”...
-
Page 50: Mouse Control
SERVSWITCH™ WIZARD MULTIMEDIA KVM EXTENDER 5.8 Mouse Control If you have attached two CPUs to your ServSwitch Wizard Multimedia KVM Extender, another convenient way to select between them at the primary control station is by using a three-button mouse. Simply hold down the central mouse button or “wheel”... -
Page 51: Hot-Plugging Ps/2 Mice And Mouse Ports Into The Extender And Re-Enabling Disconnected Cpu Ps/2 Mouse Ports
CHAPTER 5: Operation 5.9 Hot-Plugging PS/2 Mice and Mouse Ports into the Extender and Re-Enabling Disconnected CPU PS/2 Mouse Ports It is advisable to switch off the computer systems that are going to be connected to the ServSwitch Wizard Multimedia KVM Extender before you install them. However, even if this is not possible, most systems can be “hot-plugged”... - Page 52 SERVSWITCH™ WIZARD MULTIMEDIA KVM EXTENDER To restore lost mouse movement on a CPU connected to the Extender: 1. At Unit B’s keyboard, select the CPU that has lost its mouse movement. 2. Enter configuration mode (see Section 4.2.2) by pressing the hotkeys followed by [Enter].
-
Page 53: Audio Support (Stereo Speakers/Headphones And Microphone)
CHAPTER 5: Operation 5.10 Audio Support (Stereo Speakers/Headphones and Microphone) NOTE Throughout this section, the word “speakers” is used to refer to both speakers and headphones. You can attach stereo speakers and/or a microphone to either or both Unit A and Unit B of your ServSwitch Wizard Multimedia KVM Extender—see Section 3.3.1 for how to do this. -
Page 54: Rs-232 Serial Support
SERVSWITCH™ WIZARD MULTIMEDIA KVM EXTENDER 5.11 RS-232 Serial Support The ServSwitch Wizard Multimedia KVM Extender is designed to carry bidirectional communication between one RS-232 serial device or port attached to its Unit A and one such device or port attached to its Unit B. Unlike the way it handles other I/O, the Extender doesn’t perform serial switching or contention: Even when the primary control station’s keyboard and mouse are not in control of the primary CPU—and for that matter, even when the primary station is locked or... - Page 55 CHAPTER 5: Operation To set any of these serial options, refer to Section 4.2.2 as you take these steps: 1. Go into configuration mode by pressing the hotkeys followed by [Enter] at the primary control station. 2. Issue the necessary command(s). 3.
-
Page 56: Troubleshooting
Extender itself as described in Section 6.2. If nothing helps, get the Extender’s firmware-revision level as described in Section 6.3 if possible, then call Black Box Technical Support as directed in Section 6.4. If you need to ship your Extender, see Section 6.5. - Page 57 CHAPTER 6: Troubleshooting 4. If you are attempting to connect the mouse to a PS/2 mouse port on a CPU that has not been powered down, you will need to use the mouse-restoration function (see Section 5.9). 5. Make sure that you have an appropriate mouse driver loaded and that your computer’s software is configured to accept a supported mouse of the type that you have connected (PS/2 or RS-232).
- Page 58 SERVSWITCH™ WIZARD MULTIMEDIA KVM EXTENDER Problem: Compaq MX11800 model integrated keyboard and mouse only: The mouse consistently fails to boot when the Extender is connected to a PC running Windows NT 4.0 through its PS/2 style mouse port. Possible Solutions: There are three possible solutions to this problem: 1.
-
Page 59: Resetting The Extender (Hardware Reset)
CHAPTER 6: Troubleshooting 6.2 Resetting the Extender (Hardware Reset) The ServSwitch Wizard Multimedia KVM Extender has a hardware-reset function that does not require you to remove power to the Extender. To trigger a hardware reset, set position 1 of the DIP switch on the Extender’s Unit A (see Section 4.2.1) to ON. -
Page 60: Calling Black Box
If you need to transport or ship your ServSwitch Wizard Multimedia KVM Extender: • Package it carefully. We recommend that you use the original container. • Before you ship the unit back to Black Box for repair or return, contact us to get a Return Authorization (RA) number. -
Page 61: Appendix A: Guidelines For Twisted-Pair Cabling
APPENDIX A: Guidelines for Twisted-Pair Cabling Appendix A: Guidelines for Twisted-Pair Cabling To interconnect Units A and B of your ServSwitch™ Wizard Multimedia KVM Extender, you can use either shielded twisted pair (STP) or unshielded twisted pair (UTP) rated to Category 5 or higher. It should be pinned straight-through and paired according to the TIA-568A or (preferred) -568B specification, as shown in Figure A-1 on page 60. - Page 62 SERVSWITCH™ WIZARD MULTIMEDIA KVM EXTENDER RJ-45 Socket 1 2 3 4 5 6 7 8 Cable Pinning: Straight-through (Pin 1 to Pin 1, 2 to 2, etc.) Cable Pairing: Pair 1: Pins 4 and 5 (differential green video and vertical sync) Pair 2: Pins 1 and 2 (differential blue video, right channel of speaker audio, and half of microphone audio)
-
Page 63: Appendix B: Serial Pinouts
APPENDIX B: Serial Pinouts Appendix B: Serial Pinouts The ServSwitch™ Wizard Multimedia KVM Extender’s serial ports are RS-232 DCE interfaces pinned out this way on DB9 female connectors: Pin 1: No connection Pin 6: Data Set Ready (DSR), connected internally to Pin 8 Pin 2: Receive Data (RD) Pin 7: No connection Pin 3: Transmit Data (TD) - Page 64 SERVSWITCH™ WIZARD MULTIMEDIA KVM EXTENDER Adapter from serial mouse to Extender DB9 male at DB9 male at mouse end Extender end 2 (RD) 3 (TD) 3 (TD) 2 (RD) 4 (DTR) 6 (DSR) 5 (SGND) 5 (SGND) 6 (DSR)* 4 (DTR)* 7 (RTS) 8 (CTS) 8 (CTS)*...
-
Page 65: Appendix C: Rackmounting
APPENDIX C: Rackmounting Appendix C: Rackmounting We offer a Rackmount Kit (our product code RMK19WX) for mounting a ServSwitch™ Wizard Multimedia KVM Extender’s Unit A or Unit B in 1U of vertical space in a 19" rack. It consists of a front-paneled rack shelf and a pair of countersunk screws. - Page 66 SERVSWITCH™ WIZARD MULTIMEDIA KVM EXTENDER DISCLAIMERS While every precaution has been taken in the preparation of this manual, the manufacturer assumes no responsibility for errors or omissions. Neither does the manufacturer assume any liability for damages resulting from the use of the information contained herein.
- Page 67 NOTES...
- Page 68 NOTES...
- Page 69 Customer Support Information: FREE tech support 24 hours a day, 7 days a week: Call 724-746-5500 or fax 724-746-0746. Mailing address: Black Box Corporation, 1000 Park Dr., Lawrence, PA 15055-1018 World-Wide Web: www.blackbox.com • E-mail: info@blackbox.com © Copyright 2002. Black Box Corporation. All rights reserved.
Need help?
Do you have a question about the ServSwitch ACU1600A and is the answer not in the manual?
Questions and answers