Advertisement
Table of Contents
- 1 Features and Warranty
- 2 Before You Start
- 3 Table of Contents
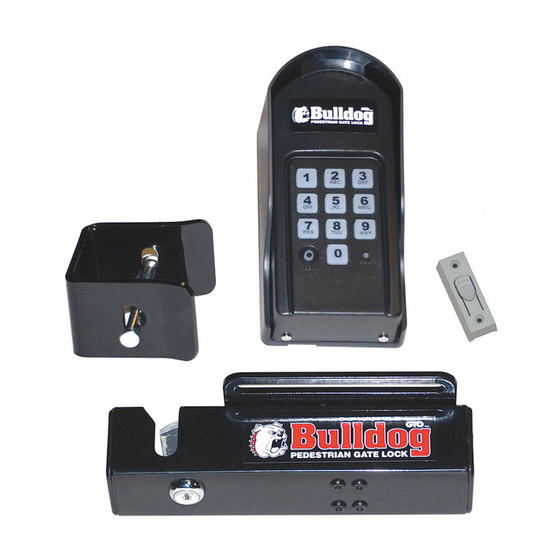
- 4 Parts Identification
- 5 Determine Mounting Location for Lock and Entry Control
- 6 Mounting the Lock
- 7 Mounting the Keypad
- 8 Wiring Connections
- 9 Keypad Description
- 10 Typical Installation with Optional Solar Panel or Transformer
- 11 Programming the Keypad
- Download this manual
Installation Manual
GTO, Inc. gate opener accessories are warranted by the manufacturer against defects in workmanship for a period of one (1) year from
the date of purchase, provided recommended installation procedures have been followed.
In the case of product failure due to defective material or manufacturer workmanship within the one (1) year warranty period, the acces-
sory will be repaired or replaced (at the manufacturer's option) at no charge to the customer, if returned freight prepaid to GTO, Inc.,
3121 Hartsfield Rd., Tallahassee, FL 32303. IMPORTANT: Call 850/575-4144 or fax 850/575-8950 for a Return Goods Authorization (RGA)
number before returning goods to factory. Products received at the factory without an RGA will not be accepted. Replacement or repaired
parts are covered by this warranty for the remainder of the one (1) year warranty period or six (6) months, whichever is greater. GTO, Inc.
will pay the shipping charges for return to the owner of items repaired.
The manufacturer will not be responsible for any charges or damages incurred in the removal of the defective parts for repair, or for the
reinstallation of those parts after repair. This warranty shall be considered void if damage to the product(s) was due to improper installa-
tion or use, connection to an improper power source, tampering, or if damage was caused by lightning, wind, fire, flood, insects, or other
natural agent.
After the one (1) year warranty period, GTO Inc. or one of its authorized service centers will make any necessary repairs for a nominal fee.
Call GTO at 850/575-4144 for more information. This warranty gives you specific legal rights, and you may also have other rights which
may vary from state to state. This warranty is in lieu of all other warranties, expressed or implied. NOTE: Verification of the warranty period
requires copies of receipts or other proof of purchase. Please retain those records.
rev - 09-25-08 • Printed in China for GTO, Inc.
PEDESTRIAN GATE LOCK
Thank you for purchasing the GTO Bulldog Pedestrian Gate Lock.
Be sure to read the directions carefully and completely.
Features
• One year* of operation with 4 x AA alkaline batteries
(no transformer or solar panel is required)
• Accepts either standard alkaline or rechargeable batteries
• Built-in charger circuit for rechargeable batteries (must use
with transformer or solar panel)
• Accepts door bell push button for easy exit from inside
property
• Up to 25 programmable entry codes (permanent and
temporary codes)
• Temporary codes can be programmed to automatically
expired (1 to 7 days)
• Daylight sensor that automatically turns on backlight when
button is pressed in low light conditions
• Automatically disables the unit after 20 key presses for
40 seconds to discourage unauthorized entry
• Programmable lock-hold time from 1-9 seconds
(default at 3 seconds)
Note: Longer lock hold time will reduce battery life when
using alkaline batteries
* Based on typical usage of 10 times/ day with 3 seconds lock-
hold time with fresh batteries.
Limited One Year Warranty
, Inc.
©2008 GTO, Inc.
Advertisement
Table of Contents

Related Manuals for GTO BullDog


Summary of Contents for GTO BullDog
-
Page 1: Features And Warranty
Products received at the factory without an RGA will not be accepted. Replacement or repaired parts are covered by this warranty for the remainder of the one (1) year warranty period or six (6) months, whichever is greater. GTO, Inc. -
Page 2: Before You Start
• Use PVC conduit for protection of low voltage wire connecting the control box to battery charger and entry control (see Illustration A, page 5). • The push button is included with your Bulldog Gate Lock for entry control. However, other devices (card readers, keypads) with normally open (n/o) contacts may be used. Transmit- ters are not compatible with this product. -
Page 3: Table Of Contents
PLEASE NOTE ... due to the variety of possible mounting applications, no mounting hardware for the lock is provided. All necessary mounting hardware can be obtained at a local hardware store; all other hardware is provided. If you need assistance please call GTO ® Technical Service at 800-543-1236. Parts Identification... -
Page 4: Determine Mounting Location For Lock And Entry Control
Determine Mounting Location for Your Lock Lock Lock OPEN OPEN Receiver Receiver Receiver Receiver OPEN OPEN Lock Lock Determine Mounting Location for Your Entry Control Possible Keypad Locations Outside Property OPEN Possible Push Button Locations Inside Property... -
Page 5: Mounting The Lock
Mounting The Lock Step 1: With the gate in the closed position, determine the best location for the lock and lock receiver. Attach the lock to a solid surface or cross member to provide stability. Step 2: Hold receiver and lock together (with receiver pin hole and lock slot aligned) against the gate post, mark their positions to drill receiver holes (see Illustration B and C, page 3). - Page 6 Illustration C Iron or Aluminum Tube Fence and Gate Installation Remember to check the alignment and mark positions before drilling holes in fence post and gate. Clevis Pin GTO Pedestrian Gate Lock Receiver Locking Cap Carriage bolts, washers, and nuts (not provided;...
-
Page 7: Mounting The Keypad
Mounting the Keypad Wiring Connections GTO LOCK DOOR BELL PUSH BUTTON Knock-out (use 22 AWG wires minimum) OPTIONAL TRANSFORMER SOLAR PANEL (not included) IMPORTANT • DO NOT USE Trans- LOCK CONTROL former or Solar Panel SOLENOID INPUTS with non-rechargeable batteries. -
Page 8: Typical Installation With Optional Solar Panel Or Transformer
Alternate Power Options When Using rechargeable nickel-metal hydride (NiMH) batteries: • Transformer or solar panel (not included) can be used to charge the battery. The control board has a trickle charge circuit to charge the batteries. • Highly recommended for heavy usage. Typical Installation with Optional Solar Panel Solar Panel Push Button... -
Page 9: Programming The Keypad
Programming the Keypad Programming Interface: Delete An Entry Code: • All codes are four (4) digits in length. • Press and release PROGRAM button. • Entry code is a four (4) digit code needed to activate the gate. • Enter the Master Code then press and release PROGRAM •... - Page 10 Telephone (850) 575-0176 • Fax (850) 575-8912 • website www.gtoinc.com The contents of all material available on this installation manual are copyrighted by GTO, Inc. (“GTO”), unless otherwise indicated. All rights are reserved by GTO, and content may not be reproduced, downloaded, disseminated, published, or transferred in any form or by any means, except with the prior, written permission of GTO. Any reprinting of GTO publications is by permission only.
Need help?
Do you have a question about the BullDog and is the answer not in the manual?
Questions and answers