
Related Manuals for GE Security Concord 4 series


Summary of Contents for GE Security Concord 4 series
-
Page 1: User Guide
466-2183 Rev B GE Security June 2005 www.gesecurity.com Part Numbers: 600-1021-95R 600-1022-95R 600-1040 600-1042 Concord 4 Series Security Systems user guide... - Page 2 4,855,713. Except expressly provided herein, the purchase of this product shall not constitute a license or otherwise provide a right to practice a method covered by any of the identified patents. GE Security hereby grants the purchaser of this product a limited, non-exclusive license to practice the methods patented in the identified patents solely with products manufactured, sold or licensed by GE Security.
-
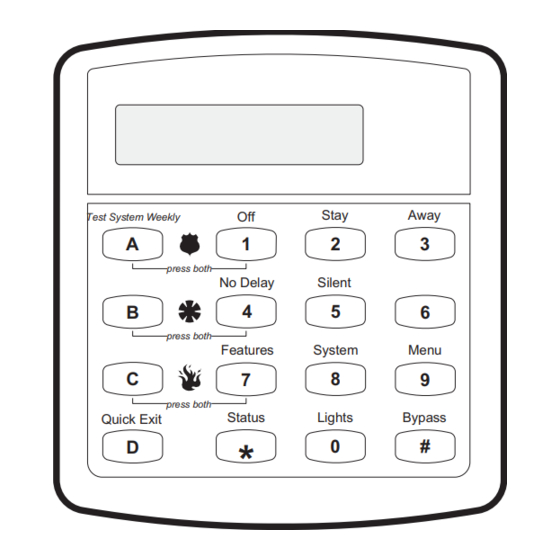
Page 3: Commands At A Glance
Commands at a Glance CODE Disarm the system. CODE or 1 CODE Cancel an accidental alarm. CODE Arm to Level 2—STAY.* CODE Arm to Level 3—AWAY.* Send a police alarm. Press and hold both POLICE buttons for 2 seconds. Send an auxiliary alarm. Press and hold both AUXILIARY buttons for 2 seconds. - Page 4 Concord 4 Series Security Systems...
-
Page 5: Table Of Contents
Contents Commands at a Glance - Getting to Know Your Security System Panel ............................1 Touchpads ..........................1 Door/Window Sensors ......................1 Motion Sensors ......................... 1 Environmental Sensors ......................1 Optional System Components ....................1 Communicating with the System Alphanumeric and Fixed Display Touchpads ................2 Wireless Handheld Touchpad .................... - Page 6 Checking the Status of Your System ................... 11 Short System Status ........................ 11 Full System Status ........................11 Panic Alarms Fire Panic Alarm ......................... 12 Lighting During a Fire Panic Alarm ..................12 Police Panic Alarm ........................12 Lighting During a Police Panic Alarm ..................12 Auxiliary Panic Alarm ........................
- Page 7 Example 1 of One Day Rollover .......................21 Example 2 of One Day Rollover .......................21 Multiple Day Rollover ......................21 Example of Multiple Day Rollover ....................21 Attaching Time Schedules ......................21 Time Schedules and Partitions ....................22 Advanced Light Control Controlling Lights By Time Schedule ..................22 Controlling Lights with Sensors ....................
- Page 8 Arming and Disarming Another Partition ................29 Programming Another Partition ....................29 Arming and Disarming Multiple Partitions at the Same Time ............ 29 Notes on Arming/Disarming Multiple Partitions from Alphanumeric and Fixed Display Touchpads ......................30 Notes on Arming/Disarming Multiple Partitions from Keychain Touchpads ........30 Macro Keys System Information Viewing the Event Buffer...
- Page 9 Accidental Smoke and Fire Alarms .................... 46 Dialer Abort ..........................46 Doors and Delay Time Settings ....................46 System Features..........................46 If the Power Goes Out ......................... 47 No Activity Time ......................... 47 Resetting the Smoke Detector ..................... 47 System Information ........................47 Paging ............................
- Page 10 Installation Instructions...
-
Page 11: Getting To Know Your Security System
Your system may include optional components that add the capability to: • control heating/air-conditioning • report alarms by cellular phone link in case landlines are down or inoperative • control/monitor the system from on- or off-site using a touchtone phone or via the Internet Concord 4 Series Security Systems... -
Page 12: Communicating With The System
If you would rather use an actual key (Figure 3) to arm and disarm the system, your security dealer can install a special key and keyswitch in your home. Figure 3. Arm/Disarm Key Concord 4 Series Security Systems... -
Page 13: Beeps And Leds- How Your System Talks To You
Your system can dial the phone numbers of five different pagers to notify pager holders of important system events, including: • System disarming • System arming • Trouble conditions • Alarm conditions For more information, see “Notification By Pager”. Concord 4 Series Security Systems... -
Page 14: Basic System Operations
Record these instructions in Appendix A: User Sheets under “Accidental Smoke and Fire Alarms”. Concord 4 Series Security Systems... -
Page 15: Clearing Alarms And Resetting Smoke Detectors
Disarm your system immediately upon entry. • Get familiar with all devices in your security system and learn how each one operates. • If you have pets, ask your installer if you need pet lenses in your motion detectors. Concord 4 Series Security Systems... -
Page 16: Aborting Accidental Alarms
2. Enter your Access Code. Touchpads display date and time or programmed text and the sys- system. tem sounds one long beep. ¾ To disarm to Level 1—OFF using a keychain touchpad: Press the Unlock button. Concord 4 Series Security Systems... -
Page 17: Level 2-Stay
Open a designated delay door and go outside. Leave the door open if you are planning to not close the door behind you! come back in! Return within two minutes and close the door. The system will rearm to 2—STAY. Concord 4 Series Security Systems... -
Page 18: Keychain Touchpad Arming
Arm” section in this manual. 3. Immediately press . Touchpads display, “ARMED TO STAY NO DELAY” or “ARMED TO AWAY NO DELAY”. Changing the arming level restores delay doors to their normal Exit and Entry Delay times. Concord 4 Series Security Systems... -
Page 19: Auto Stay Arming Feature
Refer to the “Appendix A: User Sheets” to determine the sensor number you wish to bypass. ¾ Note To bypass sensors directly: You cannot bypass sensors 1. Close all doors and windows. directly using a keychain touchpad. 2. Arm your system to the desired level. Concord 4 Series Security Systems... -
Page 20: Bypassing A Sensor Indirectly
1. From any touchpad: Press + light number. to basic and advanced light commands, the light From a 4-button keychain touchpad: switches must be turned on. You cannot turn on a specific light using a keychain touchpad. Concord 4 Series Security Systems... -
Page 21: Basic Output Control
(on/off) and the current temperature (if on). Panic Alarms Panic alarms are easily activated from any touchpad to quickly alert the central monitoring sta- tion to a Fire, Police, or Auxiliary emergency so the correct personnel can be dispatched immedi- Concord 4 Series Security Systems... -
Page 22: Fire Panic Alarm
Siren Time-out If the system is not disarmed after an alarm, the sirens will continue to sound until the time-out period is reached. The time-out period can only be programmed by your installer or dealer. Concord 4 Series Security Systems... -
Page 23: Access Codes
Regular User Code Privileges You cannot enter User Programming with a Regular User code. The Touchpad Tamper Feature The installer can program your system to activate a Police alarm in the case of possible touchpad tampering. Concord 4 Series Security Systems... -
Page 24: Changing Or Erasing User Codes
If the user code does not have this attribute turned on, the code restricts user from remote telephone access. ¾ To assign Remote Access to a user: CODE 1. Enter the programming menus by pressing + System or Partition Master Concord 4 Series Security Systems... -
Page 25: Assigning The System Test Attribute
1. Enter the programming menus by pressing + System or Partition Master 2. Press 3. Enter the correct time in 24-hour format (4 digits--see Figure 4), then press . For example, if 0723 the current time is 7:23 a.m., press Concord 4 Series Security Systems... -
Page 26: Adjusting System Sounds And Touchpad Brightness
For example, dim the touchpad display in a bedroom or enhance a display near a win- dow. Changing the touchpad display affects only the touchpad currently being used. ¾ To change touchpad display brightness: CODE 1. Enter the programming menus by pressing + System or Partition Master 2. Press Concord 4 Series Security Systems... -
Page 27: Using The Energy Saver Feature
The high and low settings you enter do not control heating and cooling systems, but determine the point at which the furnace or air conditioner is activated (see Figure 5). Concord 4 Series Security Systems... -
Page 28: Notification By Pager
Receiver Failure Police Panic Phone Test Phone Failure Receiver Jam Auxiliary Panic Event Buffer Full Touchpad Low Battery Touchpad Tamper Bus Failures • Opening and Closing Reports • Latchkey Reports • Notify by Exception Reports Concord 4 Series Security Systems... -
Page 29: Pager Messages
830 — 835 Partition master codes used (Concord 4 systems only) System Master code used Installer code used Dealer code used Quick Arm used Keyswitch sensor used System armed itself because it is being serviced or powered-up Concord 4 Series Security Systems... -
Page 30: Account Number In Page
One Day Rollover You can create a schedule that begins on one day, and stops the next day by using only one time schedule. (The stop time must be within 24 hours of the start time.) Concord 4 Series Security Systems... -
Page 31: Example 1 Of One Day Rollover
See “Advanced Light Control” for information on attaching time schedules for light control. • See “Controlling Outputs By Time Schedule” for information on attaching time schedules to outputs. • See “Schedule Arming” for information on attaching schedules to Arming. Concord 4 Series Security Systems... -
Page 32: Time Schedules And Partitions
2. Press . The touchpad displays “LIGHT n TO Sn x” or “LT n SN x,” (where n is the light and stop times. number and x is the sensor number). Concord 4 Series Security Systems... -
Page 33: Installer Programmable Lighting
Schedules cannot be used 1. At an alphanumeric or fixed display touchpad, enter the programming menus by pressing to disarm the system. CODE System or Partition Master 0660 2. Press 3. The touchpad displays “AWAY.” Concord 4 Series Security Systems... -
Page 34: Opening And Closing Reports
Regular User codes. If you would like to include a keychain touchpad as a latchkey user, contact your installer. Any regular user code can be programmed with this attribute. See “Assigning Code Attributes”. Concord 4 Series Security Systems... -
Page 35: What Will The Pager Report
“Creating Time Sched- ules”. ¾ Scheduling Latchkey Opening and/or Closing: 1. At an alphanumeric or fixed display touchpad, enter the programming menus by pressing CODE + System or Partition Master 0600 2. Press Concord 4 Series Security Systems... -
Page 36: Applying The Latchkey Modifier
Refer to “Appendix A: User Sheets” to see which pagers have been set up to receive a page for this feature. Contact the installer if you would like to turn the Notify by Exception feature on or off for any programmed pager or the central station. Concord 4 Series Security Systems... -
Page 37: Who Can Send A Page
It allows the dealer to change programming without sending a service person to the site. Download Feature Turning the Download feature on gives the dealer remote access to your system in order to: • Update your account. Concord 4 Series Security Systems... -
Page 38: Using A Partitioned System (Concord 4 Systems Only)
Code Attributes”). Each code has unique partition number assignments that it can control. By default, the System Master is the only code that can jump partitions. Refer to the “Appendix A: User Sheets” to see if any other access codes have the ability to jump partitions. Concord 4 Series Security Systems... -
Page 39: Arming And Disarming Another Partition
To disarm multiple partitions at the same time from a touchpad: 1. Press 1 on any touchpad assigned to the partitions you want to arm. The display shows “ENTER CODE”. 2. Enter your Access Code. The display shows all the partitions that will be disarmed. Concord 4 Series Security Systems... -
Page 40: Notes On Arming/Disarming Multiple Partitions From Alphanumeric And Fixed Display Touchpads
From the factory these buttons are labeled and work as follows: • CHIME—press once to turn chime on, press again to turn chime off. • STAY—press once to arm to Level 2—STAY. Concord 4 Series Security Systems... -
Page 41: System Information
Scroll through the events by pressing the A (back) and B (forward) keys. • The C key is used to toggle the second line display between Date/Time and Details. • Press the * key to exit Viewing Event History. Concord 4 Series Security Systems... - Page 42 Installer Programming Entry INST PROG ENTRY Installer Programming Exit INST PROG EXIT Lost Event (buffer overflow) LOST EVENT Main Unit Tamper MAIN UNIT TAMPER Memory Clear MEMORY CLEAR Memory Failure MEMORY FAILURE No Activity Alarm ACTIVITY ALARM Concord 4 Series Security Systems...
- Page 43 Line two of the display also contains “P-C” where P is the previous arming level and C is the current arming level. User information is shown in the following table. Detail Screen Display User U001 - U096 Wireless Touchpad or Keyfob Concord 4 Series Security Systems...
-
Page 44: Using A Touchtone Phone To Operate Your System
To access the system from off-site, the system needs to recognize two things about the call: • The panel needs to recognize that it should answer the phone. • The panel needs to recognize that the code entered has the authority to operate the system from off-site. Concord 4 Series Security Systems... -
Page 45: How The Panel Answers The Phone
Pick up the phone. Within 5 seconds of picking up the phone receiver, enter # (or Remote Phone Access Use the Ring-Hang-Ring or the Twelve-Ring method to get the system to answer the call. CODE Then enter Concord 4 Series Security Systems... -
Page 46: Activating A Police Panic Alarm
• Do not wait more than two seconds between key presses. Continue pressing even if you hear the system voice interrupt with a system status. Off-site Touchtone phones cannot activate this alarm. Concord 4 Series Security Systems... -
Page 47: Phone Questions
MINUTES LEFT.” When less than 5 minutes remain in Test Mode time, the system sounds a short beep every 60 seconds. System test 3. Follow the test procedure for each device as listed in the following table. Concord 4 Series Security Systems... -
Page 48: Phone Communication Test
The purpose of this test is to verify communication between the central monitoring station and your system. Most phone tests take only a few minutes, however, your system will try for up to 15 minutes to establish a connection if necessary. Concord 4 Series Security Systems... -
Page 49: Testing Sirens
2. Change the arming level. The table on the next page describes the conditions under which trouble beeps occur and when they begin. (These sounds are heard from interior sirens and touchpads if available.) Concord 4 Series Security Systems... -
Page 50: Common Questions And Answers
Check to see that you’ve set up the time schedule correctly as described in “Creating Time Schedules”. • Check the User Sheets in Appendix A to see in which partition the light is set up to be active. Concord 4 Series Security Systems... - Page 51 There is a problem with the power supplied to parts of the system. Call your security dealer for service. BUS FAILURE UNIT NN There is a problem with one of the peripheral devices in your system. Call your security dealer for service. Concord 4 Series Security Systems...
-
Page 52: Appendix A: User Sheets
HW / WL / TP HW / WL / TP HW / WL / TP HW / WL / TP HW / WL / TP HW / WL / TP HW / WL / TP Concord 4 Series Security Systems... -
Page 53: User Codes
Partition 1 Master NA (Default: none) Partition 2 Master NA (Default: none) Partition 3 Master NA (Default: none) Partition 4 Master NA (Default: none) Partition 5 Master NA (Default: none) Partition 6 Master NA (Default: none) Concord 4 Series Security Systems... -
Page 54: Touchpad Information
A u x i l i a r y p a n i c a l l l i g h t s . a l a r m . Figure 9. Keychain Touchpad 1 Concord 4 Series Security Systems... -
Page 55: Keychain Touchpad 2
A u x i l i a r y p a n i c a l l l i g h t s . a l a r m . Figure 12. Keychain Touchpad 4 Concord 4 Series Security Systems... -
Page 56: Accidental Smoke And Fire Alarms
… No. If I re-enter the armed premises during the Exit Delay time, it will con- tinue to count down and I must disarm the system. … Yes. I can use a key to arm the system. The switch is located: Keyswitch Arming ______________________________________________________________ … No. Concord 4 Series Security Systems... -
Page 57: If The Power Goes Out
Resetting the Smoke Detector To reset smoke detectors: … They are reset automatically. … Press the reset switch. … Enter Disarm command twice. System Information System Information Code Factory code System number System level Software version Concord 4 Series Security Systems... -
Page 58: Paging
Record the house codes for each partition and location of each light below. Partition 1—House Code______ Partition 2—House Code______ Light Location of Light Light Location of Light Partition 3—House Code______ Partition 4—House Code______ Light Location of Light Concord 4 Series Security Systems... -
Page 59: Partition 5-House Code
Location Name Energy Saver Low Temp. High Temp. Ptn. Setting Setting ° ° _____ _____ ° ° _____ _____ ° ° _____ _____ ° ° _____ _____ ° ° _____ _____ ° ° _____ _____ Concord 4 Series Security Systems... -
Page 60: Alarm Sounds And Status Beeps
1 short, high-pitched beep when a sensor/touchpad tests OK. 1 short, low-pitched beep when a sensor/touchpad fails a test. Contact your dealer for information or service. 1 short beep every minute during the last 5 minutes of sensor test. Concord 4 Series Security Systems... -
Page 61: Appendix B: Planning For Emergencies
Call for emergency assistance from a neighbor’s phone Warning Floor Plan Example Figure 13 is an example of a multi-level floor plan. Use this example as a guide to draw your own floor plan. Concord 4 Series Security Systems... -
Page 62: Your Floor Plan
Use the following guidelines when drawing your floor plan on the next page: … Show all building levels. … Show exits from each room (two exits per room are recommended). … Show the location of all security system components. … Show the locations of any fire extinguishers. Concord 4 Series Security Systems... -
Page 63: Floor Plan
Floor Plan Concord 4 Series Security Systems... -
Page 64: Alarm System Limitations
If you have any questions about your security system or if it ever needs servicing, please contact your security dealer. Company Name _____________________________ Address ____________________________________ City _______________ State _____ Zip __________ Phone Number (_____) _______________________ Contact Name _______________________________ Concord 4 Series Security Systems... -
Page 65: Appendix C: Programming Your System
¾ To change or assign a user access code: CODE 1. Enter the programming menus by pressing + System or Partition Master 2. Press until the touchpad displays “USER CODES,” then press Concord 4 Series Security Systems... - Page 66 5. Press to exit the programming menus. ¾ To change the System Master Code: CODE 1. Enter the programming menus by pressing + System Master 2. Press until the touchpad displays “USER CODES,” then press Concord 4 Series Security Systems...
-
Page 67: Using Programming Shortcuts
* + 041 + 1(off) or 2(on) + # Touchpad Brightness * + 043 + 0 through 3 + # Volume * + 044 + 0 through 7 + # * + 045 + 1(off) or 2(on) + # Voice Chime Concord 4 Series Security Systems... - Page 68 * + 064200 + 1(off) or 2(on) + # Sched 1: * + 064201 + 1(off) or 2(on) + # (Continues through Schedule 15) Sched 15: * + 064215 + 1(off) or 2(on) + # Concord 4 Series Security Systems...
- Page 69 * + 065100 + 1(off) or 2(on) + # Sched 1: * + 065101 + 1(off) or 2(on) + # (Continues through Schedule 15) Sched 15: * + 065115 + 1(off) or 2(on) + # Concord 4 Series Security Systems...
- Page 70 * + 081 + NN + # (nn = sensor no. to be attached) (Continues through Light 9) Light 9: * + 088 + NN + # (nn = sensor no. to be attached) Exit * + 00 + # Concord 4 Series Security Systems...
- Page 71 Concord 4 Series Security Systems...
- Page 72 Concord 4 Series Security Systems...
Need help?
Do you have a question about the Concord 4 series and is the answer not in the manual?
Questions and answers