VeriFone VX820 DUET Manual Manual
Paper rolls plus
Hide thumbs
Also See for VX820 DUET:
- User manual (64 pages) ,
- Installation manual (36 pages) ,
- Quick setup manual (10 pages)

Related Manuals for VeriFone VX820 DUET


Summary of Contents for VeriFone VX820 DUET
- Page 1 Paper Rolls Plus MANUAL VERIFONE VX820 DUET POINT TRANSACTION SYSTEMS OY Vanha Nurmijärventie 62 FI-01670 VANTAA | puh: +358 (0)9 477 4330 | fax: +358 (0)9 436 2490 www.point.fi...
-
Page 2: Table Of Contents
Page 2 (33) INDEX INDEX INDEX INDEX: : : : 1. BEFORE USE ....................... 4 1.1 Important ........................4 1.2 PA-DSS –Standard ....................5 1.3 Terminal structure ....................6 1.4 Technical data ......................7 1.5 Connecting the cables ..................8 1.6 Touchscreen ...................... - Page 3 Page 3 (33) 4.1.7 Receipt copy ..................... 16 4.1.8 Refund ........................ 17 4.2 ONLINE TRANSACTIONS ................17 4.2.1 General information on online transactions .......... 17 4.2.2 Online batch ...................... 17 4.2.3 Point reporting ....................18 4.3 Reports and bank connection ............... 18 4.3.1 Print batch......................
-
Page 4: Before Use
Page 4 (33) 1. BEFORE USE 1.1 Important NOTE! If these instructions are not followed and the terminal is damaged it will void the warranty! • Protect the power cord and modem. If they are damaged they are not to be used anymore. •... -
Page 5: Pa-Dss -Standard
Page 5 (33) 1.2 PA-DSS –Standard The purpose of the PA-DSS –standard is to help software suppliers develop, according to the PCI- DSS requirements, payment solutions which do not save forbidden card information such as the CVV2 or the PIN-code. Companies must use solutions for card payment processing that are approved according to the PCI-DSS –standard. -
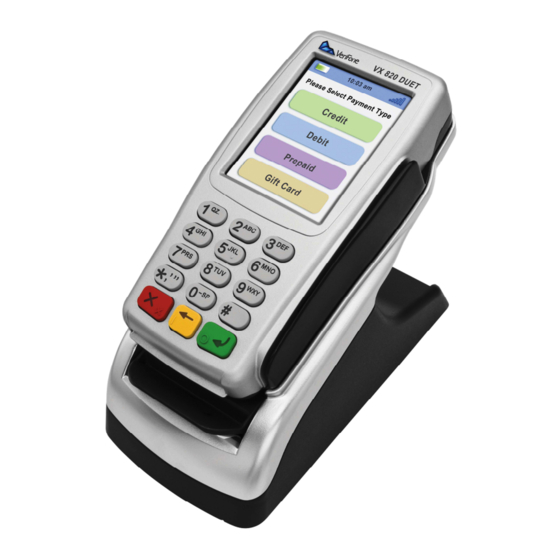
Page 6: Terminal Structure
Page 6 (33) 1.3 Terminal structure TOUCH SCREEN DISPLAY NUMERIC KEYPAD CANCEL KEY SWIPE READER CLEAR KEY ENTER KEY CHIP READER TERMINAL REST PRINTER COVER THERMAL PRINTER POWER PLUG POINT TRANSACTION SYSTEMS OY Vanha Nurmijärventie 62 FI-01670 VANTAA | puh: +358 (0)9 477 4330 | fax: +358 (0)9 436 2490 www.point.fi... -
Page 7: Technical Data
Page 7 (33) 1.4 Technical data Processor: 400 MHz ARM11, 32-bit RISC processor Memory: 160 MB (128 MB Flash, 32 MB SDRAM) standard,can exceed up to 500 Display: 240 x 320 pixel color TFT (QVGA) supports up to 26 lines x 26 characters Swipe card reader: Triple track (tracks 1, 2, 3), high coercivity, bi-directional Chip card reader:... -
Page 8: Connecting The Cables
Page 8 (33) 1.5 Connecting the cables Connecting the power cord Connect the power cord to the power plug located at the side of the terminal’s base. Connect the power cord to the power supply and the plug to an electrical outlet. Connecting the Ethernet cable Connect the Ethernet cable to the ETH-port located behind the terminal’s base. -
Page 9: Touchscreen
Page 9 (33) 1.6 Touchscreen The terminal has a touchscreen, which allows selecting menus directly from the screen. Enter- and cancel-functions can be selected directly from the screen or by pressing the particular key. 1.7 Using the menus To see the terminal’s various settings and functions, press the desired menu icon from the screen. To scroll inside the menu’s press the arrow keys from the screen, or numbers 1 and 3 from the keypad. -
Page 10: Switching The Paper
Page 10 (33) 1.9 Switching the paper • Raise the terminal from its base. • Open the printer cover. • Remove the previous paper roll from the tray. • Place the new paper roll so that the paper moves from the bottom of the roll towards the front edge. -
Page 11: Testing The Connection
Page 11 (33) 1.10 Testing the connection From the main display, select the Reports menu by pressing its icon. After this, press enter and select SEND BATCH. The screen informs DIALING. If the terminal successfully connects, the text CONNECTED appears on screen. A white bar and the text RECEIVING are displayed on screen. The bar turns gradually black as the batch sending progresses. -
Page 12: Batch Time
Page 12 (33) 2.3 Batch time The terminal will send the batch automatically if you have set a particular time for this function. The sending time can be at any time. We recommend that the time is after your stores closing time. -
Page 13: Contrast
Page 13 (33) Online bat percent = minimum battery reserve that the terminal requires to work. This is indicated in percentage (e.g. 20). GPRS shut down timer = the function is not used in this model. 2.8 Contrast You can adjust the screen’s contrast from the CONTRAST-settings with the minus and plus icons. Select the Menu icon from the screen and choose CONTRAST. -
Page 14: Certificate Downloading
Page 14 (33) Choose PHONE The terminal downloads the parameters. A white bar appears on the screen, which gradually turns black as the download progresses. The terminal prints on the paper “SUCCESSFUL PARAMETERS DOWNLOAD”. NOTE! After downloading the parameters, the terminal must connect to the bank. Select Reports from the screen, press Enter and choose SEND BATCH. -
Page 15: Swipe Card Transactions
Page 15 (33) 4.1.2 Swipe card transactions ENTER AMOUNT: Type the precise amount, including the cents, and press Enter. INSERT/SWIPE OR PRESENT CARD: Swipe the card from the magnetic reader. CREDIT / DEBIT: Choose the payment method The terminal prints out the merchant’s receipt and asks to print the customer’s receipt. Press Enter if you wish to print out the customer’s receipt. -
Page 16: Manual Entry
Page 16 (33) Select the Menu icon from the screen and choose EXTERNAL VOID ENTER RECEIPT NUMBER: Type the transaction’s receipt number. This is found on the receipt. INPUT SN: Enter the serial number of the terminal, in which the transaction has been made. The serial number is located at the back side of the terminal, next to the bar code after initials S/N. -
Page 17: Refund
Page 17 (33) 4.1.8 Refund You can make a refund at any time. If you need to undo a transaction at the same day use the REVERSAL instead NOTE! It is not allowed to make a refund for a bank card. Select the Menu icon and choose REFUND ENTER AMOUNT: Type the complete amount and press Enter INSERT/SWIPE OR TAP CARD: Insert the card into the chip reader, swipe the card or place the... -
Page 18: Point Reporting
Page 18 (33) Online batch settings enable you to choose the maximum sum and number of transactions in the terminal memory. After the maximum is reached, the terminal transmits the transactions forward. • TCS QUEUE AMOUNT = The maximum sum of the transactions in queue. After this amount is reached, the terminal will send all of the transactions in queue (e.g. -
Page 19: Send Batch
Page 19 (33) Select the Reports icon and press Enter. Select MONTHLY REPORT. Select again MONTHLY REPORT. The terminal prints out the report. Resetting the monthly report: Select the Reports icon and press Enter. Select MONTHLY REPORT. Select RESET REPORT The terminal resets the report. -
Page 20: Report Explanations
Page 20 (33) 4.3.5 Report explanations The transactions are grouped by different card types on the batch report. After the different card types the report shows the total amount and the number of transactions. SENT TO TCS: The total sum and amount of transactions that are sent to Point reporting as online transactions NOT SENT TO TCS: The total sum and amount of transactions that have not been sent to Point reporting as online transactions. -
Page 21: Issue Acknowledgment
Page 21 (33) NOT SENT, CONTAINS DUPLICATES = The batch has not been sent forward because it contains duplicate material. Actions = Contact your own bank and check the duplicates that the batch contains. If the batch must be sent again, it will be done by Point. Please contact Point’s customer service about the issue. -
Page 22: Authorization Notifications
Page 22 (33) 4.4 Authorization notifications When a transaction is declined at the authorization centre a declining code is printed on the receipt. This code tells you the reason why it has been declined. The transaction is declined by a notification given by the bank or the credit card company. - Page 23 Page 23 (33) Cashier, contact the recipient Limited card Cashier, contact recipients’ security department Exceeds PIN-code attempts Special situation Extinct card Stolen card Suspected abuse Successful Unsuccessful unsuccessful, form fault Declined. Accepted revocation of authorization, try again 900-999 System error, authorization not successful False transaction Do the transaction again Form fault, try again...
-
Page 24: Special Functions
Page 24 (33) 5. SPECIAL FUNCTIONS 5.1 Cash receipt Cash receipt is used when a customer pays with cash and a receipt is wanted from the terminal. Cash receipts are also seen on batch reports. Cash receipt is activated from the EDIT menu (2.1). Making a cash receipt sale: Press the MENU icon Choose CASH RECEIPT... -
Page 25: Cash Withdraw
Page 25 (33) 5.3 Cash withdraw Cash withdraw is used when a customer wants to withdraw cash from the cash register. A transaction is made, and the customer receives cash from the register. The merchant receives 0,50 € from every cash withdraw transaction. For example, if a customer wants to withdraw 10,00€ the merchant makes a transaction of 10,50€. -
Page 26: Vat
Page 26 (33) The terminal prints out the merchant’s receipt and asks to print the customer’s receipt. Press Enter if you wish to print out the customer’s receipt. Otherwise, press Cancel. 5.5 VAT VAT is activated from the EDIT menu (2.1). When making a transaction, the terminal asks to choose a VAT-rate for the transaction. -
Page 27: Invoice
Page 27 (33) 5.8 Invoice The invoice works in the same way as a cash receipt, except that the text INVOICE is printed on the receipt instead of CASH RECEIPT. Making an invoice: Press the MENU icon and choose INVOICE Choose INVOICE again. -
Page 28: Product Version
Page 28 (33) Multiuser reports Daily and monthly multiuser reports are similar to normal reports, except that multiuser reports specify every user’s transactions separately. 5.10 Product version Product version allows you to define products for your terminal. In this version receipts print out details of the sold products. - Page 29 Page 29 (33) The display shows the following: a) Add product b) Edit product c) Remove product a) Add product Product id: type the products number (0-99) and press Enter. Product name: Type the product name and press enter. To get letters, press repeatedly a number key until the correct character is on the screen.
- Page 30 Page 30 (33) a) Cash receipt – choose this, if the customer pays in cash. b) Make a payment? – Choose this, if the customer uses a payment card. c) Add next product? – Choose this, if you wish to sell multiple products. The terminal prints out the receipts.
-
Page 31: Trouble Shooting
Page 31 (33) 6. TROUBLE SHOOTING 6.1 Notifications on the screen BLACKLIST MISSING = The blacklist is missing from the terminal. See instructions for downloading the blacklist (4.4.4). USE MAG CARD = The terminal cannot read the card’s chip. Use the magnetic strip reader. USE CHIP = The card has an EMV-chip. -
Page 32: Notifications On The Receipt
Page 32 (33) 6.2 Notifications on the receipt CONNECTION ERROR = There is a problem with the connection. See part 6.3. BATCH SENDING ERROR = There is a problem with the connection. See part 6.3. ”PYYTÄMÄÄNNE AINEISTOA EI OLE” = The bank does not have information of the previous batch sending ready. -
Page 33: Service
Page 33 (33) 6.4 Service NOTE! Do not, under any circumstances, try to fix the terminal by yourself. The terminal should be always delivered to the maintenance service. If you suspect that the terminal is damaged or broken, do the following: •...
Need help?
Do you have a question about the VX820 DUET and is the answer not in the manual?
Questions and answers