Table of Contents
Advertisement
Quick Links
Advertisement
Table of Contents

Related Manuals for CYP PU-160ETH


Summary of Contents for CYP PU-160ETH
- Page 1 PU-160ETH Ethernet and USB to HDMI Converter Operation Manual PU-160ETH...
-
Page 3: Safety Precautions
Trademark Acknowledgments All products or service names mentioned in this document may be trademarks of the companies with which they are associated. Safety Precautions Please read all instructions before attempting to unpack or install or operate this equipment, and before connecting the power supply. Please keep the following in mind as you unpack and install this equipment: ... -
Page 4: Table Of Contents
Table of Contents Introduction …………………………………………........ Applications......…………………………………………… Package Contents.....………………………………………………. System Require ments....……………………………………….. Features ......……………………………………………….. Specifications..................Hardware Description................. 7.1 Product overview................7.2 Front Panel..................7.3 Rear Panel..................Software Installation....………………………………….……….. 8.1 USB to HDMI Software..............8.2 USB device driver................Launch USB Server................10. Using the DisplayLink Manager............10.1 Using DisplayLink Manager............ -
Page 5: Introduction
1. Introduction The Ethernet and USB to HDMI Converter allow users to use TV as the PC's primary display with keyboard and mouse at hand for Internet browsing, Microsoft Office tasking, music and movies entertainment from a PC on the network. -
Page 6: System Requirements
4. System Requirements System Hardware Requirements: 2.4 GHz single core CPU with at least 1GB RAM for optimal performance Operating Systems: Windows 2K SP4 Windows XP Home or Professional 32 bits SP2 Windows Vista 32 bits USB Port Extension: ... -
Page 7: Specifications
6. Specifications Input Port 1 x Mini USB; 1 x Ethernet Output Port 1 x HDMI Extender Ports 2 x USB Power Supply 5VDC/2.6A (US/EU standards, CE/FCC/UL certified) ESD Protection Human body model: ± 10kV (air-gap discharge) ± 6kV (contact discharge) Core chipset: ±... -
Page 8: Hardware Description
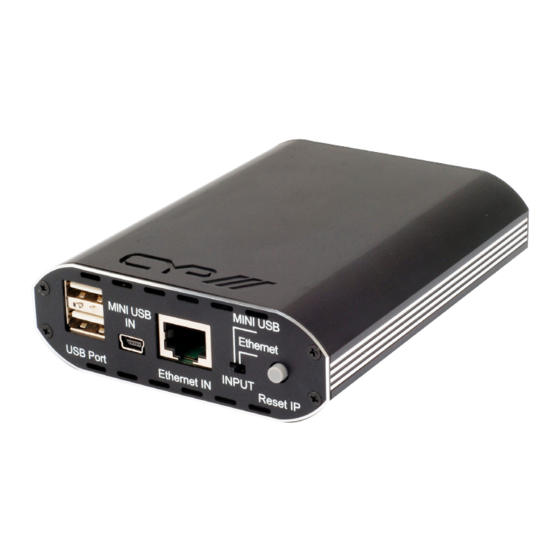
7. Hardware Description The following sections describe the hardware components of the unit. Note: Install the device driver of your Ethernet/USB to HDMI converter before operating the device. 7.1 Product overview Ethernet or mini USB HDMI PC/NB Ethernet to Monitor HDMI device 7.2 Front Panel MINI USB... -
Page 9: Rear Panel
7.3 Rear Panel DC 5V HDMI OUT POWER EDID OFF ON LINK ① ② ③ ④ ⑤ ① Power: This slot is where user plugs the 5V DC power supply of the unit before connecting the adaptor to an AC wall outlet. ②... -
Page 10: Software Installation
8. Software Installation The following sections list the procedures to follow when installing the USB to HDMI and USB device drivers. 8.1 USB to HDMI Software Insert the provided driver CD into your CD-ROM driver. Using the Program Manager, select and double-click on the “ USB to HDMI Software ” folder. Locate and then execute the “... -
Page 11: Launch Usb Server
9. Launch USB Server Press “ Launch USB Server ” icon from your desktop screen to connect the DisplayLink USB to HDMI device and C-Media USB Sound Device. Once connection completes, the status icons beside each driver will change from GREEN to ORANGE as illustrated below. -
Page 12: Using The Displaylink Manager
10. Using the DisplayLink Manager 10.1 Using DisplayLink Manager After the driver is completely installed, (the DisplayLink Manager-utility) will automatically appear on the system tray. The utility allows you to quickly change the settings and resolution for DisplayLink Manager. Right-clicking the icon will launch its context menu. - Page 13 Color Quality: This option allows you to select the screen color quality (available only in extended mode). Screen Rotation: This item allows you to rotate the screen by 90, 180 or 270 degrees, on the additional monitor.
- Page 14 Extend to: This option lets you reposition the extended screen to the top, bottom, left or right of the primary display. Extend: This item lets you set the DisplayLink Manager to Extended mode. ...
- Page 15 Mirror: This option allows you to set the DisplayLink Manager to Mirror mode. Enabling this will let you see an identical desktop image on the additional monitor. Off: This item disable the DisplayLink Manager on the system. ...
-
Page 16: Using More Displaylink Manager
Advanced: This item directly access your system's Display Properties . From this menu item, you will be able to adjust the resolution, color quality, position and refresh rate via the Display Properties . 10.2 Using More DisplayLink Manager It is not necessary to install driver again if you have completed the driver installation in advance. -
Page 17: Firmware Update
10.3 Firmware Update Updates on your firmware version may be done manually or automatically. Pease refer to the following procedures when performing either type of update. Manually Update: Manual updating of your firmware is possible by click the Updates → Check Now… , it will then check and download the latest firmware. -
Page 18: Uninstall The Device Driver
11. Uninstall the Device Driver Follow the steps below to uninstall the USB to HDMI drivers installed in your system. Step 1: Open the Control Panel: Start → Control Panel → Add or Remove Programs . Step 2: Select USB to HDMI Converter and click Remove . Step 3: Click Yes to confirm the removal. - Page 19 Step 4: Select DisplayLink Graphics and click Remove. Click Yes to confirm the removal. Step 5: Click Yes to restart your computer.
-
Page 20: Connection And Installation
12. Connection and Installation ▼ RJ-45 Cable Keybord Mouse Flash IP Router USB Cable RJ-45 Cable HDMI Cable TV/Display... -
Page 21: Troubleshooting
Situation Check Point 13. Troubleshooting 1. Make sure you restart your computer after the driver installation. 2. Check all the connectors are plugged in correctly. 3. Make sure the USB port that you are using is The device driver has USB 2.0. -
Page 22: Acronyms
Acronyms Acronym Complete Term Central Processing Uit EDID Extended Display Identification Data HDMI High-Definition Multimedia Interface Universal Serial Bus...
Need help?
Do you have a question about the PU-160ETH and is the answer not in the manual?
Questions and answers