Expobar ROSETTA MINI CONTROL 1GR User Manual
Hide thumbs
Also See for ROSETTA MINI CONTROL 1GR:
- Service manual (92 pages) ,
- User manual (36 pages) ,
- Service manual (40 pages)
Table of Contents
Advertisement
Advertisement
Table of Contents

Subscribe to Our Youtube Channel
Related Manuals for Expobar ROSETTA MINI CONTROL 1GR


Summary of Contents for Expobar ROSETTA MINI CONTROL 1GR
- Page 1 ROSETTA USER MANUAL UM_EN Date.: 140228...
-
Page 2: Table Of Contents
CONTENTS ROSETTA Original Instructions CONTENTS .....................................2 SYMBOL DESCRIPTION ..............................4 Hazard intensity levels ......................................4 gENERAL ....................................5 Introduction ..........................................5 General instructions ........................................ 5 Warnings ............................................ 5 Precautions ..........................................6 Intended use ..........................................6 TECHNICAL SPECIFICATIONS ...........................7 ROSETTA MINI CONTROL ....................................7 Accessories.......................................... - Page 3 CONTENTS ROSETTA CLEANINg AND MAINTENANCE ........................23 Coffee machine cleaning .......................................23 Daily cleaning ..........................................23 Weekly cleaning ........................................23 Cleaning the Brewing group and porta-filter ..............................24 Cleaning the gasket and shower plate ................................25 Additional handling of the machine..................................26 STORAgE AND DISPOSAL OF MACHINE ......................26 How to store the machine ....................................26 Disposal of machine ......................................26 PROgRAMMINg ................................27...
-
Page 4: Symbol Description
SYMBOL DESCRIPTION ROSETTA Hazard intensity levels There are three different levels of hazard intensity, identified by signal words DANGER, WARNING and IMPORTANT. The level of hazard is determined by the following definitions. Observe the statements to ensure safety, performance, prevent injury and machine damage. Important: Alerts against unsafe practices. -
Page 5: General
gENERAL ROSETTA Introduction Thank you for choosing the ROSETTA espresso machine. We hope you enjoy it ! Read the user manual before using the machine. Keep this manual close to hand for future This manual contains important instructions on reference. If damaged or lost, request a copy from intended and safe use of the coffee machine. -
Page 6: Precautions
gENERAL ROSETTA Do not remove or disable any of the mechanical, three units of the same model. Do not place other electrical or thermal protection mechanisms. heavier packages on top of the box. In case of emergency, (e.g. the machine catches fire The machine is likely to be exposed to or becomes unusually hot or noisy), disconnect the temperatures below 0 ºC during handling and... -
Page 7: Technical Specifications
TECHNICAL SPECIFICATIONS ROSETTA ROSETTA MINI CONTROL MODEL SPECIFICATIONS ROSETTA MINI ROSETTA MINI CONTROL 1GR CONTROL 2GR Steam wand 1 unit 1 unit Hot water outlet 1 unit 1 unit Temperature control Regulated by pressure switch Regulated by pressure switch Temperature control by group Programmed via display Dispensing system for tall cups Optional... -
Page 8: Rosetta Display Control 2Gr
TECHNICAL SPECIFICATIONS ROSETTA ROSETTA DISPLAY CONTROL 2GR MODEL SPECIFICATIONS ROSETTA DISPLAY ROSETTA 3 BOILERS CONTROL 2GR DISPLAY CONTROL 2GR Steam wand 2 units 2 units Hot water outlet 1 unit 1 unit Temperature control PID regulation PID regulation Temperature control by group Programmed via display Dispensing system for tall cups Optional... -
Page 9: Rosetta Display Control 3Gr
TECHNICAL SPECIFICATIONS ROSETTA ROSETTA DISPLAY CONTROL 3GR MODEL SPECIFICATIONS ROSETTA DISPLAY ROSETTA 4 BOILERS CONTROL 3GR DISPLAY CONTROL 3GR Steam wand 2 units 2 units Hot water outlet 1 unit 1 unit Temperature control PID regulation PID regulation Temperature control by group Programmed via display Dispensing system for tall cups Optional... -
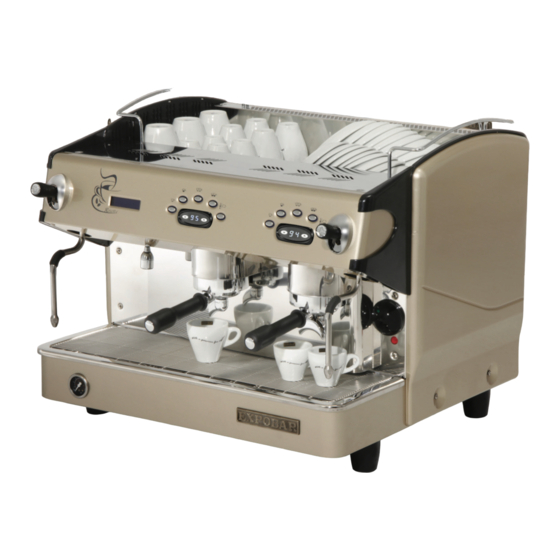
Page 10: Overview Of Components
OVERVIEW OF COMPONENTS ROSETTA Front view of the machine ROSETTA MINI CONTROL Drink ON/OFF switch Steam lever buttons Steam lever Hot water outlet Pump pressure gauge Steam wand Porta-filter Heater element lamp Boiler pressure Brewing group gauge... -
Page 11: Rosetta Display Control 2Gr
OVERVIEW OF COMPONENTS ROSETTA Front view of the machine ROSETTA DISPLAY CONTROL 2GR Steam lever Drink Steam wand buttons Steam lever Display Pump pressure gauge Heater element lamp Porta-filter Steam wand Hot water outlet Brewing ON/OFF switch group... -
Page 12: Rosetta Display Control 3Gr
OVERVIEW OF COMPONENTS ROSETTA Front view of the machine ROSETTA DISPLAY CONTROL 3GR ON/OFF switch Drink buttons Steam lever Display Steam lever Pump pressure gauge Porta-filter Heater element lamp Steam wand Hot water outlet Steam wand Brewing group... -
Page 13: Dimension Sketch
DIMENSION SKETCH ROSETTA ROSETTA MINI CONTROL Modelo 550 mm 460 mm 590 mm 74 mm ROSETTA Mini 1Gr ROSETTA Mini 1Gr 550 mm 460 mm 590 mm 124 mm Tall Cup 550 mm 460 mm 590 mm 74 mm ROSETTA Mini 2Gr ROSETTA Mini 2Gr 550 mm 460 mm... -
Page 14: Rosetta Display Control 2Gr
DIMENSION SKETCH ROSETTA ROSETTA DISPLAY CONTROL 2GR Model 550 mm 680 mm 590 mm 74 mm ROSETTA 2Gr ROSETTA 2Gr 550 mm 680 mm 590 mm 124 mm Tall Cup ROSETTA 2Gr 3 Boil- 550 mm 680 mm 590 mm 74 mm ROSETTA 2Gr 3 Boil- 550 mm... -
Page 15: Rosetta Display Control 3Gr
DIMENSION SKETCH ROSETTA ROSETTA DISPLAY CONTROL 3GR Model 550 mm 980 mm 590 mm 74 mm ROSETTA 3Gr ROSETTA 3Gr 550 mm 980 mm 590 mm 124 mm Tall Cup 550 mm 980 mm 590 mm 74 mm ROSETTA 3Gr Boilers ROSETTA 3Gr 4 Boil- 550 mm 980 mm... -
Page 16: Transport
TRANSPORT ROSETTA Packaging The machine is shipped in a unique carton box which uses expanded polystyrene paddings. The machine box is provided with conventional symbols that can be perfectly visible during the handling and storage tasks. The machine box must stay in a vertical position during the transport. Do not tip or try to place the box tilted sideways in any way. -
Page 17: Electrical Connection
INSTALLATION ROSETTA Electrical connection The coffee machine should only be connected to the power supply by qualified personnel. The following safety instructions should be followed at all times: Check that the electrical specifications on the ratings plate match the specifications of the power supply at the point of installation. -
Page 18: Water Connection
INSTALLATION ROSETTA Water connection The Installation of the machine to a water mains connection must be done by a qualified person. Rinse around 20 liters of water from the main water supply before connecting the machine to the water connection. Connect the inlet hose that is assembled in the machine to the main water supply, which should have a 3/8”... -
Page 19: Operation
OPERATION ROSETTA The porta-filter set Lock-in spring (filter basket) Filter basket Placing porta-filter spring Porta-filter & filter basket for single espresso (7g) Porta-filter & filter basket for double espresso (14g) Inserting the porta-filter in the group Align the porta-filter's two lateral Insert the porta-filter and rotate it anti-clockwise until the flanges with the slots in the group. -
Page 20: Espresso Brewing
OPERATION ROSETTA Espresso brewing Important: Always keep the porta- filter inserted in the group to keep it warm. This is very important to maintain an optimal temperature to get the best espresso. Unlock and remove the porta-filter from Fill the filter basket of the the group head. -
Page 21: Steaming And Frothing Milk
OPERATION ROSETTA Steaming and frothing milk Steaming Frothing Place the steam wand over the drip tray and open Immerse the steam wand into the jug containing the steam lever for a few seconds, this will allow the milk, make sure the wand tip is submerged. condensed water to be ejected. -
Page 22: Dispensing Hot Water
OPERATION ROSETTA Dispensing hot water Place a jug (or similar) under the hot water outlet. Press the hot water button for less than 1 seconds for automatic dose dispensing. Press for longer than 1 second for continous dispensing. Wait until the machine stops dispensing hot water automatically, or press the button again to stop hot water dispensing. -
Page 23: Cleaning And Maintenance
CLEANINg AND MAINTENANCE ROSETTA Coffee machine cleaning Important: To obtain the best efficiency, quality and performance of the machine, you should always follow the cleaning and care instructions provided in this manual. Turn off the power switch when cleaning the exterior of the machine. All external surfaces should be cleaned with a wet cloth that will not get out fibers, threads or scratch the machine. -
Page 24: Cleaning The Brewing Group And Porta-Filter
CLEANINg AND MAINTENANCE ROSETTA Cleaning the Brewing group and porta-filter Unlock and remove the porta-filter from the group head. Place the cleaning membrane in the filter basket. Fill the filter basket with professional cleaning powder for espresso coffee machines. Lock the porta-filter into the group head. Activate the auto-cleaning program: Turn off the machine. -
Page 25: Cleaning The Gasket And Shower Plate
CLEANINg AND MAINTENANCE ROSETTA Cleaning the gasket and shower plate Cleaning the gasket When placing the porta-filter filled with grinded coffee into the brewing group, left overs will accumulate in the closing surface. If these remains are excessive it can prevent a good closing between the porta-filter and the group head.Moreover, these remains can even block the dispensing of water through the group head. -
Page 26: Additional Handling Of The Machine
CLEANINg AND MAINTENANCE ROSETTA Additional handling of the machine Important: Avoid placing wet cups directly on the cup shelf, it may drip into the machine and cause machine damage. Remove and insert the porta-filter gently. Never use excessive force to try to close the porta-filter. -
Page 27: Programming
PROgRAMMINg ROSETTA Electronic control panel Button functions Here is some of the additional functions that the electronics offers: Volume control of four different espresso drinks per brewing group. Time-controlled hot water dispensing. (if available) Automatic filling and level control of the boiler. Automatic switch off of the heating element if not enough water. -
Page 28: Programming The Coffee Dosage
PROgRAMMINg ROSETTA Programming the coffee dosage This section explains how to program the doses dispensed automatically by the drink buttons . Important: Use a porta-filter filled with fresh coffee for every new dose you program. On machines not equipped with a display, hold down the Continuous Dispensing button 4 seconds. -
Page 29: Programming Using The Display
PROgRAMMINg USINg THE DISPLAY ROSETTA Machine status Machines equipped with a display include the following additional functions: Automatic daily on/off timer (stand-by function). Clock settings (current time and date). Promotional display. Number of coffees/infusions dispensed. Digital boiler-temperature display and control. PID-technology boiler-temperature control. -
Page 30: Accessing The Second Menu Level
PROgRAMMINg USINg THE DISPLAY ROSETTA Accessing the second menu level With the machine on, press the Continuous Dispensing button on the Doses setting Left-hand drink buttons and hold it down (for over 8 seconds) until the dose- Select within 30s programming menu is displayed. -
Page 31: Auto On/Off
PROgRAMMINg USINg THE DISPLAY ROSETTA Auto On/Off After accepting the changes made in the "set clock" menu, pressing the 2 Short Auto On/Off Espressos button accesses the coffee machine's auto on/off programming hh:mm menu (see fig. 09). Fig. 09 To change the auto on/off time, increase/decrease the values (hours) using the 1 short espresso and 1 Long Espresso buttons whilst the values are... -
Page 32: Messages And Alarms
MESSAgES AND ALARMS ROSETTA Fault in flow meter X Flowmeter Flow fault detected in counter X Gr. X Time-out alarm Check that the machine is receiving water. Boiler filling up Temperature sensor fault Probe unconnect Service the machine. Service To disable the alarm and reset the counter: Turn off the machine. -
Page 33: Troubleshooting
TROUBLESHOOTINg ROSETTA The following checks can be carried out by users once the machine has been turned off and disconnected from the power supply. For all other non-specified machine faults, disconnect the machine from the power supply and immediately contact authorised and qualified service personnel. Problem Possible cause Solution... -
Page 34: Technical Support
For the warranty to be valid, the conditions for maintenance must have been followed in accordance with our instructions, proper care must have been taken and any claim against the warranty must be sent without delay. The equipment in question may not be used while awaiting service if there is any risk that the damage or defect would worsen.
Need help?
Do you have a question about the ROSETTA MINI CONTROL 1GR and is the answer not in the manual?
Questions and answers