Table of Contents
Advertisement
Quick Links
Advertisement
Table of Contents

Related Manuals for Strong SRT 6500

Summary of Contents for Strong SRT 6500
- Page 1 Twin Tuner DVR Blu-ray Player Combo User’s Manual...
-
Page 3: Table Of Contents
Table of Contents Table of Contents……………………………………………………….1 Safety Instructions……………………………….………………2 About the Twin Tuner DVR…………………...………………3 Front Panel and Rear Panel……………………………….……………4 Front Panel……………………………………………………………..4 Rear Panel………………………………………………………………4 Remote Control………………………………………………………..5-6 Using the remote control………………………………………………7 Connecting to Equipment…………………………………………8-10 M a i n M e n u … … … … … … … … … … … … … … … … … … … 1 1 - 1 5 Basic Operation………………………………………………16-20 Recording Function………………………………………….21-25 DVR Storage Filter Function …………………………………………26... -
Page 4: Safety Instructions
Safety Instructions Always read the safety instructions carefully. Keep this User's Manual for future reference. Keep this equipment away from humidity. Lay this equipment on a stable flat surface before setting it up. Do not place it on soft furnishings. ... -
Page 5: About The Twin Tuner Dvr
About the SRT 6500 Thank you for choosing the SRT 6500. With its Twin Tuner’s and HDMI 1080i connection, you can watch all new digital DVB-T channels in High Definition. To get the best of the High-Definition programs, we advise you to connect the receiver: To your television with an HDMI cable for superior picture quality. -
Page 6: Front Panel And Rear Panel
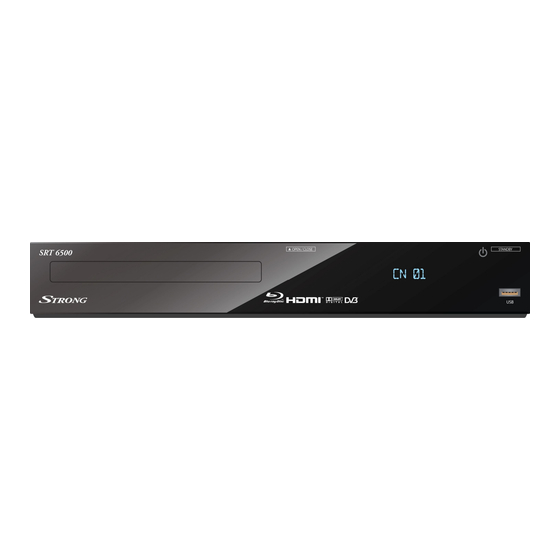
Front Panel and Rear Panel Front Panel Open/ close the door of DVD tray OPEN/CLOSE:. STANDBY button: To turn ON/OFF the Standby Mode. USB Slot: Connect for software upgrades. Rear Panel ANT IN: Ant In is where you connect the Antenna.. LOOP OUT: Loop Out RF signal to second tuner. -
Page 7: Remote Control
Remote Control Remote key functions: POWER: To turn the standby mode ON/OFF. DTV/BD: To switch between the DTV and BD mode. AUDIO: To display the Audio info of the selected program. TIMER: To add a new timer for recording. T.SHIFT: To activate and cancel time shift feature. - Page 8 Remote Control 18. ▲▼: To change the program up or down or to move the selection up/down in the menu mode. 19. EPG:To access Electronic Program Guide 20. Numeric buttons (0-9): To enter numeric options in menus and to enter a channel number directly.
-
Page 9: Using The Remote Control
1. To use the remote control, point it towards the front of the SRT 6500. 2. The remote control has a range of up to 7 meters from the SRT 6500 at an angle of up to 60 degrees (30 degrees for left hand side, 30 degrees for right hand side). -
Page 10: Connecting To Equipment
Connecting to Equipment How to get good reception • You do not need to change or replace your existing TV antenna to receive digital signal. However, if your antenna is not in a good condition it is recommended that you consider replacing it to ensure uninterrupted digital television viewing. - Page 11 Connecting to Equipment Connect the unit via YpbPr output and Audio output (for high definition viewing) Connect the antenna with ANT IN of the unit. Connect the RF loop cable via LOOP IN and LOOP OUT. Connect the unit to TV via YPbPr cable as below. Connect the unit via HDMI output (for high definition viewing) Connect the antenna with ANT IN of the unit.
- Page 12 Connecting to Equipment Audio connections via SPDIF/Mixed Audio L/R Output Connect the antenna with ANT IN of the unit. Connect the RF loop cable via LOOP IN and LOOP OUT. Connect the unit to TV via AV cable as below.
-
Page 13: M A I N M E N
MAIN MENU Press [MENU] to open MAIN MENU. Description of each item is listed below: Channels Press [OK]/[▶] to enter the Channel List. Electronic Program Guide Menu Press [OK]/[▶] to enter EPG List. Vertical EPG Horizontal EPG DVR Menu Press [OK]/[▶] to enter DVR List. - Page 14 Auto Play Next Program -Available option: Enable or Disable -Selecting “Enable”, the SRT 6500 will play the next recorded program in the list once the current program is finished. -Selecting “Disable” the SRT 6500 will only play the program which was...
-
Page 15: Network Menu
MAIN MENU NETWORK Menu Press [OK]/[▶] to enter Network Menu. Internet Radio Network Neighborhood Weather Network State INSTALLATION Menu Press [OK]/[▶] to enter Installation Menu. Auto Channel Search (please refer to page 15 for detailed instructions) ... - Page 16 MAIN MENU Time Mode Display current date Display current Time Daylight Saving Time Region Parental Control Censorship Installation Menu Setting Menu DVR Menu New Password Confirm Password Note: (1) If you select “Lock”...
- Page 17 MAIN MENU OSD Settings OSD Transparency Info Box Display Time System Information Press OK to view the system information of the unit. Firmware Update -To upgrade the software of the unit. (Details please refer to page 20) ...
-
Page 18: Basic Operation
Basic Operation Scanning for channels Press [MENU] and then press [LEFT]/[RIGHT] and highlight [Installation]. Press [OK] /[▶] to enter [Installation] menu. Press [UP]/[DOWN] to select “Auto Search” and press [OK], the unit will start to scan all available channels. OR you can use the Manual Search option to search for specific channels. Once you have entered the [Installation] menu, use [UP]/[DOWN] to select and enter “DTV Manual Search”. -
Page 19: Changing Volume
Basic Operation Channel Info Banner Open Info Banner by pressing [INFO] in Live TV Mode. Info banner shows the current and next program and the relative information of the program. To clear info banner press [EXIT]. When recording, the record status will be the screen. - Page 20 Audio Press [AUDIO] to Navigate between available sound tracks of currently viewed channel. Recall Press [Recall] to switch between current and the previously viewed channels. Mute Press [MUTE] to mute the sound. Press again to restore sound.
-
Page 21: Time Shift Function
Basic Operation Time Shift Function Activate Time Shift by pressing [PAUSE] in Live TV Mode. Time Shift supports a record time of up to 2 hours. The Main Screen will be paused. The information displays the amount of time you are behind Live TV. Press [PLAY]/[PAUSE] resume... -
Page 22: Firmware Update
Basic Operation Firmware Update Upgrade software by inserting USB device into the USB port. Please visit the Software Updates section of the STRONG website at http://www.strong.com.au/software.html to download the latest software version for the SRT 6500. Once you have downloaded the software place it on a USB stick, please ensure that the USB stick has no other files stored on it other than the required software file. -
Page 23: Recording Function
Recording Function Before recording, please select the storage destination (Internal HDD/Front USB) of the recorded program in DVR menu (please refer to page 12 – DVR Setting menu). The unit is set to record to the Internal HDD (Built-in Hard disk) as default if Front USB not selected. - Page 24 Recording Function Playback of recorded programs Open DVR Menu by pressing [DVR] in Live TV Mode. The media file currently recording will have a Red square next to the title. Press [OK] to preview the media file in the preview screen, press [OK] again to view the file in full screen.
- Page 25 Press [STOP]/[EXIT] to stop playback. If a program is being recorded while you are playing back a previously recorded program, when you press the [STOP]/[EXIT], a dialog will be displayed on screen to allow you to select to either stop playback or stop the recording. Editing recorded programs In this mode you can remove sections of the recorded program, so when playing back, these sections will be skipped and playback will continue after the...
-
Page 26: Epg Recording
Recording Function EPG RECORDING Display the EPG by pressing [EPG] in Live TV Mode. Press [▲][▼] to select desired channel and press the [OK] button. Press [▶] right arrow button to access program list Press [▲][▼] to highlight the program you wish to record. Press [ ] to scroll between pages. - Page 27 Recording Function COPY FILE TO EXTERNAL DEVICE Open DVR Menu by pressing [DVR] in Live TV Mode. Press [▲][▼] to select the programs you wish to copy. Press the Red button to display the list of options. To copy a single file select Copy and press the OK button.
-
Page 28: Dvr Storage Filter Function
DVR Storage Filter Function Open DVR Menu by pressing [DVR] in Live TV Mode. Press [INFO] to pop the storage filter options list and press [OK] select one you wish to view (Such as : Inner HDD, USB and Net Disk ). -
Page 29: Electronic Program Guide (Epg)
Electronic Program Guide (EPG) Access EPG by pressing [EPG] in Live TV Mode. EPG in Vertical Display Mode Press [▲][▼] [CH+][CH-] to highlight channel then press OK to access this channel. Press [ ▶ ] button to enter electronic program data list. Press [▲][▼] [CH+][CH-] to highlight program then press OK to view extended program information. - Page 30 Electronic Program Guide (EPG) Access EPG by pressing [EPG] in Live TV Mode. EPG in Horizontal Display Mode Press [▲][▼] [CH+][CH-] to highlight channel then press OK to access this channel. Press [ ▶ ] button to enter electronic program data list. Press [◀][▶] to highlight program then press OK to view extended program information.
-
Page 31: Epg Search(Epg)
EPG Search (EPG) Access EPG by pressing [EPG] in Live TV Mode. EPG in Vertical/Horizontal Display Mode Press [FORMAT] button to display keyboard. Input your keyword and press [BLUE] to start EPG searching. Once in the electronic program data list. 13. -
Page 32: Network
“Network state” in Network menu. Here the status will state “Enable” and your networks IP Address will be displayed. For more instructions on connecting your SRT 6500 to the internet please refer to page 41. - Page 33 The Network Neighbourhood feature allows you to access media files that you have stored on your PC on the SRT 6500 such as video files, mp3 files and photos. Regardless of the operating system on your PC the first step required is to create a folder on the local hard drive.
- Page 34 Network Open “Control Panel” and turn on the guest account Open “Control Panel” and double click “Administrative Tools” Double click “Local Security Policy” In the left menu tree, double click “User Rights Assignment”...
- Page 35 Network Double click “Deny access to this computer from the network” Select “Guest” account and click “Remove” button Click “Apply” button. 10. Now you can add “Network Neighbourhood” on Set Top Box (for full instructions please refer to the Network instructions) Please enter the correct IP address and folder name.
- Page 36 Network How to access PC media on Windows 7 Right click the “Media” folder, select “Properties” Select “Sharing” page and “Share” Select “Share” and “Done”...
- Page 37 Network Select “Security” page and “Edit” Select “Add” Input “guest” or “everyone” to the box and select “Check Names””Apply”...
- Page 38 Network Open “Control panel” ”System and Security” Select “Administrative Tools” Double click “Computer Management”...
- Page 39 Network 10. Select “Local Users and Groups””Users””Guest” 11. Unselect “Account is disabled” 12. Double click “Local Security Policy”...
- Page 40 Network 13. In left menu tree, double click “User Rights Assignment” 14. Double click “Deny access to this computer from the network” 15. Select “Guest” account and click “Remove” button...
- Page 41 Network 16. Now you can add “Network Neighbourhood” on Set Top Box (for full instructions please refer to the Network instructions) Please enter the correct IP address and folder name. Enter the username and password of the computer you wish to connect to.
- Page 42 Network Once you have set up the Media folder on your PC follow the below instructions to connect the receiver to your PC over your network. To activate the Network Neighbourhood: Press [MENU] key in Live TV mode. Select Network Network Neighborhood Press the Red button to insert the required PC share information ...
- Page 43 Network WiFi Information Press [MENU] key in Live TV mode. Select Network WiFi setting hotspot Press [OK] to search wifi and set password.
- Page 44 Network DLNA Function 1. Check the state of network,keep an account of IP address. 2. Use some APPs in android or iOS system for DMS and DMR. For android smart phone: Use Bubble UPnP and MX Player or VLC player Use iMediaShare and MX Player or VLC player For iOS smart phone:...
-
Page 45: Blu-Ray Player
BLU-RAY PLAYER Press 【BD/DTV】key to switch between the DTV and BD mode. After entering BD mode,SRT6500 can auto play disk Press 【■】key and the press【Setup】key to come in setup menu Setup the setting refer to menu information Press 【Setup】key to return to previous menu Holding the disc: Do not touch the playing side of the disc Do not paste paper or adhesive tape on the playing side... - Page 46 RAY PLAYER BLU- Specific setting method and description Menu Submenu Item Setting and description Screen saver Enable screen saver. If there is no operation in (prevent screen aging) five minutes while playing, the screen saver will be activated automatically, and enters standby mode if there is no operation in ten minutes.
- Page 47 BLU- RAY PLAYER Specific setting method and description Menu Submenu Item Setting and description disk can be used to save BD-J data. BUDA BUDA setup (setting the storage media of (for BD-J disc playing) BUDA info) USB: USB disk is used as storage media, and USB disk is required (please note that HDD can’t be used as the storage media of BUDA info: the USB disk for BUDA info must be in FAT 32 format)
- Page 48 BLU- RAY PLAYER Specific setting method and description Menu Submenu Item Setting and description Secondary screen Primary screen Disable this function. Secondary audio Enable secondary audio. The secondary audio function of certain BD discs allows playing the primary and secondary audio simultaneously.
- Page 49 BLU- RAY PLAYER Specific setting method and description Menu Submenu Item Setting and description Change password Change password Please enter current password Press [0]-[9] to enter current password, and the following dialog box appears if the password is valid: Change password New password General Press [0]-[9] to enter a new password (twice)
- Page 50 BLU- RAY PLAYER Specific setting method and description Menu Submenu Item Setting and description Motion Picture Association of America Film Rating Security Rating Description Children Suitable for children safe Suitable for all ages Watch under parent guide PG-13 Children younger than 13 watch under parente guid Parent guide is required Watch under parent guide if younger than 17...
- Page 51 BLU- RAY PLAYER Menu Submenu Item Setting and description the horizontal direction of the output signal will remain unchanged, and the vertical direction will Screen be compressed to 9/16 of the horizontal width. (set the aspect ratio When connected to 4:3 TV, select: matching the connected 4:3 panoramic TV set)
- Page 52 BLU- RAY PLAYER Menu Submenu Item Setting and description Set color space Color space YcbCr YcbCr422 Full RGB HDMI high color Set HDMI color depth to 30-bit, 36-bit, 48-bit or OFF. Display 30-bit 36-bit 48-bit Enable/disable the output of HDMI 1080P 24HZ. HDMI 1080P 24HZ HDMI 3D Enable/disable the output of 3D signal.
- Page 53 BLU- RAY PLAYER Menu Submenu Item Setting and description Digital output Turn off the signal output of digital audio output (select the digital audio terminal of the player. signal format from the Audio digital audio output output terminal) HDMI Bit stream (select the digital audio signal format from HDMI Re-encode...
- Page 54 BLU- RAY PLAYER Menu Submenu Item Setting and description Configuration 2X (configuration when two channels are Speaker (select according to setup connected) connected speaker and First step: select the audio channel mode power amplifier) L/R: select this option if your power amplifier is compatible with Dolby Pro Logic;...
- Page 55 BLU- RAY PLAYER Press the direction key [ ] to open the audio bar, Advanced Playing Operation and press [ ] [ ] to switch the audio. 1. Using screen control menu With screen control menu, you can set and select certain playing status.
-
Page 56: Troubleshooting
Troubleshooting If there is any failure in Bluray mode, please check as below. If you are not sure with the instructions or the problems still can’t be solved, please contact your local distributor. It isn’t the problem of the player in the following cases. There is noise when the disc is rotating;... - Page 57 Troubleshooting player according to the specification of the TV. HDMI always has output, and CVBS only has output at 720P. Therefore, certain user can’t watch BD images in CVBS, because the output resolution in the setting menu is too high; please set the resolution in HDMI state to lower than 720P.
- Page 58 Warning: If you are still experiencing problems do not return this product to the place of purchase before contacting STRONG Technical Support on 1800 820 030 or visiting our website at www.strong.com,au and referring to the FAQ section.
-
Page 59: Technical Specification
Technical Specifications Item Specification Tuner Input Frequency 174~230MHz (VHF) & 474~858MHz (UHF) Bandwidth 7MHz Input Impedance 75 Ohms Input Level -80 ~ -20 dBm Channel Waveform COFDM decoding Demodulation QPSK,16QAM, 64QAM 1/2, 2/3, 3/4, 5/6, 7/8 Guard 1/4, 1/8, 1/16, 1/32 Mode 2K, 8K Video... - Page 60 Technical Specifications Rear Panel HDTV output HDMI 1.3 ANT Input IEC-type, Female Loop Out IEC-type, Male VIDEO CVBS YPbPr AUDIO Digital Audio Output Optical USB2.0 Front IR Receiver 38KHz Panel/RCU Category IR(Carrier 38KHz) Battery 2 x 1.5V Power/Ambient Input Voltage AC 100-240V ~ 50/60 Hz Power Consumption Operation Temperature...
-
Page 61: Warranty Information
STRONG Australia accompanied by the original purchase receipt. After this 30 day period the unit must be returned to STRONG Australia for testing, and if deemed faulty, will be repaired or replaced at the discretion of STRONG Australia Pty Ltd. - Page 62 60 WEDGEWOOD ROAD, HALLAM, VICTORIA 3803 PH: +61 3 8795 7990 FAX: +61 3 8795 7991 TECHNICAL SUPPORT: 1800 820 030 STRONG & CO. (FAR EAST), LTD. P.O. BOX 85, YOKOHAMA, KANAGAWA-KEN JAPAN 231-91 FAX: +81 45 651 1842 www.strong.com.au tech@strong.com.au...
Need help?
Do you have a question about the SRT 6500 and is the answer not in the manual?
Questions and answers