
Related Manuals for Eneo NXC-1602M


Summary of Contents for Eneo NXC-1602M
- Page 1 NXC-1602M Full HD NETWORK CAMERA Please read this manual thoroughly before use and keep it handy for future reference.
- Page 2 DESCRIPTION --------------------------------------------------------------------------------------------------------------------------- The NXC-1602M is an internet protocol based megapixel network camera with a built-in web based viewer accessible by multiple browsers. The camera has a connection feature for third-party applications. It is supplied with SmartyManager Utility software for easy installation and Client software to search, configure, manage, live view, record and playback.
-
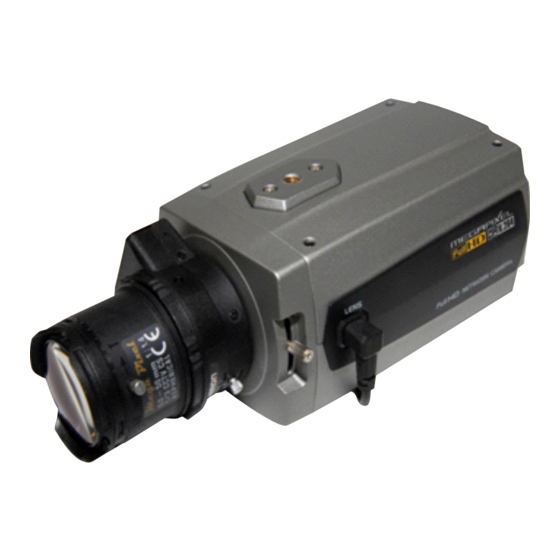
Page 3: Camera Layout
Camera Layout RJ-45 connector: Supplies power to the camera through the network using PoE. If PoE is not available, supplies DC12V or AC24V power source to the POWER connector. ETHERNET link indication LED: Flashes green to indicate that data is being TX/RX by the camera. -
Page 4: Installation
Please take steps as follows: 1. Power off 2. Press and hold the RESET button 3. Supply the camera with power 4. Hold the RESET button for 15 seconds ALARM connection: Connect one or two physical alarm input signal into the device and one alarm output signal that can be used to control an external alarm circuit. -
Page 5: Before Installation
--------------------------------------------------------------------------------------------------------------------------- Before Installation Before installing the camera, thoroughly familiarize yourself with the information in this section of the manual. To ensure secure access to the IP camera, place the camera behind a firewall when it is connected to a network. NOTE - Use megapixel lens for higher image quality. -
Page 6: Dc Auto Iris Lens Installation & Adjustment
This camera will autosense and work with either a straight Ethernet cable or crossover Ethernet cable. DC Auto Iris Lens Installation & Adjustment The camera supports DC-type auto iris lenses. Perform the following steps to install and adjust a DC-type auto iris lens. - Solder the lens control wires to the connector supplied with the camera. -
Page 7: Alarm Connection
[Audio connection] External Speaker External Microphone Alarm Connection The camera has two alarm inputs for external signalling devices and one alarm output for activating external device. Both Normally Open and Normally Closed devices are supported. [Alarm connector] Alarm Input 1 Alarm Ground Alarm Input 2 Alarm Output... - Page 8 3. Select the camera on the list and right click. You will see the following pop-up menu: 4. Enter the required IP address. Click OK, the devices IP address will be changed, ensure the PC is on the same network, to gain connection.
- Page 9 : Connectable to the camera but fixed security settings (password) : Unavailable for connection to the camera (PC can’t access relevant IP Address) NOTE For more information, refer to the Smart Manger User’s Manual.
- Page 12 Videor E. Hartig GmbH Exclusive distribution through specialised trade channels only. Videor E. Hartig GmbH Carl-Zeiss-Straße 8 • 63322 Rödermark, Germany Tel. +49 (0) 6074 / 888-0 • Fax +49 (0) 6074 / 888-100 www.videor.com...
Need help?
Do you have a question about the NXC-1602M and is the answer not in the manual?
Questions and answers