
Subscribe to Our Youtube Channel
Related Manuals for Assa Abloy Interlock Elevation Window Control System


Summary of Contents for Assa Abloy Interlock Elevation Window Control System
- Page 1 Elevation Window Control System Keypad installation and user guide August 2013 ©copyright by ASSA ABLOY...
- Page 2 To prevent damage to the screen, always press the touch screen with your fingertip. CAUTION: Changes or modifications to this product not approved by ASSA ABLOY could result in warranty being voided. IMPORTANT: Correct installation of the network is paramount to the function of the keypad.
-
Page 3: Table Of Contents
Elevation Window Control System CONTENTS PAGE INSTALLER - SETUP AND CONFIGURATION Basic Operating Principle Powering up the System Calibration System Setup and Configuration Allocating Actuators to Zones Checking Zone Allocation Modifying System Configuration 8-10 Removing Actuators from Zones Adding Actuators to Zones Restoring Previous Settings Rain Sensor Setup 12-17... -
Page 4: Installer - Setup And Configuration
INSTALLER - SETUP AND CONFIGURATION ACTIVE TOUCH SCREEN BACKLIT HOME BUTTON BASIC OPERATING PRINCIPLE When configuring your network, Actuators are loaded into groups known as Zones. Multiple Zones are available. Each actuator can only be allocated to one Zone. POWERING UP THE SYSTEM Ensure all wiring connections are complete before powering up. -
Page 5: System Setup And Configuration
SYSTEM SETUP AND CONFIGURATION An Actuator can only be assigned to one Zone. Allocating Actuators to Zones: This screen will appear once the auto calibration is complete. Press Yes to commence Zone Setup. No will take you to the Home page where options of Open All, Close All, and Setup will be available. -
Page 6: Checking Zone Allocation
SYSTEM SETUP AND CONFIGURATION continued Checking Zone Allocation: Method 1. 1. Use the arrow buttons to scroll through the Zone list. 2. Press the zone name, e.g. Lounge 1 3. Press any opening position and observe which windows move to check that the Actuators are assigned to the correct Zones. Repeat steps 1, 2, and 3 until all Zones have been checked. - Page 7 SYSTEM SETUP AND CONFIGURATION continued Checking Zone Allocation continued: Method 2. You can view Zones to see which Actuators have been assigned to a particular Zone. 1. Press View Zones. 2. Use the appropriate arrow buttons to scroll through either the Actuator list or the Zone list.
-
Page 8: Modifying System Configuration
MODIFYING SYSTEM CONFIGURATION Removing Actuators from Zones: Note: All Rain Sensors must be removed from a Zone before removing Actuators from that Zone. 1. From the Home page, press Setup. 2. Press Zone Setup. 3. Press Remove from Zone. This now takes you to a screen where you can remove Actuators from Zones. - Page 9 MODIFYING SYSTEM CONFIGURATION continued Removing Actuators from Zones continued: 8. Then use the arrow keys to scroll to the next Actuator in the Zone and repeat the process until the desired Actuator is found. Note: Actuator locations may have also been previously noted on pages 26 &...
-
Page 10: Adding Actuators To Zones
MODIFYING SYSTEM CONFIGURATION continued Adding Actuators to Zones continued: 2. Press Add To Zone. This now takes you to a screen where you can add Actuators to Zones. 3. Press the Actuator button on the left. The corresponding Actuator will open. 4. -
Page 11: Restoring Previous Settings
RESTORING PREVIOUS SETTINGS Restore Previous will enable you to restore the previously saved Zone settings. Not recommended for use if Rain Sensors are installed. Rain Sensor settings will be deleted and will need to be reprogrammed if Restore Previous is used. 1. -
Page 12: Rain Sensor Setup
RAIN SENSOR SETUP Adding Rain Sensors to Zones: Note: A maximum of 4 Rain Sensors can be connected to a Network. 1. Press Setup on the Home screen to view this screen. 2. Press Rain Sensor Setup. 3. Press Add RS To Zone. - Page 13 RAIN SENSOR SETUP continued Adding Rain Sensors to Zones continued: Confirm that the message displays the correct number of Rain Sensors online. 4. Press Yes to confirm and proceed to the next screen. Press No or Setup to go back to the Setup screen. Note: The system may take a few minutes to register the Rain Sensors.
- Page 14 RAIN SENSOR SETUP continued Adding Rain Sensors to Zones continued: 6. Confirm your selection by pressing Yes. A confirmation screen will be displayed and the system will return to the Add RS To Zone page. The Rain Sensor will no longer be displayed on the left hand side of the screen once assigned to a Zone.
-
Page 15: Removing Rain Sensors From Zones
RAIN SENSOR SETUP continued Removing Rain Sensors from Zones: 1. Press Remove RS From Zone. Confirm that the message displays the correct number of Rain Sensors online. 2. Press Yes to proceed to the next screen. -
Page 16: Configuring Rain Sensor Function
RAIN SENSOR SETUP continued Removing Rain Sensors from Zones continued: 3. Use the arrow keys to scroll to the desired Zone and match it with the desired Rain Sensor. 4. Press Remove from Zone. 5. Confirm your selection by pressing Yes. A confirmation screen will be displayed and then the system will return to the Remove From Zone page. - Page 17 RAIN SENSOR SETUP continued Configuring Rain Sensor Function continued: 2. Use the arrow Keys to scroll to the desired Zone. 3. Toggle the functional options by pressing the buttons. The options displayed are the current settings. Default settings are: Disable Reopen and Shut. The other options are shown in the picture.
-
Page 18: Restarting The Keypad
RESTARTING THE KEYPAD This function is used when a Zone warning is displayed on the Keypad indicating that one or more of the Actuators have not been recognized by the Keypad. 1. Wait for at least 2 minutes. If the warning is still present push Restart Keypad in the Setup page. The Keypad should now recognize the Actuator. -
Page 19: User Guide
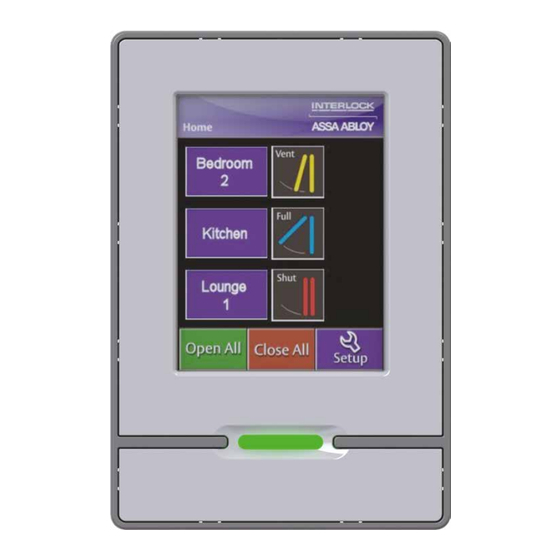
USER GUIDE HOME PAGE ZONE STATUS SCROLL ZONE NAMES SCROLL DOWN LABEL DEFINITION Zone Names A maximum of 3 Zones are shown on the Home page at any one time. Press the Zone name to display the 4 preset window position options. Refer next page. Zone Status This shows the current opening position of the corresponding windows in that Zone. -
Page 20: Selecting A Window Position
SELECTING A WINDOW POSITION After pressing any of the pre-set positions below, the Actuators will automatically move to that position. Press Stop at any time to stop the Actuators. A symbol will be displayed next to the Zone highlighting the fact that the window is not at a pre-set position. -
Page 21: Backlit Home Button
BACKLIT HOME BUTTON BACKLIT HOME BUTTON Pressing and releasing the Backlit Home Button will return you to the Home page. If no buttons are pressed for 120 seconds the screen will go into sleep mode. Touching the screen or pressing the Backlit Home Button will reactivate the screen. Pushing and holding the Backlit Home Button for 5 seconds before releasing will close all windows on the network. -
Page 22: Pin Code Creation
PIN CODE CREATION Write your desired PIN code here: ENABLE PIN CODE: 1. Press Setup from the Home page. 2. Press PIN Code Disabled. 3. Press Yes to continue. ENTERING A 4 DIGIT CODE: 1. Enter your 4 digit code. A star symbol (*) will appear on the top bar for each digit you touch. -
Page 23: System Warnings
SYSTEM WARNINGS WINDOW OPERATING: This symbol will appear when a window has been activated and is completing its task. You can push Home or the Backlit Home Button to continue using the Keypad while the window is operating. WINDOW OBSTRUCTED: Check all windows for obstructions. - Page 24 SYSTEM WARNINGS continued RAIN SENSOR/NETWORK ADAPTOR LOST COMMUNICATION: Check all direct wiring to the Network Adaptor. SYSTEM LOCKED BY PIN CODE: Press Unlock located at the bottom of the screen to enter your PIN Code. INCORRECT PIN CODE HAS BEEN ENTERED: If you have forgotten your PIN Code, type in: 4811 This is a default override code that will allow you to gain access to the Keypad.
- Page 25 SYSTEM WARNINGS continued This screen will appear if you try to remove Actuators from Zones if there are no Zones Setup. This screen will appear if trying to add Rain Sensors to Zones but there are no new Zones available, and every Rain Sensor has been added to every Zone. It is possible for this error to occur mainly on large networks with over 20 Actuators during power up.
-
Page 26: Rain Sensor/Actuator Location Matrix
RAIN SENSOR/ACTUATOR LOCATION MATRIX Place the spare serial number label, or write the serial number in one column, and the location and/or Zone name in the next. See example below. Note: Only the bottom line of the label refers to the serial number. NETWORK ADAPTOR LOCATION ON NETWORK ADAPTOR... - Page 27 RAIN SENSOR/ACTUATOR LOCATION MATRIX continued ACTUATOR ZONE/LOCATION: ACTUATOR ZONE/LOCATION: SERIAL NUMBER: SERIAL NUMBER:...
-
Page 28: Frequently Asked Questions
FREQUENTLY ASKED QUESTIONS Possibly. Hold the Backlit Home Button for 5 seconds and release when the Can I close my windows if the second beep is heard. The first beep will be heard when you first push the Keypad is not responding? button. -
Page 29: Zone Names
FREQUENTLY ASKED QUESTIONS continued From the PIN Code page, disable the current PIN Code. How do I reset my PIN Code? Then you can simply re-enter a new PIN Code. ZONE NAMES Lounge 1 Upstairs Zone 2 Lounge 2 Downstairs Zone 3 Bedroom 1 Hall... -
Page 30: Wiring Diagram
WIRING DIAGRAM... -
Page 31: Notes
NOTES... - Page 32 ASSA ABLOY is the global leader in door opening solutions, dedicated to satisfying end-user needs for security, safety and convenience. ASSA ABLOY is represented in all major regions, in both mature and emerging markets, with leading positions in Australia, Europe and North America.
Need help?
Do you have a question about the Interlock Elevation Window Control System and is the answer not in the manual?
Questions and answers