Table of Contents
Advertisement
Advertisement
Table of Contents
Troubleshooting

Related Manuals for Assa Abloy Emtek EMPowered


Summary of Contents for Assa Abloy Emtek EMPowered
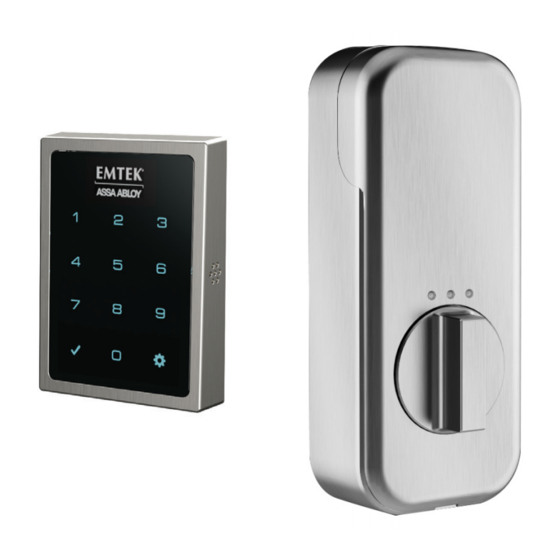
- Page 1 EMPowered Motorized Touchscreen Keypad Deadbolt...
- Page 2 What’s in the box Battery Interior Mounting Cover Escutcheon Plate Deadbolt Latch Deadbolt Latch 2-3/4” 2-3/8” AA x4 Strike Plate Security Plate Batteries #8-32 x 5/16” Machine Screws #8 x 3/4” #10-32 x 1-3/8” #10 x 3” Wood Screws Machine Screws Wood Screws...
- Page 3 Door Prep 2-3/8” or 2-3/4” Backset 1/8” Deep 2-1/4” 2-1/8” Diameter Bore 1” 1” Diameter Edge Bore Door Jamb Prep 3/16” Deep 1-1/4” Deep 1-1/4” 2-3/4” 2-3/4" 3/4” 1-1/8”...
- Page 4 Install Latch & Strike Plate Note: Use only the supplied latch for proper functionality. Bolt must be in retracted (unlocked) position. Note horizontal orientation of mechanism.
- Page 5 Install Touchscreen Escutcheon Outside of the door Inside of the door...
- Page 6 Install Interior Mounting Plate Loosen screw to remove cover.
- Page 7 Connect the Cable Assembly...
- Page 8 Install Interior Escutcheon See comment about reset button on page 16, “Resetting Lock to Factory Default.”...
- Page 9 Testing Operation...
- Page 10 Install Batteries Bolt must be in retracted (unlocked) position before installing batteries.
- Page 11 Install Cover Secure cover by tightening screw on bottom.
- Page 12 Handing the Lock Activate the Lock “Handing Lock” “Handing Lock Complete”...
- Page 13 Creating Master PIN Code Creating a Master PIN Code must be performed upon installation or after resetting the lock to factory default. Programming and use of lock is not possible until this step has been successfully completed. “Register Master Code. Press the gear key to continue.”...
- Page 14 Creating User PIN Code Master PIN Code must be created first. *Max User Codes = 250 with Network Module. *Max User Codes = 25 without Network Module. “Menu Mode, enter number, Enter Master PIN Code Press press the gear key to continue.”...
- Page 15 Unlocking Door with PIN Code Enter PIN Code Press Code Chart Duplicate if Necessary PIN Code Management (With Network Module - Up to 250 Users) User Type User Name User # PIN Code Master User____ User____ User____ User____ User____ User____ User____ User____ User____...
- Page 16 Resetting Lock to Factory Default When lock is reset to factory defaults, all User Codes (including the Master PIN Code*) are deleted and all programming features are reset to original default settings (see below). 1. Remove battery cover and batteries. 2.
- Page 17 Definitions All Code Lockout Mode: This feature is enabled by the Master PIN Code. When enabled, it restricts all user (except Master) PIN Code access. When attempting to enter a code while the unit is in Lockout, the RED locked padlock will appear on the screen. Automatic Re-lock Time: After a successful code entry and the unit unlocks, it will automatically re-lock after thirty (30) seconds.
- Page 18 Feature Programming Trough Menu Mode Using Master PIN Code* 1. Touch screen with back of hand or palm to activate. 2. Enter 4-8 digit master PIN Code* followed by key. Lock Response: “Menu mode, enter number, press key to continue.” 3.
- Page 19 Master PIN Code Setting Register Continue User PIN Code Registration Complete Continue Delete Complete Continue Complete Disable Automatic Re-lock Advanced Lock Settings 30 sec 60 sec 2 min 3 min Inside Indicator Light Enable Continue Disable One Touch Locking Enable Disable Complete Performs...
- Page 20 Programming Troubleshooting Symptom Suggested Action Lock does not respond • Touchscreen becomes active when pressed with whole hand. Use larger area of the hand or fingers - door is open and and verify contact with at least 3 numbers. accessible. •...
- Page 21 Hardware Troubleshooting Cycle lock in both the locked and unlocked positions. If problems are found: Door is binding a. Check that door and frame are properly aligned and door is free swinging. b. Check hinges: They should not be loose or have excessive wear on knuckles. Bolt will not deadlock a.
- Page 22 Compliance FCC INTERFERENCE STATEMENT This device complies with Part 15 of the FCC Rules. Operation is subject to the following two conditions. (1) This device may not cause harmful interference, and (2) this device must accept any interference received, including interference that may cause undesired operation.
- Page 23 INDUSTRY CANADA COMPLIANT This device complies with RSS·210 of the Industry Canada Rules Operation Is subject to the following two conditions: (1) This device may not cause harmful interference, and (2) this device must accept any interference received, including interference that may cause undesired operation.
- Page 24 IN8-EMPWRSA REV 19A 04-03-19 Copyright © 2019, EMTEK Products, Inc. an ASSA ABLOY Group company. All rights reserved. Reproduction in whole or in part without the express written permission of EMTEK Products, Inc. is prohibited. WARNING: This product can expose you to chemicals including lead, which is known to the state of California to...
Need help?
Do you have a question about the Emtek EMPowered and is the answer not in the manual?
Questions and answers
how to delete a code?