Soyer BMS-9 Operating Instructions Manual
Stud welders
Hide thumbs
Also See for BMS-9:
- Operating instructions manual (52 pages) ,
- Operating instructions manual (104 pages) ,
- Operating instructions manual (53 pages)
Table of Contents
Advertisement
Advertisement
Table of Contents

Related Manuals for Soyer BMS-9


Summary of Contents for Soyer BMS-9
- Page 1 Operating Instructions BMS-9 BMS-9 V Stud Welders...
- Page 2 BMS-9...
-
Page 3: Operating Instructions
Code designation Note Capacitor bank 66,000 μF P01070 BMS-9 Capacitor bank 90,000 μF PO1071 BMS-9 V Heinz Soyer Bolzenschweißtechnik GmbH Inninger Straße 14 - 82237 Wörthsee - Germany Tel.: +49 (0) 8153 885-0 – Fax: +49 (0) 8153 8030 - www.soyer.de... - Page 4 Thank you! ® Congratulations on purchasing the BMS-9 SOYER stud welder. ® You have made an excellent choice. Your BMS-9 SOYER stud welder was specially ® developed for the high-speed fastening of SOYER weld studs in compliance with DIN EN ISO 13 918 (capacitor discharge) on metallic, weldable workpieces.
- Page 5 EC Directive on Machinery. Any modification of this machine without confirmation shall automatically annul this declaration. Stud welder Designation of machine BMS-9 / BMS-9 V Machine type Machine no. ______________________ Applicable EC directives...
-
Page 6: Table Of Contents
BMS-9 Table of contents Safety precautions ........................ 8 Description of reference signs in the operating instructions ..........10 Staff qualification and training ....................11 Dangers in the case of non-compliance with safety instructions ......... 11 Before starting to weld......................11 Working with the stud welding equipment ................ - Page 7 BMS-9 Cleaning ..........................34 8.3.1 Detergents for cleaning the housing ................34 Replacement of components ....................34 Troubleshooting ........................35 Malfunctions ......................... 35 Error codes (error messages on digital 7 segment display) ..........36 Transport and storage ......................37 Terms of warranty ....................... 37...
-
Page 8: Safety Precautions
BMS-9 1 Safety precautions These safety precautions are for your safety. General safety instructions Become trained and read and follow all safety precautions listed below as well as all chapters of this manual before starting to weld. Non-compliance with the safety precautions can result in personal injuries or death. - Page 9 BMS-9 Fumes and gases can cause damage to your health Fumes and suspended matters may be generated during welding. Beware of fumes detrimental to health, particularly when using surface treated materials. Please also observe the safety regulations applicable for your country.
-
Page 10: Description Of Reference Signs In The Operating Instructions
BMS-9 Description of reference signs in the operating instructions The non-observance of safety instructions such as pictographs and warning words can cause damage to persons. The safety instructions of this manual describe the following: Safety instructions Danger! Immediate hazards which could result in serious personal injuries or loss of life. -
Page 11: Staff Qualification And Training
Roll up the cables without buckling them Prevent the stud welder being operated by unauthorized personnel Check welding cable and connections of the stud welder for damage such as burn-off, ® mechanical wear etc. and have damaged parts replaced by the SOYER customer service... -
Page 12: General
M3 - M8 (M10 with BMS-9 V) or Ø 3 - 7.1 mm and many other types of weld fasteners in accordance with DIN EN ISO 13918 (capacitor discharge) manufactured of steel, stainless steel, aluminum and brass. -
Page 13: Conduct In The Case Of Malfunctions
BMS-9 2.5.1 Conduct in the case of malfunctions If malfunctions occur, first try to detect and eliminate the causes according to the "Troubleshooting" list in chapter 9 of these operating instructions. In all other cases, please contact our service department. -
Page 14: Description Of Stud Welder
M3 - M8 (M10 with BMS-9 V) or Ø 3 – 7.1 mm and many other types of weld fasteners in accordance with DIN EN ISO 13918 (capacitor discharge) manufactured of steel, stainless steel, aluminum and brass. -
Page 15: Technical Data
M3 - M8 or Ø 3 - 8 mm with steel, stainless steel, aluminium and brass Welding range (M8 or Ø 8 in aluminium and brass conditionally, depending on the respective requirements) Capacitor bank 66,000 μF (option: BMS-9 V 99,000 μF) Power source Charging voltage 50 - 200 V infinitely variable up/down... -
Page 16: Installation Of Stud Welder
BMS-9 4 Installation of stud welder • Only install the stud welder on an even surface. The pads located on the bottom of the welding equipment guarantee its anti-skid position and serve as vibration dampers. • Although the stud welder is resistant to environmental influences, it should be protected against dampness and dust. -
Page 17: Start-Up
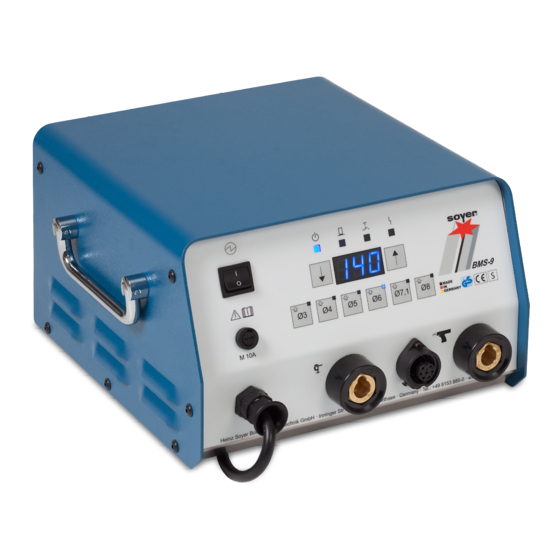
BMS-9 5 Start-up Front view 1 Mains switch 6 Digital 7-segment display 2 Selection keys 7 Mains cable 3 Function key ↓ "Down Arrow" 8 Earth cable socket 4 LED displays 9 Control cable socket 7-pole 5 Function key ↑ "Up Arrow"... -
Page 18: Operating Elements
The mains switch is used to switch the stud welder on and off. Selection keys (item 2, chapter 5.1) The selection keys [ Ø3] .. [ Ø8] ( [ Ø3] .. [ Ø10] with BMS-9 V]) allow different parameters to be quickly selected according to the desired diameter. - Page 19 BMS-9 Function key "arrow up" (item 5, chapter 5.1) The function key "arrow up" enables continuous increase of the charging voltage e.g. for larger stud diameters. Digital 7-segment display (item 6, chapter 5.1) The digital 7-segment display shows the set energy (charging voltage in volts)
-
Page 20: Fuse Element
BMS-9 5.1.2 Fuse element The BMS-9 stud welder is protected by the following fuse: - Power input fuse: 1 x M 10 A medium time lag (front panel item 7, chapter 5.1) 5.1.3 Connecting elements Earth cable socket (item 8, chapter 5.1) The earth cable socket serves to connect the ground clamps to the stud welder. -
Page 21: Preparation For Start-Up
BMS-9 Preparation for start-up Connect the stud welding gun and earth cables to the stud welder prior to start-up. 5.2.1 Earth connection Attach earth cable to earth cable socket (item 8, chapter 5.1) and lock by turning to the right until stop. -
Page 22: Operation
BMS-9 Operation NOTE The applicable accident prevention and safety regulations have to be complied with when operating the stud welder. NOTE The welding areas must be metallically bright. → If necessary, grind the area to be welded Switch on mains switch. -
Page 23: Notes With Regard To The "Lifting Test" Operation Mode
BMS-9 Notes with regard to the "Lifting test" operation mode The lifting test allows for the activation of the gun’s lifting magnet thus being able to control the setting. Proceed as follows: The stud welder is still deactivated. ... -
Page 24: Instructions For The Adjustment Of Stud Welding Guns
BMS-9 6 Instructions for the adjustment of stud welding guns Start-up of PS-9 welding gun with adjustment-free stud chuck NOTE The PS-9 welding gun in combination with the new adjustment-free stud chuck is only suitable for threaded weld studs from M3 - M8! - Page 25 BMS-9 Hand-tighten sleeve nut by means of SW 17 socket wrench. Circular LED display lights up green = Standby Stud chuck not shown in illustration Attach support tube. Circular LED display lights up green = Standby Stud chuck not shown in illustration...
- Page 26 BMS-9 Switch stud welder off by means of the mains switch. Switch it on again after approx. 5 seconds. Stud welder is now ready for operation. Is the charging voltage set according to the stud diameter? ...
-
Page 27: Basic Setting Of The Stud Chuck With Adjusting Screw
BMS-9 Basic setting of the stud chuck with adjusting screw The stud chucks with adjusting screws of the PS-1, PS-3K, PS-0K and PS-1K welding guns are all of the same style. For different stud diameters, different stud chucks are required. -
Page 28: Start-Up Of Ps-1K Welding Gun
BMS-9 Start-up of PS-1K welding gun Note: The PS-1K stud welding gun is only suitable for stud sizes M3 - M8! Ensure depth of immersion / stud protrusion is set between 1.5 mm and 3 mm. After adjustment, check and correct if necessary. Hand-tighten by means of the fixing nut. - Page 29 BMS-9 Ensure stud protrusion is set between 1.5 mm and 3 mm The stud/stud flange must protrude for about 1.5 – 3 mm from the support tube! Switch stud welder on by means of the mains switch. Is the charging voltage set according to the stud diameter? ...
-
Page 30: Start-Up Of Ps-9 Welding Gun (Stud Chuck With Adjusting Screw)
BMS-9 Start-up of PS-9 welding gun (stud chuck with adjusting screw) Note: The PS-9 stud welding gun is only suitable for stud sizes M3 - M8! Ensure depth of immersion / stud protrusion is set between 1.5 mm and 3 mm. - Page 31 BMS-9 Ensure stud protrusion is set between 1.5 mm and 3 mm The stud/stud flange must protrude for about 1.5 – 3 mm from the support tube! Adjusting and checking the height of lift The height of lift is the distance for which the stud is lifted from the workpiece during the welding process.
- Page 32 BMS-9 Switch stud welder off by means of the mains switch. Switch it on again after approx. 5 seconds. Stud welder is now ready for operation. Is the charging voltage set according to the stud diameter? ...
-
Page 33: Quality Control (Stud Welding)
7 Quality control (stud welding) General instructions ® Provided that the SOYER stud welding system is properly used and the materials are appropriately selected, the strength of the welding joint (welding zone) will always be stronger than that of the stud or base material. -
Page 34: Maintenance
SOYER spare parts are used. CAUTION Disconnect the mains cable from the mains supply before replacing any components. ® Electric and electronic components may only be replaced by the SOYER customer service or by trained and appropriately qualified personnel. -
Page 35: Troubleshooting
If it is difficult or impossible to eliminate the trouble, please contact the ® SOYER customer service responsible for your area or Heinz Soyer Bolzenschweißtechnik GmbH. DANGER Before starting any repair work, maintenance work or cleaning work, always disconnect the mains cable from the socket. -
Page 36: Error Codes (Error Messages On Digital 7 Segment Display)
BMS-9 Error codes (error messages on digital 7 segment display) Code Description Cause Safety switch-off due to a voltage of more - Stud inserted too deep in the stud chuck than 25 V measured for more than approx. - Mechanical problems with the gap gun... -
Page 37: Transport And Storage
The stud welder is robustly designed and has a two-piece metal housing with front and rear panel. Owing to electronic components it should be ensured, however, that transport is free from vibrations. The BMS-9 stud welder has two carrying handle on its top for easy transport and mobile use within short distances. -
Page 38: List Of Standards And Guidelines
BMS-9 12 List of standards and guidelines • 2006/42/EC EC Directive on Machinery • 2006/95/EC EC Directive on Low-Voltage • 2004/108/EC EC Directive on Electromagnetic Compatibility • DIN EN 12100 – 1 Safety of machinery; basic terms, general principles of construction;... - Page 39 BMS-9 Heinz Soyer Bolzenschweißtechnik GmbH Etterschlag Inninger Straße 14 D-82237 Wörthsee Tel.: ++49 (0) 81 53 / 8 85-0 Fax: ++49 (0) 81 53 / 80 30 www.soyer.de E-Mail: info@soyer.de...
Need help?
Do you have a question about the BMS-9 and is the answer not in the manual?
Questions and answers