Table of Contents
Advertisement
Quick Links
Advertisement
Table of Contents

Related Manuals for Soyer BMS-8N


Summary of Contents for Soyer BMS-8N
- Page 1 Operating Instructions Stud Welder BMS-8N...
-
Page 2: Operating Instructions
Operating Instructions Stud Welder BMS-8N Serial number* Stud Welder BMS-8N * Please enter the serial number, so that this data is immediately available if you need service support. Heinz Soyer Bolzenschweißtechnik GmbH Etterschlag Inninger Straße 14 82237 Wörthsee Phone08153 - 885 - 0... - Page 3 We appreciate any suggestions for improvement. Date of issue revision 1: Heinz Soyer Bolzenschweißtechnik GmbH 1995 · All rights reserved Aug. 1, 2000 Subject to technical alterations...
- Page 4 Heinz Soyer Bolzenschweißtechnik GmbH Inninger Straße 14 82237 Wörthsee CE Declaration of Conformity We herewith declare that the machine described in the following and the version available on the market correspond in design and construction to the safety and health requirements of the listed guidelines and standards.
-
Page 5: Table Of Contents
Contents Contents G e n e r a l _ __________________________________________________________________________ 1-1 The following should be principally observed ... ____________________________________________ 1-1 Application _________________________________________________________________________ 1-2 Information on the product _____________________________________________________________ 1-2 Type plate ___________________________________________________________________________ 1-2 Information on the documentation _______________________________________________________ 1-3 1.5.1 Chapters of operating instructions _______________________________________________________ 1-3 1.5.2... - Page 6 Exploded view of stud welder BMS-8N - View A __________________________________________ 8-29 Spare parts list for stud welder BMS-8N - View B, C and D ________________________________ 8-30 Exploded view of stud welder BMS-8N - View B, C and D _________________________________ 8-31...
-
Page 7: General
General General 1.1 The following should be principally observed ... With this stud welder you have purchased a product which • is state-of-the art technology • fully complies with the current safety requirements and • enables successful working. Before putting the stud welder into operation, always observe the following : •... -
Page 8: Application
® The SOYER stud welder BMS-8N with tip ignition allows you to weld pins and threaded studs of M3 - M8 or Ø 3 - 7.1 mm as well as numerous various fastening elements made of steel and stainless steel (see chapter 2.4, Techni- cal Data). -
Page 9: Information On The Documentation
General 1.5 Information on the documentation The following operating instructions are supplied with the BMS-8N stud welder: • Operating instructions for stud welder BMS-8N Order no.: P00298 For repeat-orders please contact: Heinz Soyer Bolzenschweißtechnik GmbH Etterschlag Inninger Straße 14 D-82237 Wörthsee... -
Page 10: Information On Operating Instructions
All obligations of Heinz Soyer Bolzenschweißtechnik GmbH result from the respective contract of purchase which also comprises the complete and generally valid warranties. -
Page 11: Description Of Stud Welder
1 - 3 milliseconds (0.001 - 0.003 sec.). 2.2 Stud welder set-up The standard pistol to be connected to the stud welder BMS-8N is the stud welding pistol PS-1K with control cable. Optionally it is possible to connect the stud welding pistols PS-0K, PS-1 and PS-3K. -
Page 12: Dimensions
≈ 70 ≈ 100 ≈ 115 ≈ 140 ≈ 175 ≈ 190 BMS-8N TÜV Rheinland geprüfte Sicherheit Heinz Soyer Bolzenschweißtechnik GmbH · Etterschlag · Inninger Str. 14 · 82237 Wörthsee · Tel.: 0 81 53/885-0 Depth 320 mm SZ.0124.E Revision 1... -
Page 13: Technical Data
Description of stud welding system 2.4 Technical data Description BMS-8N Welding range M3 - M8 or Ø 3 - 7.1 mm Material Steel, stainless steel. Aluminium and brass conditionally, depending on the respective requirements Welding method Tip ignition according to DVS Leaflet 0903... -
Page 14: Block Diagram
Description of stud welding system 2.5 Block diagram of BMS-8N K275 yellow/green brown Relay SP2 5VDC black brown green yellow white KL21 blue KL20 Charging module KL19 blue KL18 black KL17 F2 1A blue KL16 Control 2200µF blue KL15 KL14... -
Page 15: Safety Instructions
Safety instructions Safety instructions These operating instructions contain basic instructions which have to be complied with during installation and/or operation. It is therefore absolutely necessary that these operating instructions are read by the operator and responsible specialist staff prior to assembly and initiation. They must always be available at the installation site. -
Page 16: Staff Qualification And Training
Safety instructions Safety instructions the non-observance of which may endanger the machine and its functions are marked with the terms "CAUTION" or "WARNING". General instructions are marked with the hand symbol. 3.2 Staff qualification and training The staff responsible for operation, maintenance, inspection and assembly must have the respective qualification for carrying out these works. -
Page 17: Safety Instructions For The Operator/User
Safety instructions 3.5 Safety instructions for the operator/user When stud welding, danger may result from • electric current • optical radiation • harmful substances (smoke) • acoustic shock • spraying sparks You are therefore obliged to restrict the dangers to an inevitable degree and to point these dangers out to the operator and other persons involved. -
Page 18: Before Starting Welding
Safety instructions • Wear gauntlet gloves made of leather. • Wear neither rings, watches nor electrically conductive jewellery. • Wear protective goggles to protect your eyes from welding spatters and flashes of light that are generated during the process. • Wear ear protection. Capacitor discharge generates a loud bang. 3.7 Before starting welding ... -
Page 19: Working With The Stud Welder
Safety instructions 3.9 Working with the stud welder • Comply with all accident prevention regulations which apply to the operation of your stud welder One of the accident prevention regulations applicable for stud welders is VBG15 "Welding , cutting and similar working methods". -
Page 20: Inadmissible Operating Methods
• Roll up the cables without buckling them. Our tool and gear wagon GW-1 is the optimum solution for installing SOYER stud welders and for properly storing welding pistols, cables, studs, retrofit kits etc. • Make sure stud welder cannot be used by unauthorized persons. -
Page 21: Installation Of Stud Welder
• Ensure sufficient ventilation of the working room when operating the system. The housing of stud welder BMS-8N corresponds to safety class IP 21. Please observe e.g. that this system of protection is not suitable for being operated or transported in the rain. -
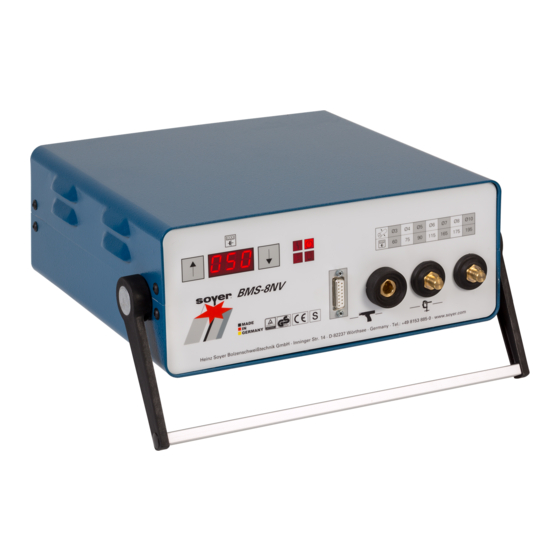
Page 22: Initiation
≈ 190 BMS-8N TÜV Rheinland geprüfte Sicherheit Heinz Soyer Bolzenschweißtechnik GmbH · Etterschlag · Inninger Str. 14 · 82237 Wörthsee · Tel.: 0 81 53/885-0 Rear view SZ.0126.X 1 Function key "Arrow up" 6 Welding cable socket Increase of charging voltage... -
Page 23: Operating Elements
Initiation 5.1.1 Operating elements • Mains switch (item 9, chapter 5.1) The mains switch located at the rear side of the stud welder serves to switch the stud welder on and off. • Function key "Arrow up" (item 1, chapter 5.1) The function key "Arrow up"... -
Page 24: Symbols
Marks where control and welding cable sockets are for pistol connection. SZ.0128.E 5.1.5 Fuse elements The stud welder BMS-8N is protected by the following fuses: - Mains supply fuses: 2 x 10 A slow Plug-in unit (item 10, chapter 5.1) - Charging fuse F1: 6.3 A slow... -
Page 25: Preparation For Initiation
Initiation WARNING Should it become necessary to replace fuses, only use those with specified electrical values. Oversized fuses could either cause defects to the electrical system or a fire. MORTAL DANGER Always disconnect the mains plug from the power supply when replacing fuses! 5.2 Preparation for initiation Connect the stud welding pistol and the earth cables to the stud welder prior... -
Page 26: Operation
The stud welder is ready for welding again after a few seconds (LED "Ready", item 4.2, chapter 5.1.2, lights up). 5.4 Welding parameters The welding parameters of the stud welder BMS-8N were determined by using the stud welding pistols PS-1 and PS-1K. The charging voltages shown Ø... -
Page 27: Quality Control
DIN 4113, part 2). 6.4 Type and scope of test Provided that the SOYER stud welding system is properly used and the materials are appropriately selected, the strength of the welding joint (welding zone) will always be stronger than that of the stud or base material. The follow- ing tests are carried out in general practice: •... -
Page 28: Standard Work Test
Quality control 6.4.1 Standard work test Generally, standard work tests have to be carried out and supervised by the user before welding at a structure and after a certain number of welds has been made. The number of welds after which a standard work test is required is agreed upon with the customer. -
Page 29: Tensile Test
Quality control 6.5.3 Tensile test The tensile test serves to test the metallic bond of the stud with the base metal. At least 3 studs are welded and then axially loaded by means of an appropriate tension device until they break. If the customer demands that a certain percentage of the welded studs should be tested with a specific test load in production, a tension device with load indicator should be used. -
Page 30: Maintenance
Contact the SOYER ® service department if necessary. 7.2 Replacement of components Defective components may only be replaced by trained SOYER servicemen. Perfect function of your stud welder can only be guaranteed when original SOYER spare parts are used. MORTAL DANGER Ensure that the capacitors are discharged before replacing any compo- nents. -
Page 31: Fuses
Maintenance 7.3 Fuses The stud welder BMS-8N is protected by the following fuses: - Mains supply fuses: 2 x 10 A slow Plug-in unit (item 10, chapter 5.1) - Charging fuse F1: 6.3 A slow Control board S0-115 - Control fuse F2:... -
Page 32: Spare Parts
Spare parts Spare parts 8.1 Spare parts list for BMS-8N stud welder - Overview Item No. Quantity Description Order No. Upper part of housing __________________ F03938 Rubber foot, internal ___________________ M01121 Washer M4, nylon _____________________ M01251/01 Fillister head screw M4x8 _______________ M03509... -
Page 33: Exploded View Of Stud Welder Bms-8N - Overview
Spare parts 8.2 Exploded view of BMS-8N stud welder - Overview SZ.0174.X Revision 1 8-27... -
Page 34: Spare Parts List For Stud Welder Bms-8N - View A
Spare parts 8.3 Spare parts list for BMS-8N stud welder - View A Item No. Quantity Description Order No. Rubber mat ___________________________ F03951 Capacitor mounting plate _______________ F03949 Spacing bolt M4x10 ___________________ M03553 Spring ring M4 ________________________ M01074 Hexagon nut M4 ______________________ M01012 PC Board SO-115, revision 2 ____________ F04295/FA Fine-wire fuse 6.3AT ___________________ E01897... - Page 35 Spare parts 8.4 Exploded view of BMS-8N stud welder - View A SZ.0175.X Revision 1 8-29...
- Page 36 Spare parts 8.5 Spare parts list for BMS-8N stud welder - View B, C and D Item No. Quantity Description Order No. Flat head screw M3x10 _________________ M01348 Mains switch __________________________ E03685 Varistor ______________________________ E01347 Coated toroidal core, large ______________ E03607...
- Page 37 Spare parts 8.6 Exploded view of BMS-8N stud welder - View B, C and D 13.1 18 19 SZ.0176.X Revision 1 8-31...
-
Page 38: Malfunctions
If it is difficult or impossible to eliminate the trouble, please contact the SOYER customer service responsible for your area or Heinz Soyer Bolzenschweißtechnik GmbH. For address and telecommunication data, please refer to chapter 1.6, page 1-4. -
Page 39: Error Codes
The stud welder is ready for welding again after it has cooled down. Software fault or hardware failure → Elimination by SOYER customer service only Hardware failure in charging circuit → Elimination by SOYER customer service only Revision 1... -
Page 40: Troubleshooting
Use stud with ignition tip or reduce centre mark Control of stud welder or welding pistol is defective → Inform SOYER customer service Stud is too loose in stud holder → Press stud holder together or tighten it Stud thread scorched Stud holder worn →... - Page 41 Malfunctions Error Cause → Elimination Intensive sparking, Welding energy is set too high → Reset welding energy stud flange almost melted away Stud not welded with total Welding energy is set too low → Reset welding energy flange surface, deficient weld joint strength Poor earth connection →...
-
Page 42: Transport And Storage
Owing to the electronic components, however, please ensure that transport is free from vibrations. The stud welder BMS-8N is equipped with a carrying handle for easy transport. The unit suitcase GK-2 is the optimum solution for storing and transporting the stud welder BMS-8N and the stud welding pistol PS-1K. -
Page 43: List Of Standards And Guidelines
Standards and guidelines 11 List of standards and guidelines • 2014/35/EU Directive on Low Voltage • 2014/30/EU Directive on Electromagnetic Compatibility • EN 60974–1 Arc welding equipment - welding current sources • EN 60974–10 Arc welding equipment - EMC requirements •... -
Page 44: Terms Of Warranty
Terms of warranty 12 Terms of warranty We warrant for this equipment for a period of 6 months in accordance with our conditions of sale and delivery. Any claim to a warranty will be forfeited if damage is caused by improper operation, or if repairs or interferences have been made by unauthorized persons, or whenever accessories and spare parts have been used which do not match our equipment. -
Page 45: Adjustment Of Stud Welding Pistol
Appendix A/PS-1 and PS-1K Adjustment of stud welding pistols - Tip ignition Adjustment of stud welding pistol Adjustment of stud holder The stud holders of stud welding pistols PS-1, PS-3K, PS-0K and PS-1K are all of the same style. When using long welding studs with the welding pistols PS-0K and PS-1K, however, it is necessary to shorten the stud holders' stop screw (4) due to these pistols' small size. - Page 46 Appendix A/PS-1 and PS-1K Adjustment of stud welding pistols - Tip ignition Installation of stud holder into stud welding pistols PS-1 and PS-3K The illustration below shows how to install the stud holder into the stud welding pistols PS-1 and PS-3K. SZ.0136.X 1 Pistol leg 4 Bellows...
-
Page 47: Installation Of Stud Holder Into Stud Welding Pistols Ps-1 And Ps-3K
Appendix A/PS-1 and PS-1K Adjustment of stud welding pistols - Tip ignition Installation of stud holder into stud welding pistol PS-1K and PS-0K The illustration below shows how to install the stud holder into the stud welding pistol PS-1K. These instructions are also applicable for stud welding pistol PS-0K. -
Page 48: Adjustment Of Spring Pressure
Appendix A/PS-1 and PS-1K Adjustment of stud welding pistols - Tip ignition Adjustment of spring pressure The pressure with which the stud is pressed against the workpiece during the welding process is called spring pressure. The illustration below shows how to adjust the spring pressure of stud welding pistol PS-1 which is equipped with a spring pressure indicator. -
Page 49: Initiation
Appendix A/PS-1 and PS-1K - Initiation - Tip ignition Initiation Total view The illustration below shows stud welding pistol PS-3K. The indicated compo- nents are only slightly different from those of stud welding pistols PS-1, PS-3, PS-0K and PS-1K. • The stud welding pistols PS-0K and PS-1K are equipped with support tubes instead of pistol legs (2). -
Page 50: Connecting Stud Welding Pistols To Stud Welder
Appendix A/PS-1 and PS-1K - Initiation - Tip ignition Connecting stud welding pistols to stud welder The stud welding pistols are connected to the stud welder by means of pistol and control cables. Operation • Connect stud welder to earth •... -
Page 51: Spare Parts
Appendix A/PS-1 and PS-1K - Spare parts - Tip ignition Spare parts Revision 1... -
Page 52: Spare Parts List For Stud Welding Pistol Ps-1K
Appendix A/PS-1 and PS-1K - Spare parts - Tip ignition Spare parts list for stud welding pistol PS-1K Item Quantity Description Order No. Support tube Ø 30 mm _________________ F03813 Pistol leg (optional) _____________________ F03890 Grub screw (optional) __________________ M01338 Support tube retainer __________________ F03812 Grub screw M6 x 5 ____________________ M03541 Grub screw with spring M4 x 10 _________ M03542... -
Page 53: Exploded View Of Stud Welding Pistol Ps-1K
Appendix A/PS-1 and PS-1K - Spare parts - Tip ignition Exploded view of stud welding pistol PS-1K SZ.0177.X Revision 1... - Page 54 Appendix A/PS-1 and PS-1K - Spare parts - Tip ignition Revision 1 A-10...
- Page 55 Beiblatt zu BMS-8N/2 / Supplement to BMS-8N/2 Änderung der Netzspannung auf 115 / 230 Volt Alteration of mains voltage to 115 / 230 volt LEBENSGEFAHR Ziehen Sie vor dem Öffnen des Gehäuses der Bolzenschweißanlage grundsätzlich den Anschlussstecker aus der Netzanschlussdose. Nur ausgebildetes und entsprechend qualifiziertes Personal darf Arbeiten an der elektrischen Stromversorgung und Anlage durchführen.
- Page 56 Heinz Soyer Bolzenschweißtechnik GmbH Etterschlag Inninger Straße 14 D-82237 Wörthsee Tel.: ++49-(0) 81 53 / 8 85-0 Fax: ++49-(0) 81 53 / 80 30 Internet: www.soyer.de www.soyer.com E-Mail: verkauf@soyer.de export@soyer.de...
Need help?
Do you have a question about the BMS-8N and is the answer not in the manual?
Questions and answers