Table of Contents
Advertisement
Advertisement
Table of Contents

Related Manuals for Rice Lake IQ9500


Summary of Contents for Rice Lake IQ9500
- Page 1 IQ9500 Counting Scale Version 6.2E Installation Manual 53785...
-
Page 2: Table Of Contents
8.7 Data ..............................36 8.8 Status Data Byte ..........................36 8.9 Bar Code Scanner ..........................37 Copyright © 2001 Rice Lake Weighing Systems. All rights reserved. Printed in the United States of America. Specifications subject to change without notice. Version 6.2E, June 2001... - Page 3 8.11 Three Lines Bar Code ........................37 8.12 Header............................37 8.13 Z Command............................ 38 Appendix ............................ 39 9.1 IQ9500 Character Code List (Teraoka Code) ..................39 9.2 IQ9500 Message List........................40 9.3 Connector Pinouts..........................41 9.4 Cable Wiring ............................. 43 9.5 Bar Code Board ..........................
-
Page 4: About This Manual
This manual contains operating procedures for the Some procedures described in this Warning manual require work inside the scale IQ9500 counting scale and provides the user with all base. These procedures are to be the information necessary for set up and operation. performed qualified... -
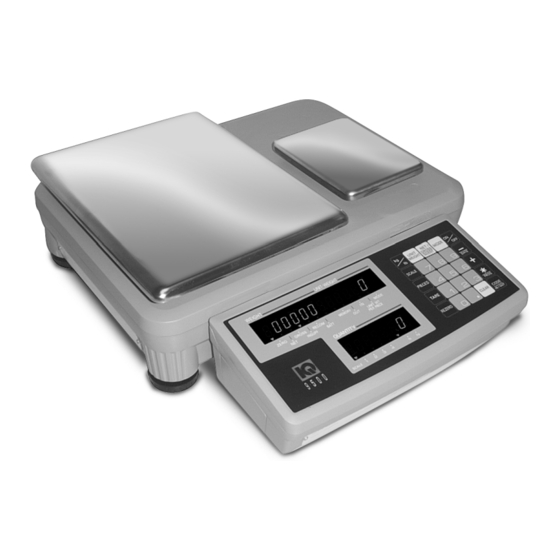
Page 5: Front Panel
Figure 1-2. IQ9500 Keypad and Displays Annunciators Table 1-1 shows a list of the 17 annunciators that the IQ9500 uses to provide additional information about the value being displayed. The annunciators are illuminated when the specific function is being performed. -
Page 6: Iq9500 Keypad
IQ9500 Keypad Table 1-2 list the description of the IQ9500 keypad (see Figure 1-2 on page 2). Description through Used to enter numeric values. When using the scale, first enter a numeric value, then press the appropriate function key. Clears keyed-in data from the display starting with the last digit entered or clears keyed-in data all CLEAR at once (depends on SPEC 6, bit 2 setting). -
Page 7: Installation
Damage to the load cell can occur if the scale is turned upside down. The IQ9500 counting scale is delivered in a locked position to prevent damage to the load cells during shipment. To prevent damage to the load cells,... -
Page 8: Capacities And Resolutions
11 x 16 NOTES: 25.0 0.002 0.00002 11 x 16 Units are selected as either lb or kg. The IQ9500 can be programmed to weigh in lb, kg, or g. Consult factory for 50.0 0.005 0.00005 11 x 16 remote platform sizes. -
Page 9: Powering Up The Iq9500
Powering Up the IQ9500 If the scale has been connected to AC power while in the OFF condition, no warm-up is necessary. The IQ9500 can be operated either from an AC power NOTE: If the scale displays erratic data, it may be caused source or with an optional rechargeable battery pack by a power transient. -
Page 10: Setting Time And Date
Setting Time and Date You can set the time and date that you want to appear on IQ9500 print tickets. SPEC 5, bits 0 and 1 list three sequence variations of year, month, day that are available to program into the IQ9500 counting scale. -
Page 11: Installing Cable Strain Relief
To prevent load cell or peripheral cable damage from bending and twisting, cable strain reliefs are used in the back of the IQ9500 keyboard. Each IQ9500 counting scale comes equipped with these rubber strain reliefs and should be installed on initial scale setup. -
Page 12: Load Cell Replacement
Load Cell Replacement Load cell replacement requires partial disassembly of the scale base. Sections 2.9.1 and 2.9.2 describe the procedure for replacing in single- and dual-platform scales. On a dual-platform scale, there are two load cell cables connected to a common power board. Load cell replacement requires unsoldering and soldering of load cell connections to the power board. - Page 13 14. Connect DC inlet power supply. 15. Replace scale base cover and platform support brackets in the reverse order of disassembly. NOTE: Remove load cell setscrews before putting the scale back into service. Figure 2-14. Remove Platform Attach Bracket IQ9500 Installation Manual...
-
Page 14: Operator Instructions
The following paragraphs contain detailed operator 3. Tightening the manufacturing tolerances on the parts reduces piece weight variations and instructions for the IQ9500 counting scale (see increases count accuracy. Figure 3-1). Included are instructions to enter tare weights, toggle between net and gross weight, enter... -
Page 15: Entering Unit Weights
The PIECES scale will calculate a unit weight based on the The IQ9500 counting scale is fully capable of part capacity of the scale compared to the weight of the number inventory tracking and maintenance using the sample. The following paragraphs detail the procedure... -
Page 16: Toggle Between Scales
2. Enter known tare weight, or place empty 1. Conduct a sampling process (Section 3.3) to container on scale to perform tare function determine the unit weight of the pieces. (Section 3.1). 2. Place container to be tared on scale and enter 3. -
Page 17: Programming The Scale
Up to 200 item code numbers can 8. Press key to enter the part name (20 CODE be programmed on your IQ9500 counting scale. characters maximum). Section 4.1.1 details the procedure for storing the unit 9. Use the Teraoka Code to enter the part name weight, tare weight, quantity, part number, part name, (refer to Section 9.1). -
Page 18: Item Code Maintenance
(no fractional percentages). • The IQ9500 can program up to six setpoints by repeating Steps 2 through 6, SPEC 18, bit 0 through 2 (Number of Setpoints) determines the number of setpoints. The six setpoints are TTL output for quantity or weight, but not percent quantity or percent weight. -
Page 19: Using Item Code In Normal Mode
(refer information stored with the item code and Section 3.3). Press the key a UNIT WEIGHT automatically return to the normal mode. second time to store the weight value into the item code memory. IQ9500 Installation Manual... -
Page 20: Global Setpoint Programming-Setpoints Not Tied To An Item Code
NOTES: Setpoints Not Tied to an Item Code • The IQ9500 can program up to six setpoints by The IQ9500 provides the flexibility to use the setpoint repeating Steps 2 through 4 (SPEC 18, bits 0, 1, programming for parts counting applications that are and 2 (Number of Setpoints) determine the based on weight or quantity. -
Page 21: Configuration/Dealer Settings
Configuration/Dealer Settings This section presents the setup and configuration of SPEC 1 through SPEC 19 (Table 5-1) are customer the IQ9500 counting scale to be used specifically by specifications and use the access code while distributors service technicians. These SPEC 20 through SPEC 39 (Table 5-2) are weight and configuration settings will configure the counting... - Page 22 RS-232C (force balance) Parity Bit balance) Stop Bit 0: Not used 00: No 01: Odd 0: 1 bit 1: Ohaus 2130 10: Not used 11: Even 1: 2 bits Table 5-1. Applicable IQ9500 Customer Specifications (141 Settings) (Continued) Configuration/Dealer Settings...
- Page 23 00: Internal Scale 1 00: Internal Scale 1 01: Internal Scale 2 01: Internal Scale 2 10: External scale 10: External scale 11: Force balance 11: Force balance Table 5-1. Applicable IQ9500 Customer Specifications (141 Settings) (Continued) IQ9500 Installation Manual...
- Page 24 0 if an Eltron printer is not being used. ____ Weight Decimal Point Position (Cable Port 1, Scale 2) 000: 00000 011: 00.000 001: 0000.0 100: 0.0000 010: 000.00 101: 0.00000 Table 5-2. Applicable IQ9500 Weight and Measurement Specifications (142 Settings) Configuration/Dealer Settings...
- Page 25 1.69 1010: 0.82 0.95 1110: 0.46 0.53 0011: 2.25 2.59 0111: 1.27 1.46 1011: 0.71 0.82 1111: 0.40 0.46 1001 Load Cell Sensitivities Selection (mV/V)—Scale 2 Table 5-2. Applicable IQ9500 Weight and Measurement Specifications (142 Settings) (Continued) IQ9500 Installation Manual...
- Page 26 1101: 0.53 0.91 0010: 2.59 3.00 0110: 1.46 1.69 1010: 0.82 0.95 1110: 0.46 0.53 0011: 2.25 2.59 0111: 1.27 1.46 1011: 0.71 0.82 1111: 0.40 0.46 Table 5-2. Applicable IQ9500 Weight and Measurement Specifications (142 Settings) (Continued) Configuration/Dealer Settings...
- Page 27 0: For std/normal 0: 500,000 load cell 0: Yes 1: 1,000,000 0: Yes 1: For load cell with 1: No 1: No too large offset 0010 Not used Table 5-2. Applicable IQ9500 Weight and Measurement Specifications (142 Settings) (Continued) IQ9500 Installation Manual...
-
Page 28: Calibration
The following tables list the weight resolution performance test procedure. Your IQ9500 scale should capabilities for the IQ9500 counting scale. Table 6-1 be turned on for a minimum of 10 minutes and the has the single channel platform configuration while platform excercised three to four times before Table 6-2 contains the dual channel scales. - Page 29 If you are using a multiple scale configuration, it 6. Enter the known calibration weight (including will be necessary to calibrate all scales individually using all trailing zeros) using the numeric keypad. Steps 1 through 13. Use the SCALE key to switch between scales. IQ9500 Installation Manual...
-
Page 30: Iq9500 Counting Scale Setup
The following paragraphs contain instructions for Specifications 16 and 17 are used only to set up the initial IQ9500 setup and operation either in the battery annunciators for each of the four scales. These or the AC power mode. These instructions include specifications do not turn on the additional scales. -
Page 31: Scale Setup Options
Scale Setup Options The IQ9500 scale setup options are shown in the following paragraphs. Specification Setting 7.2.1 Single Platform IQ9500 Scale Setup 0001 Connect load cell cable to Cable Port 1 at the back of 1011 the keyboard as shown in Figure 7-1. - Page 32 Scale 1 and SPEC 33 and 36 for Scale 2. SPEC 23 will be used to set the display resolution for both scales. NOTE: Refer to Section 9.3 for remote platform wire numbering and connector pinout information. IQ9500 Counting Scale Setup...
- Page 33 7.2.4 Three Platform Scale with IQ9500 Single Platform Use SPEC 20 and 21 to set the minimum display and (Figure 7-5) decimal position for Scale 1, SPEC 20 and 22 for Scale 2, and SPEC 33 and SPEC 36 for Scale 3. SPEC...
- Page 34 REZERO IN / OUT IN / OUT Figure 7-8. Diagram of IQ9500 Dual-Platform Scale with One External Scale Use SPEC 20 and 21 to set the minimum display and decimal position for Scale 1, SPEC 20 and 22 for Specification Setting Scale 2, and SPEC 33 and SPEC 36 for Scale 3.
-
Page 35: Rs-232 Specification
RS-232 Ports would be configured to 0011. SPEC 3 would need to be configured to 0011 or 0010. The IQ9500 is equipped with three RS-232 ports for connecting devices such as a force balance, bar code NOTE: See Section 9.0 for remote platform wire numbering laser/pen scanner, PC, or printer (bar code, tape, or and connector pinout information. -
Page 36: Epson Tape Printers
NOTE: Epson printers must be connected to the memory. Shown in Figure 8-2 is a label sample IQ9500 and powered on before powering up the recalling an item code number from memory and the IQ9500. -
Page 37: Epson Ticket Printers
Table 8-11. Epson TM-U295 Printer Specification (with connector or the 8-pin DIN connector. Form Feed) Connected to 8-Pin DIN Connector NOTE: Epson printers must be connected to the IQ9500 and powered on before powering up the IQ9500-to-PC Output Data Format IQ9500. with Header Table 8-8 presents the TM-U295 printer configuration... -
Page 38: Iq9500-To-Pc Output Data Format Without Header
SETPOINT 5 Setpoint 5 Setpoint 6 SETPOINT 6 Setpoint 6 Table 8-12. IQ9500 RS-232 Specification with Header IQ9500-to-PC Output Data Format NOTES: Without Header • CR must be added at the end of the data. • LF must be added at the end as a termination code of The IQ9500-to-PC output data format (without the transmission. -
Page 39: Data
Setpoints 2, 3, 4, 5, and 6 Always set to 0 Quantity Percentage Upper uantity Lower quantity Weight Percentage Upper weight Lower weight NOTE: Setpoints 2 through 6 must either increase or decrease. The decimal point for weight must be correct. IQ9500 Installation Manual... -
Page 40: Bar Code Scanner
Bar Code Scanner 8.11 Three Lines Bar Code Bar code scanning capabilities are available using The IQ9500 can read three lines of bar code. The either a laser scanner or a wand (or pen) scanner. The following illustrations show the configuration for laser scanner allows non-contact, instantaneous, and Lines 1, 2, and 3. -
Page 41: 8.13 Z Command
Scale 4 Tare NOTE: SPEC 14, bit 3 (RS-232C Connection) must be set to 1 (Yes) and SPEC 15, bit 2 (RS-232C with Header) must be set to 0 (Yes) for the console to recognize the Z commands. IQ9500 Installation Manual... -
Page 42: Appendix
(Teraoka Code) WEIGHT and the UNIT-WEIGHT display will show . The The IQ9500 is not equipped with a full alphanumeric display will prompt QUANTITY CodE PArt-no keyboard; therefore, the Teraoka Code listed in , or depending on the data you are... -
Page 43: Iq9500 Message List
IQ9500 Message List Message Contents Accuracy ---Add XX Sampling quantity is insufficient All memory C XX Number of items in memory CH XXX Checking item code ALL CLEAr Clear memory dFt SPC Default spec EntEr tIñE Enter time from 0000 to 2400 EntEr ñ-d-y... -
Page 44: Connector Pinouts
Connector Pinouts Figure 9-3. Nine-Pin Sub-D Female Figure 9-1. Eight-Pin DIN Female Pin Number Description Scanner DIN Force Balance DIN Number Connector Connector S. GND S. GND S. GND vcc (5 V) Table 9-4. Nine-Pin D-Sub Connector Pin Description Table 9-2. Eight-Pin DIN Connector Pin Description Figure 9-2. - Page 45 PIN 8 - GND OAC5 OUT OPTO 22 115 VAC G4PB4 HOT IN FIELD CONTROL FUSE-HIGH VOLTAGE CAUTION: HOT AND COMMON SHOULD NOT BE SWITCHED Figure 9-5. Typical Wiring for 4 AC Outputs to Control Equipment in the Field IQ9500 Installation Manual...
-
Page 46: Cable Wiring
Eltron 2722/2742 Cables The following tables show the wiring required for cables used with the TM-U295/TM-U200 and Eltron Cable PN 64660 2722 /2742 printers. Eltron 2722/2742 IQ9500 9.4.1 TM-U295/TM-U200 Cables 9-pin D-Sub Male 9-pin D-Sub Male Cable PN 41279 Function... -
Page 47: Bar Code Board
Bar Code Board IQ9500 Installation Manual... -
Page 48: Iq9500 Limited Warranty
IQ9500 Limited Warranty Rice Lake Weighing Systems (RLWS) warrants that all RLWS equipment and systems properly installed by a Distributor or Original Equipment Manufacturer (OEM) will operate per written specifications as confirmed by the Distributor/OEM and accepted by RLWS. All systems and components are warranted against defects in materials and workmanship for one year.
Need help?
Do you have a question about the IQ9500 and is the answer not in the manual?
Questions and answers