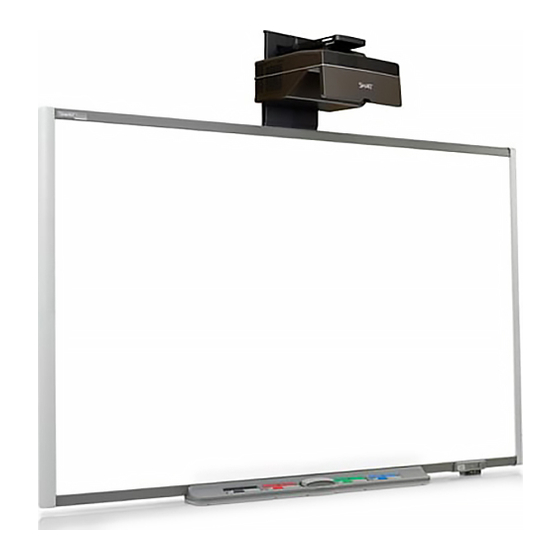
SMART Board SB685ix2 User Manual
Interactive whiteboard systems
Hide thumbs
Also See for SB685ix2:
- Configuration and user's manual (106 pages) ,
- Installation and cabling manual (4 pages)

Related Manuals for SMART Board SB685ix2


Summary of Contents for SMART Board SB685ix2
- Page 1 SMART Board® 685ix2 Interactive whiteboard systems Configuration and user’s guide For model SB685ix2...
- Page 2 © 2014 SMART Technologies ULC. All rights reserved. No part of this publication may be reproduced, transmitted, transcribed, stored in a retrieval system or translated into any language in any form by any means without the prior written consent of SMART Technologies ULC. Information in this manual is subject to change without notice and does not represent a commitment on the part of SMART.
-
Page 3: Important Information
Failure to follow the installation instructions shipped with your SMART product could result in personal injury and damage to the product. To reduce the risk of fire or electric shock, do not expose the SMART product to rain or moisture. - Page 4 I M P O R T A N T I N F O R M A T I O N Two people are required to mount your SMART product because it may be too heavy for one person to safely maneuver.
- Page 5 Make sure an electrical socket is near your SMART product and remains easily accessible during use. Using your SMART product near a TV or radio could cause interference to the images or sound. If this happens, move the TV or radio away from the projector.
-
Page 6: Environmental Requirements
Disconnect the product from its power source when it is not used for a long period. Other precautions If you own a SMART product other than a SMART Board 685ix2 series interactive whiteboard system, refer to the warnings document that shipped with your product for relevant warnings and maintenance instructions. - Page 7 Periodic cleaning is required in areas with heavier dust. See Cleaning the projector on page 27 for information on cleaning the SMART UX80 projector. Electrostatic discharge EN61000-4-2 severity level 4 for direct and indirect ESD (ESD) No malfunction or damage up to 8kV (both polarities) with a 330 ohm,...
-
Page 9: Table Of Contents
Contents Important information Safety warnings, cautions and important information Environmental requirements Chapter 1: About your interactive whiteboard system SMART Board 685ix2 interactive whiteboard system features Included accessories Chapter 2: Installing your interactive whiteboard system Choosing a location Choosing a height Routing the cables... - Page 10 Web page management Simple Network Management Protocol (SNMP) Appendix B: Remotely managing your system through an RS-232 serial interface Connecting your room control system to the SMART UX80 projector Projector programming commands Appendix B: Adjusting projector settings Appendix C: Integrating other devices...
-
Page 11: Chapter 1: About Your Interactive Whiteboard System
Remote control Pens Eraser Hardware mounting kit Your SMART Board 685ix2 interactive whiteboard system combines the following components: SMART Board 600 series interactive whiteboard SMART UX80 projector Accessories and optional equipment This chapter describes the features of your interactive whiteboard and provides information about product parts and accessories. -
Page 12: Smart Board 685Ix2 Interactive Whiteboard System Features
SMART Board 600 series interactive whiteboard Your SMART Board 600 series interactive whiteboard has many features, including a resistive touch screen and a pen tray. The SMART Board 600 series interactive whiteboard performs well with the SMART UX80 projector because of the projector's exceptional color performance, aspect ratio, input response and short- throw image distance. -
Page 13: Smart Ux80 Projector
D600 series interactive whiteboard installation and user’s guide (smarttech.com/kb/001414). N O T E Because of its wide-screen format, the SMART UX80 projector is compatible only with SMART Board 685 interactive whiteboards, and not with SMART Board 640, 660, 680, 690, D680 or D690 interactive whiteboards. SMART UX80 projector The SMART UX80 projector system includes an... -
Page 14: Extended Control Panel (Ecp)
Remote management via network through an RJ45 cable Remote management via a serial RS-232 interface Connectivity for a second SMART UX80 projector in a dual interactive whiteboard system Self-protection timer for a hot re-strike of the projector lamp Protected cable routing through the projector housing and a cable cover that prevent tampering... -
Page 15: Included Accessories
N O T E Some of SMART’s older pens aren’t designed to reflect infrared light and the pen tray sensors might not detect them reliably. T I P Wrap light-colored tape around a substitute pen to improve the reflection of infrared light and help with tool detection. -
Page 16: Eraser
For more information on accessories, go to smarttech.com/accessories. Hardware mounting kit You can order a hardware mounting kit for your projector from your authorized SMART reseller (smarttech.com/where). It contains an assortment of screws and wall anchors for several different wall types (see smarttech.com/kb/160505). -
Page 17: Chapter 2: Installing Your Interactive Whiteboard System
I M P O R T A N T The SMART Board 685ix2 interactive whiteboard system installation and cabling guide is also available online (smarttech.com/kb/170472). This chapter provides additional considerations and details for installing your interactive whiteboard system. -
Page 18: Choosing A Location
Choosing a height SMART includes a mounting template with each interactive whiteboard system. If you lose this template, contact your authorized SMART reseller. Using this template ensures that you can do the following: Mount the projector at a safe height for headspace clearance, while maintaining enough space for airflow and installation access above the unit. -
Page 19: Routing The Cables
Download SMART software from smarttech.com/software. These web pages list the minimum hardware requirements for each software version. If SMART software is already installed on your computer, take this opportunity to upgrade your software to ensure compatibility. -
Page 20: Focusing The Image
Installing your interactive whiteboard system Focusing the image Use the focus lever on the bottom of the SMART UX80 projector to focus the projected image. To focus and adjust the image Turn the focus lever clockwise or counterclockwise until the image is in focus. -
Page 21: Projector Connection Diagram
C H A P T E R 2 Installing your interactive whiteboard system Use the mechanical adjustments described in the installation document and the image alignment screen to adjust the projected image size, shape and location so that you can see the full projected image clearly. -
Page 22: Integrating Your System With Peripheral Devices
Connecting peripheral sources and outputs on page 82. Locking the pen tray to your interactive whiteboard To learn how to lock the pen tray to your interactive whiteboard, see the SMART Board 600 and D600 series interactive whiteboard installation and user’s guide (smarttech.com/kb/001414). smarttech.com/kb/170510... -
Page 23: Chapter 3: Using Your Interactive Whiteboard System
Chapter 3 Using your interactive whiteboard system Using your projector Using your remote control Using the remote control buttons Adjusting projector settings Using your interactive whiteboard Using the Extended Control Panel (ECP) This chapter describes the basic operation of your interactive whiteboard system and explains how to set up your remote control, retrieve system information, access the projector’s image adjustment options and integrate your interactive whiteboard system with peripheral devices. -
Page 24: Using The Remote Control Buttons
C H A P T E R 3 Using your interactive whiteboard system Using the remote control buttons The projector remote control enables you to access on-screen menus and change projector settings. Use the Power button on the remote control or ECP to put the projector into Standby mode or to turn it on. -
Page 25: Adjusting Projector Settings
Keep your remote control in a safe place because there is no other way to access menu options. Setting Notes Image Adjustment menu Display Mode Indicates the projector’s display The default is SMART Presentation. output (SMART Presentation, Bright Room, Dark Room, sRGB and User). Brightness Adjusts projector brightness The default is 50. - Page 26 H-Position Moves the horizontal position of Don’t adjust this setting unless you’re advised the source video left or right to by SMART Support. from 0 to 100 (relative to the Apply this setting only after you make all projected image). physical adjustments.
- Page 27 C H A P T E R 3 Using your interactive whiteboard system Setting Notes Projector Functions menu Auto Signal Enables or disables signal The default is off. Detect searching of input connectors. Select On to have the projector continuously switch inputs until it finds an active video source.
- Page 28 Startup Screen, Preview displayed. Startup Screen), or Image SMART displays the default SMART logo on a Alignment Screen. blue background. Capture User Startup Screen closes the on-screen display menu and captures the entire projected image.
- Page 29 C H A P T E R 3 Using your interactive whiteboard system Setting Notes DHCP Displays the status of the The default is on. network’s Dynamic Host On enables a DHCP server on the network to Configuration Protocol (DHCP) automatically assign an IP address to the as On or Off.
- Page 30 C H A P T E R 3 Using your interactive whiteboard system Setting Notes Projector Name Displays the projector’s name You can set the projector’s name using the as set by an administrator remote management features (see Remotely (maximum 12 characters). managing your system through a network interface on page 47 and Remotely managing your system through an RS-232 serial...
-
Page 31: Using Your Interactive Whiteboard
Reserved for future application. Using your interactive whiteboard Refer to the SMART Board 600 and D600 series interactive whiteboard installation and user’s guide (smarttech.com/kb/001414) for more information on using your interactive whiteboard. When you connect your SMART Board interactive whiteboard to a computer with SMART software, you can access the full capabilities of your interactive whiteboard. -
Page 32: Using The Extended Control Panel (Ecp)
C H A P T E R 3 Using your interactive whiteboard system Using the Extended Control Panel (ECP) The ECP gives you control of the basic operations of your interactive whiteboard system. Additionally, you can connect peripheral devices directly to the ECP, as described in Connecting peripheral sources and outputs on page 82. - Page 33 USB #2 port on the ECP. By default, this port is enabled only when the HDMI-1 video input on the projector is active. USB A receptacle (for SMART Board interactive whiteboard only) USB B receptacle (for your primary computer) N O T E Use the projector’s USB menu to ensure that the appropriate projector video input...
-
Page 35: Chapter 4: Maintaining Your Interactive Whiteboard System
SMART Board 685ix2 interactive whiteboard system. Maintaining your interactive whiteboard With proper care, your SMART Board interactive whiteboard will provide years of trouble-free service. Preventing damage to your interactive whiteboard Although your interactive whiteboard’s surface is very durable, take the following precautions to prevent damage. -
Page 36: Keeping The Writing Surface Clean
C H A P T E R 4 Maintaining your interactive whiteboard system The digital cameras located in the corners of the frame are protected from dust and dirt by windows. In extremely dusty environments, spray a household, alcohol-free glass cleaner, such as Windex®... -
Page 37: Cleaning The Projector
C H A P T E R 4 Maintaining your interactive whiteboard system Cleaning the projector W A R N I N G Cleaning a wall-mounted projector can result in a fall or injury. Use caution when climbing a ladder. C A U T I O N Before you clean the projector, press the Power button twice on the ECP or remote control... - Page 38 Thoroughly clean the area around the projector, and discard any edible items placed in that area because they could be contaminated. Call your authorized SMART reseller for instructions. Do not attempt to replace the lamp. When replacing the projector lamp: Put the projector into Standby mode and wait 30 minutes for the lamp to cool completely.
-
Page 39: Resetting The Lamp Hours
C H A P T E R 4 Maintaining your interactive whiteboard system Resetting the lamp hours After you replace the lamp module, you need to access the projector service menu and reset the lamp hours. To prevent accidental errors, only a system administrator should perform this procedure. N O T E Always reset the lamp hours after you replace the lamp, because lamp service reminders are based on the current hours of use. -
Page 40: Replacing The Remote Control Battery
C H A P T E R 4 Maintaining your interactive whiteboard system Replacing the remote control battery Follow this procedure to replace the remote control battery. W A R N I N G Reduce the risk associated with a leaking battery in the projector’s remote control by following these practices: Use only the specified CR2025 coin-cell battery. -
Page 41: Chapter 5: Troubleshooting Your Interactive Whiteboard System
Chapter 5 Troubleshooting your interactive whiteboard system Before you start Locating status lights Locating serial numbers Determining your interactive whiteboard system’s status Resolving interactive whiteboard issues Resolving operation issues Resolving connection issues Resolving controller module issues Resolving projector issues Resolving projector errors Your projector stops responding The “Projector Overheated”, “Fan Failure”, “Lamp Failure”... -
Page 42: Before You Start
C H A P T E R 5 Troubleshooting your interactive whiteboard system This chapter provides basic troubleshooting information for your interactive whiteboard system. For issues not covered in this chapter, consult the SMART Support website (smarttech.com/support) or contact your authorized SMART reseller (smarttech.com/where). Before you start Before you troubleshoot your interactive whiteboard system or contact SMART Support or your... -
Page 43: Locating Serial Numbers
Troubleshooting your interactive whiteboard system Locating serial numbers The serial number on your SMART Board 600 series interactive whiteboard is located on the lower- right edge of the interactive whiteboard’s frame. For more information, see the SMART Board 600 and D600 series interactive whiteboard installation and user’s guide (smarttech.com/kb/001414). -
Page 44: Determining Your Interactive Whiteboard System's Status
Solid green Solid green Solid green Correct None There’s an issue with the interactive whiteboard. See Resolving operation issues on page 36. Solid green Solid green Flashing Correct Touch only SMART Product Drivers isn’t green installed or running correctly on the connected computer. smarttech.com/kb/170510... -
Page 45: Resolving Interactive Whiteboard Issues
Resolving interactive whiteboard issues This section includes information on resolving issues with your interactive whiteboard. For information not covered in this section, see the SMART Board 600 and D600 series interactive whiteboard installation and user’s guide (smarttech.com/kb/001414). smarttech.com/kb/170510... -
Page 46: Resolving Operation Issues
Confirm that the 4-wire cable (and 2-wire cable, if present) is connected to the interactive whiteboard’s controller module. If necessary, complete additional troubleshooting with the guidance of SMART Support using SMART Board Diagnostics. Confirm that the 4-wire cable (and 2-wire cable, if present) is connected between the interactive whiteboard and the interactive whiteboard’s controller module. -
Page 47: Resolving Projector Issues
Resolving projector issues Resolving projector errors System administrators can resolve the following projector errors on their own prior to contacting SMART Support. Performing initial troubleshooting on your projector will reduce the time of a support call. Your projector stops responding If your projector stops responding, perform the following procedure. -
Page 48: The "Lamp Failure" Message Appears
If replacing the lamp module doesn’t resolve the issue, put the projector into Standby mode, disconnect the power cable, and then contact your authorized SMART reseller. The projector Power and Service lights are off If the projector Power and Service lights are both off, one of the following issues is occurring: There was a power outage or a power surge. -
Page 49: Resolving Image Issues
If a video source signal is not detected, out of range of the projector’s support video modes or the signal is being switched to a different device or input, the projector doesn’t show a source signal and instead displays the SMART logo on a blue screen. smarttech.com/kb/170510... -
Page 50: Partial, Scrolling Or Incorrectly Displayed Image
If your projector still doesn’t show a source signal, contact your authorized SMART reseller. Partial, scrolling or incorrectly displayed image N O T E This procedure may vary depending on your version of Windows®... -
Page 51: Unstable Or Flickering Image
Disconnect the power cable from the power outlet, and then wait at least 60 seconds. Connect the power cable, and then turn on the projector. If the previous steps don’t resolve the issue, contact your authorized SMART reseller. The image from your connected laptop computer isn’t projected Laptop computer settings can interfere with projector operations. -
Page 52: Resolving Audio Issues
Use the instructions in the included SMART Board 685ix2 interactive whiteboard systems installation instructions (smarttech.com/kb/170472) to eliminate most image alignment issues. The projector image can slip if the projector is moved often or installed in a location prone to vibration, such as next to a heavy door. -
Page 53: Resolving Network Communication Issues
If you're using an HDMI video input on the projector, don’t use any DVI to HDMI adapters, because they don’t transfer audio from the DVI source to the HDMI input on the projector. If the previous steps don’t resolve the issue, contact your authorized SMART reseller. Resolving network communication issues If you don’t have network access, perform the following procedure to troubleshoot your system. -
Page 54: Resolving Ecp Issues
IP address field. Enter this IP address into your browser or SNMP agent. If you still don’t have network access, contact your network administrator. If your administrator is unable to resolve the issue, contact your authorized SMART reseller. Resolving ECP issues If the ECP isn’t receiving power, complete the following tasks:... -
Page 55: Transporting Your Interactive Whiteboard System
Scroll to Exit, and then press Enter on the remote control to exit the projector service menu. Transporting your interactive whiteboard system Save your original SMART Board interactive whiteboard packaging so that it’s available if you need to transport your interactive whiteboard system. When required, repack it with all of the original packaging. -
Page 57: Appendix A: Remotely Managing Your System Through A Network Interface
Password settings Simple Network Management Protocol (SNMP) Crestron® RoomView® This chapter includes detailed instructions on how to remotely manage your SMART Board 685ix2 interactive whiteboard system settings through a network interface. Web page management You can access advanced setup features via the projector’s web page. This web page enables you to manage the projector from a remote location using any computer connected to your intranet. -
Page 58: Accessing Web Page Management
Start your Internet browser. Type the IP address in the address box, and then press ENTER. The SMART UX80 Projector Settings window appears. Select the menu options in the left pane to access the settings on each page. Modify settings using your computer’s mouse and keyboard, and then click Submit or another action button next to each setting you change. -
Page 59: Control Panel
Closed Captioning Turns on or turns off the closed captioning feature. Display Mode Adjusts the display output to SMART Presentation, Bright Room, Dark Room, sRGB and User modes so you can project images from various sources with consistent color performance: SMART Presentation is recommended for color fidelity. - Page 60 A P P E N D I X A Remotely managing your system through a network interface Submenu setting Description White Peaking Adjusts the image color brightness from 0 to 10 while providing more vibrant white shades. A value closer to 0 creates a natural image and a value closer to 10 enhances brightness.
- Page 61 Startup Screen Sets the type of startup screen to SMART or User. The SMART screen is the default SMART logo on a blue background. The User screen uses the saved picture from the Capture User Startup Screen function.
-
Page 62: Control Panel Ii
A P P E N D I X A Remotely managing your system through a network interface Submenu setting Description Emergency Alert Turns the on-screen alert broadcast message on or off. When enabled, this message displays over the current projected image. Displays an on-screen emergency notification message (maximum Alarm Message / Alert 60 characters). -
Page 63: Network Settings
A P P E N D I X A Remotely managing your system through a network interface Network settings This menu allows you to use or not use Dynamic Host Control Protocol (DHCP) and to set the network-related addresses and names when DHCP is not used. Submenu setting Description DHCP... -
Page 64: E-Mail Alerts
A P P E N D I X A Remotely managing your system through a network interface Submenu setting Description TRAP Destination Address Displays or allows you to set the IP address of the network’s SNMP TRAP manager in values between 0.0.0.0 and 255.255.255.255. The TRAP destination address is the IP address of the computer assigned to handle unsolicited data generated by SNMP TRAP events generated by the projector, such as power state changes,... -
Page 65: Password Settings
Lamp Driver Failure Lamp Over Hours N O T E The projector sends an alert e-mail (SMART Alert) to your e-mail address. Click E-mail Alert Test to confirm that your e-mail address and SMTP server settings are correct by sending a test e-mail (SMART Alert-Test Mail). -
Page 66: Simple Network Management Protocol (Snmp)
IT network. There are no control processors and no custom programming is required; just connect the SMART UX80 projector to your network and Crestron RoomView immediately recognizes the device for seamless communication and control. -
Page 67: Appendix B: Remotely Managing Your System Through An Rs-232 Serial Interface
Service and support controls Network controls Advanced display controls This appendix includes detailed instructions on how to set up your computer or room control system to remotely manage your SMART Board 685ix2 interactive whiteboard system settings through an RS-232 serial interface. smarttech.com/kb/170510... -
Page 68: Connecting Your Room Control System To The Smart Ux80 Projector
Connecting your room control system to the SMART UX80 projector By connecting a computer or room control system to the RS-232 serial interface of the SMART UX80 projector, you can select video inputs, start up or shut down your interactive whiteboard system and request information such as projector lamp use, current settings and network addresses. -
Page 69: Projector Programming Commands
A P P E N D I X B Remotely managing your system through an RS-232 serial interface continue. The room control feature of the projector is always on. To configure your computer’s serial interface Turn on your computer, and then start your serial communications program or terminal emulation program. - Page 70 A P P E N D I X B Remotely managing your system through an RS-232 serial interface Command Control basics Commands the projector to exit Standby mode, to ignite the lamp and to begin projecting an image. Commands the projector to stop projecting an image, to cool down the lamp and to enter Standby mode.
-
Page 71: Power State Controls
A P P E N D I X B Remotely managing your system through an RS-232 serial interface Power state controls These commands put the projector in and out of Standby mode and request the projector’s current power state. The projector’s power state determines whether certain commands are available at that time. -
Page 72: Display Controls
Valid values Notes by power state Standby / idle videoinputs Returns a text list of The default SMART UX80 available video source projector with no accessories inputs, such as VGA#, will return a list of VGA1, HDMI#, Composite. HDMI1, HDMI2. -
Page 73: Audio Controls
A P P E N D I X B Remotely managing your system through an RS-232 serial interface Audio controls These commands control the audio of the projector. Usable command by Property Valid values Notes power state Standby / idle •... -
Page 74: System Controls
Standby / idle •VGA# [# range of 1~5] set or get set or get usb1source A default SMART UX80 • HDMI# [# range of 1~5] projector with no additional (default = vga1) accessories has VGA1, HDMI1 and HDMI2 only. • VGA# [# range of 1~5]... - Page 75 Remotely managing your system through an RS-232 serial interface Usable command Property Valid values Notes by power state Standby / idle • smart (default) set or get startupscreen Chooses what splash screen • usercapture to display at projector startup • preview or when there is no active video source signal.
-
Page 76: Service And Support Controls
A P P E N D I X B Remotely managing your system through an RS-232 serial interface Service and support controls These commands control the integration properties of the projector. Usable command by Property Valid values Notes power state Standby / idle modelnum... - Page 77 A P P E N D I X B Remotely managing your system through an RS-232 serial interface Usable command by Property Valid values Notes power state Standby / idle resolution last known video input resolution in the format of ###x###@##Hz or ###i/p •...
-
Page 78: Network Controls
A P P E N D I X B Remotely managing your system through an RS-232 serial interface Network controls These commands control the integration properties of the projector. Usable command Property Valid values Notes by power state Standby / idle •... - Page 79 A P P E N D I X B Remotely managing your system through an RS-232 serial interface Usable command Property Valid values Notes by power state Standby / idle set or get groupname [text string] These properties aren’t used by any of the projector functions.
-
Page 80: Advanced Display Controls
A P P E N D I X B Remotely managing your system through an RS-232 serial interface Advanced display controls These commands control the integration properties of the projector. Usable command by Property Valid values Notes power state Standby / idle •... - Page 81 A P P E N D I X B Remotely managing your system through an RS-232 serial interface Usable command by Property Valid values Notes power state Standby / idle set or get vposition Numeric value. Range: Automatically detected from -5~5 current video source.
-
Page 82: Appendix B: Adjusting Projector Settings
Keep your remote control in a safe place because there is no other way to access menu options. Setting Notes Image Adjustment menu Display Mode Indicates the projector’s display The default is SMART Presentation. output (SMART Presentation, Bright Room, Dark Room, sRGB and User). Brightness Adjusts projector brightness The default is 50. - Page 83 V-Position Moves the vertical position of Don’t adjust this setting unless you’re advised the source video up or down to by SMART Support. from -5 to 5 (relative to the Apply this setting only after you make all projected image). physical adjustments.
- Page 84 A P P E N D I X B Remotely managing your system through an RS-232 serial interface Setting Notes Lamp Reminder Turns the lamp replacement This reminder appears 100 hours before the reminder on or off. recommended lamp replacement. Lamp Mode Adjusts lamp brightness to Standard displays a high-quality, bright...
- Page 85 Startup Screen, Preview displayed. Startup Screen), or Image SMART displays the default SMART logo on a Alignment Screen. blue background. Capture User Startup Screen closes the on-screen display menu and captures the entire projected image.
- Page 86 A P P E N D I X B Remotely managing your system through an RS-232 serial interface Setting Notes DHCP Displays the status of the The default is on. network’s Dynamic Host On enables a DHCP server on the network to Configuration Protocol (DHCP) automatically assign an IP address to the as On or Off.
- Page 87 A P P E N D I X B Remotely managing your system through an RS-232 serial interface Setting Notes Projector Name Displays the projector’s name You can set the projector’s name using the as set by an administrator remote management features (see Remotely (maximum 12 characters).
- Page 88 A P P E N D I X B Remotely managing your system through an RS-232 serial interface Setting Notes Firmware Displays the projector’s digital Version display processor (DDP) firmware version in x.x.x.x format. MPU Version Displays the projector microprocessor unit (MPU) firmware version in x.x.x.x format.
-
Page 89: Appendix C: Integrating Other Devices
HD and SD signal format compatibility Video system signal compatibility Connecting peripheral sources and outputs This appendix provides information on integrating your SMART Board 685ix2 interactive whiteboard system with peripheral devices. Video format compatibility Your projector has a native video format and various video format compatibility modes. You can change image appearances for certain formats and compatibilities. - Page 90 A P P E N D I X C Integrating other devices Video format compatibility The following tables list the projector’s compatible VESA RGB video formats by resolution, which you can adjust by using the aspect ratio commands described in Adjusting projector settings on page 72.
- Page 91 A P P E N D I X C Integrating other devices Resolution Mode Aspect ratio Refresh rate (Hz) “Match Input” appearance 1280 × 1024 SXGA3 75 75.025 Pillarbox 1280 × 1024 SXGA3 85 85.024 Pillarbox 1400 × 1050 SXGA+ 59.978 Pillarbox 1600 ×...
-
Page 92: Connecting Peripheral Sources And Outputs
The RCA jacks on the ECP aren’t used in this configuration and aren’t enabled. To connect a laptop to a SMART Board 685ix2 interactive whiteboard system Connect a USB cable from the laptop to the appropriate USB port on the ECP. - Page 93 ECP, through the remote control or through a room control system. To connect a second projector Connect a Cat 5 crossover cable to the Projector 2 port of the primary SMART UX80 projector and into the Projector 2 port of the secondary SMART UX80 projector.
-
Page 95: Appendix D: Remote Control Code Definitions
Appendix D Remote control code definitions IR signal format: NEC1 Repeat Vendor code Key code format Byte 1 Byte 2 Byte 3 Byte 4 Input Power ( ) Menu Up ( ) Left ( ) Enter ( ) Right ( ) Down ( ) Hide Volume up ( ) -
Page 97: Appendix E: Hardware Environmental Compliance
Appendix E Hardware environmental compliance SMART Technologies supports global efforts to ensure that electronic equipment is manufactured, sold and disposed of in a safe and environmentally friendly manner. Waste Electrical and Electronic Equipment and Battery regulations (WEEE and Battery Directives) Electrical and electronic equipment and batteries contain substances that can be harmful to the environment and to human health. -
Page 99: Index
Index DVDs 83 3.5 mm audio connectors 11 e-mail alerts 54 about 4 accessories lights and status of 44 included 5 using 22 alarms 52 electrostatic discharge v aspect ratios 3, 17, 51, 74, 79-82 emergency alerts 52 audio 63 emissions v controlling volume of 22, 49 environmental requirements iv... - Page 100 I N D E X image alignment screen 10 pen tray input selection 22, 51 about 3 installation locking to the interactive whiteboard 12 choosing a height 8 pens 5 choosing a location 8 Perchlorate material 87 interactive whiteboard peripheral sources 82 about 2 pillarboxing 80-81 indicators and controls of 35...
- Page 101 See RS-232 serial interface serial number 33 signal loss 39 SMART Board interactive whiteboard See interactive whiteboard XGA support 80 SMART UX80 projector See projector SMTP 54 SNMP 53, 56 sound See audio zoom 50 startup screen 51 subnet mask 19, 53, 76...
- Page 104 SMART Technologies smarttech.com/support smarttech.com/contactsupport smarttech.com/kb/170510...
Need help?
Do you have a question about the SB685ix2 and is the answer not in the manual?
Questions and answers