Advertisement
Quick Links
Download this manual
See also:
Manual
Introduction
Drobo, the world's first storage robot, is a fully automatic data storage system that provides the only effortless, safe and
expandable repository for all of your digital assets. Drobo connects easily to your PC via FireWire 800 or USB 2.0, and
appears like one large external drive to Windows, requiring no configuration for use. Drobo can also be easily shared over
a network using DroboShare. For more information about DroboShare, see
Sharing Drobo Between
Computers.
Many of the key features delivered to enhance your user experience include:
1
Advertisement

Related Manuals for Drobo storage system


Summary of Contents for Drobo storage system
- Page 1 Introduction Drobo, the world's first storage robot, is a fully automatic data storage system that provides the only effortless, safe and expandable repository for all of your digital assets. Drobo connects easily to your PC via FireWire 800 or USB 2.0, and appears like one large external drive to Windows, requiring no configuration for use.
-
Page 2: Sharing Drobo Between Computers
Sharing Drobo Between Computers Drobo connects directly to one computer at a time via the provided FireWire 800 or USB 2.0 cable. However, you may have a need to share your Drobo across your network. This is easily done using DroboShare, a unique companion to Drobo. - Page 3 The Ins and Outs of Drobo While Drobo does much of the work for you, there are still a few items that you will need to understand to take full advantage of its rich feature set. Take some time to familiarize yourself with your Drobo.
- Page 4 The Ins and Outs of DroboShare DroboShare is a simple, plug 'n play companion to Drobo. Take some time to familiarize yourself with how Drobo and DroboShare connect. Related Topics Adding Hard Drives to Your Drobo Connecting Drobo to Your PC or DroboShare...
- Page 5 Adding Hard Drives to Your Drobo When you add hard drives to your Drobo, each individual hard drive becomes part of a large pool of storage where data is spread out across all of the hard drives in Drobo. As you add or replace hard drives to increase capacity, each new hard drive becomes identified as part of the storage pool.
- Page 6 Drobo. Next, connect the other end to an available FireWire 800 port on your PC. USB 2.0: Connect the square end of the supplied USB 2.0 cable to the USB 2.0 port on the back of your Drobo.
- Page 7 Drobo after the initial formatting, you will get immediate access to any additional capacity. After the initial format, you will not need to format added drives until an additional pool of storage is created and Drobo will walk you through that process when the time comes.
- Page 8 From the Drobo Format dialog box, click Yes to view the Drobo Format Options dialog box. From the Format Options dialog box you will be presented with different format options depending on whether your Drobo is directly attached to your PC or attached to your local network via DroboShare.
- Page 9 By default, Drobo will format itself as a 2TB volume regardless of the capacities of the drives inserted into Drobo. This property allows Drobo to easily expand, without forcing complex Windows management and configuration. The Volume Size Selection tool allows you to modify the volume size based on what is available depending on your operating system.
- Page 10 Depending on your volume selection and the total raw capacity of the drives in Drobo, you will be presented with the opportunity to select a name and drive letter for your volume(s). When done, click Next. You will be asked to confirm your selections. Click Format to begin formatting.
- Page 11 Be sure to only format the newly created volume to ensure your existing data is retained. Tip: Use the Drobo Dashboard Format button when you wish to erase all data the drives in Drobo. This should only be used when you are confident you want to erase all data on the drives in Drobo.
- Page 12 Using virtualization technology, Drobo does not require you to format each and every drive added to Drobo. After the initial format, when you add new hard drives, or upsize existing drives with larger ones, Drobo will automatically format the new drives for you until the actual capacity is greater than the volume size. When this occurs an additional pool of storage is created.
- Page 13 Right-click on the disk described in Step 2. Select Initialize Disk.
- Page 14 Windows automatically launches the Initialize Disk Wizard. Click OK. Drobo is now initialized and appears in the Computer Management Console. The disk status has changed from Unknown to Basic and from Not Initialized to Online, but the disk space will still appear as Unallocated.
- Page 15 The New Partition Wizard will launch. Click Next.
- Page 16 The Select Partition Type Options is displayed. The Primary partition is pre-selected; extended partitions are not supported. Click Next to continue. 10. The Specify Partition Size Window is displayed. Select the size for the partition and click Next.
- Page 17 11. The Assign Drive Letter or Path Window appears. Select the drive letter you want assigned to this partition in Drobo. Windows automatically displays the next available drive letter (in this example, with one partition, it is E). Click Next.
- Page 18 Extended and multiple partitions are not supported at this time. Default as the Allocation unit size. Enter the volume label of your choice. For example, you could name it Drobo. Be sure to select the check box by Perform a quick format to complete the format. Tip: If you don't select a quick format, the format operation could take as long as a few hours to complete.
- Page 19 14. Windows automatically displays the Computer Management Console while the formatting is in progress.
- Page 20 15. Disk formatting will vary depending on the speed of your system and if you had selected Perform a Quick Format in a previous step. When the formatting is complete, Windows displays the drive as Healthy in the Computer Management Console. 16. Drobo is formatted and ready to use.
- Page 21 Dashboard. If you want to know the current used capacity on your Drobo, you can get a quick idea with a glance at the utilization meter on the front. Additionally, Drobo will always warn you if you are starting to run low on available space. If you want detailed information, the Drobo Dashboard provides any information you may require.
- Page 22 If you have a data bay indicator showing a yellow or red status, Drobo is informing you to insert a hard drive or upsize a smaller capacity hard drive with a larger capacity one into the data bay that is lit.
- Page 23 If the Drobo Dashboard appears with a message saying "No Drobo is detected. Please check my connections", check to see if the FireWire 800 or USB 2.0 cable is still connected between your PC and Drobo. Additionally, check to be sure Drobo is still connected to its power source.
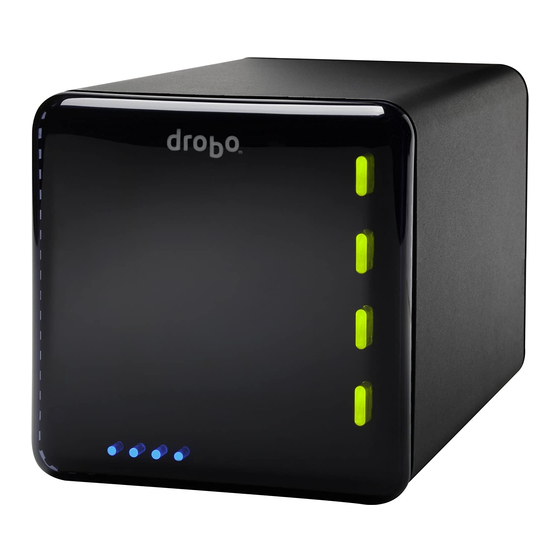
- Page 24 Data Bay Indicators Drobo utilizes status indicators found to the right of each Data Bay. These indicators will always let you know the status of your Drobo. When all lights are green "everything is okay." If there is a yellow light, you are running low on protected capacity and you should add or upsize a hard drive with one of greater capacity at your convenience.
-
Page 25: Removing And Replacing Hard Drives
Removing a hard drive during this process could result in data loss. If you remove or replace too many hard drives at once, Drobo will light all 4 data bay indicators with red lights and request that you reinsert the last drive removed. - Page 26 Clearing Hard Drives In the event you may want to completely reset your Drobo, clear all data from the hard drives and start anew, you may do so using the following procedure: Warning: This procedure will clear ALL existing data on the hard drives inside of your Drobo.
- Page 27 Failure to properly remove Drobo from your PC can cause loss of data. The Standby operation should take only a few seconds. Once Drobo is in Standby, all lights will turn off except for the power indicator, which will turn orange. Only then, can you safely disconnect Drobo from your PC or disconnect the power from your Drobo.
- Page 28 Failure to properly remove Drobo from DroboShare can cause loss of data. The Standby operation should take only a few seconds. Once Drobo is in Standby, all lights will turn off except for the power indicator, which will turn orange. Only then, can you safely disconnect your Drobo from DroboShare or disconnect the power from your Drobo.
- Page 29 Drobo uses any 3.5” SATA hard drive, from any manufacturer, of any capacity, and of any rotation speed (5400 RPM, 7200 RPM, etc). You are able to mix and match hard drives in Drobo and it will take full advantage of the capacity on the hard drives you add to the system.
- Page 30 Robotics devices to the most recent released versions of firmware and software. Drobo Dashboard provides an easy to read System Tray icon that shows you the status of your Drobo. So if you keep your Drobo in a location where the data bay indicators are not visible to you, you can use Drobo Dashboard to remotely monitor the status and capacity of Drobo and DroboShare.
- Page 31 Basic Drobo Dashboard Each Drobo attached to your PC will have a specific drive tab. If the Drobo is connected over the network via a DroboShare, it is specifically identified by the DroboShare logo in the drive tab. Item Description Drive Tab Shows the Windows drive letter and volume name assigned to Drobo.
- Page 32 The Capacity Breakdown Bar Drobo divides your entire storage space into four types of storage areas. Use the Capacity Breakdown Bar to view information about how much space is allocated to those areas. To view the bar, click on "How is my storage being used?"...
-
Page 33: Advanced Drobo Dashboard
Drobo Dashboard icon in the Windows System Tray and selecting Data. Depending on whether Drobo is directly connected to your PC or connected through the network via DroboShare, the Data Tab will show a graphical depiction of Drobo or Drobo and DroboShare. - Page 34 DroboShare. Each drive bay provides information about status and capacity for each drive in your Drobo. If there is no drive in a bay, it will remain empty in the status window. The upper left corner of this frame will provide a system status, which normally will display "I am Healthy."...
- Page 35 Drobo Dashboard icon in the Windows System Tray and selecting Tools. Depending on whether Drobo is directly connected to your PC or connected through the network via DroboShare, specific controls on the Tools Tab may or may not be accessible.
- Page 36 Item Description Standby Puts Drobo in a state which will allow you to disconnect Drobo from your PC or power. Note: Wait until all lights on Drobo go dark and the power light turns orange before removing drives or power from Drobo.
- Page 37 DroboCare License Provides your serial number as well as the expiration date of your DroboCare License. Note: In order to download the latest versions of Drobo Dashboard and Drobo & DroboShare Firmware, you must have a valid DroboCare License.
- Page 38 DroboShare Settings Combined with Drobo, DroboShare enables Drobo to be shared across a local network via Ethernet. Typically DroboShare does not need any configuration, however, for unique network situations; you can access the DroboShare Settings page by clicking on Setup under the DroboShare section of the Tools Tab in the Advanced Dashboard.
- Page 39 DroboShare-attached Drobos. If this is enabled, the user will be prompted for the username and password when they access this specific Drobo tab in Drobo Dashboard. The username and password will only have to be supplied once.
-
Page 40: E-Mail Alerts
E-mail Alerts Drobo Dashboard can send e-mail alerts based on a selected alert level for all Drobos attached to your PC. To access this option, right-click on the System Tray Drobo Dashboard icon and select "E-mail Alert Settings”. Item Description... - Page 41 From E-mail Address E-mail address from which the alert is sent from. Mail Server Server used to send e-mail from. This can be specified as a server name (ex. smtp.company.com) or a server’s IP address (ex. 127.0.0.1). If you are unsure, contact your network administrator or your e-mail service provider.
-
Page 42: Troubleshooting
Check to see if a PATA, IDE, or SCSI hard drive was inserted into Drobo. If it is a PATA, IDE, or SCSI drive, it won't work with your Drobo. - Page 43 Visit the Data Robotics™ Incorporated website, at www.drobo.com Or contact Customer Support at support@drobo.com...
Need help?
Do you have a question about the storage system and is the answer not in the manual?
Questions and answers