Advertisement
Quick Links
Introduction
Drobo, the world's first storage robot, is a fully automatic data storage system
that provides the only effortless safe, and expandable repository for all of your
digital assets. Drobo connects easily to your Mac via USB 2.0, and appears like
one large external USB Drive to OS X, requiring no configuration to use. Many of
the key features delivered to enhance your user experience include:
1
Advertisement

Related Manuals for Drobo Storage system


Summary of Contents for Drobo Storage system
- Page 1 Introduction Drobo, the world's first storage robot, is a fully automatic data storage system that provides the only effortless safe, and expandable repository for all of your digital assets. Drobo connects easily to your Mac via USB 2.0, and appears like one large external USB Drive to OS X, requiring no configuration to use.
- Page 2 The Ins and Outs of Drobo While Drobo does much of the work for you, there are still a few items that you will need to understand to take full advantage of its rich feature set. Take some time familiarize yourself with your Drobo.
-
Page 3: Getting Started
Removing, and Replacing Hard Drives" for instructions. Add Hard Drives to Your Drobo Drobo has four data bays. Each one holds a single 3.5" SATA hard drive. PATA hard drives are not compatible, so they can not be used. Before connecting Drobo to your Mac, insert your hard drives into the empty data bays. - Page 4 7. You are now ready to Format Your Drobo. Formatting Your Drobo This formatting procedure must be done when you add hard drives to Drobo for the first time. In the future, when you add new hard drives, or replace drives with larger ones, Drobo will automatically format the new drives for you.
- Page 5 If you plan on connecting Drobo to only a Mac, then select the HFS+ radio button. If you plan on connecting Drobo to a Mac, and on some occasions to a computer running Microsoft Windows, or to a NAS appliance (other than Airport Extreme), then select the FAT32 radio button.
- Page 6 To Format Drobo Using the Mac OS Disk Utility: 1. If your Mac detects your unformatted Drobo, the Disk Insertion dialog box will appear. 2. Click Initialize to launch the Disk Utility application. If the application does not appear, it can be started from Applications > Utilities > Disk Utility.
- Page 7 4. From the Volume Format drop-down list, accept Mac OS Extended (Journaled) unless you have a specific need for a different option. 5. In the Name text box, type a name for your Drobo; for example, Drobo. 6. Click the Erase button to view the Erase warning message.
- Page 8 Drobo. To Start Drobo Dashboard and Then Format Drobo: 1. If you want to start the Drobo Dashboard from the Doc, do the following, or skip to Step 2 to start it from the Applications Folder. Find the Drobo icon in your dock.
- Page 9 If you plan on connecting Drobo to only a Mac, then select the HFS+ radio button. If you plan on connecting Drobo to a Mac, and on some occasions to a computer running Microsoft Windows, or to a NAS appliance (other than Airport Extreme), then select the FAT32 radio button.
- Page 10 Related Topics My Mac Says Drobo has 2 Terabytes of Capacity Adding New Capacity to My Drobo Launching the Drobo Dashboard Basic Drobo Dashboard...
- Page 11 When you look at the properties for your Drobo using any of your Mac tools such as Finder or Get Info, you will find that your Mac sees Drobo as a 2 Terabyte (TB) drive. This property allows Drobo to easily expand, without forcing very complex management and configuration.
- Page 12 Tip: You do not need to format a hard drive you are adding to a Drobo that is already up and running. Drobo does all the work for you. Just add a hard drive and immediately take advantage of your new capacity.
- Page 13 Drobo, eject Drobo to put it into Standby. You can do this by dragging the Drobo icon from your desktop to the Trash, or by using the Mac OS Safe Eject Utility. Once the power indicator on Drobo turns orange, disconnect the power and then reconnect it to restart Drobo.
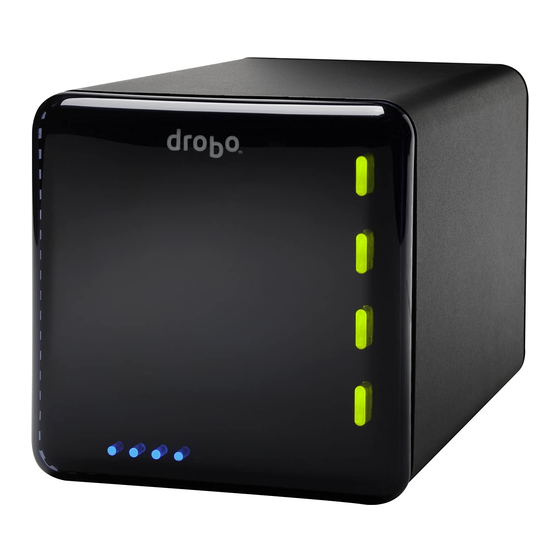
- Page 14 Drobo utilizes status indicators found to the right of each Data Bay. These indicators will always let you know the status of your Drobo. When all lights are green "everything is okay." If there is a yellow light, you are running low on protected capacity and you should add or replace a hard drive with one of greater capacity at your convenience.
- Page 15 Related Topics Adding New Capacity to My Drobo Launching the Drobo Dashboard Basic Drobo Dashboard Advanced Drobo Dashboard...
- Page 16 When removing or replacing hard drives, make sure you remove or replace them one at a time. If you remove or replace too many hard drives at once, Drobo will light all 4 data bay indicators with red lights and request that you reinsert the last drive removed.
- Page 17 Clear Hard Drives...
- Page 18 Clear Hard Drives In the event you may want to completely reset your Drobo, clear all data from the hard drives and start anew, you may do so using the following procedure: Warning! This procedure will clear all existing data on the hard drives inside of your Drobo.
- Page 19 Drobo, always properly put Drobo into Standby Mode by safely ejecting your Drobo first. You can do this by dragging the Drobo icon from your desktop to the Trash, using the Mac OS Safe Eject Utility, or clicking on the Standby button located on the Tools Tab of the Advanced Controls Panel.
- Page 20 Drobo uses any SATA hard drive, from any manufacturer, of any capacity, and of any spindle speed (5400RPM, 7200RPM, etc). You are able to mix and match hard drives in Drobo and it will take full advantage of the capacity on the hard drives you add to the system.
- Page 21 The Drobo Dashboard provides a Menu Bar that mirrors the status of your Drobo. This way, if you keep your Drobo in a location where the data bay indicators are not visible, you can still monitor the status and capacity of the system.
- Page 22 Related Topics Basic Drobo Dashboard Advanced Drobo Dashboard...
- Page 23 Drive Name At the top center of the window, appears the name assigned to Drobo. Multiple partitions on a single Drobo will show up listed on a single tab. Multiple Drobos attached to a single Mac will show up as separate disk drives.
- Page 24 This space can be accessed as more capacity is added to Drobo. Used for protection Space utilized by Drobo for protection of your data. Overhead Space used for Drobo overhead. Related Topics...
-
Page 25: Advanced Drobo Dashboard
The status window provides an at-a-glance view of your Drobo. Each drive bay provides detailed information about status and capacity for each drive in your Drobo. If there is no drive in a bay, it will remain dark in the status window. -
Page 26: Tools Tab
"Drobo Suggests…" area. Tools Tab You can open the Tools window from the Advanced Dashboard by clicking on the Tools tab. You can also reach the tools window by right-clicking on the Drobo Dashboard icon in the Doc. Item Description... - Page 27 Drobo from the PC or disconnect power from Drobo. Note: Before removing drives or power from Drobo, wait until all lights on Drobo go dark except for the power light that will turn orange. Format Erases all data and reformats the hard drives in your Drobo.
- Page 28 Launching the Drobo Dashboard Basic Drobo Dashboard...
-
Page 29: Troubleshooting
Is it plugged into your MAC's USB 2.0 port? Is it plugged into a power outlet? Are all of the hard drives inserted properly into Drobo? Try pulling out a drive and then putting it back in. Does your Mac see Drobo? Open your Disk Utility to see if Drobo is recognized. - Page 30 Visit the Data Robotics™ Incorporated website, at www.drobo.com Or contact Customer Support at support@drobo.com...
Need help?
Do you have a question about the Storage system and is the answer not in the manual?
Questions and answers
Can the Drobo be used as a nas? Network address?
The Drobo storage system can be used behind a NAS appliance, but it is not explicitly described as a standalone NAS device.
This answer is automatically generated