Table of Contents
Advertisement
Advertisement
Table of Contents

Related Manuals for IPC Eagle 512 Rider


Summary of Contents for IPC Eagle 512 Rider
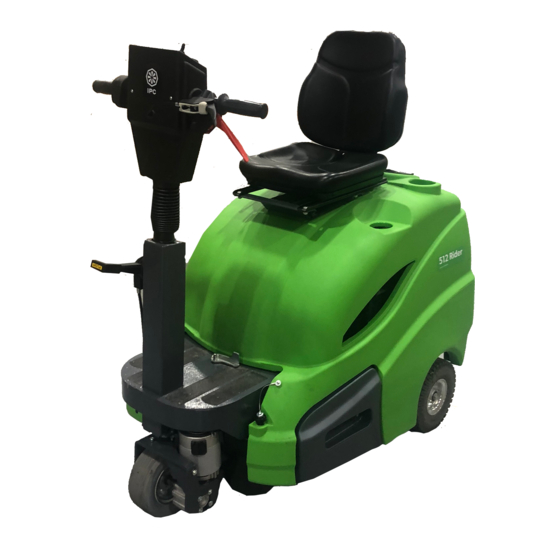
- Page 1 OPERATIONS MANUAL 512/712 Rider...
-
Page 2: Table Of Contents
CONTENTS CONTENTS .......................... 2 GENERAL INFORMATION....................4 2.1........................4 COPE OF THE MANUAL 2.2................5 OCUMENTATION PROVIDED WITH THE MACHINE TECHNICAL INFORMATION ....................5 3.1........................5 ENERAL DESCRIPTION 3.2............................5 EGEND 3.3..........................6 ANGER ZONES SAFETY INFORMATION ..................... -
Page 3: English
8.2.5. Fuses: replacing....................... 18 8.2.6. Side brush belt: replacing ....................18 8.2.7. Drive belt 512-712: replacing ..................18 8.3....................... 19 EGULAR MAINTENANCE 8.3.1. Daily operations ....................... 19 8.3.2. Weekly operations ......................19 8.3.3. Six monthly operations....................19 TROUBLESHOOTING ....................... 21 9.1. -
Page 4: General Information
GENERAL INFORMATION Read this manual carefully before carrying out any work on the machine 2.1. Scope of the manual This manual has been written by the Manufacturer and is an integral part of the machine. It defines the purpose for which the machine has been designed and constructed and contains all the information required by operators. -
Page 5: Documentation Provided With The Machine
The rating plate located as shown in fig. 1, ref. 1 provides the following information: • model; • power supply; • total nominal power; • serial number; • year of fabrication; • weight fully loaded; • maximum slope; • barcode with serial number; •... -
Page 6: Danger Zones
• battery charger display (fig. A / B, ref. 7) (OPTIONAL) 3.3. Danger zones A - Control panel: danger of short circuit. B - Centre brush: danger due to brush rotation. C -Side brush: danger due to brush rotation. D -Back/front wheels: danger of crushing between the wheel and chassis. E - Motor compartment: danger of short circuit between the poles of the battery (BATTERY VERSION), risk of serious burns when performing any maintenance with the engine off but not completely cold (INTERNAL COMBUSTION ENGINE... - Page 7 (eg. paint solvents, acetone etc.). Never pick up flaming or incandescent objects. Never use the machine on slopes or ramps of more than 2%. In the case of slight slopes, do not use the machine transversally, always manoeuvre with care and do not reverse. When transporting the machine on steeper ramps or slopes, take the utmost care to avoid tipping up and/or uncontrolled acceleration.
- Page 8 Special waste. Do not dispose of with ordinary waste. Alternatively the machine must be returned to the Manufacturer for a complete overhaul. If you decide to stop using the machine, you are recommended to remove the batteries and dispose of them at an authorised collection centre. You should also make sure that all parts of the appliance which could represent a hazard, particularly to children, are made safe.
-
Page 9: Handling And Installation
HANDLING AND INSTALLATION 5.1. Lifting and transporting the packaged machine IMPORTANT During all lifting operations, make sure the packaged machine is firmly anchored to avoid it tipping up or being accidentally dropped. Always load/unload lorries in adequately lit areas. The machine, packaged on a wooden pallet by the Manufacturer, must be loaded using suitable equipment (see EC Directive 89/392 and subsequent amendments and/or additions). -
Page 10: Lifting And Transporting The Machine
5.4. Lifting and transporting the machine IMPORTANT All phases must be performed in an adequately lit room and adopting the safety measures most appropriate to the situation. The operator must always use personal protection devices. To load the machine onto a means of transport, proceed as follows: •... -
Page 11: Controls - Description 512 - 712
brush on the floor. Accelerator knob (fig. A, ref. 9), sets the speed of the machine. Front flap raising knob (fig. A, ref. 10), raises the front flap to collect bulky debris. Side brush lifting lever (fig. A, ref. 11): raises and lowers the side brush. Direction selector (fig. -
Page 12: Preparing The Machine For Work
6.4. Preparing the machine for work IMPORTANT Before starting work, wear overalls, ear protectors, non-slip shoes, mask to protect the respiratory tract, gloves and all other personal protection devices necessitated by the work environment. 6.4.1. Internal combustion engine: preparation Read the engine instruction manual annexed to the machine manual carefully and check the level of oil in the engine. -
Page 13: The Battery Charger
• Rotate the top cowling • When using the machine, follow the instructions below. 6.4.3. The battery charger IMPORTANT Never allow the batteries to become excessively flat as this could damage them irreparably. 6.4.4. Choosing the battery charger Make sure the battery charge is compatible with the batteries to be charged: tubular lead batteries: you are recommended to use an automatic battery charger. - Page 14 • Prepare the machine as described in the above paragraph. • Lift the side brush using the lifting lever (fig. A, ref. 11). • Turn the key switch (fig. C, ref. 1) to the "1" position. • Check the LEDs (fig. C, ref. 5) to make sure the battery/ies is fully charged. If not, charge the batteries (BATTERY version).
- Page 15 charge the batteries (BATTERY version). • Open the cowling and use the internal combustion engine starting handle. When the engine is cold, you also need to use the choke (INTERNAL COMBUSTION ENGINE with manual pull start). • Use the lever to activate the drive (fig.C, ref. 2) •...
-
Page 16: Periods Of Inactivity
Front bin: • Use the handle to release the bin (fig. B, ref. 12) 512-712. • Use the handle to release the bin (fig. B, ref. 13) 512-712 RIDER. • Grip the bin and slide it out • Empty the bin. •... -
Page 17: Maintenance - General Rules
compliance with current safety legislation and as described in the maintenance manual. For all maintenance on the engine, see the instruction book. ! DANGER Never perform any maintenance operations without first disconnecting the batteries from the machine’s electrical circuit. 8.1. Maintenance - General rules Performing regular maintenance according to the Manufacturer's instructions improves performance and extends the working life of the machine. -
Page 18: Side Brush: Replacing
8.2.4. Side brush: replacing • Lift the front of the machine • Unscrew the screw (fig. D, ref. 1), remove the worn brush • Install the new brush and fix it with the screw (fig. D, ref. 1). • Unscrew the two screws (fig. E, ref. 1), adjust the height of the brush and tighten the screws. -
Page 19: Regular Maintenance
8.3. Regular maintenance 8.3.1. Daily operations • empty the bins. • make sure there are no wires or straps rolled around the centre brush. • recharge the batteries according to the procedure described. 8.3.2. Weekly operations • check for wear of the FLAPS. If necessary, replace. •... - Page 20 TABLE OF MAINTENANCE On receipt Every 10 hours Every 50 hours Every 100 hours CHECK Centre brush: make sure there are no straps or nylon cord warapped around the brush. If necessary, remove Centre brush: check wear of the brush Side brushes: check wear of the brushes Flap / Bin gasket: check wear...
-
Page 21: Troubleshooting
TROUBLESHOOTING 9.1. How to resolve possible problems 512 – 712 RIDER PROBLEM CAUSE SOLUTION The machine does not Battery disconnected Connect the battery to the machine function The battery is flat. Recharge the battery The key switch (fig. C, ref. 1) is in Turn the key switch (fig. -
Page 22: How To Resolve Possible Problems 512 - 712
Drive motor overheated Turn off the machine and wait for a few minutes Heat sensor damaged Replace heat sensor Damaged drive board Replace drive board Motor malfunction Replace the motor Accelerator potentiometer Replace potentiometer malfunction 9.2. How to resolve possible problems 512 – 712 PROBLEM CAUSE SOLUTION... - Page 23 Dust comes out of the fan Filter incorrectly positioned Remove the filter and replace correctly Worn gaskets Replace gaskets Drive motor does Fuse blown Replace fuse work 512-712 Motor malfunction Replace the motor ENGLISH...
-
Page 24: Alarms Displayed 512 - 712 Rider
9.3. Alarms displayed 512 – 712 RIDER Accelerator. Appears if the accelerator knob (fig. A, ref. 9) is activated before the machine is turned on or after the emergency button has been reset. Release the accelerator knob then action again Potentiometer. -
Page 25: Setting The Control Panel Board 512 - 712 Rider
SETTING THE CONTROL PANEL BOARD 512 – 712 RIDER i INFORMATION If the control board is replaced, make sure the dip switches are set according to the type of machine being used. SW1 ( ON ) 12 V machine power supply SW2 ( ON ) GEL batteries SW3 ( ON )
Need help?
Do you have a question about the 512 Rider and is the answer not in the manual?
Questions and answers