Merrychef eikon e3 Installation And Operating Instructions Manual
Hide thumbs
Also See for eikon e3:
- Quick start manual (97 pages) ,
- Service & parts manual (64 pages) ,
- Service & parts manual (64 pages)
Table of Contents
Advertisement
www.horepa.nl
info: +31 (0)226 354535
eikon e3, e4 & e5
Installation and Operating
Instructions
eikon
TM
IMPORTANT INFORMATION READ BEFORE USE
Users are cautioned that maintenance and repairs should be performed by a Merrychef authorized service agent
using genuine Merrychef replacement parts. Merrychef will have no obligation with respect to any product that
has been improperly installed, adjusted, operated or not maintained in accordance with national and local codes or
installation instructions provided with the product, or any product that has its serial number defaced, obliterated or
removed, or which has been modified or repaired using unauthorized parts or by unauthorized service agents. For
a list of authorized service agents, please refer to the back page of this booklet. The information contained herein
(including design and parts specifications) may be superseded and is subject to change without notice.
www.horepa.nl
1
Installation and Operating original instructions.
Part Number 32Z3797 GB
Issue 1
Advertisement
Table of Contents

Subscribe to Our Youtube Channel
Related Manuals for Merrychef eikon e3


Summary of Contents for Merrychef eikon e3
- Page 1 IMPORTANT INFORMATION READ BEFORE USE Users are cautioned that maintenance and repairs should be performed by a Merrychef authorized service agent using genuine Merrychef replacement parts. Merrychef will have no obligation with respect to any product that has been improperly installed, adjusted, operated or not maintained in accordance with national and local codes or installation instructions provided with the product, or any product that has its serial number defaced, obliterated or removed, or which has been modified or repaired using unauthorized parts or by unauthorized service agents.
-
Page 2: Introduction
The instructions outlined in this guide are intended to ensure the safety and long life of your Merrychef oven. pleAse ReAD The fOllOWING sAfeTy INsTRUCTIONs CARefUlly www.horepa.nl Installation and Operating original instructions. -
Page 3: Table Of Contents
www.horepa.nl info: +31 (0)226 354535 CONTeNTs INTRODUCTION sAfeTy & ReGUlATIONs IMPORTANT SAFETY INSTRUCTIONS PRECAUTIONS TO BE OBSERVED SUITABLE COOKING UTENSILS pRODUCT DeTAIls MAIN FEATURES TECHNICAL SPECIFICATIONS Specifications Serial Number (Rating Plate): Compliances: INSTALLATION OVEN LOCATION AND POSITIONING ELECTRICAL INSTALLATION ELECTRICAL INSTALLATION GUIDE Phase Loading OpeRATION &... -
Page 4: Important Safety Instructions
www.horepa.nl info: +31 (0)226 354535 ImpORTANT sAfeTy INsTRUCTIONs When using electrical appliances basic safety precautions iv) Do not use the cavity for storage purposes. Do not leave should be followed, including the following: paper products, cooking utensils or food in the cavity when not in use. -
Page 5: Precautions To Be Observed
www.horepa.nl info: +31 (0)226 354535 pReCAUTIONs TO be ObseRveD 1. Read this manual before using your oven. 8. Items should be unwrapped when using convection and combination functions. 2. As with all electrical appliances, it is wise to have the electrical connections inspected at least once a year. -
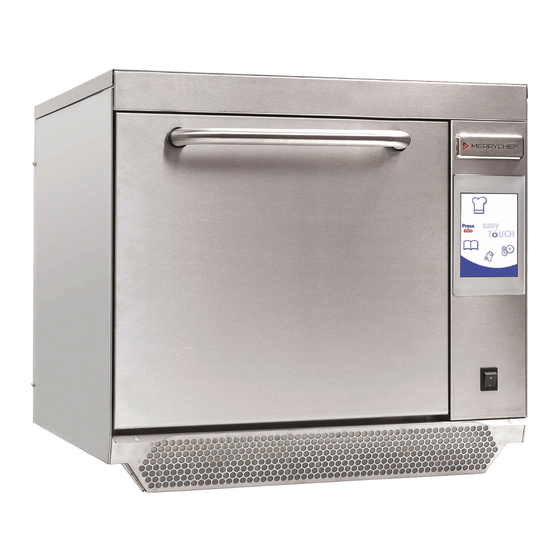
Page 6: Main Features
Located on the rear panel of the oven states the serial number, model type & electrical specifications. MenuConnect A USB socket located under the Merrychef logo allows changes to programs stored on the oven (See ‘USB MenuConnect’ , Operation & Controls section, for details of updating oven programs). -
Page 7: Technical Specifications
www.horepa.nl info: +31 (0)226 354535 TeChNICAl speCIfICATIONs specifications Description unit Touch screen controls programs 1024 1024 1024 Ambient operating temperature °C <40 <40 <40 External HxWxD 551x598x622 591x584x750 642x711x705 External HxWxD inches 21.7x23.5x24.5 23.3x23.0x29.5 25.3x28.0x27.8 Internal HxWxD 319x332x325 218x375x312 258.4x495x363.5 Internal HxWxD inches 12.6x13.1x12.8... - Page 8 Conducted disturbance CISPR 11:2003:A1:2004 quality and environmental management Merrychef Limited and Viscount Catering employ a certified quality management system in accordance with EN ISO 9001:2008 and Viscount Catering employs a certified environmental management system in accordance with EN ISO 14001 www.horepa.nl Installation and Operating original instructions.
-
Page 9: Installation
www.horepa.nl info: +31 (0)226 354535 INsTAllATION Check for obvious signs of transit damage. If necessary, inform the freight company IMMEDIATELY. Remove packing material and protective film from the oven and safely discard. Included inside your oven: Model e3 Series: ● Handle. -
Page 10: Electrical Installation
www.horepa.nl info: +31 (0)226 354535 eleCTRICAl INsTAllATION DANGeR! ThIs ApplIANCe mUsT be eARTheD. fAIlURe TO DO sO mAy ResUlT IN eleCTRIC shOCk AND DeATh. The oven must be connected to a separate electrical supply installed by a qualified and approved electrician. -
Page 11: Electrical Installation Guide
www.horepa.nl info: +31 (0)226 354535 eleCTRICAl INsTAllATION GUIDe DANGeR! WARNING ThIs ApplIANCe mUsT be eARTheD. hIGh leAkAGe CURReNT. fAIlURe TO DO sO mAy ResUlT IN eleCTRIC shOCk AND DeATh. EQUIPOTENTIAL The oven must be connected to a separate An Equipotential Earth point is provided on electrical supply installed by a qualified and the rear panel of the oven for independent approved electrician. -
Page 12: Quick Start Guide: Quick Service Oven
www.horepa.nl info: +31 (0)226 354535 qUICk sTART GUIDe: qUICk seRvICe OveN The easyToUCH screen display, layout and icons shown herein, are for guidance purposes only and are not intended to be an exact representation of those supplied with the oven. sTART Up 1. -
Page 13: Using A Cooking Program
www.horepa.nl info: +31 (0)226 354535 UsING A COOkING pROGRAm Taking all the necessary precautions to ensure you do not burn yourself, open the oven door to place the food into the hot oven and close the door. 1. Select a program group, for example, ‘BURGERS’ to display the individual cooking programs. -
Page 14: Operating Guide: Full Service Oven
www.horepa.nl info: +31 (0)226 354535 OpeRATING GUIDe: fUll seRvICe OveN easyToUCh mAIN meNU & keybOARD sCReeN MAIN MENU SCREEN: 1. DEVELOPMENT MODE enables multistage cooking programs to be developed, then stored under a name and symbol for reuse. 2. PRESS & GO allows quick access to use the cooking programs that are already stored. -
Page 15: Development Mode: Creating A Cook Program
www.horepa.nl info: +31 (0)226 354535 DevelOpmeNT mODe: CReATING A COOk pROGRAm 1. Select the ‘chef’s hat’ symbol from the main menu to enter development mode. Enter stage 1 of the program 2. The temperature displays the set preheated oven temperature. To increase or decrease the temperature required, select the temperature symbol (2), enter the temperature in the keypad within the limits... -
Page 16: Press & Go
www.horepa.nl info: +31 (0)226 354535 pRess & GO Running a cooking program from the Press & Go menu. 1. Select ‘PRESS & GO’ from the main menu screen. 2. Select the item required to cook. 3. The display shows the temperature, cooking time, microwave power and fan speed while the timer counts down. -
Page 17: Changing The Oven Temperature
www.horepa.nl info: +31 (0)226 354535 4. Select the required cooking program to start cooking. For example, ‘1 BURGER’ . 5. The program either starts immediately displaying a countdown timer, or an instruction is displayed first; follow the stage instruction then select OK to start cooking. -
Page 18: Adding A New Program Group
www.horepa.nl info: +31 (0)226 354535 ADDING A NeW pROGRAm GROUp To add a new Program Group. 1. Select ‘COOKBOOK’ from the main menu screen. 2. Select ‘EDIT COOKBOOK’ . 3. Select the ‘ADD A NEW GROUP’ symbol. 4. Enter a name for the new Program Group (max. 20 characters). -
Page 19: Adding A Program To A Group
www.horepa.nl info: +31 (0)226 354535 ADDING A pROGRAm TO A GROUp To add a cooking program to an existing PROGRAM GROUP. Example add Program ‘4 BURGERS’ to the program group ‘BURGERS’ . 1. Select ‘COOKBOOK’ from the main menu screen. 2. -
Page 20: Oven Control Settings
www.horepa.nl info: +31 (0)226 354535 OveN CONTROl seTTINGs 1. Select the ‘settings’ symbol from the main menu screen. 2. Enter the password and select OK to display the Settings menu (3) comprising: A. Oven mode/navigation settings. B. Language options. C. Oven temperature settings and labels. D. -
Page 21: Recipe Counters (E)
www.horepa.nl info: +31 (0)226 354535 Recipe counters (e) Select the clipboard symbol to display a listing of recipe counters. If shown, use the arrows (bottom right) to scroll up and down the list. Date and Time settings (f) Select the time/date symbol to display the setting options. -
Page 22: Usb Oven Programs (J)
www.horepa.nl info: +31 (0)226 354535 Usb oven programs (J) IMPORTANT: Downloading from a USB will clear all the existing programs. Check that the key has the correct number/code for the programs you want to load into the oven memory. Select USB from the settings screen. Slide the USB cover (logo on the oven front) upwards to insert the USB into the slot. -
Page 23: Cooling The Oven Down Before Cleaning
www.horepa.nl info: +31 (0)226 354535 COOlING The OveN DOWN befORe CleANING Oven cool down IMPORTANT: the oven must be cooled down before the cleaning processes are carried out. 1. In Full Serve mode, select the CLEANING symbol from the main menu. 2. -
Page 24: Cold Oven Cleaning Instructions E3
www.horepa.nl info: +31 (0)226 354535 Cold oven CleANING INsTRUCTIONs e3 Complete COOL DOWN procedure and allow the oven and accessories to cool before commencing cleaning. DO NOT Use TOOls REMOVE & CLEAN Oven Parts: 1. Remove the air filter at the base of the oven. 2. -
Page 25: Cold Oven Cleaning Instructions E4
www.horepa.nl info: +31 (0)226 354535 Cold oven CleANING INsTRUCTIONs e4 Complete COOL DOWN procedure and allow the oven and accessories to cool before commencing cleaning. DO NOT Use TOOls REMOVE & CLEAN Oven Parts: 1. Remove the air filter at the base of the oven. 2. -
Page 26: Cold Oven Cleaning Instructions E5
www.horepa.nl info: +31 (0)226 354535 Cold oven CleANING INsTRUCTIONs e5 Complete COOL DOWN procedure and allow the oven and accessories to cool before commencing cleaning. DO NOT Use TOOls REMOVE & CLEAN Oven Parts: 1. Remove the air filter at the base of the oven. 2. -
Page 27: Fault Finding Chart
www.horepa.nl info: +31 (0)226 354535 fAUlT fINDING ChART Although every effort is made to ensure your oven will continue to perform to a high standard, please check the chart to see if the problem can be easily resolved before contacting your service agent. pROblem pOssIble CAUse RemeDy... - Page 28 www.horepa.nl info: +31 (0)226 354535 www.horepa.nl Installation and Operating original instructions. Part Number 32Z3797 GB Issue 1...
-
Page 29: Servicing
-m a i l : i n fo @ me r r yc h e f. co m w w w.merr yc hef.com Merrychef reserves the right to change product specifications without notice and accepts no liability for any inaccuracies, errors or ommissions contained herein.
Need help?
Do you have a question about the eikon e3 and is the answer not in the manual?
Questions and answers