Table of Contents
Advertisement
Quick Links
Download this manual
See also:
User Manual
ALI-HVR3000H Series 4/8/16-Channel 960H HD-TVI Hybrid+ DVR Quick Setup Guide
This quick setup guide provides instructions to initially setup and use the ALI-HVR3000H series digital video recorder (DVR). For additional
information on the extensive capabilities of your DVR, refer to the ALI-HVR3000H Series Alibi 4/8/16-Channel 960H HD-TVI Hybrid+
Security Digital Video Recorder User Manual provided on the CD with your system.
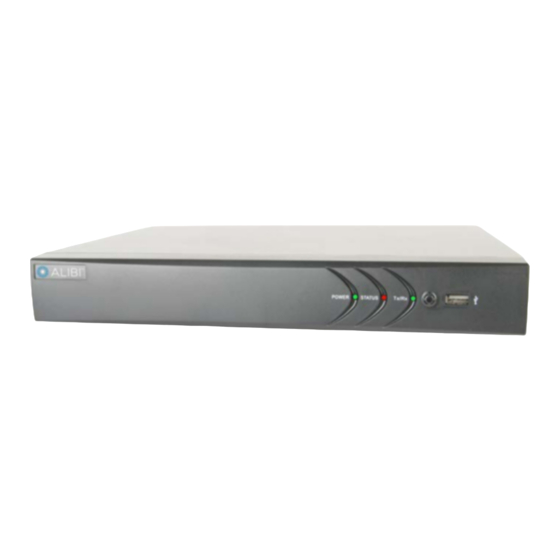
DVR Front Panel
ALI-HVR3004H, ALI-HVR3008H front panel
(ALI-HVR3016H (not shown) has the same items)
Item
Usage
Power LED
Indicator turns green when DVR is powered up.
Status
STATUS indicator lights in red when HDD is reading/writing.
TX / RX
LED indicator blinks green when network connection is functioning properly.
IR Receiver
Sensor for the remote control.
USB Interface
This port can be used for a USB mouse or USB flash memory devices.
DVR Back panels
1
2
5
6
1
Status
TX / RX
Power LED
IR Receiver
USB Interface
1
2
3
5
6
7
8
9
ALI-HVR3004H backpanel
3
4
7
8
9
10
11
ALI-HVR3008H backpanel
Item
1
VIDEO IN
2
Monitor Out
3
AUDIO IN
4
ON / OFF switch
5
USB
6
HDMI
7
VGA
8
AUDIO OUT
9
LAN
10
RS-485 terminations
11
12 Vdc
12
GND terminal
4
Remote control
The enter key on the remote control or the front panel has the same function as a mouse left click. The IR Range of the remote control is about
33 feet. The buttons on the remote control correspond with the buttons on the front panel.
10
11
12
12
1
2
3
5
6
7
8
ALI-HVR3016H backpanel
Description
BNC connectors for camera video channels in. Number of channels is dependent on the model of the DVR.
Not used.
RCA connector for audio in cable.
Switch for powering the DVR on and off
This port can be used for a USB mouse or USB memory device such as a flash drive or DVD burner. An additional USB
port is located on the front panel.
Connector HDMI monitor cable.
Connector VGA monitor cable.
RCA connector for audio out cable.
RJ-45 connector for Ethernet drop cable.
Connector for RS-485 devices. Connect the D+ and D- terminals to T+ and T- of PTZ receiver respectively.
Plug for 12 Vdc power adapter (provided).
Ground terminal post.
17
13
12
10
8
18 16
15
14
11
9
4
12
9
10
11
6
4
1
7
5
3
2
ALI-HVR3000H_SQ
9/8/14
Advertisement
Table of Contents

Subscribe to Our Youtube Channel
Related Manuals for ALIBI ALI-HVR3000H Series


Summary of Contents for ALIBI ALI-HVR3000H Series
- Page 1 ALI-HVR3000H Series 4/8/16-Channel 960H HD-TVI Hybrid+ DVR Quick Setup Guide This quick setup guide provides instructions to initially setup and use the ALI-HVR3000H series digital video recorder (DVR). For additional information on the extensive capabilities of your DVR, refer to the ALI-HVR3000H Series Alibi 4/8/16-Channel 960H HD-TVI Hybrid+ Security Digital Video Recorder User Manual provided on the CD with your system.
- Page 2 The operation of the mouse: Item Name Function POWER Power on/off the device. Action Effect Enables/Disables Remote Control. Single click: Live view: Select channel and show the quick set menu. Alphanumeric Buttons Switching to the corresponding channel in Live view or PTZ Control mode. Menu: Select and enter.
-
Page 3: Installing The System
Although each security system installation is different, most require the following items not included with your system components: Cameras and cables compatible with the DVR. The Video in ports on the backpanel support most analog CCTV camera brands and Alibi •... - Page 4 After the initial Alibi loading window (see above), a menu language screen may appear. Select the preferred language from the drop- down list, then click Apply. Observint strongly recommends that you change the default admin user password to improve the security of your surveillance system.
- Page 5 In the date and time setup window, click the field you want to change, then use the drop-down list or setup aid to select the appropriate values. For instance, click the Time Zone field, then highlight Time Zone for your DVR. In the screen below, other fields were changed appropriately, and the Preferred DNS Server address was set to 8.8.8.8.
- Page 6 “5” is the IP camera added in the previous screen. In the next window, the DVR will display all Alibi IP cameras it can find on the LAN. You can add any of these cameras to your DVR if the number of cameras plugged into the BNC connectors on the backpanel plus the number of IP cameras you add here does not exceed the channel capacity of your DVR (ALI-DVR3004H supports 4 camera channels, ALI-DVR3008H supports 8 camera channels, etc.).
- Page 7 To configure another camera differently, open the Camera graphical menu and select the next camera to configure. Then repeat the steps above to configure the recording mode for that camera. You can also Copy these settings to other cameras. After configuring the recording mode for each camera, click OK to confirm your settings and close the Wizard. The Wizard will close and the DVR will present the Live View display.
- Page 8 Step 6. Opening the Menu system Specifications After the initial setup of your DVR using the Wizard, the Menus interface enables you to refine your configuration settings and expand the Section Item ALI-HVR3004H ALI-HVR3008H ALI-HVR3016H functionality of the system. To use most menus, the user must log into the DVR system, either locally or remotely, with administrative privileges.
Need help?
Do you have a question about the ALI-HVR3000H Series and is the answer not in the manual?
Questions and answers