Table of Contents
Advertisement
Quick Links
Advertisement
Table of Contents

Subscribe to Our Youtube Channel
Related Manuals for Monark LT2


Summary of Contents for Monark LT2
- Page 1 Manual for LT2...
-
Page 3: Table Of Contents
Replacement of brake belt ����������������������������������������������������18 Brake belt contact surface ����������������������������������������������������18 Chain 1/2“ x 1/8“ �������������������������������������������������������������������19 Freewheel sprocket ���������������������������������������������������������������20 Spare parts list ������������������������������������������������������������ 21 Important Read the manual carefully before using the cycle and save it for future use. 2014 MONARK EXERCISE AB, Vansbro, Sweden... -
Page 4: Monark Exercise Ab
Monark Exercise AB Monark has 100 years’ experience of bicycle production. The Monark tradition has yielded know-how, experience, and a real feel for the product and quality. Since the early 1900s, Monark’s cycles have been living proof of precision, reliability, strength and service. Those are the reasons why we are now the world leader in cycle ergometers and the market leader in Scandinavia in transport cycles. - Page 5 • LT2 has a brand new frame that is adjustable in all directions • LT2's new frame also means the Q-factor can be reduced, which increases the opportunities for a better workout experience • LT24 gives the conditions; the rest is up to the rider •...
-
Page 6: Product Information
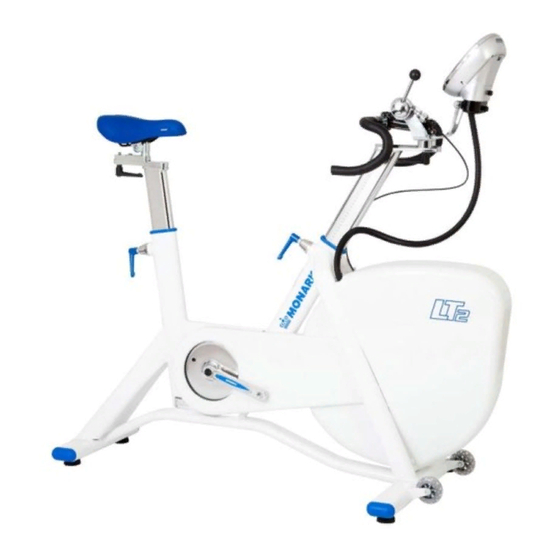
Recommended accessories bearings. • Calibration weight, 2 and 4 kg LT2 is set to measure the workload at the flywheel. • Chest belt The bike can be set to work with effect in the pedals / •... - Page 7 Fig: Overview Fig: Overview 1) Knob for horizontal adjustment of saddle 2) Scale for height adjustment saddle 3) Locking handle for height adjustment saddle 4) Machine plate (serial number) 5) Power input 6) Knob for height adjustment of handlebar and display 7) Scale for height adjustment handlebar and display 8) Resistance control unit 9) Display...
-
Page 8: Cycle Adjustments
Cycle adjustments Validation Adjustments of the bike The following procedure ensures that the bike works for daily use. Crank Steel, 52T, 172.5 mm standard, Q 146 mm • Check the HR function if you use chest belt, see Pedals 9/16”, combi SPD / Clips section, on ‘Heart rate’. -
Page 9: Pulse Function
NOTE! Electromagnetic waves can interfere with the telemetry system. Cellular phones are not allowed to be used near the bike during test. Monark Exercise AB recommend that you use an ANT+ chest belt for best function. Pulse standard (chest belts) -
Page 10: Display Description
Display Description Display Pedal revolution (RPM) pedal revolutions / TIME min:sec Workload (WATT alt. kpm/min) Watt Speed km/h Distance Calories (KCAL) kcal % Max HR Batteries: 4 x 1.5 V, R14 Storing temperature: -10º C - +60º C Operating temperature: 0º... -
Page 11: Personal Settings
Personal settings Alternative workload / force display Usually you are asked to set the personal data needed The meter displays workload in watts (default). If you when you start a program or a test. This data can want to display the workload in kpm / min instead, also be set before, during e.g. -
Page 12: User Settings
User settings Units Kg, km, km / h, ml / min / kg are default. You can Here you can make individual adjustments to switch between the different unit combinations with optimize the bike for your needs on first use and when (+/-) button. -
Page 13: Current Potentiometer Value
9) PROGRAM button START STOP button to exit without saving. Monark Exercise AB recommends that you (However, if you press ENTER the calibration make a mechanical calibration once a year to process has begun and must also be completed.) -
Page 14: Training
Training Personal data can be set for estimated HR (default HR is 185). See ‘Personal settings’. TIME Start Training KCAL program KM/H WATT To end the Training program, press START STOP and the Stop Training results are displayed on program QUICK START three pages. -
Page 15: Mets
References / Literature: started with the same settings. • Astrand P-O, ”Ergometri - konditionsprov”, Monark, Sverige Press START STOP (for 5 seconds • Åstrand I, ”Aerobic work capacity in men and women with special reference to age”, Acta Physiol Scand. -
Page 16: Troubleshooting Guide
Troubleshooting guide Symptoms Probable Cause / Corrective Action Display does not light up • No batteries in the meter • No current in the outlet (if power adaptor is used). Check the fuses. • Check cables and connections. • If you use power adaptor: Is it the correct power adaptor? Check that the transformer information (voltage, current, polarity, AC / DC) in section ‘Facts’... -
Page 17: Service
EC Directive 1999/44/EC. In short, • Check that the pedal crank is secure to the crank the directive states that your Monark dealer will be axle (4 times per year). liable for any defects, which existed at the time of delivery. -
Page 18: Batteries
The flywheel bearing is long term greased and requires to clean the brake surface. See ‘Brake belt contact no supplementary lubrication. If a problem arises, surface’. please contact your Monark dealer. Brake belt contact surface Crank bearing Deposits of dirt on the brake belt and on the contact... -
Page 19: Chain 1/2" X 1/8
Chain 1/2“ x 1/8“ Check the lubrication and tension of the chain at regular intervals. In the middle of its free length the chain should have a minimum play (3) of 10 mm (1/4 inch). See Fig: Chain adjustments. When the play in the chain is about 20 mm (3/4 inch) the chain must be tightened. -
Page 20: Freewheel Sprocket
Freewheel sprocket When replacing the freewheel sprocket remove frame covers if necessary. Remove the chain according to section ‘Chain 1/2” x 1/8”’. Loosen the axle nuts and lift off the flywheel. Remove the axle nut, washer, chain adjuster and spacer on the freewheel side. -
Page 21: Spare Parts List
Spare parts list Workload device Workload device left side right side Pos. Qty. Art. No. Description Pos. Qty. Art. No. Description 9125-86 Spring 9384-27 Pulley 9311-73 Brake belt LT, complete 9326-164 Magnet 9300-3 Flywheel complete 9300-475 Crank set, 52T, 172.5 mm, Q 146 mm 9300-24 -Wheel suspension complete set 9300-480... - Page 23 -Wire adjustment 9328-26 -Rubber foot with screw M8 9311-45 -Rubber ball 32/M8 black 9301-4 Support tube front, complete 9311-164 Display LT2 9328-51 -Plastic cap 9000-104 Pole screw M5x12, black 9328-26 -Rubber foot with screw M8 9326-801 End cap with hole, black...
- Page 24 Version 1402 Art. No: 7950-378 KROONS VÄG 1, SE-780 50 VANSBRO, SWEDEN | WWW.MONARKEXERCISE.SE | TEL: +46(0)281 59 49 40 | FAX: +46(0)281 719 81...
Need help?
Do you have a question about the LT2 and is the answer not in the manual?
Questions and answers