
Related Manuals for Boca Systems Lemur


Summary of Contents for Boca Systems Lemur
- Page 1 LEMUR TICKET PRINTERS Operator’s Manual Lemur Lemur-S Lemur-2 Lemur-K Lemur-2K RevA: 12.04.09...
-
Page 2: Table Of Contents
Appendix A - CONTROL PANEL Appendix B - VERTICAL PRINTER INSTALLATION Appendix C – LEMUR-2 OR LEMUR-2K Appendix D - CHANGING ETHERNET PARAMETERS Appendix E – INTERFACE TESTING A LEMUR Appendix F – DOWNLOADING SOFTWARE COMMANDS Appendix G – CONFIGURE WI-FI CONNECTION... -
Page 3: Fcc Notice & Warranty Information
FCC NOTICE NOTE: The equipment has been tested and found to comply with the limits for a class A digital device, pursuant to part 15 of the FCC rules. These limits are designed to provide reasonable protection against harmful interference when the equipment is operated in a commercial environment. This equipment generates, uses, and can radiate radio frequency energy and, if not installed and used in accordance with the instruction manual, may cause harmful interference to radio communications. -
Page 4: Table Of Contents Page
1.0 Introduction Lemur series printers are direct thermal ticket printers that may be purchased with optional integrated cutting mechanism and LCD display. This manual will provide the user with general information regarding printer set-up, configuration and troubleshooting. Please read the important safety information section before installation is conducted. -
Page 5: Important Safety Information
3.0 Important Safety Information WARNING: The appearance of this symbol indicates the proximity of an exposed high voltage area. Please follow all directions carefully for your personal safety. You must read the following safety information carefully before working on the printer. As a safety precaution, all service to the printer should be done by qualified persons with... -
Page 6: Installation
Prior to site preparation and installation, the printer should be powered up and run in the self-test mode. • Lay the printer flat on a counter top. On a Lemur-S model printer you will need to remove the side cover. - Page 7 Above sample was printed on a 4”x6” ticket using a 300dpi Lemur without cutter. Above sample was printed on a 2” x 5.5” ticket using a 200dpi Lemur with cutter. Your printout may vary depending on printer configuration and ticket stock used.
-
Page 8: Ticket Load Procedure
Adjustable (ADJ, ADJW & ADJ2) Above two photos are of a Lemur and Lemur-K printer. The ticket feed area of a Lemur-2 and Lemur-2K would look the same. Above photo is of a Lemur-S with optional cutter. Your printer may vary. -
Page 9: Configuration
Click here to return to > Table of Contents 6.0 Configuration Lemur series printer is factory configured for a variety of customer requirements. For a comparison of the different electronics packages, refer to the BOCA Systems website under the BASIC section. -
Page 10: Standard Interface Pinouts
7.0 Standard Interface Pinouts RJ12 Serial Connection +5VDC RJ12 Connector TYPICAL DB9 to RJ12 PIN CONNECTIONS 9 pin host BOCA RJ12 Transmit Receive PARALLEL FUNCTION Strobe (negative) Data (DB0 - DB7) ACK (negative) BUSY PAPER OUT SELECT (negative) ERROR (negative) Ground USB is considered a full speed device (version 1.1) not a high speed device (version 2.0). -
Page 11: Thermal Paper - Theory & Specifications
Thermal Paper - Theory & Specification Refer to the BOCA Systems website at www.bocasystems.com, THERMAL TICKETS section for the most current paper specifications. The print head’s life expectancy is composed of both a mechanical and an electrical component. Both of these factors are strongly influenced by the quality of the thermal paper used. -
Page 12: Maintenance And Adjustments
9.0 Maintenance and Adjustments Your ticket printer is solidly constructed and has been designed for high volume use. It requires minimal care to provide maximum service. WARNING: The appearance of this symbol indicates the proximity of an exposed high voltage area. Please follow all directions carefully for your personal safety. -
Page 13: Cut Or Tear Opto
To adjust the cut or tear position, physically adjust the opto mounting bracket forward or backwards to achieve the desired cut or tear location. On a Lemur with auto cut the cut position should be a 1/16”- 1/8” away from the ticket perforation. On a Lemur without auto cut the ticket perforation should line up with the edge of the cabinet or top plate. -
Page 14: Thermal Print Head
9.1.2 THERMAL PRINT HEAD The print head should be cleaned periodically to prevent debris from building up on the print element. The required cleaning interval varies greatly depending on the quality of the ticket stock and the amount of dust entering the print area. -
Page 15: Platen
9.1.3 Platen (Rubber Driver Roller) The Platen (rubber drive roller) should be cleaned once a year to prevent paper dust from building up on the roller. (NOTE: The platen may require more frequent cleaning in dusty environments or when using inferior ticket stock.) 1. -
Page 16: Ticket Width Adjustment
9.1.4 Ticket Width Adjustment To adjust the paper path for use with a different ticket width, adjust the slider bar to the fully open position. Insert your ticket stock into the paper guide. Adjust the slider bar down to the proper ticket width, making sure the bar is not too tight against the ticket. -
Page 17: Cutter Assembly
9.2 Cutter Assembly The BOCA cutter system is a fully integrated cutter knife mechanism powered by a stepper motor. The cutter requires no adjustments and is rated for approximately 750,000 cuts. Please be aware of the following: Wait five seconds before feeding ticket stock into the printer after power up. During this time the cutter knife will move up and down. -
Page 18: Logic Board
9.3.1 Logic Board (Removal) 1. Gain access to the logic board. This is normally done by removing the electronics cover or rear access panel (for Lemur-S). 2. Denote where all the cable plug into the logic board. 3. Unplug connectors connected to the main logic board. -
Page 19: Logic Board (Installation)
Cover Front, Lemur-2 421623 Hopper, 2” wide ticket stock (cutter Lemur-S) 422113 Hopper, 2” wide ticket stock (cutter Lemur & Lemur-2) 421623-5M4 Hopper, 2.5” to 4” wide ticket (cutter Lemur, Lemur-S & Lemur-2) *Customer dependent and not shown in photos... - Page 20 Above and below photos are of a Lemur with optional LCD display and cutter...
- Page 21 View with thermal head unlocked and open. View with cover removed. Lemur-S with optional cutter...
- Page 22 View with rear access panel removed. Lemur-S with optional cutter Lemur-2K with optional cutters...
-
Page 23: Troubleshooting Guide
Lemur-2 without optional LCD display 11.0 Troubleshooting Guide This is a simplified troubleshooting guide listing some of the typical problems. It is not intended to provide As a safety technical details or repair methods, but can serve as a guide to fault isolation in the field. - Page 24 c. Check that the ticket stock is being loaded correctly. Consult “Installation” section. d. Contact your system provider or BOCA for further assistance. ERRATIC CUT POSITION a. Check for defective ticket stock. Is the black mark unevenly spaced apart or light in color? Is the ticket too wide for the paper path? b.
-
Page 25: Appendix A - Control Panel
APPENDIX A - CONTROL PANEL The FGL46 printers allow the user to adjust various printer options through the optional control panel. To access the control panel menu, press both MENU and TEST switches simultaneously for about 3 seconds. The LCD will display the “OPERATOR MENU!”... - Page 26 DUAL & SINGLE PATH PRINTER ONLY (Not used for a Lemur model printer) ON P1 DUAL PATH PRINTER ONLY on path #2 (Not used for a Lemur model printer) ON P2 DUAL PATH PRINTER ONLY on both paths (Not used for a Lemur model printer) ON BOTH DUAL &...
- Page 27 INC CUT1/2 COUNT? moves the cut/tear position to the left (towards the ticket entrance area). Cut counts are increments of .003” for 300dpi and .005” for 200dpi. Depressing CHOICES changes the count value. 16 is factory default. (1 is for path one; 2 is for path 2 [dual only]) DEC CUT1/2 COUNT? moves the cut/tear position to the right (towards the ticket exit area).
-
Page 28: Appendix B - Vertical Printer Installation
NOTE: The table or counter top must be able to support at least four times the weight of the printer. Vertical Mount Lemur Vertical Mount Lemur-2 Attach the top plate to the printer using only the supplied mounting hardware. -
Page 29: Appendix C - Lemur-2 Or Lemur-2K
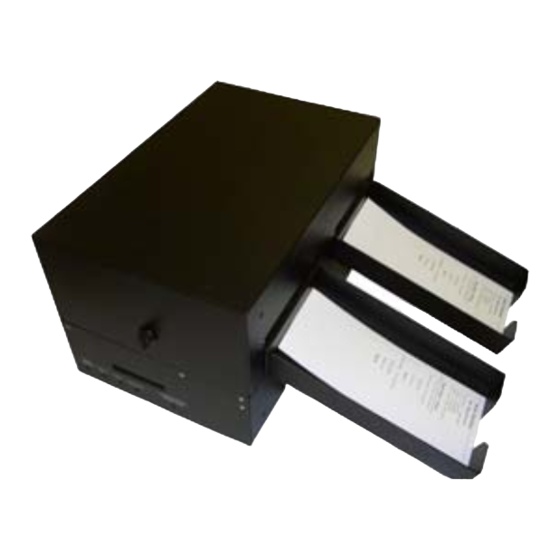
APPENDIX C – LEMUR-2 OR LEMUR-2K Ticket Load Procedure for a Lemur-2 Printer Feed Direction Path 2 Path 1 Your printer may vary from the above photo Turn the printer on and wait five seconds. If your printer has an optional LCD then it will display PAPER OUT (the red CHECK PAPER led will be illuminated). -
Page 30: Appendix D - Changing Ethernet Parameters
APPENDIX D – CHANGING ETHERNET PARAMETERS CHANGING 'IP ADDRESS' 1. Please follow these steps to change the fixed IP address on your Ethernet printer. Note: if using a fixed IP address make sure the ‘ETHERNET’ setting is set to ‘YES’ (see above). 2. -
Page 31: Appendix E - Interface Testing A Lemur
APPENDIX E – INTERFACE TESTING A LEMUR Boca Systems, Inc. has developed a program that allows customers to communicate from a host computer to the printer over any interface (parallel, serial, USB, Ethernet) and print drivers too. The below programs are... - Page 32 6. Now click on the “Select Printer Operation” drop-down arrow and chose the appropriate test program. If your printer has FGL firmware then chooses “FGL Test Ticket” or if your printer had HP firmware then choose “PCL Test Ticket”. If you are going to be sending a text commands then see Appendix If you are going to configure your Wi-Fi connection then see Appendix G...
- Page 33 Above sample FGL ticket was printed on a 2” x 5.50” (concert) ticket using a RADJW-2” 300dpi FGL printer. Above sample FGL ticket was printed on a 3.25” x 8” (receipt) ticket using a RADJW-3.25” 200dpi FGL printer. Above sample FGL ticket was printed on a 3.25” x 8” (receipt) ticket using a RADJW-3.25” 300dpi FGL printer.
- Page 34 Above sample PCL ticket was printed on a 3.25” x 5” ticket using a RADJW-3.25” 300dpi PCL printer. Click here to return to > Table of Contents...
-
Page 35: Appendix F - Downloading Software Commands
APPENDIX F – DOWNLOADING SOFTWARE COMMANDS For those Lemurs model printers without LCD display the menu setting changes may be done by utilizing the software commands listed below. This is best done using our customer based program (see Appendix E If needed, the printer may be defaulted back to it’s originally factory settings as follows. - Page 36 The following list shows all of the commands necessary to access the operator control panel functions. BAUD RATE COMMAND - <brx,y,z> (printer will reset after receipt of command) Note: This function should only be used by an experienced user. This command sets the baud rate (x), parity (y) and data bit size (z) for the printer. Valid values for each are shown below.
- Page 37 4 - reverse adjustable 2” path1 5 - reverse adjustable 2” path2 6 - reverse adjustable 2” both paths 7 - reverse adjustable 2.5” path1 8 - reverse adjustable 2.5” path2 9 - reverse adjustable 2.5” both paths 10 - reverse adjustable 2.7” path1 11 - reverse adjustable 2.7”...
- Page 38 Server and then register the name with the local NetBIOS name server – usually the WINS Server ). Notes: Ethernet Diagnostic Modes should only be used after consulting with Boca Systems. The DHCP enabled function will cause the printer to automatically attempt to retrieve a ‘permanent’ IP address from a Local Server after powering on.
- Page 39 PERMANENT DEFAULT GATEWAY IP ADDRESS COMMAND - <dgw10.0.1.254> (printer will reset after receipt of command). Note: This function should only be used by an experienced user. This command permanently changes the IP address of the default gateway and stores it in flash. The example above would change the address to 10.0.1.254.
-
Page 40: Appendix G - Configure Wi-Fi Connection
We recommend using the Boca Systems Customer program to perform this task (see Appendix After installing the Boca Systems Customer program, click on the “Update” button to acquire any recent modifications to the tool. Once you have the program running click on the Help button in the upper right hand corner.
Need help?
Do you have a question about the Lemur and is the answer not in the manual?
Questions and answers