StarTech.com SV441DUSBI Instruction Manual
4 port vga usb ip kvm switch with virtual media
Hide thumbs
Also See for SV441DUSBI:
- Manual (52 pages) ,
- Instruction manual (72 pages) ,
- Manual (52 pages)
Table of Contents
Advertisement
Quick Links
4 Port VGA USB IP KVM Switch
with Virtual Media
SV441DUSBI
DE: Bedienungsanleitung - de.startech.com
FR: Guide de l'utilisateur - fr.startech.com
ES: Guía del usuario - es.startech.com
IT: Guida per l'uso - it.startech.com
NL: Gebruiksaanwijzing - nl.startech.com
PT: Guia do usuário - pt.startech.com
For the most up-to-date information, please visit: www.startech.com
Manual Revision: 07/21/2011
Advertisement
Table of Contents
Troubleshooting

Related Manuals for StarTech.com SV441DUSBI


Summary of Contents for StarTech.com SV441DUSBI
- Page 1 DE: Bedienungsanleitung - de.startech.com FR: Guide de l'utilisateur - fr.startech.com ES: Guía del usuario - es.startech.com IT: Guida per l'uso - it.startech.com NL: Gebruiksaanwijzing - nl.startech.com PT: Guia do usuário - pt.startech.com For the most up-to-date information, please visit: www.startech.com Manual Revision: 07/21/2011...
- Page 2 Where they occur these references are for illustrative purposes only and do not represent an endorsement of a product or service by StarTech.com, or an endorsement of the product(s) to which this manual applies by the third-party company in question. Regardless of any direct acknowledgement elsewhere in the body of this document, StarTech.com hereby acknowledges...
-
Page 3: Table Of Contents
Table of Contents Introduction ...............................1 Features ................................1 Package Contents .............................1 Hardware Guide ...............................2 Front Panel ..............................2 Installation................................4 Device Connection ..........................4 Initial Power-Up ............................5 Operation ................................6 Initial IP-OSD Setting ..........................6 Mouse Setting .............................9 KVM Switch OSD Operation .......................10 Data-Transfer Rule .............................11 USB Port Rule ...............................12 Using the Web Interface ..........................13 The Login Screen ............................13... - Page 4 Modem ................................23 Serial Ports ..............................23 Time / Date ..............................23 Firmware .................................23 Purchase Options ............................24 Status ................................24 Port Numbers ..............................25 Help Menu ..............................25 Site Map Menu ............................25 Copyright Menu............................25 Using the Terminal Interface via Serial Port ................25 Accessing the VNC Interface ........................26 Web Interface ..............................26 Native VNC Client ............................27 SSH Tunnel (with Native VNC client) .....................28...
- Page 5 Using the Modem feature ..........................39 Background..............................39 Connecting a Modem ..........................39 Modem configuration..........................40 Configuring the Remote Connection ..................41 Accessing the Web Interface ......................42 Modem Troubleshooting Guide ......................43 Serial Remote Control operation ......................43 Background..............................43 Connecting Serial Remote Control Modules ................44 Using the Web Interface ........................44 Advanced Configuration Using the Integrated SSH Shell ..........45 Remote Login via SSH ..........................46 Operating Notes ...............................46...
-
Page 6: Introduction
Introduction The SV441DUSBI 4 Port USB VGA IP KVM Switch with Virtual Media allows for secure local and remote control of up to 4 computers over a LAN or the Internet. Featuring 2 additional USB ports for peripheral sharing (USB storage, CD ROM, etc.), allowing file transfers and disk emulation for remote application and OS installs. -
Page 7: Hardware Guide
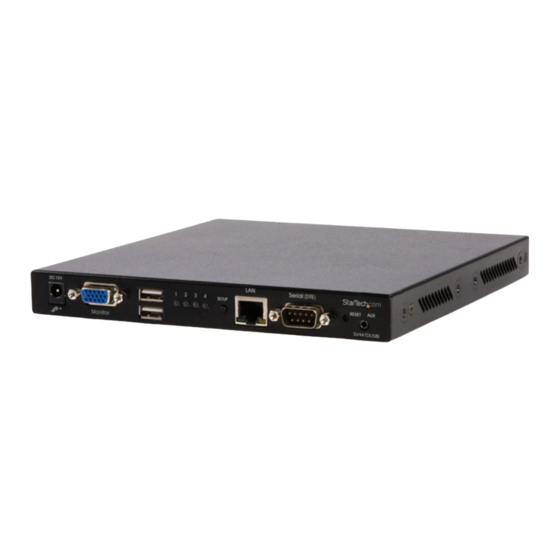
Hardware Guide Front Panel 1. Power Supply Connects to a DC 12V power adapter. 2. HDB15 Connector Connect to the console monitor. 3. USB Type A Connectors Connect to the console keyboard and mouse ports. 4. Port LED Indicator Displays the status of connected PCs (for more specific instructions, see the table below). 5. -
Page 8: Rear Panel
LED Color Meaning Connected to a PC that is powered on and Green + Blue (Light Blue) possesses the data-transfer function. The selected port possesses the data-transfer Red + Blue (Light Purple) function. Red + Green (Yellow) The PC that is powered on is selected. The selected and powered on PC possesses Red + Green + Blue (White) the data-transfer function. -
Page 9: Installation
Installation Device Connection 1. Connect the USB keyboard, mouse, and monitor to the console connectors on the SV441DUSBI. 2. Connect a Cat5 cable to the LAN port of the SV441DUSBI. Instruction Manual... -
Page 10: Initial Power-Up
3. Power up the monitor and the SV441DUSBI. The IP-OSD menu should come up automatically. Follow the on-screen instructions to finish the initial setup. Initial Power-Up You must power up the SV441DUSBI with a keyboard, mouse, and monitor connected before turning on any other devices. -
Page 11: Operation
Operation Initial IP-OSD Setting Power on the monitor and the SV441DUSBI. The IP-OSD menu will automatically appear. Follow the on-screen instructions to complete the initial setup. Press the Enter key to enter the Advanced Settings Menu. Once the desired settings have been achieved, press ESC to close the Menu. - Page 12 The IP KVM can have its IP address assigned dynamically, or it can be given a fixed IP address. If you are unaware of the IP address, obtain it from the network administrator. Press Enter to go to the next menu. Enter the Netmask (Consult your network administrator if necessary).
- Page 13 Enter the address (Consult your network administrator if necessary). Wait for the SV441DUSBI to apply the setting changes. Press the Enter key. Press Enter to complete the setting process. Instruction Manual...
-
Page 14: Mouse Setting
Mouse Setting Many operating systems offer a feature called mouse acceleration that allows the user to adjust the responsiveness of the cursor on the screen to the physical movements of the mouse. While this is usually a beneficial interface enhancement, it can interfere with the operation of the unit and should be disabled on the managed computers before a remote session is attempted. -
Page 15: Kvm Switch Osd Operation
KVM Switch OSD Operation To enter the Hotkey Menu, press the Ctrl key twice within two seconds. • L-CTRL is the Ctrl key located on the left side of the keyboard. • 1~8/A~H are the number keys 1-8 located in the upper row of the keyboard, and the character keys A-H (not case sensitive). -
Page 16: Data-Transfer Rule
To access additional menu functions, press the F4 key. A new screen will appear displaying more functions, as shown below. To access the remaining menu functions, press the F4 key again. This will bring you to the screen shown below. Data-Transfer Rule Manual stick-on: Data-Transfer function resides in one particular KVM-Channel, pressing Ctrl + Ctrl + T to switch to the next KVM-Channel. -
Page 17: Usb Port Rule
Tracking KVM-Channel: Data-Transfer function tracks the selected KVM-Channel. USB Port Rule Manual stick-on: USB-Port resides in one particular KVM-Channel, pressing Ctrl + Ctrl + U to switch to the next KVM-Channel. Tracking KVM-Channel: USB-Port tracks the selected KVM-Channel. Instruction Manual... -
Page 18: Using The Web Interface
HTML Web browser. You can access the Web interface by opening your Web browser and entering the IP address of the SV441DUSBI you wish to access/ configure. The IP address will be either a) the address assigned by your DHCP server as identified in the previous section, or b) 192.168.1.123 if your network uses static IP addressing. -
Page 19: Web Interface Introduction
Web Interface Introduction After the initial login screen, the screen is divided into several sections, a number of which will remain on the screen at all times while viewing the Web Interface: Name Main Menu Name: At the top of the screen, the name of the machine being controlled is displayed Main Menu: At the left-most side of each page, the Main Menu is displayed, allowing users to choose functions offered by the Web Interface. -
Page 20: Main Menu Selections
Preferences: The Preferences screen offers several configuration options pertaining to the functionality of the SV441DUSBI. Here, you are able to customize settings to optimize overall performance (i.e. Encryption options, VNC options, display and bandwidth options etc.), according to each user’s individual preferences. Please save your selections by clicking the Save Changes button. -
Page 21: File Transfer
File Transfer The SV441DUSBI is able to emulate a virtual USB disk drive on any host connected using the USB Server Interface Module (SV5USBS). Depending on configuration, it will appear to the host as a floppy drive (1.44MB), an 8MB RAM Disk or a CD-ROM. The host computer does not require any special drivers or other configuration. - Page 22 (the data track) of a data CD-ROM. The ISO file must be made available on a web server that can be accessed by SV441DUSBI. To switch to this mode, type in a URL pointing to the ISO image, and click on Commit. The system will connect to the web server and test the file for access.
- Page 23 MS-DOS disk, with a single file called Put files here...TXT. SV441DUSBI is able to read most MS-DOS/Windows formatted disks and presents the files via the Web interface. However, disk emulation occurs at the lowest level, so other disk formats can be used if you have the tools needed to create and read the disk images.
-
Page 24: Network Configuration
Clicking the Commit button applies any changes made on this page, but leaves the old settings active until the next time the unit restarts. Clicking Make changes effective now applies the changes and restarts the SV441DUSBI so the new settings take effect immediately. Instruction Manual... -
Page 25: User Accounts
Ethernet Address (MAC Address): This is the Ethernet hardware address of this unit’s LAN port. It is set at the factory and cannot be changed. You may need this number to configure your DHCP server. Dynamic DNS Configuration: Dynamic DNS (DDNS) is a method, protocol, or network service that allows a networked device using the Internet Protocol Suite to notify a domain name server to change, in real time, the active DNS configuration of its configured hostnames, addresses or other information stored in DNS. -
Page 26: System Identification
System Identification Machine Name: This is the name that is used to uniquely identify this machine. You may wish to create a DNS entry that matches this name. The name is provided as the Client Name for the DHCP server. It is also shown at the top of each page in the web browser interface and is the “desktop name”... -
Page 27: Compatibility
KVM or power management device. SNMP The SNMP menu allows you to configure the SV441DUSBI so it can be recognized and managed using industry standard Simple Network Management Protocol software. RADIUS... -
Page 28: Modem
6. Upload the latest firmware file from your computer to the IPKVM. It will take more than 5 minutes for uploading and writing it to the flash memory of the SV441DUSBI. Instruction Manual... -
Page 29: Purchase Options
Auto Self Upgrade: The SV441DUSBI unit includes an innovative feature allowing it to upgrade itself over the internet. Simply click on the button labeled Upgrade to Latest and the unit will use the internet to download the latest version of the system firmware and then install it. -
Page 30: Port Numbers
The terminal interface can be accessed via the serial port for configuration of the basic settings of the SV441DUSBI. While not intended to be a substitute for the Web interface, it does allow you to configure some of the same functions. The menu list below describes the options that can be modified through the terminal interface. -
Page 31: Accessing The Vnc Interface
Web Interface Using SV441DUSBI’s web interface requires a browser, with cookies and JavaScript enabled. To start the Java VNC client, login to the Web configuration interface and click on the thumbnail of the desktop on the Home menu, or click on the Connect button, located in the Main Menu. -
Page 32: Native Vnc Client
Native VNC Client This system implements the VNC protocol, so any off-the-shelf VNC client can be used. There are over 17 different VNC clients available and they should all work with this system. This system automatically detects and makes use of certain extensions to the basic RFB protocol that is provided by the better VNC clients. -
Page 33: Ssh Tunnel (With Native Vnc Client)
These menus allow you to control the many features of the SV441DUSBI without using the web interface or a custom client. When you initially connect to the system, a Welcome Window will appear indicating which system you are controlling, what encryption algorithm was used, and what key strength is currently in effect. -
Page 34: Main Menu
[1][A][S]: These flags show the state of the keyboard lights, NumLock, ShiftLock and ScrollLock respectively. X: Click this button to close the Bribar and hide it. This can be very useful on a client machine that has a screen size the same as the remote machine. No vertical screen space is wasted with the Bribar. - Page 35 • KVM Menu: Generates the key sequence used to access the on-screen menu for an enterprise-class KVM switch. When these conventional KVM switches are combined with the SV441DUSBI, this key makes accessing their built-in menu easier, especially from the Java client.
-
Page 36: Virtkeys Menu
VirtKeys Menu Clicking any button in the top half of the window simulates pressing and releasing the indicated key. In the bottom area of the screen, clicking will simulate the indicated Meta key being pressed. You may then click in the top part to send another key and release the Meta key at the same time. -
Page 37: Video Tuning Menu
Video Tuning menu Use the Auto Everything button to automatically fine-tune all three adjustments. If the test pattern for Color Offset calibration is not present on the screen, then the Color Offset adjustment is skipped. Changes/frame indicates the number of 16x16 blocks of video that are being sent, on average, for every frame of video. -
Page 38: Accessing Kvm Features
This section describes how to use the on-screen display (OSD) system to manage your computers. Once you have established a VNC session with the SV441DUSBI, you can access the KVM features as though you were at a local console. -
Page 39: Osd Function Keys
OSD Function Keys You can use the function keys when the OSD menu is active. Function key <F1> Edits the name of a managed computer or a Slave KVM. First, use the <UP> and <DOWN> arrow keys to highlight a channel then press <F1> followed by name entry. Each name can be up to 14 characters long. - Page 40 Manual Scan Scans through powered computers using keyboard control. Scan Type (<F4>: More\Scan Type) determines if scanned computers must also be eye mark selected. Press the up arrow key to select the previous computer and the down arrow key to select the next computer. Press any other key to abort the Manual Scan mode.
-
Page 41: Hot Key Commands
Hot Key Commands A hot key command is a short keyboard sequence to select a computer, activate a computer scan, etc. A hot-key sequence starts with two Left Control keystrokes followed by one or two more keystrokes. The short form hot-key menu can be turned on as an OSD function (<F4>: More\Hotkey Menu) every time the left <CTRL>... -
Page 42: Changing Your Configuration
VNC client allow. • Network latency, which is the total time it takes for a packet to get to the SV441DUSBI and come back, has the biggest impact on perceived performance and usability. Network bandwidth has a lesser effect, particularly when just moving the mouse around. -
Page 43: Using The Advanced Video Tuning Feature
Advanced button on the Video Tuning VNC menu. While many users will probably allow the SV441DUSBI to automatically configure the video properties, you can use this menu to exercise a great deal of control over the settings if you wish. -
Page 44: Using The Modem Feature
Using the Modem feature Background The modem feature allows the SV441DUSBI to act as an Internet connection server for increased security and flexibility in connecting with the host computer. Unlike the TCP/IP connection used with the standard Web configuration and VNC clients, the modem creates a one-to-one connection between the SV441DUSBI and the computer you are using to manage the host computer that is essentially private, as it bypasses the public Internet completely. -
Page 45: Modem Configuration
The initialization (“init”) string is the command (using the standardized Hayes AT command set) that the SV441DUSBI will send to the modem to activate it. The string included should work with the majority of modems and configures the following connection properties: answer incoming calls on the first ring, enable hardware flow control, and lock the connection speed. -
Page 46: Configuring The Remote Connection
9. In the space provided under Phone Number enter the phone number for the line to which the SV441DUSBI’s modem is connected. You may need to add the area code, country code, or other digits needed to access the outside line as appropriate. When finished, click Next. -
Page 47: Accessing The Web Interface
(see immediately above for instructions on what type of cable to use for the port you are accessing on the SV441DUSBI) and begin a terminal session following the instructions under Terminal Configuration Using a Serial Cable in this manual. -
Page 48: Modem Troubleshooting Guide
Modem init chat script failed The modem did not respond to the initialization string from the SV441DUSBI. You may need to change the init string or verify the cabling and modem status. -
Page 49: Connecting Serial Remote Control Modules
The cable for each serial device is similar to a phone cable and uses an RJ-14 connector. For the first module, connect the cable to the R-Port on the rear panel of the SV441DUSBI. Connect the opposite end to the DATA OUT (or similar) port on the Serial Remote Control unit. Note that some devices may use an integrated cable, so you will not need to make a separate connection on the serial device. -
Page 50: Advanced Configuration Using The Integrated Ssh Shell
Advanced Configuration Using the Integrated SSH Shell In most cases, configuring the SV441DUSBI to the same settings as the R-Port devices you are connecting should allow the devices to work with a minimum amount of configuration. However, you can also change the default settings on each R-Port device to fit your preferences and the needs of your application. -
Page 51: Remote Login Via Ssh
LED that mirrors the status of the light on the front panel. • Hardware handshaking (CTS/RTS) is required for speeds exceeding 9600 bps. It is enabled by default on the SV441DUSBI, but may need to be enabled on the other end of the connection. For Unix systems, the command is: stty –crtscts <... -
Page 52: About Security Certificate Warnings
StarTech.com’s behalf may not yet be recognized as a trusted source by the computer you are using to access the SV441DUSBI. Second, since the unit could be configured in a number different ways, it is impossible to supply a generic certificate that will match your exact network settings. -
Page 53: Troubleshooting
Troubleshooting Forgotten master password. You can reset the master password using the serial interface on the unit. Use the S command, and type a new password. The old password is not required for this procedure. Remote mouse and local mouse don’t line up. Use the Mouse resync command in the main menu or press the Resync button on the Bribar. -
Page 54: Specifications
Specifications General Specifications Maximum Supported 1600 x 1200 @ 85Hz Video Mode 640x400 @ 85Hz 720x400 @ 85Hz 640x480 @ 60Hz, 72Hz, 75Hz, 85Hz 800x600 @ 56Hz, 60Hz, 72Hz, 75Hz, 85Hz Standard Video Modes 1024x768 @ 60Hz, 70Hz, 75Hz, 85Hz Supported 1152x864 @ 75Hz 1280x960 @ 60Hz, 85Hz... -
Page 55: Supported Protocols
Supported Protocols Service Description Benefit May be used to securely “tunnel” VNC and Secure Shell HTTP protocols. Convenience server to redirect all web traffic Web Redirector HTTP to encrypted port. Clear-text HTTP is not (to HTTPS) supported. SNMP Agent Allows integration with existing SNMP SNMP (UDP) network management systems. -
Page 56: Technical Support
Limitation of Liability In no event shall the liability of StarTech.com Ltd. and StarTech.com USA LLP (or their officers, directors, employees or agents) for any damages (whether direct or indirect, special, punitive, incidental, consequential, or otherwise), loss of profits, loss of business, or any pecuniary loss, arising out of or related to the use of the product exceed the actual price paid for the product. - Page 57 StarTech.com is an ISO 9001 Registered manufacturer of connectivity and technology parts. StarTech.com was founded in 1985 and has operations in the United States, Canada, the United Kingdom and Taiwan servicing a worldwide market.
Need help?
Do you have a question about the SV441DUSBI and is the answer not in the manual?
Questions and answers