Table of Contents
Advertisement
Quick Links
4 / 8-Port Enhanced Digital USB KVM Switch
Over IP with File Transfer
SV441DUSBI
SV841DUSBI
DE: Bedienungsanleitung - de.startech.com
FR: Guide de l'utilisateur - fr.startech.com
ES: Guía del usuario - es.startech.com
IT: Guida per l'uso - it.startech.com
NL: Gebruiksaanwijzing - nl.startech.com
PT: Guia do usuário - pt.startech.com
For the most up-to-date information, please visit: www.startech.com
Manual Revision: 12/17/2019
*actual product may vary from photos
Advertisement
Table of Contents
Troubleshooting

Subscribe to Our Youtube Channel
Related Manuals for StarTech.com SV841DUSBI


Summary of Contents for StarTech.com SV841DUSBI
- Page 1 DE: Bedienungsanleitung - de.startech.com FR: Guide de l'utilisateur - fr.startech.com ES: Guía del usuario - es.startech.com IT: Guida per l'uso - it.startech.com NL: Gebruiksaanwijzing - nl.startech.com PT: Guia do usuário - pt.startech.com For the most up-to-date information, please visit: www.startech.com Manual Revision: 12/17/2019...
- Page 2 StarTech.com. Where they occur these references are for illustrative purposes only and do not represent an endorsement of a product or service by StarTech.com, or an endorsement of the product(s) to which this manual applies by the third-party company in question. Regardless of any direct acknowledgement elsewhere in the body of this document, StarTech.com hereby...
-
Page 3: Table Of Contents
Table of Contents Introduction ....................1 Packaging Contents ..........................1 System Requirements ..........................1 Front View ..............................2 Rear View ..............................3 Installation ....................4 Device Connection ........................... 4 Initial Power-Up ............................4 Operation ....................4 Initial IP-OSD Setting ..........................4 Mouse Setting (optional)........................6 Using the Web Interface ................7 The Login Screen ............................ - Page 4 Firmware ............................... 15 Status ................................17 Port Numbers ............................. 17 Help Menu ..............................17 Site Map Menu ............................17 Copyright Menu ............................17 Using the Terminal Interface via Serial Port........18 Accessing the VNC Interface ..............18 Web Interface ............................. 18 Native VNC Client ............................19 SSH Tunnel (with Native VNC client)....................
- Page 5 Accessing the Web Interface ......................... 36 Modem Troubleshooting Guide ......................37 Serial Remote Control operation ............37 Background ..............................37 Connecting Serial Remote Control Modules ................... 38 Remote Login via SSH..........................39 About Security Certificate Warnings ....................40 Installing the New Certificate ....................... 41 Troubleshooting ..................42 Supported Protocols ................44 Specifications ..................45...
-
Page 6: Introduction
Introduction Thank you for purchasing a StarTech.com IP KVM Switch with USB Console. The SV441DUSBI / SV841DUSBI revolutionizes remote server management by combining our industry-leading, third generation Server Remote Control technology with a proven Enterprise class digital KVM switch. This IP KVM Switch empowers you to securely manage up to four or eight computers remotely from almost anywhere using the internet or your local area network (LAN). -
Page 7: Front View
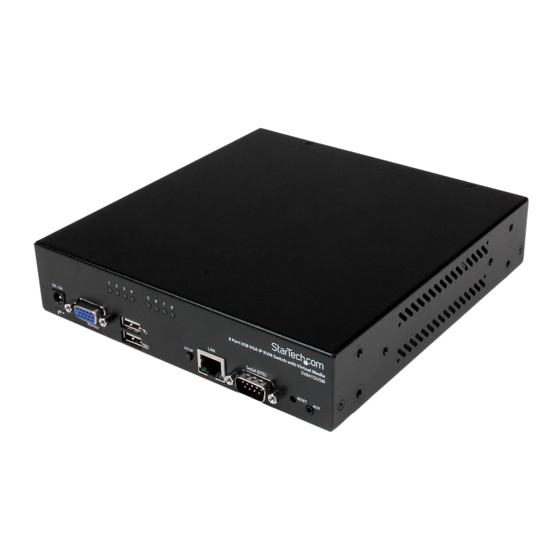
Front View SV441DUSBI SV841DUSBI 1. DC Power connector 2. DE-15 VGA connector (Local Console monitor) 3. USB Keyboard/Mouse connector (Local Console) 4. Port Status LED Indicators (see next page for descriptions) 5. Setup button 6. RJ45 Ethernet connector 7. DB9 Serial connector 8. -
Page 8: Rear View
Rear View SV441DUSBI SV841DUSBI 1. R-Port connector 2. USB Hub connectors 3. Computer Port connectors LED Color Description Green Connected to an active computer system Currently selected Port Blue Data-Transfer Mode is enabled Instruction Manual... -
Page 9: Installation
Installation Device Connection 1. Connect the USB keyboard, mouse, and VGA monitor to the console connectors on the IP KVM Switch. 2. Connect a Cat5 Ethernet cable to the LAN port. 3. Power up the monitor followed by the IP KVM Switch. The IP-OSD menu should come up automatically. - Page 10 Select the “Network Setup Wizard” and press <Enter> to go to the next menu. The IP KVM can have its IP address assigned dynamically, or it can be given a fixed IP address. If you are unaware of the IP address, obtain it from the network administrator.
-
Page 11: Mouse Setting (Optional)
Mouse Setting (optional) Many operating systems offer a feature called mouse acceleration that allows the user to adjust the responsiveness of the cursor on the screen to the physical movements of the mouse. While this is usually a beneficial interface enhancement, it can interfere with the operation of the unit and should be disabled on the managed computers before a remote session is attempted. -
Page 12: Using The Web Interface
Using the Web Interface The Web interface is the most intuitive way to configure the IP KVM Switch, offering a Java-based VNC client that can be used to control the host computer from a remote location, as well as support for any industry-standard HTML Web browser. You can access the Web interface by opening your Web browser and entering the IP address of the IP KVM Switch you wish to access/configure. -
Page 13: Web Interface Introduction
Web Interface Introduction After the initial login screen, the Name screen is divided into several sections, a number of which will remain on the screen at all times while viewing the Web Interface: Name: At the top of the screen, the name of the machine being controlled is displayed Main Menu: At the left-most side... -
Page 14: File Transfer
Snapshots: The Snapshots screen allows you to view and save a screenshot of the controlled computer in its current state. This screenshot will update periodically (automatically). Saved image files are stored in PNG format. Logout: Clicking on Logout will terminate your Web Interface section. To re-initiate the Web Interface, you will be required to re-enter your username and password. - Page 15 emergency repair disks are often floppy-based etc.). You can transfer bits from that floppy to the IP KVM (use the upload disk image form) and boot from the special floppy. CD-ROM Mode: The IP KVM does not store any data in this mode. Instead, it emulates a USB CD-ROM drive with a disk inserted.
-
Page 16: Network Configuration
If the host computer’s BIOS supports USB boot devices, it is possible to boot from the emulated CD-ROM or floppy - allowing complete operating system replacement without any on-site intervention. The first step is getting a bootable disk image onto the emulated floppy or CD-ROM. For CD-ROM images, you will need an .ISO image from a disk that contains special bits to enable booting (“El Torito”... -
Page 17: User Accounts
Clicking the Commit button applies any changes made on this page, but leaves the old settings active until the next time the unit restarts. Clicking Make changes effective now applies the changes and restarts the IP KVM so the new settings take effect immediately. -
Page 18: System Identification
System Identification Machine Name: This is the name that is used to uniquely identify this machine. You may wish to create a DNS entry that matches this name. The name is provided as the Client Name for the DHCP server. It is also shown at the top of each page in the web browser interface and is the “desktop name”... -
Page 19: Compatibility
The Compatibility menu offers features that may provide enhanced functionality with certain KVM and power products, such as StarTech.com’s Remote Power Switch (PCM8155HNA). These can be left at their default values if you are not connecting the unit to a KVM or power management device. -
Page 20: Modem
Modem Enable this to allow the modem to answer the phone and start a PPP connection. Enable modem connections (PPP) via serial port/ modem. Serial Ports The Serial Ports menu allows you to manage and connect to devices connected to the unit using the R-Port on the IP KVM. - Page 21 Manual Upload: Enter the name of the firmware file that you downloaded from StarTech.com into the field provided (or use the “Browse” button). Press Start Upload and wait until a successful upload message is shown. NOTE: Remember the following during the firmware upgrade: •...
-
Page 22: Status
Status The Status screen displays a system security log, various system settings, and the ability to generate a copy of the system configuration in plain text format. Port Numbers Port Numbers provides a table allowing you to change TCP port values for services available on the IP KVM. -
Page 23: Using The Terminal Interface Via Serial Port
Using the Terminal Interface via Serial Port The terminal interface can be accessed via the serial port (or through SSH using the setup command) for configuration of the basic settings of the IP KVM. While not intended to be a substitute for the Web interface, it does allow you to configure some of the same functions. -
Page 24: Native Vnc Client
Socket Layer) encrypted link that encrypts all data from the session, including the actual video pictures. Because Java is considered a “safe” programming language, the Java VNC client has some limitations. Certain special keystrokes cannot be sent, such as “Scroll Lock” on the keyboard. -
Page 25: Using The Vnc Menu
• The port number “15900” is arbitrary in the above example and can be any number (1025...65535). It is the port number used on your client machine to connect your local SSH instance with the VNC client. If you want to tunnel two or more systems, you will need to use a unique number for each instance on the same SSH client machine. -
Page 26: Main Menu
• KVM: Sends the KVM “hotkey” sequence. This function is only enabled when you have configured the unit to expect a particular brand of KVM downstream. It sends the key sequence to launch the KVM’s on-screen display (OSD) menu. This button is only present when a KVM model is selected in the Web interface. - Page 27 The main menu window may be moved by clicking and dragging on the title bar. It can be closed by pressing Escape, or by clicking on the red X in the top right corner. Here is a guide outlining various fields from the Main Menu. Most of the functions operate immediately.
-
Page 28: Virtkeys Menu
VirtKeys Menu Clicking any button in the top half of the window simulates pressing and releasing the indicated key. In the bottom area of the screen, clicking will simulate the indicated Meta key being pressed. You may then click in the top part to send another key and release the Meta key at the same time. - Page 29 Color Offset is a fine tuning adjustment that requires the use of a test pattern. There is a copy of the test pattern available on the Help! menu of the integrated web server. You must arrange for that image to be shown on the host computer. Do not allow scaling, cropping or any other changes to that image.
- Page 30 the values. Note that any previous settings assigned to that button will be lost. If you do not wish to save the presets after clicking the Save->Preset button, click the Save->Preset button a second time and the save function will be cancelled. The section of the screen marked Current Values indicates the various video parameters that can be adjusted.
-
Page 31: Optimizing Video Performance
Optimizing video performance Choose the best video mode • We recommend using 60Hz refresh rate and 1024 x 768 resolution. Using a smaller resolution like this allows you to fit multiple windows on your remote desktop. Higher refresh rates stress the video card’s quality and do not provide any additional information or benefit. -
Page 32: Accessing Kvm Features
Accessing KVM Features Once you can access and configure the networking component of the Server Remote Control, you can use it to select and control the managed computers connected to it. This section describes how to use the on-screen display (OSD) system to manage your computers. - Page 33 To access additional menu functions, press the <F4> key. A new screen will appear displaying more functions, as shown below. To access the remaining menu functions, press the <F4> key again. This will bring you to the screen shown below. Data-Transfer Rule Not Followed Selected PC: Data-Transfer function resides on one particular KVM- Channel, press <CTRL>...
-
Page 34: Osd Operations
OSD Operations By hitting the left <CTRL> key twice within two seconds, you may see the ‘Hotkey Menu’ (unless disabled through OSD menu). Or, by hitting the left <CTRL> key three times within two seconds, you will see a KVM MENU screen showing a list of the computers with corresponding channel addresses, names and status. - Page 35 <F3> then enter the password. If you want to access the locked device temporarily, simply highlight it and press <ENTER>. Enter the password and you can access the device. The device is automatically re-locked once you switch to another device. During Scan mode, OSD skips the security-enabled device.
-
Page 36: Hot Key Commands
Hotkey Menu When you hit the left <CTRL> key twice within two seconds, the Hotkey Menu appears displaying a list of hot-key commands if the option is On. The Hotkey Menu can be turned Off, if you prefer not to see it when the left <CTRL> key is hit twice. The non-volatile memory stores the Hotkey Menu setting. -
Page 37: Changing Your Configuration
Selecting a Computer To select a computer by hot-key command you need to know the device’s channel address, which is determined by the KVM connection. For a computer connected to the switch, the address is represented by the PC port number (1~4). For example, to access the PC plugged into port 4 of the Master KVM switch, type: left <Ctrl>... -
Page 38: Using The Modem Feature
If you wish to use this feature through a PBX system, it may require some experimentation and additional support from your telecom services provider, and is not supported by StarTech.com. Connecting a Modem The IP KVM will work with virtually any Hayes-compatible modem that recognizes the standard AT command set. -
Page 39: Modem Configuration
with the modem or the IP KVM, but simply reflect the line conditions at the time the connection is made. The Serial port can be used for serial port configuration when the modem is connected. It requires the use of a null modem serial cable. Place the modem near the IP KVM and an available telephone jack. -
Page 40: Configuring The Remote Connection
Configuring the Remote Connection This section describes how to configure a typical Windows dial-up session to access the modem connection on the IP KVM. The instructions here relate to a Windows XP configuration; other versions of Windows are similar. 1. Open My Network Places from the desktop or the Start menu. 2. -
Page 41: Accessing The Web Interface
Accessing the Web Interface Once a dial-up connection has been established, you can access the Web interface or start a VNC session using the following IP address: https://99.99.99.99 You can now login to the Web interface (and/or VNC session) normally. Note that the remote machine (the one you dialed from) is automatically assigned the IP address 99.99.99.100 for the PPP session. -
Page 42: Modem Troubleshooting Guide
Modem Troubleshooting Guide The following messages will appear in the system log on the Status screen in the Web interface and may help to diagnose problems with the modem configuration. Starting PPP (for auth) on port… Modem is connecting and the PPP login process is starting. Modem hang up. -
Page 43: Connecting Serial Remote Control Modules
Connecting Serial Remote Control Modules The cable for each serial device is similar to a phone cable and uses an RJ-14 connector. For the first module, connect the cable to the R-Port on the rear panel of the IP KVM. Connect the opposite end to the DATA OUT (or similar) port on the Serial Remote Control unit. -
Page 44: Remote Login Via Ssh
device will logout and reset itself if the carrier signal is lost, increasing security. Note that this may not work with all devices and could impair proper operation in some circumstances. The default setting is off. • Console Log: Clicking this link will open a separate Web page that will display the last 200 characters committed to that device’s console log. -
Page 45: About Security Certificate Warnings
Web browser or the VNC Java client for two different reasons. First, the CA that has issued the certificate on StarTech.com’s behalf may not yet be recognized as a trusted source by the computer you are using to access the IP KVM. -
Page 46: Installing The New Certificate
Can I prevent the warning from occurring? Yes. You have two options that may prevent the warning from occurring. First, if the Web browser you are using offers the option to ignore the warning for future visits, the browser will no longer generate a warning if that option is selected. Second, if you install the certificate from the IP KVM onto the host computer (see below) and if the unit is configured with a domain name ending in .com, .net, .org, .gov, .edu, .us, .ca, .uk, .jp, or .tw (i.e. -
Page 47: Troubleshooting
Troubleshooting Forgotten master password. You can reset the master password using the serial interface on the unit. Use the S command, and type a new password. The old password is not required for this procedure. Remote mouse and local mouse don’t line up. Use the Mouse resync command in the main menu or press the Resync button on the Bribar. - Page 48 Mouse performance is erratic when using the GNOME or KDE desktop in a Linux X-Window environment. The mouse controls in GNOME and KDE environments offer both an acceleration and sensitivity setting. The following directions correct this issue, and apply to Red Hat Fedora Core 2, but should be similar for other distributions that use GNOME or KDE: 1.
-
Page 49: Supported Protocols
Supported Protocols Service Description Benefit May be used to securely “tunnel” VNC and HTTP Secure Shell protocols. Web Redirector Convenience server to redirect all web traffic to HTTP (to HTTPS) encrypted port. Clear-text HTTP is not supported. SNMP Agent Allows integration with existing SNMP network SNMP (UDP) management systems. -
Page 50: Specifications
Specifications SV441DUSBI SV841DUSBI Number of Ports 1 x DE-15 VGA female 2 x USB type A female Console Connectors 1 x RJ45 Ethernet female 1 x 9-pin DB9 male Computer Connectors 1 x DE-15 female (per port) LEDs 4 x Port Status... -
Page 51: Technical Support
Limitation of Liability In no event shall the liability of StarTech.com Ltd. and StarTech.com USA LLP (or their officers, directors, employees or agents) for any damages (whether direct or indirect, special, punitive, incidental, consequential, or otherwise), loss of profits, loss of business, or any pecuniary loss, arising out of or related to the use of the product exceed the actual price paid for the product. - Page 52 StarTech.com is an ISO 9001 Registered manufacturer of connectivity and technology parts. StarTech.com was founded in 1985 and has operations in the United States, Canada, the United Kingdom and Taiwan servicing a worldwide market.
Need help?
Do you have a question about the SV841DUSBI and is the answer not in the manual?
Questions and answers