
Related Manuals for DynaGen Tough TG350AMF


Summary of Contents for DynaGen Tough TG350AMF
- Page 1 TG350AMF User Manual Manual Revision: 1.0 Software Revision: 1.2 Date Released: 7/24/2012 © 2012 DynaGen Technologies Inc.
-
Page 2: Table Of Contents
................................39 4.6 Exerciser and Maintenance ........................... 41 4.7 CAN Bus (J1939) ........................... 42 4.7.1 Diagnostic Trouble Codes ................................44 4.7.2 DM1 Messages ................................45 4.7.3 DM2 Messages ................................46 4.7.4 DTC Conversion Methods ................................47 © 2012 DynaGen Technologies Inc. - Page 3 TOUGH Series User Manual 5 Troubleshooting and Contact Information © 2012 DynaGen Technologies Inc.
-
Page 4: Introduction
100 Event Log Clock / Exerciser Generator Metering 3-Phase Mains Metering (AMF + ATS) 3-Phase Configurable Switched Inputs Resistive Sensors Universal Sensor (Resistive, 0-5V, 4-20mA) User Configurable Switched Outputs (+Fuel and Crank) TOUGH Series User Manual © 2012 DynaGen Technologies Inc. -
Page 5: Specifications
The TOUGH Series controllers were rigorously tested to ensure durability, reliability and functionality. The following specifications are a brief summary of the standards to which the controller has been tested. For complete details on the testing performed please contact DynaGen. SPECIFICATION... -
Page 6: Accessories
Introduction Accessories The following items are available to be purchased from DynaGen to be used with the TOUGH Series controllers. ACCESSORY PART NUMBER DESCRIPTION Relay Pak RP100 Snap-on Relay Pak with 3 x 12V @ 40A relays ENC0080 Enclosure (NMEA 1) - Page 7 Introduction Custom Harness Component List If DynaGen harnesses are not suitable for your application, custom harnesses can be created using the following part list: COMPONENT PART NUMBER NOTES Molex 2x3 Connector 39-01-2060 Used with Relay Pak harness. Molex 2x4 Connector 39-01-2080 Used with Advanced I/O Harness.
-
Page 8: Installation
6) Tighten the screws on the clips until controller is snug against the panel. Do not over tighten, the bottom of the screws should angle very slightly away from the controller. TOUGH Series User Manual © 2012 DynaGen Technologies Inc. -
Page 9: Main I/O Starter Harness
High resistance sensor (0 - 7,500Ω) J4-13 Sensor Input B Low resistance sensor (0 - 750Ω) J4-14 Sensor Input C Low resistance sensor (0 - 750Ω) Looking at rear of controller TOUGH Series User Manual © 2012 DynaGen Technologies Inc. -
Page 10: Advanced I/O Harness
2. Place Sensor Input D wire into the 'Run' channel of the Scotchlok connector. 3. Place the other side of the 4 - 20mA wire into the 'Stop' channel of the Scotchlok connector. 4. Drive the U-Contact down and latch the top cover. TOUGH Series User Manual © 2012 DynaGen Technologies Inc. -
Page 11: 3-Phase Ac Volts Harness
NOTE: If using a 2-Wire Single configuration you must use Phase A terminal. If using 3-Wire Single configuration you must use Phase A and B terminals. TOUGH Series User Manual © 2012 DynaGen Technologies Inc. -
Page 12: Magnetic Pickup / J1939 Interface Harness
Turning on the 'Auto Power ECM' setting in the J1939 menu enables the fuel relay to be on when controller is in Auto mode. This way the ECM will be always be on except wen in OFF mode. TOUGH Series User Manual © 2012 DynaGen Technologies Inc. -
Page 13: Relay Pak (Rp100)
(Contact) amperage requirements. The following is a sample wiring diagram using the RP100. Keep in mind that the wires from connector J1 are connected to the controllers switched outputs and ground. TOUGH Series User Manual © 2012 DynaGen Technologies Inc. -
Page 14: Amf / Ats Wiring
The following is an example wiring diagram for a transfer switch. Keep in mind that there are some items omitted (fuses, connections to controller, etc.) and that not all configurations will be the same. TOUGH Series User Manual © 2012 DynaGen Technologies Inc. -
Page 15: Typical Wiring Diagram
Installation Typical Wiring Diagram TOUGH Series User Manual © 2012 DynaGen Technologies Inc. -
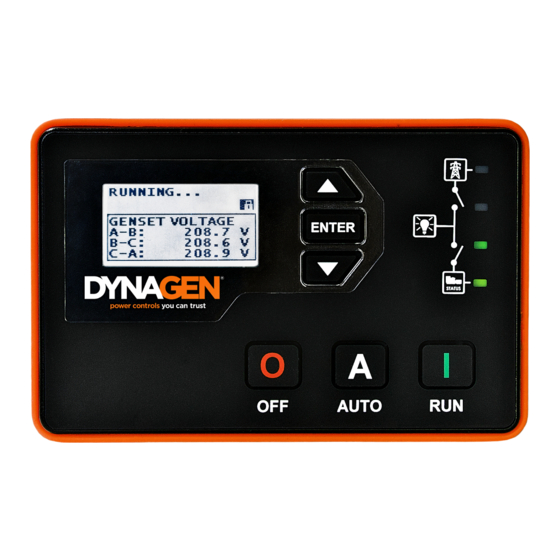
Page 16: Using The Controller
Used for entering the menu system, accepting settings, or Enter locking the LCD screen when viewing parameters. Used for moving around in the menu, changing a settings Down value, or changing the currently displayed parameter page. TOUGH Series User Manual © 2012 DynaGen Technologies Inc. - Page 17 Recharge, Failure, Remote Start, Loss of Mains). Starts the engine manually and will continue to run until the off button is pressed, emergency stop input is activated, or a failure occurs. TOUGH Series User Manual © 2012 DynaGen Technologies Inc.
-
Page 18: Using The Menu System
ENTER button. Upon being locked a small icon of a lock will appear in the top right corner. You can still manually scroll through the parameters while the screen is locked. TOUGH Series User Manual © 2012 DynaGen Technologies Inc. -
Page 19: Warnings, Failures And Events History
Gives the hardware version, software version and serial number. Gives the amount of time remaining before maintenance is required. Maintenance If '----' is displayed maintenance is disabled. A negative number indicates the amount of time since maintenance timer expired. TOUGH Series User Manual © 2012 DynaGen Technologies Inc. -
Page 20: Starting, Stopping And Controller Modes
Switched inputs 'Momentary Start' and 'Momentary Stop' can be used for starting and stopping of the engine. Unlike other inputs, they only have to be activated for a short period of time to perform their function. TOUGH Series User Manual © 2012 DynaGen Technologies Inc. -
Page 21: Emergency Stop And Failures
If you notice that the engine is shutting down immediately after start up, verify that the 'Bypass Time' in the Sensors menu is set to a high enough value to allow the readings to settle to their normal ranges. TOUGH Series User Manual © 2012 DynaGen Technologies Inc. -
Page 22: Configuration
Schedule ii. Timeout ii. Sensor Type c. Maintenance iii. Number iii. Trim Offset i. Reset Counter iv. Setpoints ii. Enable Counter iii. Count Interval d. Trigger Delays i. Config Inputs TOUGH Series User Manual © 2012 DynaGen Technologies Inc. - Page 23 Amount of time after the passcode is entered to remain Passcode Timeout unlocked. Once timeout limit is reached due to inactivity the passcode must be entered again. Number The desired passcode digits. TOUGH Series User Manual © 2012 DynaGen Technologies Inc.
-
Page 24: Engine Logic
The flowchart on the following page depicts the way the controller uses some of the the engine logic settings to start and stop the engine. TOUGH Series User Manual © 2012 DynaGen Technologies Inc. - Page 25 The following flowchart shows a typical start up and shutdown sequences for a controller. Some items from the Engine Logic section have been omitted / included for illustration purposes and may not be used in your application. TOUGH Series User Manual © 2012 DynaGen Technologies Inc.
-
Page 26: Switched Inputs
After Cranking Input active from engine started to engine shutdown. NOTE: All switched inputs with the exception of the the Configurable Inputs have actives modes that are fixed and cannot be changed. TOUGH Series User Manual © 2012 DynaGen Technologies Inc. - Page 27 Performs a 'Lamp Test' for the LED's. Fuel In Basin Global Displays a warning that there is fuel in the basin. Battle Mode Running Ignores all warnings and failures while running. TOUGH Series User Manual © 2012 DynaGen Technologies Inc.
-
Page 28: Voltage Select
Configuration AMF / ATS Inputs The following inputs are only available in the TG350AMF version of the controller. See AMF / ATS more information on how these inputs function. FUNCTION ACTIVE MODE DESCRIPTION Indicates the current position of the user operated... -
Page 29: Configurable Inputs
The reason for changing these trigger mode is to allow the user to wire a single push button to be used for both starting and stopping the engine. Holding the button for too long will cause the engine to shutdown immediately after starting and vice versa. TOUGH Series User Manual © 2012 DynaGen Technologies Inc. -
Page 30: Switched Outputs
Engine Running Running engine running until shutdown. Turns on when the controller is performing the Exercising Running exerciser function. See Exerciser and Maintenace for more information. Switched Outputs continued on next page... TOUGH Series User Manual © 2012 DynaGen Technologies Inc. -
Page 31: Pull And Hold Coil
3. Pull coil is de-energized while Hold coil remains on while the engine is running. Configuring a switched output to Pull Coil automatically configures the engine logic necessary for a Pull Coil system. TOUGH Series User Manual © 2012 DynaGen Technologies Inc. -
Page 32: Sensors
10 - 180Ω 0 - 100% NOTE: The temperature sensors shown here are for use with high resistance ports (0 - 7,500Ω). Using a low resistance port will limit the lower temperature readings. TOUGH Series User Manual © 2012 DynaGen Technologies Inc. - Page 33 'Sensor Type,' selecting one of the following options will make it function in switch mode. CLOSE = Warning OPEN = Warning CLOSE = Failure OPEN = Failure NOTE: CLOSE is equivalent to a short to ground and OPEN is equivalent to no connection. TOUGH Series User Manual © 2012 DynaGen Technologies Inc.
-
Page 34: Auxiliary Sensors
If readings rises above Start Level, auto start the engine. WARNING: When using a mode other than 'Fault Monitor' , the controller will not detect warnings and failures for this sensor. TOUGH Series User Manual © 2012 DynaGen Technologies Inc. - Page 35 NOTE: Once the output or engine turns off, the controller will continue to monitor the levels and will restart the output or engine if the Stop Level still has not been met. TOUGH Series User Manual © 2012 DynaGen Technologies Inc.
- Page 36 Active Time Disabled has not been reached. Start Level 325°F The temperature at which to turn the fan on. Stop Level 200°F The temperature at which to turn the fan off. TOUGH Series User Manual © 2012 DynaGen Technologies Inc.
-
Page 37: Custom Sensor Tables
Below is an example sensor table for engine temperature sensor DATCON 02025-00. Nam e: Engine Temp TEMP. VALUE Input Type: Resistance 129°F 491Ω Unit Type: Temperature 140.1°F 406Ω 149.2°F 330Ω 160°F 263Ω 175°F 202Ω 189.7°F 147Ω 221°F 96Ω 275°F 49Ω 330°F 7Ω TOUGH Series User Manual © 2012 DynaGen Technologies Inc. -
Page 38: Speed Sensing And Battery
NOTE: When the generator is running, the battery voltage will equal the alternator charging voltage. The actual open-circuit battery voltage may be lower than displayed. Battery Recharge Sequence TOUGH Series User Manual © 2012 DynaGen Technologies Inc. -
Page 39: Ac Monitoring
Example: Voltages about 575VAC are being monitored using the controller and there are 2:1 step down transformers between the generator and the controller. A sensing ratio of 2.00 is required to scale the voltage back up to the appropriate value. TOUGH Series User Manual © 2012 DynaGen Technologies Inc. -
Page 40: Amf / Ats
NOTE: During Manual ATS mode you can move back to the regular ATS functionality by pressing the AUTO button. Moving back to regular ATS functionality will disable the 'Transfer to...' inputs. TOUGH Series User Manual © 2012 DynaGen Technologies Inc. - Page 41 These inputs are only used when the AMF / ATS Mode is set to AMF. Their only function is for turning on and off the switch LED's on the controllers front panel. They must be wired to switches that indicate the position of a user operated switch controlling the load position. TOUGH Series User Manual © 2012 DynaGen Technologies Inc.
-
Page 42: Exerciser And Maintenance
To find out the amount of time until next maintenance, follow these menu steps: Main Menu -> Device Info. -> Maintenance If '----' is displayed maintenance is disabled. A negative number indicates the amount of time since maintenance timer expired. TOUGH Series User Manual © 2012 DynaGen Technologies Inc. -
Page 43: Can Bus (J1939)
WARNING: If using 'Cummins Idle Speed' and powering the ECM externally you may get the error message 'J1939 Erratic'. The ECM expects the speed update to be sent continuously and if it is not the ECM thinks there is a problem with the J1939 communications. TOUGH Series User Manual © 2012 DynaGen Technologies Inc. - Page 44 If there are no communications between the ECM and controller, the controller will not stop the crank cycle when the engine is running as it is not receiving the engine speed. TOUGH Series User Manual © 2012 DynaGen Technologies Inc.
-
Page 45: Diagnostic Trouble Codes
The setting enables/disables the ability to request stored fault codes from the ECM (DM2). When this setting is enabled the controller will allow manually triggered requests of stored faults from the ECM’s memory (DM2). TOUGH Series User Manual © 2012 DynaGen Technologies Inc. -
Page 46: Dm1 Messages
The controller Event History can store up to 30 DM1 messages (DM2 messages are not stored). Once the 30 limit has been reached the oldest message is removed from the log to be replaced by the incoming DM1 TOUGH Series User Manual © 2012 DynaGen Technologies Inc. -
Page 47: Dm2 Messages
ECM address can only be changed by using the PC Configurator. The controller may also show 'Reading Abort' if communication is unsuccessful. If the request was successful, the controller will show 'Read DTC Success' and start to display the messages. TOUGH Series User Manual © 2012 DynaGen Technologies Inc. -
Page 48: Dtc Conversion Methods
1 and 2. Version 4 has the bit set to 0 which allows the user to know the conversion format without consulting the engine manufacturer. TOUGH Series User Manual © 2012 DynaGen Technologies Inc. - Page 49 Insert issue here. Insert solution here. Insert issue here. Insert solution here. Contact Information Contacting DynaGen can be done by any of the methods below. Technical support is offered Monday - Friday, 8:00am - 4:00pm (EST). TYPE INFORMATION Website www.dynagen.ca/support Email support@dynagen.ca...
Need help?
Do you have a question about the Tough TG350AMF and is the answer not in the manual?
Questions and answers