Regency P121 Owners & Installation Manual
Zero clearance direct vent gas fireplace
Hide thumbs
Also See for P121:
- Owners & installation manual (48 pages) ,
- Brochure & specs (32 pages) ,
- Owners & installation manual (44 pages)
Table of Contents
Advertisement
Quick Links
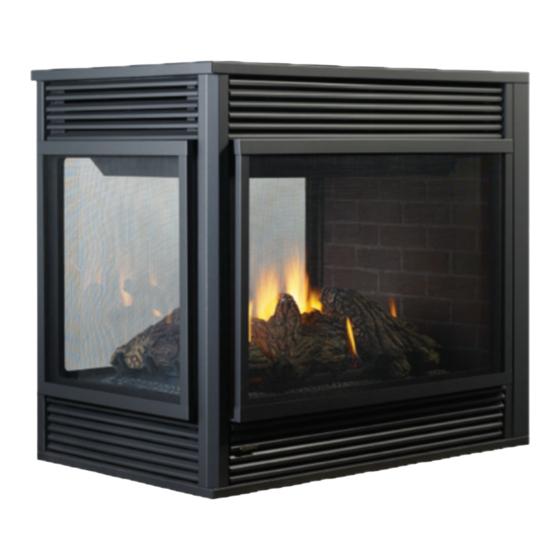
P121 / P121LC / P121RC / P131
Zero Clearance Direct Vent Gas Fireplace
WARNING:
If the information in these instructions are not followed
exactly, a fire or explosion may result causing property
damage, personal injury or loss of life.
FOR YOUR SAFETY
Do not store or use gasoline or other flammable vapours and
liquids in the vicinity of this or any other appliance.
Installation and service must be performed by a qualified
installer, service agency or the gas supplier.
Tested by:
918-107a
FPI FIREPLACE PRODUCTS INTERNATIONAL LTD. 6988 Venture St., Delta, BC Canada, V4G 1H4
www.regency-fire.com
STYLE
See Thru
P121-NG1 Natural Gas
Left Corner
P121LC-NG1 Natural Gas P121LC-LP1 Propane
Right Corner P121RC-NG1 Natural Gas P121RC-LP1 Propane
Pier
P131-NG1 Natural Gas
Installer: Please complete the details on the back cover
and leave this manual with the homeowner.
Homeowner: Please keep these instructions for future reference.
MODEL
P121-LP1 Propane
P131-LP1 Propane
FOR YOUR SAFETY
What to do if you smell gas:
Do not try to light any appliance
Do not touch any electrical switch: do not use any
phone in your building.
Immediately call your gas supplier from a neighbour's
phone. Follow the gas supplier's instructions.
If you cannot reach your gas supplier, call the fire
department.
Owners &
Installation Manual
01/15/04
Advertisement
Table of Contents

Related Manuals for Regency P121


Summary of Contents for Regency P121
- Page 1 P121 / P121LC / P121RC / P131 Owners & Zero Clearance Direct Vent Gas Fireplace Installation Manual STYLE MODEL See Thru P121-NG1 Natural Gas P121-LP1 Propane Left Corner P121LC-NG1 Natural Gas P121LC-LP1 Propane Right Corner P121RC-NG1 Natural Gas P121RC-LP1 Propane...
-
Page 2: Installation
INFORMATION FOR MOBILE/MANUFACTURED HOMES AFTER FIRST SALE This Regency product has been tested and listed by Warnock Hersey as a Direct Vent Wall Furnace to the following standards: VENTED GAS FIREPLACE HEATERS ANSI Z21.88a-2000/CSA 2.33a-2000 and GAS-FIRED APPLIANCES FOR USE AT HIGH ALTITUDES CAN/CGA 2.17-M91. -
Page 3: Table Of Contents
Glass Door Removal ..........26 Finishing Trim ............26 Louvers and Grills ............26 Remote Control (optional) .......... 27 Remote Wall Switch (optional) ........27 Wall Thermostat (optional) ........27 Wiring Diagram ............28 Regency P121-1/P121LC-1/P121RC-1/P131-1 Zero Clearance Direct Vent Gas Fireplace... -
Page 4: Safety Label
Massachusetts. For the State of Massachusetts, flexible connectors shall not exceed 36 inches in length. For the State of Massachusetts, the appli- ances individual manual shut-off must be a t-handle type valve. Regency P121-1/P121LC-1/P121RC-1/P131-1 Zero Clearance Direct Vent Gas Fireplace... -
Page 5: Important Message
OR CLOTHING IGNITION. be used in this appliance. that causes sooting or carboning that results in damage is not the responsi- 14) The appliance area must be kept clear and bility of the manufacturer. Regency P121-1/P121LC-1/P121RC-1/P131-1 Zero Clearance Direct Vent Gas Fireplace... -
Page 6: Specifications
INSTALLATION SPECIFICATIONS P121-1 See Thru Note: These units are non-load bearing. P131-1 Pier Regency P121-1/P121LC-1/P121RC-1/P131-1 Zero Clearance Direct Vent Gas Fireplace... - Page 7 INSTALLATION P121LC-1 Left Corner Unit Note: These units are non-load bearing. P121RC-1 Right Corner Unit Regency P121-1/P121LC-1/P121RC-1/P131-1 Zero Clearance Direct Vent Gas Fireplace...
-
Page 8: Locating Your Gas Fireplace
Have a C) P121LC-1 Left Corner qualified inspector, dealer, or installer re- view your plans before installation. Note: For Exterior Vent Termination Locations see page 12. D) P121RC-1 Right Corner Regency P121-1/P121LC-1/P121RC-1/P131-1 Zero Clearance Direct Vent Gas Fireplace... -
Page 9: Clearances
Caution: Ensure the paint that is used on the mantel and the facing is "heat resistant" or the paint may discolour. * If the 3" (76mm) metal extension trim is removed it must be replaced with a 8" (203mm) non-combustible material. Regency P121-1/P121LC-1/P121RC-1/P131-1 Zero Clearance Direct Vent Gas Fireplace... -
Page 10: Framing And Finishing
Vent Clear- ances, page 9. P121LC-1 - Corner Unit P121-1 - See Thru P131-1 - Pier P121RC-1 - Corner Unit Note: These units are non-load bearing. Regency P121-1/P121LC-1/P121RC-1/P131-1 Zero Clearance Direct Vent Gas Fireplace... -
Page 11: Facing And Finishing Requirements
Each direct vent gas appliance must use it's own separate vent system. Common vent sys- 3) Attach the standoff securely to the top with tems are prohibited. 4 screws per standoff (on opposite cor- ners). Regency P121-1/P121LC-1/P121RC-1/P131-1 Zero Clearance Direct Vent Gas Fireplace... -
Page 12: Exterior Vent Termination Locations
INSTALLATION EXTERIOR VENT TERMINATION LOCATIONS Regency P121-1/P121LC-1/P121RC-1/P131-1 Zero Clearance Direct Vent Gas Fireplace... -
Page 13: Venting: Direct Vent System (Flex)
Regency Direct Vent System (Flex) Horizontal Terminations Only These venting systems, in combination with the P121-1/P121LC-1/P121RC-1/P131-1 Direct Vent Gas Fireplace, have been tested and listed as a direct vent heater system by Warnock Hersey. The location of the termination cap must conform to the requirements in the Vent Terminal Locations diagram on page 12. -
Page 14: Venting: Simpson Dura Vent Direct Vent Gs
The Simpson Dura-Vent Direct Vent System offers a complete line of component parts for installation of both horizontal and vertical installations. Many items are offered in decorative black, as well as galvanized finish. We recommend using the galvanized finish for installation with the P121- 1/P121LC-1/P121RC-1/P131-1. -
Page 15: Venting Arrangements Horizontal Terminations
6 feet total vertical and maximum 17 feet total horizontal. Please note minimum 1 foot between 90 elbows is required. Diagram 1 Diagram 2 Please note the minimum centerline for basic install shown above. Regency P121-1/P121LC-1/P121RC-1/P131-1 Zero Clearance Direct Vent Gas Fireplace... - Page 16 With the above options, maximum total pipe length if 37 feet with minimum of 5 feet total vertical and maximum 12 feet total horizontal. Please note minimum 1 foot between 90 elbows is required. Diagram 4 Diagram 6 Regency P121-1/P121LC-1/P121RC-1/P131-1 Zero Clearance Direct Vent Gas Fireplace...
-
Page 17: Vertical Terminations
Must use optional flue adapter when using Simpson Dura-Vent pipe (Part# 510-994). The P121-1/P121LC-1/P121RC-1/P131-1 is approved for a maximum 35 ft. (10.7m) straight vertical, with Simpson Dura-Vent Direct Vent GS vent systems for Propane and Natural Gas, as per diagram 7 below. - Page 18 With the above options, maximum total pipe length if 37 feet with minimum of 5 feet total vertical and maximum 12 feet total horizontal. Please note minimum 1 foot between 90 elbows is required. Diagram 11 Regency P121-1/P121LC-1/P121RC-1/P131-1 Zero Clearance Direct Vent Gas Fireplace...
-
Page 19: Venting - Dura-Vent Horizontal Installations
Note: If installing termination on a siding tations so they match and slide in to the covered wall, a vinyl siding stand- four entry slots on the male ends, Dia- off or furring strips must be used Regency P121-1/P121LC-1/P121RC-1/P131-1 Zero Clearance Direct Vent Gas Fireplace... -
Page 20: Venting - Dura-Vent Vertical Termination
11/12 to 12/12 1.22 over 12/12 to 14/12 1.52 over 14/12 to 16/12 1.83 over 16/12 to 18/12 2.13 over 18/12 to 20/12 2.29 Diagram 5 over 20/12 to 21/12 2.44 Diagram 3 Regency P121-1/P121LC-1/P121RC-1/P131-1 Zero Clearance Direct Vent Gas Fireplace... -
Page 21: System (Flex)
We recommend framing a 10"(254mm) x 10"(254mm) (inside dimensions) hole to give struc- tural rigidity for mounting the ter- mination. Note: If installing termination on a siding covered wall, furring strips must Regency P121-1/P121LC-1/P121RC-1/P131-1 Zero Clearance Direct Vent Gas Fireplace... -
Page 22: Converion To Propane
INSTALLATION CONVERSION KIT FROM NATURAL GAS TO PROPANE MODEL #730-969 FOR P121-1/P121LC-1/P121RC-1/P131-1 USING SIT 820 NOVA GAS VALVE THIS CONVERSION MUST BE DONE BY A QUALIFIED GAS FITTER IF IN DOUBT DO NOT DO THIS CONVERSION !! Conversion Kit Contains:... -
Page 23: System Data
CAN/CGA B149 installation pressures equal to or less than 1/2 psig. (3.45 code. kPa). Disconnect piping from valve at pres- sures over 1/2 psig. Regency P121-1/P121LC-1/P121RC-1/P131-1 Zero Clearance Direct Vent Gas Fireplace... -
Page 24: Log Set Installation
02-81 02-79 02-82 02-80 end of the log into the grate post. 02-80 Tab on Burner Grate Post 02-80 02-82 02-79 02-81 Regency P121-1/P121LC-1/P121RC-1/P131-1 Zero Clearance Direct Vent Gas Fireplace... - Page 25 Log onto the second grate post from the left. Ensure that the log fits into a pin that is on Log 02-79. 02-81 02-81 02-82 02-79 Place Log 02-82 onto pin. Grate Post Regency P121-1/P121LC-1/P121RC-1/P131-1 Zero Clearance Direct Vent Gas Fireplace...
-
Page 26: Glass Door Removal
3) P131 & P121LC/P121RC Corner Model: Push trim tight Remove the 6 screws that secure the The Top and Bottom Side Louver or Grill is against magnet. glass door and repeat step 2. installed the same way. Regency P121-1/P121LC-1/P121RC-1/P131-1 Zero Clearance Direct Vent Gas Fireplace... -
Page 27: Remote Control (Optional)
4 AA alkaline batteries in the receiver. 22 GA. 9 Ft. Install the receiver and its cover in the wall. Switch the remote receiver to "remote" mode. The remote control is now ready for operation. Regency P121-1/P121LC-1/P121RC-1/P131-1 Zero Clearance Direct Vent Gas Fireplace... -
Page 28: Wiring Diagram
A any circumstances.) CAUTION: Label all wires prior to disconnection when servicing controls. Wiring errors can cause improper and dangerous operation. Terminal Block Location Terminal Block Remove cover to access Terminal Block Regency P121-1/P121LC-1/P121RC-1/P131-1 Zero Clearance Direct Vent Gas Fireplace... -
Page 29: Operating Instructions
"clicking" sound. This is the Minimum Air Shutter Opening: switch contacts closing and is normal. 5) Use the wall switch, thermostat or remote 3/16" Natural Gas control to turn on the unit. 3/8" Propane Regency P121-1/P121LC-1/P121RC-1/P131-1 Zero Clearance Direct Vent Gas Fireplace... -
Page 30: Lighting Plate Instructions
You may shut off the pilot during prolonged non use periods to conserve fuel. and in extreme cases, holes. These com- ponents should be replaced immediately. DO NOT REMOVE THIS INSTRUCTION PLATE 908-017a Regency P121-1/P121LC-1/P121RC-1/P131-1 Zero Clearance Direct Vent Gas Fireplace... -
Page 31: General Vent Maintenance
5) Drop the thermocouple or thermopile down through the extrusion and pull it out of the unit. 6) Reinstall the new ones in reverse order. Regency P121-1/P121LC-1/P121RC-1/P131-1 Zero Clearance Direct Vent Gas Fireplace... -
Page 32: Installing Valve
16) Reinstall the logs, grate and brick panels as needed. 17) Reinstall the glass doors. 18) Fire up the unit again and check for proper flame appearance. 12) Lift the entire assembly out. Regency P121-1/P121LC-1/P121RC-1/P131-1 Zero Clearance Direct Vent Gas Fireplace... -
Page 33: Fan Replacement
Reverse for installation. Ensure that no wires will touch hot surfaces. 5) Remove 2 connector wires. Connector wires Regency P121-1/P121LC-1/P121RC-1/P131-1 Zero Clearance Direct Vent Gas Fireplace... -
Page 34: Parts List
33) 902-297 Brick Panel - Base - Side 34) 902-298 Brick Panel - Side 98) 910-366 Switch Cover Plate 99) 910-363 Wall Switch 100) 910-367 Switch Receptacle Plastic Box 910-882 Wire - Valve to Burner Switch Regency P121-1/P121LC-1/P121RC-1/P131-1 Zero Clearance Direct Vent Gas Fireplace... - Page 35 33) 902-297 Brick Panel - Base - Front 34) 902-298 Brick Panel - Side 98) 910-366 Switch Cover Plate 99) 910-363 Wall Switch 100) 910-367 Switch Receptacle Plastic Box 910-882 Wire - Valve to Burner Switch Regency P121-1/P121LC-1/P121RC-1/P131-1 Zero Clearance Direct Vent Gas Fireplace...
- Page 36 33) 902-297 Brick Panel - Base - Front 34) 902-298 Brick Panel - Side 171) 360-920 Louver Front - Black (set) 360-922 Louver Front - Black/Gold (set) 360-924 Louver Front - Black/Steel (set) 360-926 Louver Front - Black/Brass (set) Regency P121-1/P121LC-1/P121RC-1/P131-1 Zero Clearance Direct Vent Gas Fireplace...
- Page 37 171) 360-920 Louver Front - Black (set) 34) 902-298 Brick Panel - Side 360-922 Louver Front - Black/Gold (set) 35) 902-300 Brick Panel - Front 360-924 Louver Front - Black/Steel (set) 360-926 Louver Front - Black/Brass (set) Regency P121-1/P121LC-1/P121RC-1/P131-1 Zero Clearance Direct Vent Gas Fireplace...
- Page 38 68) W840470 Pilot Assembly Gasket 69) 910-190 Piezo Ignitor and Nut 79) 360-525 Burner Assembly 82) 360-027 Grate Assembly 904-690 Orifice #31 - NG 936-170 Orifice Gasket *Not available as a replacement part. Regency P121-1/P121LC-1/P121RC-1/P131-1 Zero Clearance Direct Vent Gas Fireplace...
-
Page 39: Warranty
Regency Fireplace Products, are designed with reliability and simplicity in mind. In addition, our internal Quality Assurance Team carefully inspects each unit thoroughly before it leaves our door. Regency Industries Ltd. is pleased to extend this limited lifetime warranty to the original purchaser of a Regency Product. - Page 40 Dealer Name & Address: ______________________________________________ __________________________________________________________________ Installer: ___________________________________________________________ Phone #: ___________________________________________________________ Date Installed: ______________________________________________________ Serial No.: _________________________________________________________ Regency and Panorama are trademarks of FPI Fireplace Products International Ltd. Printed in Canada © Copyright 2004, FPI Fireplace Products International Ltd. All rights reserved.
Need help?
Do you have a question about the P121 and is the answer not in the manual?
Questions and answers