Table of Contents
Advertisement
Quick Links
Advertisement
Table of Contents

Related Manuals for Tandberg Data DAT 160


Summary of Contents for Tandberg Data DAT 160
- Page 2 Further, Tandberg Data Corporation reserves the right to revise this publication without obligation of Tandberg Data Corporation to notify any person or organization of such revision or changes. TRADEMARK NOTICES: Tandberg Data Corporation trademarks: Tandberg Data, Exabyte, the Exabyte Logo, EZ17, M2, SmartClean, VXA, and VXAtape are registered trademarks;...
-
Page 3: Table Of Contents
..Operating your tape drive ..........23 ..Front panel ....................24 ..LED sequences .................... 24 ..LED sequences for the DAT 160 tape drive ........... 24 ..LED sequences for the DAT 72 tape drive ..........26 ..Loading and unloading cartridges ..............28 ..Inserting cartridges ................ - Page 4 ..Use the correct media ............31 ..Data cartridges ..................... 31 ..DAT 160 tape drives and DAT 160 cartridges ........31 ..Compatibility ..................31 ..Write-protecting cartridges ................32 ..Cleaning cartridges ..................33 ..Handling cartridges ..................34 ..Getting the most out of cartridges and drives ..........34 ..Troubleshooting ..............
- Page 5 Figures Figure 1-1 Front view of DAT 160 tape drive ..........10 Figure 1-2 Front view of DAT 72 tape drive ..........10 Figure 2-1 Example, attaching mounting screws ........15 Figure 2-2 Installing the tape drive ............16 Figure 2-3 Attaching cables ..............
- Page 6 Table 1-1 Power requirements ..............11 Table 5-1 LED sequences for DAT 160 ........... 25 Table 5-2 LED sequences for DAT 160, continued ......... 26 Table 6-1 Data cartridge compatibility ............ 32 Table 6-2 Cleaning cartridge compatibility ..........33 August 2009...
-
Page 7: About This Guide
About this guide This guide provides information about: • Installing the Tandberg Data DAT USB tape drive • Using the Tandberg Data DAT USB tape drive • Troubleshooting the Tandberg Data DAT USB tape drive Intended audience This guide is intended for users who install, operate and maintain the Tandberg Data DAT tape drive. -
Page 8: Table 1 Document Conventions
About this guide Warning Indicates that failure to follow directions could result in bodily harm or death. Indicates that failure to follow directions could result Caution in damage to equipment or data. Provides clarifying information or specific instructions. Important Table 1 Document conventions Convention Element Blue text:... -
Page 9: Before You Start
“Drivers” on page 11 • “Backup software” on page 12 DAT tape drive models This guide describes how to install and operate the following Tandberg Data DAT USB tape drive models: • Tandberg Data DAT 160 internal and external tape drive •... -
Page 10: Which Operating Systems Are Supported
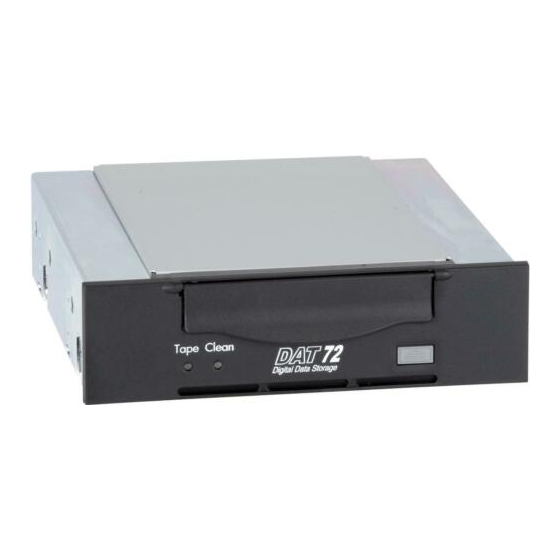
1. Clean LED 4. Ready LED 2. Tape LED 5. Eject button 3. Drive LED Figure 1-1 Front view of DAT 160 tape drive 1. Clean LED 3. Eject button 2. Tape LED Figure 1-2 Front view of DAT 72 tape drive... -
Page 11: How Do I Connect The Drive To My Server
What are the mounting requirements for an internal tape drive? You need one industry-standard, 5¼-inch, half-height bay in which to install the Tandberg Data DAT tape drive. For many servers, no mounting tray or rails are required. Devices simply slide into the server's chassis and are fixed with screws. -
Page 12: Backup Software
Tape driver instead of the manufacturer's Tape driver. Note: The NT backup application is compatible with DAT tape drives, but the user must always choose 4 mm tape even when using 8 mm tape with a Tandberg Data DAT 160 tape drive. DAT USB Tape Drives 1018932... -
Page 13: Installing An Internal Dat Tape Drive
Installing an internal DAT tape drive In this chapter: • “Prepare mounting bay” on page 13 • “Attach mounting hardware” on page 14 • “Attach cables” on page 16 • “Secure the drive” on page 17 Please refer to “Installing an external DAT tape drive”... -
Page 14: Attach Mounting Hardware
Chapter 2–Installing an internal DAT tape drive from the server and removed the cover, touch a bare metal part of the chassis. Similarly, touch a bare metal part of the drive before installing it. Refer to your server documentation for detailed instructions and assemble the necessary tools and materials. -
Page 15: Install Drive
Install drive 1. M3 mounting screws 2. M3 offset mounting screws Figure 2-1 Example, attaching mounting screws Install drive Static electricity can damage electronic components. Caution Always wear an antistatic wriststrap if one is available. If not, after you have disconnected power from the server and removed the cover, touch a bare metal part of the chassis. -
Page 16: Attach Cables
Chapter 2–Installing an internal DAT tape drive Figure 2-2 Installing the tape drive The illustration shows a tape drive that has mounting rails fitted. If your server does not use mounting hardware, check that the holes in the chassis are aligned with the holes in the side of the tape drive. Do not secure the drive at this point because you may have to move the drive to get the cables into place. -
Page 17: Secure The Drive
Secure the drive Attach a spare power cable from the server's internal power supply to the power connector. 1. USB cable to tape drive 3. USB cable to server's USB port 2. power cable Figure 2-3 Attaching cables Secure the drive Secure the drive, as described in your server documentation. -
Page 18: Figure 2-4 Securing Drive Example 1, Mounting Hardware Used
Chapter 2–Installing an internal DAT tape drive 1. plastic rail 2. server latch, push down to lock the tape drive into position Figure 2-4 Securing drive example 1, mounting hardware used 1. M3 screws, supplied with tape drive Figure 2-5 Securing drive example 2, no mounting hardware used DAT USB Tape Drives 1018932... -
Page 19: Installing An External Dat Tape Drive
Installing an external DAT tape drive In this chapter: • “Important information before you start” on page 19 • “Connecting the power and USB cables” on page 19 Please refer to “Installing an internal DAT tape drive” on page 13, if you are installing an internal DAT tape drive. -
Page 20: Figure 3-1 Connecting Power And Usb Cables
Chapter 3–Installing an external DAT tape drive Plug the power cable securely into the socket on the rear panel of the drive and plug the other end of the power cable into the power outlet. 1. USB cable (pre-fitted) 3. power cable 2. -
Page 21: Verify Installation
At the end of the hardware self-test: • DAT 160 drives: If self-test passes, the green Ready LED flashes and then shows steady green. If the test fails, the Drive Error and Tape Error LEDs flash, while the Ready and Clean (or Use Cleaning Cartridge) LEDs are off. - Page 22 Chapter 4–Verify installation Verify that the tape drive installation was successful. If you encounter a problem during this verification procedure, turn to “Troubleshooting” on page 37 for help in diagnosing and fixing the problem. For all operating systems ensure that you have downloaded any upgrades necessary for your backup application.
-
Page 23: Operating Your Tape Drive
Operating your tape drive In this chapter: • “Front panel” on page 24 • “LED sequences” on page 24 • “Loading and unloading cartridges” on page 28 • “Removing power from the drive” on page 29 August 2009... -
Page 24: Front Panel
2. power LED (external drives only) 6. ready LED 3. clean LED 7. eject button 4. tape LED Figure 5-1 Front panel, DAT 160 tape drive 1. cartridge door 4. tape LED 2. eject button 5. power LED (external drives only) 3. -
Page 25: Table 5-1 Led Sequences For Dat 160
LED sequences LED sequences for the DAT 160 tape drive The meaning of different patterns of LEDs is as follows: Table 5-1 LED sequences for DAT 160 LED Sequence Cause Action required Make sure the drive is switched on. The power on/off switch incorporates Drive may a green LED. -
Page 26: Led Sequences For The Dat 72 Tape Drive
Chapter 5–Operating your tape drive Table 5-2 LED sequences for DAT 160, continued LED Sequence Cause Action required Unload the tape cartridge. Make sure that you are using the correct format cartridge. (See “Use the correct The drive media” on page 31.) believes the Reload the cartridge. - Page 27 LED sequences Tape LED Clean LED Meaning The cartridge is loaded and the drive is ready. The cartridge is loading or unloading, or flashing slowly self-test is in progress. flashing rap- The cartridge is loaded, activity is occur- idly ring. This is the Error Condition Signal.
-
Page 28: Loading And Unloading Cartridges
2. arrow indicates leading direc- tion Figure 5-3 Inserting a data cartridge (into a DAT 160 external drive) DAT 160 tape drives: The Ready light flashes green while the drive performs its load sequence. When the cartridge is loaded, the Ready light shows steady green. -
Page 29: Removing Cartridges
Removing power from the drive Removing cartridges Never try to remove a cartridge before it is fully Caution ejected. Press the Eject button on the front panel. 1. eject button Figure 5-4 Ejecting a cartridge (from an external drive) The drive completes any task it is currently performing, winds the tape to the beginning, and ejects the cartridge. - Page 30 Chapter 5–Operating your tape drive Notes DAT USB Tape Drives 1018932...
-
Page 31: Use The Correct Media
Data cartridges DAT 160 tape drives and DAT 160 cartridges DAT 160 cartridges can only be used with DAT 160 tape drives; they are wider than earlier formats and will not fit into earlier tape drive models. DAT 160 cartridges provide optimum performance and maximum capacity for DAT 160 tape drives. -
Page 32: Write-Protecting Cartridges
32. Shaded boxes show the recommended media for each tape drive. Capacities assume a compression ration of 2:1. Table 6-1 Data cartridge compatibility DDS-1 & DDS-3 DDS-4 DAT 72 DAT 160 read/write not sup- not sup- DAT 160 read/write read/write ported... -
Page 33: Cleaning Cartridges
Figure 6-1 Write protecting a cartridge Cleaning cartridges Table 6-2 Cleaning cartridge compatibility Tape drive model Cleaning cartridge required You must use a DAT 160 cleaning cart- DAT 160 tape drives ridge You must use a standard DDS cleaning All other DAT tape drives cartridge Do not use swabs or other means of cleaning the heads. -
Page 34: Handling Cartridges
See the insert included with the tape cartridge for storage conditions. Getting the most out of cartridges and drives • Use mostly the matching media type (DAT 160 media for DAT 160, DAT 72 media for DAT 72). • Use media for the recommended number of times (DAT 160, DAT 72 =100 full backups). - Page 35 Getting the most out of cartridges and drives • If you want to bulk erase cartridges, this should be done in a controlled environment. You need to make sure there are no other cartridges with sensitive information on them anywhere near the bulk eraser when in use.
- Page 36 Chapter 6–Use the correct media Notes DAT USB Tape Drives 1018932...
-
Page 37: Troubleshooting
Troubleshooting In this chapter: • “General Procedure” on page 37 • “Verifying USB installation for optimum performance” on page 38 • “Problems with cartridges” on page 40 General Procedure If a problem occurs, the first step is to try to establish whether the problem lies with the cartridge, the drive, the host computer and connections, or the way the system is being operated. -
Page 38: Verifying Usb Installation For Optimum Performance
• DAT 160 media can only be used with DAT 160 drives. • DAT 72 media can be used with DAT 160 and DAT 72 drives. Has the cartridge been write-protected, see “Write-protecting cartridges” on page 32? Clean the tape heads with the cleaning cartridge, see “Cleaning... -
Page 39: Check For Usb 2.0 Port (Windows)
Ensure that the hp_usbstor driver is being used (Windows) The USB DAT drive will work with the Microsoft usbstor driver, however, we strongly recommend that you use the Tandberg Data USB driver for improved performance. To check the driver being used: Go to Device Manager and select Devices by connection from the View menu. -
Page 40: Check Drivers (Linux)
Chapter 7–Troubleshooting If the tape drive is connected to the HP USB Mass Storage Device, it is configured correctly. Check drivers (Linux) Use the following procedure to check that both drivers are present: usb_storage driver • At the command prompt type: lsmod | grep usb_storage •... -
Page 41: The Cartridge Is Jammed
Problems with cartridges The cartridge is jammed If the cartridge is jammed or the backup application is unable to eject it, you can force eject the cartridge. Once the cartridge is successfully ejected, it is good practice to upgrade the firmware. If the failure occurs regularly, contact customer service via http://www.tandbergdata.com. - Page 42 Chapter 7–Troubleshooting Notes DAT USB Tape Drives 1018932...
-
Page 43: Usb Configuration Guide
USB Configuration Guide In this chapter: • “USB in DAT devices” on page 43 • “USB terminology” on page 43 • “Setting up a USB network” on page 44 • “USB cables” on page 45 USB in DAT devices The DAT tape drive is a USB 2.0 logo certified device. It supports the high-speed USB transfer rate with a theoretical maximum transfer of over 50 MB/s. -
Page 44: Setting Up A Usb Network
Chapter 8–USB Configuration Guide Hubs act as command repeaters and multipliers. This allows many devices to be supported by one host. A host command can arrive at the upstream port of the hub and be transmitted via the downstream ports to many other device and hubs. -
Page 45: Usb Cables
USB cables If you are using a high-speed (USB 2.0) device, make sure that the USB host at the system and all the hubs between the device and host support high-speed (USB 2.0) transfer. When using a bulk transfer device, such as a tape drive, do not use other USB devices that will place restrictions on the USB bandwidth available to the bulk transfer device. - Page 46 Chapter 8–USB Configuration Guide Notes DAT USB Tape Drives 1018932...
-
Page 47: Index
32 internal drive, 13 cleaning cartridges, 33 installing internal compatibility attach mounting hardware, 14 backup software, 12 prepare mounting bay, 14 conventions secure drive, 17 document, VII text symbols, VIII jammed cartridge, 41 DAT 160 cartridges, 31 August 2009... - Page 48 Index unloading cartridges, 28, 29 upgrading firmware LEDs, 25 drives, 29 at power on, 21 loading cartridges, 28 loading cartridges, 28 verify installation, 21 media write protect, 32 See cartridges models supported, 9 mounting requirements, 13 online, 28 operating systems supported, 10 operation drives, 24...
Need help?
Do you have a question about the DAT 160 and is the answer not in the manual?
Questions and answers