Nonin 8500 Operator's Manual
Handheld pulse oximeters
Hide thumbs
Also See for 8500:
- Operator's manual (33 pages) ,
- Operator's manual (32 pages) ,
- Troubleshooting (2 pages)
Table of Contents
Advertisement
Quick Links
Advertisement
Table of Contents

Related Manuals for Nonin 8500


Summary of Contents for Nonin 8500
- Page 1 Operator’s Manual Models 8500 & 8500M Handheld Pulse Oximeters English...
- Page 3 References to “NONIN” in this manual shall imply Nonin Medical, Inc. NONIN, nVISION, Flexi-Form, and FlexiWrap are registered trademarks or trademarks of Nonin Medical, Inc. References to “8500” in this manual imply Models 8500 and 8500M. © 2002 Nonin Medical, Inc.
-
Page 4: Table Of Contents
Table of Contents Precautions for Use ..............1 Unpacking the Model 8500 ............3 Introduction................4 Indications for Use ..................4 General Description ................... 4 Basic Operation................5 Installing Batteries..................5 Connecting Sensors ..................7 Features ..................10 Controls....................10 Displays ....................15 Printer/Serial Output................ -
Page 5: Precautions For Use
Precautions for Use Contraindications • Do not use the 8500 in an MRI environment. • Do not use the 8500 in a situation where alarms are required. The 8500 has no alarms. Warnings • Explosion Hazard. Do not use the 8500 in an explosive atmosphere. - Page 6 SpO2 measurement. • The 8500 might not work on all patients. If you are unable to achieve stable readings, discontinue use. • The 8500 might misinterpret motion as good pulse quality. Minimize patient motion as much as possible.
-
Page 7: Unpacking The Model 8500
Unpacking the Model 8500 Confirm that the items listed below are packed with the 8500 Handheld Pulse Oximeter. The 8500 shipment includes: • 8500 or 8500M Handheld Pulse Oximeter • Operator’s Manual for Models 8500 and 8500M Pulse Oximeter • Six AA batteries •... -
Page 8: Introduction
This simple method gives the user a pulse-by-pulse visual indication of waveform signal quality without requiring complex waveform analyses. The Model 8500 pulse oximeter may be used with a variety of NONIN pulse oximeter sensors. Because the Model 8500 has no patient alarms, SpO and pulse rate displays must be observed frequently. -
Page 9: Basic Operation
Replace the batteries by removing the battery door on the bottom of the 8500. Be sure to follow the polarity markings on the rear label of the pulse oximeter when installing new batteries. Refer to Figure I for an illustration of battery replacement. - Page 10 Figure I: Replacing Batteries in the 8500...
-
Page 11: Connecting Sensors
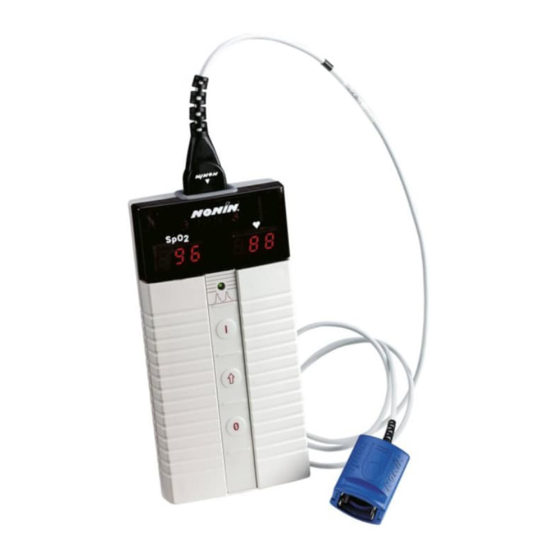
Connecting Sensors Connect the sensor to its 9-pin mating jack on the top of the 8500 as shown in Figure II. If additional cable length is necessary, connect the Model 8500I Patient Cable between the sensor and the 8500 Pulse Oximeter. - Page 12 Figure III: Front View of the 8500 Figure IV: Rear View of the 8500...
- Page 13 Cleaning the Pulse Oximeter CAUTION! Do not immerse the 8500 in liquid, and do not use caustic or abrasive cleaning agents. The 8500 Pulse Oximeter may be cleaned with a mild detergent and a soft cloth or with an isopropyl alcohol wipe.
-
Page 14: Features
Features Controls All functions of the 8500 are controlled by switches found on the front of the unit. Refer to Figure III for an illustration of these switches. Power Pressing the ON switch ("") causes power to be applied to all internal circuitry. - Page 15 The modes determine how often and in which format data is written to the printer. Refer to Figure V for a flowchart of setting the printer mode. When the printer setting sequence is completed, the 8500 continues to the calendar settings.
- Page 16 Display Display Setup Default Mode Setting Press Press Increment printer mode Press Press Proceed to calendar setup Figure V: Flow Chart for Setting Printer Mode Seconds Minimum Touch Printer per data print Mode point printed?* capability?** * For modes where the minimum SpO data is written, there are two lines of data written for each data output.
- Page 17 The day may be set to "01" through "31". Refer to Figure VI for a flowchart of setting the calendar. When the calendar setting sequence is completed, the 8500 continues to the clock settings. Setting the month to "00" disables the clock function and NOTE: helps conserve battery life.
- Page 18 Clock Settings After the calendar settings have been determined in the setup mode, " " will appear in the SpO display, indicating clock setup mode for the hour. The hour may be set to "00" through "23". After selecting the hour, the display will show "...
-
Page 19: Displays
Although SpO data is acceptable, corrective measures should be considered to improve sensor placement, change sensor type, or reduce patient movement. Green indicates a good pulse waveform signal and accurate SpO data. CAUTION! The 8500 might interpret motion as good perfusion. - Page 20 Flashing Display The numerical displays will flash once each second if the 8500 determines that a battery low condition exists. Replace all six batteries immediately. Inaccurate SpO 2 and/or pulse rate measurement might NOTE: result if the 8500 is operated in a low battery condition.
-
Page 21: Printer/Serial Output
Detector Cathode, +5 V Table III: Printer/Sensor Interface Assignments The information from the 8500 in the real-time mode is sent in an ASCII serial format at 9600 baud with 9 data bits, 1 start bit, and 1 stop bit. The data is output at a rate of once per second. -
Page 22: Memory Option (8500M Only)
Memory Option (8500M Only) The memory option is identified by the "M" in the model number (i.e. 8500M as opposed to the 8500). This model number is located just above the serial number on the back of the unit. The 8500M Pulse Oximeter... - Page 23 Memory Output Mode To output the data stored in the memory of the 8500M, start with the unit OFF and then: 1) Hold the " " switch while pressing the "" switch; 2) Release the " " and "" switches when " "...
-
Page 24: Specifications
Specifications 1. Oxygen Saturation Range (SpO 2 ) 0 to 100% 2. Pulse Rate Range 18 to 300 Pulses Per Minute 3. Displays Patient Indicator Perfusion LED Digital Displays 3-digit 7-segment LEDs 4. Measurement Wavelengths 660 nanometers Infrared 910 nanometers 5. -
Page 25: Service
NONIN does not recommend field repair of the 8500 Handheld Pulse Oximeter. The circuit board in the 8500 series is a multi-layer board using traces 0.01" wide. Due to the very small trace size, extreme care must be used when replacing components to prevent permanent non-repairable damage to the circuit board. -
Page 26: Warranty
This warranty excludes cost of delivery to and from NONIN. All repaired units shall be received by the purchaser at NONIN. For any system or accessory sent to NONIN for warranty repair which is found to be within specification, the purchaser agrees to pay $100.00. -
Page 27: Accessories
8500RB Rubber Bumper 8500YC Real-Time Cable NVISION nVISION software for Microsoft Windows 95/98/ 2000/NT 4.0 operating systems For more information about NONIN parts and accessories, contact your distributor, or contact NONIN at (800) 356-8874 (USA and Canada) or (763) 553-9968. -
Page 28: Troubleshooting Guide
Troubleshooting Guide Symptom Possible Cause Possible Solution 8500 will not power up Batteries are depleted Replace all six batteries. Incorrect battery Verify battery sequence. installation Battery door is missing Replace the battery door metal contact Numeric displays are Battery voltage is low... - Page 29 Reset pulse oximeter by turning after changing Prn updated internally it off and then on mode If any of these solutions do not correct the problem, please contact NONIN Customer Support at (800) 356-8874 (USA and Canada) or (763) 553-9968.
Need help?
Do you have a question about the 8500 and is the answer not in the manual?
Questions and answers