
Subscribe to Our Youtube Channel
Related Manuals for Kramer Galil 4-D


Summary of Contents for Kramer Galil 4-D
-
Page 1: User Manual
K R A ME R E LE CT R O N IC S L TD . USER MANUAL MODEL: Galil 4-O (SPK-W411T) On-Wall Speakers P/N: 2900-300371 Rev 1... -
Page 3: Table Of Contents
Contents Introduction Getting Started Achieving the Best Performance Recycling Kramer Products Overview Defining the Galil 4-O Installing the Galil 4-O Choosing the Best Location Installing the Speaker Wires Installing the Mounting Bracket Array Installation Galil 4-O Setup Technical Specifications Figures... -
Page 4: Introduction
Introduction Welcome to Kramer Electronics! Since 1981, Kramer Electronics has been providing a world of unique, creative, and affordable solutions to the vast range of problems that confront video, audio, presentation, and broadcasting professionals on a daily basis. In recent years, we have redesigned and upgraded most of our... -
Page 5: Getting Started
Achieving the Best Performance To achieve the best performance: Use only good quality connection cables (we recommend Kramer high- performance, high-resolution cables) to avoid interference, deterioration in signal quality due to poor matching, and elevated noise levels (often associated with low quality cables) ... -
Page 6: Recycling Kramer Products
Kramer Electronics has made arrangements with the European Advanced Recycling Network (EARN) and will cover any costs of treatment, recycling and recovery of waste Kramer Electronics branded equipment on arrival at the EARN facility. For details of Kramer’s recycling arrangements in your particular country go to our recycling pages at http://www.kramerelectronics.com/support/recycling/. -
Page 7: Overview
Overview The Galil 4-O includes a pair of high performance indoor on-wall speakers that can be mounted on the wall vertically or horizontally. The mounting brackets, made of painted steel, can be attached to each speaker, letting you rotate each speaker to the left or right. -
Page 8: Defining The Galil 4-O
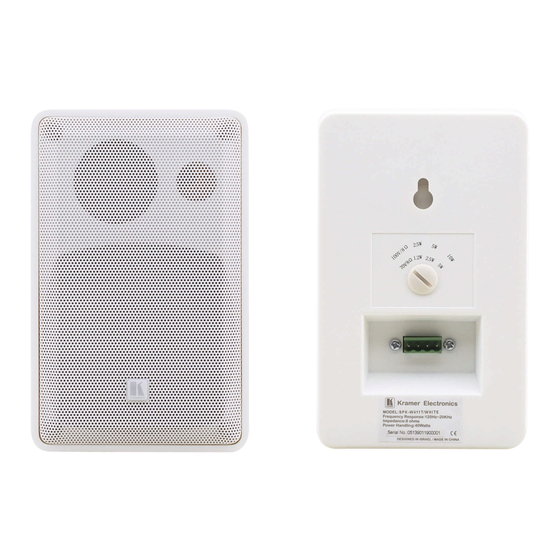
Defining the Galil 4-O This section defines the Galil 4-O: Figure 1: Galil 4-O Feature Function Mounting screw opening Provides the ability to hang the Speaker on the wall Tap Selector Adjust each speaker to the appropriate tap setting: For 70V: 1.2W, 2.5W or 5W For 100V: 2.5W, 5W or 10W Or select 8... -
Page 9: Installing The Galil 4-O
Installing the Galil 4-O This section explains how to: Choose the best location for your speakers (see Section 4.1) Install the speaker wires (see Section 4.2) Install the mounting brackets (see Section 4.3) Setup an array installation (see Section 4.4) ... -
Page 10: Installing The Mounting Bracket
3. Pass the speaker wires through the round hole in the mounting bracket (see Section 4.3). 4. Adjust each speaker to the appropriate tap setting (see Figure Set the tap according to the power requirements of the speaker based on its location in the room (for example, a speaker located in a remote corner may require additional power) Figure 2: Adjust Tap Selector 5. -
Page 11: Figure 3: Galil 4-O With Brackets Connected
3. Slide a speaker into each mounting bracket. 4. Align the bracket screw holes (upper and lower) to those on the speaker and screw a knob to each of the holes to secure the speaker to the bracket (see Figure Figure 3: Galil 4-O with Brackets Connected 5. -
Page 12: Array Installation
Array Installation When installing the Galil 4-O in an array installation layout, you need to define the distance between speakers as well as the layout pattern (square or hexagonal). The distance between speakers is set according to the uniformity of the coverage desired and the budget. -
Page 13: Figure 6: Square Layout Parallel Wiring
Figure 6 shows an example of parallel wiring in a square array installation: Figure 6: Square Layout Parallel Wiring Galil 4-O - Installing the Galil 4-O... -
Page 14: Galil 4-O Setup
Galil 4-O Setup You can connect the Galil 4-O speakers to an amplifier, for example the Kramer 907xl Power Amplifier/Mixer, as illustrated in Figure Figure 7: Galil 4-O Installed Galil 4-O - Installing the Galil 4-O... -
Page 15: Technical Specifications
Technical Specifications Audio and Power DESCRIPTION: 2-way on-wall speakers FREQUENCY RESPONSE: 160Hz to 16kHz @ ±3dB 90Hz to 20kHz@ -10dB 4” (102mm) polypropylene cone WOOFER: 0.51” (13mm) Mylar TWEETER: 8Ω (transformer tap in off position) IMPEDANCE: 70V – 5W / 2.5W / 1.2 / Off (Lo-Z) TRANSFORMER TAPS: 100V –... - Page 17 This page is intentionally left blank...
- Page 18 For the latest information on our products and a list of Kramer distributors, visit our Web site where updates to this user manual may be found. We welcome your questions, comments, and feedback. Web site: www.kramerelectronics.com E-mail: info@kramerel.com SAFETY WARNING...
Need help?
Do you have a question about the Galil 4-D and is the answer not in the manual?
Questions and answers