Table of Contents
Advertisement
Quick Links
Advertisement
Table of Contents

Related Manuals for SoundMax SM-CDM1030


Summary of Contents for SoundMax SM-CDM1030
- Page 1 SM-CDM1030 CD/MP3 RECEIVER CD/MP3 Instruction manual...
-
Page 2: Table Of Contents
Dear customer! Thank you for purchasing our product. For safety, it is strongly recommended to read this manual carefully before connecting, operating and/or adjusting the product and keep the manual for reference in the future. Table of contents Table of contents ..........................2 Important safeguards...........................3 Installation/ Connections ........................4 Panel controls............................8... -
Page 3: Important Safeguards
Important safeguards - Read carefully through this manual to familiarize yourself with this high-quality sound system. - Disconnect the vehicle's negative battery terminal while mounting and connecting the unit. - When replacing the fuse, be sure to use one with an identical amperage rating. Using a fuse with a higher amperage rating may cause serious damage to the unit. -
Page 4: Installation/ Connections
Installation/ Connections First complete the electrical connections, and then check them for correctness. Installation way It is an anti-theft installation way. The chassis wear a metal sliding housing. Please have the wiring connection of the power supply, speakers and antenna as for the requirement of the manual, and then install the metal sliding housing into the car according to the diagram. -
Page 6: Detaching The Front Panel
Detaching the front panel 1. Press the OPEN button on the front panel. The panel will go down (pic. 1). 2. Push the panel to the right and then pull it towards you (pic. Pic. 2 Pic. 1 Attaching the control panel 1. -
Page 7: Speaker Connection
Speaker connection R (Red) L (White) Notes: In spite of having any kinds of speaker system, must use 4 ohms impedance of speaker to reduce the distortion during high volume level. Prohibit to make the conductors of auto antenna and ground touch with each other. -
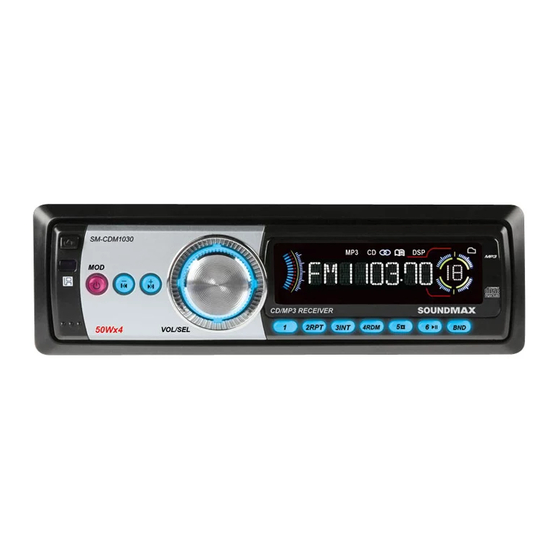
Page 8: Panel Controls
Panel controls Front panel 1. OPEN BUTTON Press it to flip down the front panel to insert or eject the disc. 2. VOL KNOB/ SEL BUTTON Rotate VOL knob clockwise to increase the volume level; rotate anticlockwise to decrease the volume level. Press SEL button repeatedly to select the modes: TIME =>... - Page 9 4. POWER/MOD BUTTON Press it and hold 2 seconds to turn the power on. Press again to turn the power off. When the power is on press it to select RADIO => PLAYBACK. 5. << -/ >> + BUTTONS Tune down/ up, Seek down/ up, Track down/ up, Reverse/ Fast forward buttons, Time set. 6.
-
Page 10: Remote Control
Remote control 1. MODE button 2. POWER button 3. BND button 4. EQ button 5. STOP/REVERSE button 6. INT button 7. LOC button 8. LOUDNESS button 9. VOL +/- button 10. ESP button 11. Digit area 12. PLAY/PAUSE button 13. MUTE button 14. -
Page 11: Function Of Controls
Function of controls General operations Reset the unit Operating the unit for the first time or after replacing the car battery, you must reset the unit. Press OPEN button and remove the panel, then press the RESET button to restore the unit to the original factory settings. - Page 12 Time set Press SEL button (VOL knob) repeatedly to select TIME item. The display will show the current time. Press the >>/+ button to set hour. Press the <</- button to set minutes. Press SEL again to exit the mode. MODE button Press the MOD button on the front panel or on the RC to select RADIO =>...
-
Page 13: Radio Operations
Radio operations BAND button Press the BND button on the front panel or on the RC repeatedly to select your desired radio band during RADIO mode: FM1, FM2, FM3, AM1, AM2. Auto/ Manual tuning - Automatic tuning: Press the <</ >> buttons on the front panel or 9 or : on the RC shortly, the automatic search will start. -
Page 14: Discs Operations
Discs operations Loading/ eject a disc Turn the power on. Press the OPEN button on the panel. Insert the disc with the printed side facing upward into the slot. Press EJECT button on the inner side to eject the disc. Playing/ pausing When the disc has been already loaded press the PLAY/PAUSE button on the front panel or on the RC to start playback. - Page 15 Select the tracks for playback in MP3 format Serial number of track search mode: In playback of discs with MP3 format, press the BAND button once, the TRACK icon will appear on the LCD display, and will be in blinking. a.
-
Page 16: Mp3 Overview
MP3 overview Notes on MP3 - MP3 is short for MPEG Audio Layer 3 and refers to an audio compression technology standard. - This product allows playback of MP3 files on CD-ROM, CD-R or CD-RW discs. - The unit can read MP3 files written in the format compliant with ISO 9660. However it does not support the MP3 data written by the method of packet write. -
Page 17: Anti-Theft System
Anti-theft system This unit is equipped with a slide-down detachable and mask panel. Panel can be detached and taken with you, helping to deter theft. Detaching the front panel 1. Press the POWER/MOD button to turn the power off. 2. Press the OPEN button on the front panel. The panel will go down (pic. -
Page 18: Handling Compact Discs
Handling compact discs Dirty, scratched or warped discs may cause skip ping or noise. Handle the disc only by the edges. To keep clean do not touch its surface. Discs should be stored in their cases after use to avoid scratches. Do not expose discs to direct sunlight, high humidity, high temperature or dust. -
Page 19: Troubleshooting Guide
Troubleshooting guide Symptom Cause Solution General The car ignition is not on. If the power supply is properly connected to the No power car accessory switch the ignition key to " ACC ". The fuse is blown. Replace the fuse. Disc Presence of CD disc inside the Remove the disc in the player then put a new... -
Page 20: Specification
Specification General Power supply: 12 V DC Current consumption max. 15 A Maximum power output: 50Wx4 channels Fuse: Dimensions (W x H x D) 178 x 50 x 192 mm FM Stereo Radio. Frequency range: 87.5 - 108.0 MHz Usable sensitivity: 3 uV I.F. - Page 21 ............................ 21 ........................22 ......................... 23 ......................... 27 ......................21 3 ............................35 ........................ 36 ......................36 ..........................37 ..................37 ......................39...
- Page 25 OPEN . 1). . 2). .3).
- Page 27 OPEN EJECT SEL, : TIME => VOL => BAS => TRE => BAL => FAD => LOU => LOC.
- Page 28 POWER/MOD POWER/MOD, : Radio ( ) => Playback (CD ) => Aux. << -/ >> + (1-6) RPT ( INT ( RDM ( STOP ( PLAY/PAUSE ( Radio. OPEN, RESET EJECT...
- Page 29 MODE. POWER. BAND: RADIO. STOP/REVERSE. VOL+/-. PLAY/PAUSE. MUTE. SEL - 9/:. PROG. (CR 2025 3V),...
- Page 30 RESET ( OPEN. RESET, POWER/MOD POWER VOL+/- : TIME ( ) => VOLUME ( ) => BASS ( ) => TRE LE ( ) => BALANCE ( ) => FADER ( ) => LOUD => LOCAL. - VOL: 00, 02,.., 44, 46 - BASS/TREB: -6, -5,.., 0, +1, +2,..+5, +6 - BAL: 12L, 11L,.., L=R, 1R,..,12R , L -...
- Page 31 TIME SET ( SEL ( TIME ( <</- , >>/+, RADIO ( ), PLAYBACK ( ), AUX. PROG, 00:00. PLAY/ PAUSE, : POP, CLASSIC, ROCK, FLAT, PLAY/PAUSE...
- Page 32 : FM1, FM2, FM3, AM1, AM2. << >> << >> <</ >> 1~6, 1~6. · INT. AMS. 1-6. · 1~6. AMS. LOC ON ; _DX_ .
- Page 33 OPEN, EJECT PLAY/ PAUSE PLAY/PAUSE PLAY/PAUSE STOP << >> <</ >> Intro INT,...
- Page 34 BAND TRACK << -/>> +, Number Search rack number ( : 001, << -/>> + SEL, SEL, << -/>> + SEL, SEL, << -/>> + SEL, << -/>> + SEL, BAND, NAVIGA +/-, Navigate Search ( SEL, SEL, << -/>> + 1.0/2.0,...
- Page 35 MPEG 3 CD-ROM, CD-R CD-RW. ISO 9660. .mp3 . .mp3 , 256. VBR, . VBR: CD-R CD-RW, 44,1 ISO 9660, CD-R MP3 CD-R CD-RW CD-R CD-RW CD-R CD-RW 1. ID3TAG.
- Page 36 POWER/MOD, OPEN . 1). . 2). .3). . 4). . 4).
- Page 38 « ». RESET.
- Page 39 12 , 87.5 - 108.0 10.7 522-1620 MP3/ CD-R/ CD-RW 44,1 20-100 10-20 . 2000...
Need help?
Do you have a question about the SM-CDM1030 and is the answer not in the manual?
Questions and answers