Lorex LW2020 SERIES Instruction Manual
Home video monitoring system
Hide thumbs
Also See for LW2020 SERIES:
- Quick start manual (2 pages) ,
- Frequently asked questions manual (6 pages)

Related Manuals for Lorex LW2020 SERIES


Summary of Contents for Lorex LW2020 SERIES
- Page 1 HOME VIDEO MONITORING SYSTEM INSTRUCTION MANUAL ENGLISH VERSION 1.0 CONNECT LW2020 /LW 2030 S ER I ES www.lorextechnology.com *Handheld monitor included with LW2030 Series only...
-
Page 3: Safety Instructions
Safety Instructions WARNING This video monitor is compliant with all relevant standards regarding electromagnetic fields and is, when handled as described in the User’s Guide, safe to use. Therefore, always read the instructions in this User’s Guide carefully before using the device. - Page 4 Using this product as a baby monitor If you intend to use this wireless video monitor as a baby monitor, we advise you to take the following precautions to avoid possible injury to infants: • DO NOT place baby audio and video camera monitors too close to cribs, bassinets, play yards and other safe sleep environments for infants.
-
Page 5: Table Of Contents
Table of Contents Contents............1 System Requirements . -
Page 7: Contents
Contents The system comes with the following components: Camera & Handheld Camera* Gateway Antenna monitor power adapter x2 Gateway power adapter microSD card microSD card adapter Handheld monitor The handheld monitor is included with the LW2030 Series only. Additional Contents •... -
Page 8: System Requirements
System Requirements Your system must meet the minimum system requirements. PC Requirements • Skype for Windows version 4.2 and above • Windows 7, Windows Vista, Windows XP SP3 • 1 GHz or greater processor • 1GHz Intel processor • Mac OS 10.6 or later (Intel processors only) •... -
Page 9: Gateway Overview
Gateway Overview Gateway Overview Rear View Front View Antenna: Transmits the video signal to the camera. On/Off button: Press to turn the Gateway on or off. microSD card slot: For future use. Camera LED indicators: • S: Glows to indicate the Gateway is connected to Skype. •... -
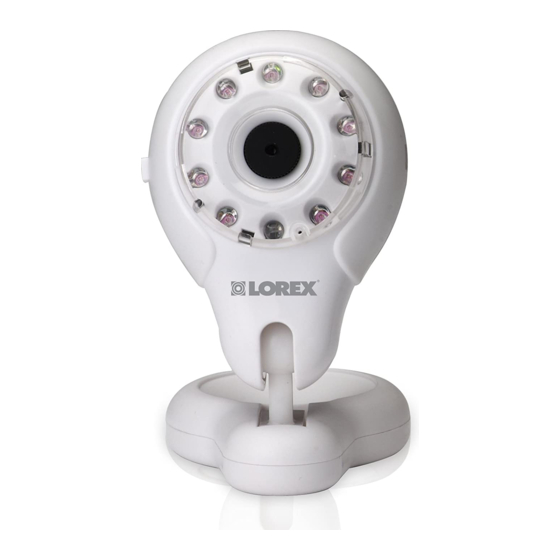
Page 10: Camera Overview
Camera Overview Camera Overview Status LED: Glows green to indicate camera is active. Glows red if camera is inactive. Flashes red to indicate low battery power. Charging LED: Glows red to indicate camera is charging. Infrared LEDs: Allows the camera to view in the dark. Glows red during night time viewing. Light Sensor: Detects the light level in the room to automatically turn on/off the night time LEDs. -
Page 11: Charging The Camera
Camera Overview Charging the camera AC adapter port To charge the camera: Plug the AC power connector from the power adapter into the AC adapter port on the camera. Connect the power adapter to a power outlet. The charging LED glows red to indicate the camera is charging. NOTE: The Status LED on the camera flashes when there is approximately 30 minutes of battery life left. -
Page 12: Handheld Monitor (Lw2030 Series Only)
Handheld Monitor (LW2030 Series only) Handheld Monitor (LW2030 Series only) The handheld monitor allows you to view video and listen to audio transmitting from the camera. You can view up to four connected cameras, one at a time. NOTE: The handheld monitor has priority over a user connecting to the Gateway. -
Page 13: Charging The Handheld Monitor
Handheld Monitor (LW2030 Series only) Charging the handheld monitor Before connecting to the camera, it is recommended to charge the handheld monitor for 6 consecutive hours to ensure a full charge on the battery. To charge the handheld monitor: Connect the power adapter to the handheld monitor. Connect the other end of the power adapter to a power outlet. - Page 14 Handheld Monitor (LW2030 Series only) Pairing By default, the camera is pre-paired to channel 1 on the handheld monitor. If you purchase additional cameras, you will have to pair them to the handheld monitor. You can pair a maximum of 4 cameras. To pair a camera to the handheld monitor: Turn off the camera that you wish to pair.
- Page 15 Handheld Monitor (LW2030 Series only) Interface Overview Channel number Battery life indicator Camera signal strength Power Save mode Audio indicator Charging indicator Reading the battery indicator Low battery Full battery Reading the signal indicator Low signal Full signal...
-
Page 16: Changing Camera Views
Handheld Monitor (LW2030 Series only) Changing camera views To change between cameras: Press 1,2,3 or 4 to view the desired camera. Channel buttons (1~4) Adjusting the volume You can listen to audio captured by the camera. To adjust the handheld monitor volume: ... -
Page 17: Configuring The Power Save Feature
Handheld Monitor (LW2030 Series only) Configuring the Power Save feature Power Save mode allows the monitor display to be turned off while continuing audio monitoring. This allows you to conserve battery power for extended handheld monitor operation. You will still be able to listen to your cameras during Power Save mode. Press any button to turn the display back on. - Page 18 Handheld Monitor (LW2030 Series only) Recording live video You can record live video onto a microSD card. To record live video: Press and hold the ) button until a timer appears in the top-left corner of the screen. Press and hold for approximately 5 seconds 00:18 Timer indicates recording is in progress...
-
Page 19: Viewing Pictures And Videos On Your Handheld Monitor
Handheld Monitor (LW2030 Series only) Viewing pictures and videos on your handheld monitor You can view images and videos recorded on your handheld monitor. To view pictures or video on your handheld monitor: Press the Menu button. Select Memory ( ), and press the OK button. -
Page 20: Inserting Or Removing The Microsd Card
Handheld Monitor (LW2030 Series only) Inserting or removing the microSD card To insert a microSD memory card: Orient the microSD card as shown below. Push the microSD card into the slot until the card clicks into place. NOTE: The microSD card goes in one way only. Do not force the microSD card into the slot. Orient the microSD card as shown above, before inserting it into the monitor. - Page 21 Use the included SD card adapter if your memory card reader does not support microSD memory cards. On your computer, browse for the memory card directory and locate the folder named LOREX. Double-click the LOREX folder to access your pictures or videos. ...
-
Page 22: How The Gateway Works
How the Gateway Works How the Gateway Works Overview Your computer or mobile device connects to the Skype server. The Skype server connects to your home router. Your home router connects to the Gateway, which captures video from the camera. Home Router Camera Gateway... - Page 23 How the Gateway Works Basic Setup Step 1: Connect the Gateway Screw the antenna clockwise onto the antenna jack on the Gateway until it is secure. Connect the power cord and ethernet cable to the Gateway. Connect the other end of the power cord to a power outlet.
-
Page 24: Setting Up The Gateway
Once you have connected the Gateway to your network, you can browse the Gateway on your Local Area Network (LAN). Note that if you are on a PC, your operating system must have UPnP enabled. Windows 7 / Vista Click Start ( )>Computer>Network. Network Under "Other Devices", double-click LOREX Gateway ( LOREX Gateway... - Page 25 Setting up the Gateway Windows XP Double-click the My Network Places icon on the desktop ( Double-click on the LOREX Gateway icon ( LOREX Gateway Launch Safari. Click the Open all bookmarks button ( Open all bookmarks button...
- Page 26 Setting up the Gateway Click Bonjour on the left column. Double-click the LOREX Gateway icon. Bonjour LOREX Gateway Step 2: Assign a Skype account to the Gateway In the Time zone drop-down menu, select your local time zone and click Next.
- Page 27 Setting up the Gateway Fill in the appropriate fields. Write down your Gateway information. You will need this information to complete the setup process. Gateway Skype Account Information E-mail: Skype Name: Password: Click Next to continue. • If your name has been taken, the Gateway prompts you to re-enter another user name. NOTE: Your user name and password must contain letters and numbers.
- Page 28 Setting up the Gateway If you have an existing Skype Account: OPTIONAL: If you plan to control multiple cameras, please download the Lorex Gateway Control Panel Software (PC only). Mac users: to control multiple cameras, please see “Changing camera view”...
-
Page 29: If You Do Not Have A Skype Account
Setting up the Gateway ATTENTION: Users of Internet Explorer 9 (IE9) may experience security measures when downloading the pop-up software. When attempting to Run or Save the software, IE9 will warn you of security risks to your PC. Click Actions >More Options >Run Anyway. Click Actions. - Page 30 Setting up the Gateway Click Add a contact. Add a contact Enter your Gateway account’s Skype name or email recorded in page 21, and click Add. This will send a friend request from your Personal Account to the Gateway account. Enter the Gateway’s Email address Enter the Gateway’s Skype Name Click Skype>Signout to log off.
- Page 31 Setting up the Gateway Log-in to your Gateway Account, using the information recorded on page 21. Enter the Gateway’s Skype name and password Click Contact Request, then click Add to Contacts to accept the friend request from the Gateway. Contact Request Add to Contacts Click Skype>Signout to log off your Gateway account.
- Page 32 Setting up the Gateway If you have a Skype Account: Log-in to your Gateway Account, using the information recorded on page 21. Click Add a contact. Add a contact Enter your Personal Skype account’s email address or Skype name. Click Add. Send a friend request from the Gateway account to your personal account.
- Page 33 Setting up the Gateway Log in to your Personal Skype account. Enter your personal Skype account user name and password Next, see “Step 3: Call your Gateway” on page 27. Step 3: Call your Gateway You’re now ready to make your first call! Pre-requisite: •...
- Page 34 Setting up the Gateway Changing camera view If you have multiple cameras connected to the Gateway, you can change the camera view manually (Mac and PC), or by using the Gateway Control Panel software (PC only). For details, see “Gateway Control Panel” on page 31. To change cameras using the chat menu: Right-click on the video window, and click Send IM.
- Page 35 Setting up the Gateway Tap Chat. Chat Type Cam1 for camera 1, Cam2, for camera 2 etc. Next, tap Send. NOTE: There are no spaces when typing Cam1, Cam2 etc. Type camera number here Send Tap Done, and then Tap Contacts. Done Contacts...
- Page 36 Setting up the Gateway Tap Call to connect to the camera. Call NOTE: You may see a "Stopped sending video" message. This is normal. To change camera view, tap End Call, and repeat steps 3~6. Changing camera view on the iPad: During live view, tap the button to open the chat window.
-
Page 37: Gateway Control Panel
Gateway Control Panel To install the Gateway Control Panel: Double-click on the Gateway Control Panel setup file on the desktop ( Follow the on-screen instructions to install the Gateway Control Panel (Lorex Video Plug-in). Initial Setup Log-in to Skype using your Personal account. - Page 38 Gateway Control Panel Click to open the account management window. Select the checkbox beside the Gateway’s Skype name, and click OK. This allows the Gateway Control panel to automatically "pop-up" when Skype launches. Select checkbox beside the Gateway’s Skype name Right-click on the name of your Gateway, and click Call to connect to your camera.
- Page 39 Gateway Control Panel Gateway Control Panel Overview Use the control panel to change cameras. Colored icon indicates Add accounts to Pair control panel camera is online Greyed-out icon indicates camera is offline Change camera [For future use] To change camera view: Click the buttons to change between cameras 1~4.
-
Page 40: Configuring Gateway Menus
User name: admin Password: admin To connect to the Gateway menu on a PC: Click Start ( )>Computer>Network. Under "Devices", double-click LOREX Gateway ( Enter admin in the username and password fields. Click Log-in. admin Enter in the Username and... - Page 41 To connect to the Gateway menu on a Mac: Launch Safari. Click the Open all bookmarks button ( Click Bonjour on the left column. Double-click the LOREX Gateway icon. Enter admin in the username and password fields. Click Log-in. admin...
- Page 42 Configuring Gateway menus Signing-on & Signing-off the Gateway To sign-on / sign-off the Gateway: Click the Camera tab (selected after initial login). Click the following: • Sign-in button: Click Sign-in to log in to Skype. This allows you to connect to your Skype Gateway Remotely.
- Page 43 Configuring Gateway menus Changing the camera name To change the camera name: Click the Camera tab. Under the "New Camera Name" fields, enter the desired camera name. Enter desired camera name Save button Click Save update the camera names. Changing the default camera You can change the default camera that appears when you connect to the Gateway.
-
Page 44: Pairing Additional Cameras
Configuring Gateway menus Pairing additional cameras By default, the camera comes pre-paired with the Gateway. If you purchase additional cameras, you must pair them to the Gateway. Pre-requisites: • Ensure the camera has power, and is turned on. • Camera must be within 1 foot of receiver during pairing process. To pair additional cameras: Click the Camera tab. - Page 45 Configuring Gateway menus Changing the Gateway Log-in Password To change the log-in password for the Gateway: Log-in to the Gateway, and click the Administrator tab. My new password: Enter your new password in the "New Password" field. Re-enter your new password in the "Confirm New Password" field. Click Save to update your Gateway password.
- Page 46 Configuring Gateway menus Upgrading the firmware Upgrading the firmware improves product stability, and may introduce new features. Pre-requisites • Search for the Gateway (LW2031) product page on www.lorexcctv.com • Download and extract the latest firmware to your computer To upgrade the Gateway’s firmware: Click Administration>Firmware Upgrade.
- Page 47 Configuring Gateway menus Viewing system status To view the Gateway system information: Click the Status tab. Gateway account name Camera status Network information Viewing videos You can view videos recorded onto the microSD card in the Gateway. To view saved videos: Click Status>...
- Page 48 Configuring Gateway menus Help Menu To view the Gateway’s Help menu: Click the Help button. Help button Basic Setup You can re-assign a new Gateway Skype name, or go through the basic installation of the Gateway using the Basic setup menu. To open the Basic setup menu: Click the Basic setup button.
-
Page 49: Appendix A: Enabling Upnp
Appendix A: Enabling UPnP Appendix A: Enabling UPnP About UPnP UPnP (Universal Plug and Play) allows your Windows operating system to automatically detect new devices connected to the network. In order for your network to detect the Gateway once it is connected to your router, UPnP must be enabled. - Page 50 Appendix A: Enabling UPnP Enabling UPnP on Windows Vista By default, UPnP is turned off in Windows Vista. To enable UPnP on Windows Vista: Click Start ( )>Control Panel> Network and Sharing Center ( Click to open the Sharing and Discovery menu. Click here to expand menu Click Turn on network discovery and then click Apply.
-
Page 51: Troubleshooting The Handheld Monitor
Appendix B: Troubleshooting the handheld monitor Appendix B: Troubleshooting the handheld monitor No video displayed on the monitor • Ensure the monitor is powered on (check for green power LED on monitor). • If the power LED is off: •... -
Page 52: Replacing The Handheld Monitor Battery
Appendix C: Replacing the handheld monitor battery Appendix C: Replacing the handheld monitor battery To install the monitor battery: Slide the cover off of the back of the monitor. Align the metallic contact points on the battery with the metallic contact points on the monitor by ensuring the symbols are... -
Page 53: Notices
Notices Notices FCC Notice • Do not clean any part of the product with This device complies with Part 15, cleaners with thinners or other solvents and subpart C, of the FCC Rules. Operation chemicals. This may cause permanent is subject to the following two conditions: damage to the product which is not covered (1) this device may not cause by the Warranty. - Page 54 Notices...
- Page 56 CONNECT LW2020/LW2030 SERIES Ver si on 2.0 www.lorextechnology.com Copyright © 2011 Lorex Technology Inc.
Need help?
Do you have a question about the LW2020 SERIES and is the answer not in the manual?
Questions and answers