Lorex LW2003 User Manual
Video baby monitor
Hide thumbs
Also See for LW2003:
- Specifications (3 pages) ,
- Frequently asked questions manual (7 pages)

Related Manuals for Lorex LW2003


Summary of Contents for Lorex LW2003
- Page 1 LOREX snap LIVE LOREX Video Baby Monitor U s e r ’ s G u i d e WARNING Adult assembly required. Keep small parts away from www.lorextechnology.com children when assembling.
-
Page 3: Before You Start
Welcome! Thank you for purchasing the Lorex LIVE Snap baby monitor. Before you start... Please insert the battery into the monitor and charge it before use. See the quick start guide or page 7 for instructions. Contents Make sure you have the following: •... -
Page 4: Safety Instructions
Safety Instructions WARNING This baby monitor is compliant with all relevant standards regarding electromagnetic fields and is, when handled as described in the User’s Guide, safe to use. Therefore, always read the instructions in this User’s Guide carefully before using the device. -
Page 5: Table Of Contents
TABLE OF CONTENTS 1. Video Monitor Overview....1 2. Camera Overview ..... . 5 3. -
Page 7: Video Monitor Overview
1. VIDEO MONITOR OVERVIEW 1. Up button/Talk button: Press to scroll up in the menu. Press and hold to talk to baby. 2. Menu button: Press to open/close the menu. 3. Channel 1 button: Press to view channel 1 in full screen. 4. - Page 8 1. Video Monitor Overview 9. Channel 3 button: Press to view channel 3 in full screen. 10.Channel 4 button: Press to view channel 4 in full screen. 11.Right button/ Increase volume: Press to increase the value of the selected menu item. Press to increase volume. 12.Down button / Snapshot: Press to scroll down the menu items.
- Page 9 1. Video Monitor Overview Monitor icons overview Power Save Audio Activated Alerts Channel Scan Battery life indicator Snapshot Charging indicator Camera signal strength Talk function Channel number...
- Page 10 1. Video Monitor Overview Audio Level Indicator This icon displays the sound level detected by the camera. Reading The Signal Strength Indicator No signal Low signal (icon flashes) NOTE: If you hear a beeping sound from the monitor, and your monitor displays "CAMERA NOT DETECTED": •...
-
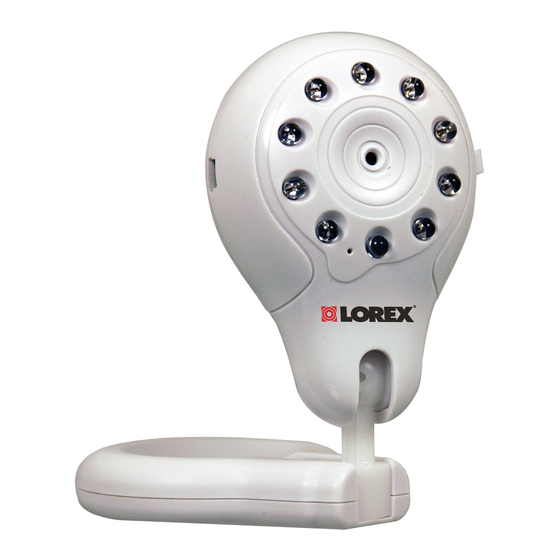
Page 11: Camera Overview
2. CAMERA OVERVIEW 1. Status LED: Glows green to indicate camera is active. Glows red if camera is inactive. Flashes red to indicate low battery power. 2. Charging LED: Glows red to indicate camera is charging. 3. Infrared LEDs: Allows the camera to view in the dark. Glows red when the power adapter is connected. -
Page 12: Getting Started
3. Getting Started 3. GETTING STARTED It is recommended to charge your monitor and camera before initial use. 3.1 CHARGING THE CAMERA AC adapter port To charge the camera: 1. Plug the AC power connector from the power adapter into the AC adapter port on the camera. -
Page 13: Installing The Monitor Battery
3.2 INSTALLING THE MONITOR BATTERY To install the monitor battery: 1. Slide the cover off of the back of the monitor. 2. Align the metallic contact points on the battery with the metallic contact points on the monitor by ensuring the shown in the bottom right corner. -
Page 14: Setting Up The Video Monitor
3. Getting Started 3.3 SETTING UP THE VIDEO MONITOR Charging cradle 1. Plug the power adapter from the charging cradle into a power outlet. 2. Gently push the monitor into the charging cradle at a slight angle to align the AC adapter port on the monitor to the power jack in the cradle. -
Page 15: Pairing Up Cameras
4. PAIRING UP CAMERAS The camera(s) included with the monitor have already been paired up with the monitor. If for any reason your monitor and camera are not paired up, OR you purchased additional add-on cameras (model model # LW2003AC1), follow the steps below. Menu button To pair a camera to your monitor: 1. - Page 16 4. Pairing Up Cameras 6. Turn on the camera and wait 15 seconds for the camera to pair up. When the camera has been successfully paired with the monitor, a "Device Found" message appears. NOTE: • The monitor can connect up to 4 cameras at the same time. TIPS •...
-
Page 17: Positioning The Camera
5. POSITIONING THE CAMERA 5.1 TABLE TOP SETUP • Place the camera in a location where the baby cannot easily reach or knock over the camera. • Place the camera on a flat surface (i.e. table). • Proceed to step 3 to improve camera balance when positioning on a flat surface. -
Page 18: Using The Baby Monitor
6. Using the Baby Monitor 6. USING THE BABY MONITOR 6.1 SELECTING THE CAMERA To view different cameras connected to the monitor in full screen, press the buttons marked 1, 2, 3 or 4. • The included camera is synched to channel 1 by default. - Page 19 Scan Mode Channel scanning mode requires 2 or more cameras. Channel scanning mode automatically changes channels every 8 seconds. This allows you to monitor multiple cameras in full screen view. The monitor only scans for cameras that are paired up and turned on. To enable Scan Mode: 1.
-
Page 20: Adjusting Volume
6. Using the Baby Monitor 6.3 ADJUSTING VOLUME To adjust the volume, press the buttons during viewing. Note: You can adjust the volume in full screen view only. 6.4 TALK FUNCTION In full screen view, press and hold button to talk. Your voice will be heard on the selected camera. -
Page 21: Snapshot Function
6.5 SNAPSHOT FUNCTION The Snapshot function lets you take pictures of what you see on screen. The pictures are stored on a microSD memory card which is pre-inserted into the monitor for your convenience. See label on product box for microSD card size. -
Page 22: Navigating The Menu
6. Using the Baby Monitor 6.6 NAVIGATING THE MENU To open the monitor menu, press the MENU button. MENU button Adjust the brightness of the monitor display. View Snap Shot pictures stored on the microSD memory card. Adjust volume level for sound activated alerts. Adjust the duration the monitor remains on before going into Power Save mode. -
Page 23: Adjusting Screen Brightness
6.7 ADJUSTING SCREEN BRIGHTNESS To adjust screen brightness: 1. Press the MENU button. 2. Press 3. Press increase the screen brightness. 4. Press the MENU button to exit. 6.8 MEMORY To view pictures stored on your microSD memory card: 1. Press the MENU button. 2. -
Page 24: Vox (Audio Activated Alerts)
6. Using the Baby Monitor 6.9 VOX (AUDIO ACTIVATED ALERTS) In VOX mode, the monitor goes into standby. When sound is detected by the camera at the preset audio level, the monitor's screen and audio instantly turn on. This conserves battery power, and alerts you only when needed. -
Page 25: Power Save (Audio Only Mode)
6.10 POWER SAVE (AUDIO ONLY MODE) Power Save mode allows the monitor display to be turned off while continuing audio monitoring. You will still be able to listen to your cameras during Power Save mode. Press any button to turn the display back on. -
Page 26: Sharing Snapshot Recordings
3. On your computer, browse for the memory card directory and locate the folder named LOREX. 4. Double-click the LOREX folder to access your pictures. IMPORTANT: In order to share your pictures, you will need to rotate them from landscape to portrait. PC: Double-click on the picture, then click if you are on Windows XP™, or click... -
Page 27: Inserting The Microsd Card
Use the included SD card adapter if your memory card reader does not support microSD memory cards. 7.1 INSERTING THE MICROSD CARD To insert the microSD card into your monitor: • Push the microSD card into the microSD slot on the monitor until you hear a click. -
Page 28: Help
8. Help 8. HELP No video displayed on the monitor • Ensure the monitor is powered on (check for green power LED on monitor). 1.If the power LED is off: • Press and hold the ...the monitor. • Recharge the battery in the monitor. •... - Page 29 The camera and monitor are not detecting each other • Ensure you have selected the correct camera channel. • Make sure the camera is turned on. • Make sure the camera is charged. • The camera and monitor may be out of range. Move the monitor and camera closer together.
-
Page 30: Cleaning And Disposal
9. Cleaning and Disposal 9. CLEANING AND DISPOSAL 9.1 CLEANING Clean the monitor and camera with a slightly damp cloth or an anti-static cloth. Never use cleaning agents or abrasive solvents. • Do not clean any part of the product with cleaners with thinners or other solvents and chemicals. -
Page 31: Fcc/Ic Notice
11. FCC/IC Notice 11. FCC/IC NOTICE This device complies with Part 15, subpart C, of the FCC Rules. Operation is subject to the following two conditions: (1) this device may not cause harmful interference, and (2) this device must accept any interference received, including interference that may cause undesired operation. -
Page 32: Technical Specifications
12. Technical Specifications 12. TECHNICAL SPECIFICATIONS Camera Frequency Maximum Range Image Sensor Lens IR LED Power Video Monitor Frequency Display Display colors Power 2.4 GHz to 2.4835GHz Extended range up to 450 feet* *Based on unobstructed line of sight. Actual range will vary depending on surroundings. -
Page 33: Wall Mounting Template
13. Wall Mounting Template 13. WALL MOUNTING TEMPLATE 1. Use the template below to mark the holes on the wall to mark the proper places to drill the mounting screws. - Page 34 13. Wall Mounting Template...
- Page 35 13. Wall Mounting Template 2. Insert included screws into the holes and tighten the screws 3/4 of the way. Then, align the camera with the screws and push it down. 3. Adjust the camera so that it provides a satisfactory view of your baby on the monitor.
- Page 36 13. Wall Mounting Template...
- Page 38 LOREX LW 2 0 0 3 Ve r si on 1. 0 w w w .l o re x tec h no l ogy. c om Copyright © 2010 Lorex Technology Inc.
Need help?
Do you have a question about the LW2003 and is the answer not in the manual?
Questions and answers