Table of Contents
Troubleshooting

Related Manuals for SVAT CV300 - 4CH


Summary of Contents for SVAT CV300 - 4CH
- Page 1 SVAT ELECTRONICS now you can see User Friendly DVR Security System w/ 4 Indoor/Outdoor Night Vision Surveillance Cameras COMPLETE SYSTEM Version 1.0 INSTRUCTION MANUAL Model #: CV300 - 4CH www.svat.com www.svat.com...
- Page 2 NEED HELP? DO NOT RETURN THIS PRODUCT TO THE STORE Please contact a SVAT customer support representative first regarding any additional information on product features, specifications or assistance with set-up. Please contact us via one of the methods below: Email: support@svat.com...
-
Page 3: Product Warranty Information
This warranty does not cover shipping costs, insurance, or any other incidental charges. You MUST call SVAT before sending any product back for repair. You will be sent a Return Authorization form with return instructions. When returning the product for warranty service, please pack it carefully in the original box with all supplied accessories, and enclose your original receipt or copy, and a brief explanation of the problem (include RA #). -
Page 4: Table Of Contents
To Set Time ..........................19 Hidden Channel Setup ......................19 Image Parameters ........................19 Password Enable ........................20 Keypad Tones .......................... 20 Sequence Dwell Time ......................20 Sequencing Instructions ......................20 NETWORK SETUP ..........................21 Terms ..............................21 CV300 - 4CH... - Page 5 Provider Information ....................... 45 Account Setup.......................... 45 DVR TROUBLESHOOTING ........................47 DVR SPECIFICATIONS 50 CAMERA MANUAL..........................53 WHAT IS INCLUDED ..........................53 FEATURES ............................53 CAMERA INSTALLATION ........................54 CAMERA TROUBLESHOOTING ....................... 55 CAMERA SPECIFICATIONS ........................55 CV300 - 4CH...
-
Page 6: Introduction
• Camera Mounting Hardware a computer) • Software CD (For viewing DVR through USB connection) • 1 Year Warranty • Quick Start Guide • 24/7Lifetime Live Customer Support • Instruction Manual • RCA to RCA (Male) Cable CV300 - 4CH... -
Page 7: Features
SVAT ELECTRONICS now you can see Fast & Hassle-Free Setup SVAT's stylish DVR is incredibly easy to set up and use. It is plug-and-play so you can do everything yourself within minutes. Record Over 2 Years of Video Footage The 500GB hard drive can hold over 2 years of continuous video and is optimized for 24/7 surveillance. We only use hard drives that are specifically designed for high capacity writing, which ensures long product life and accurate video data storage. -
Page 8: Optional Accessories
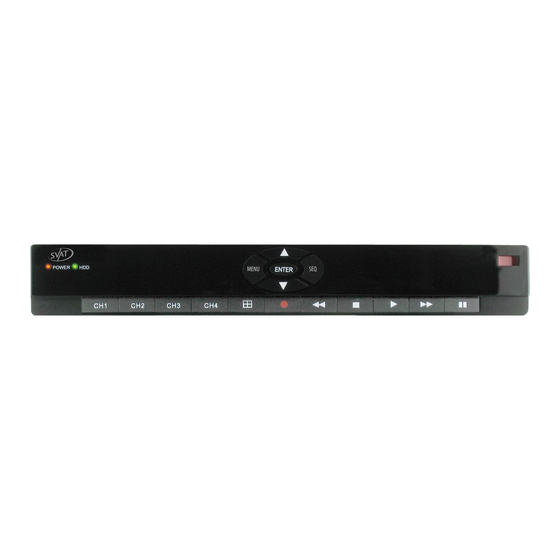
24/7 Lifetime Live Customer Support Assistance is available whenever you need it. Simply visit www.svat.com for illustrated networking guides, simple tips on how to protect your property, and instructional videos on topics such as camera placement. Our customer support team can be reached by phone 24/7, or by e-mail and live web chat services so that you will always have access to an expert. - Page 9 11. Play Button - Calls up the playback menu 12. Fast Forward Button – ast forwards through playback footage and allows you to navigate the menu to the right 13. Stop Playback Button - Stops recording and/or playback footage CV300 - 4CH...
-
Page 10: Basic Setup
Plug the included 4 Plug the 4PIN DIN port power supply female connection on cable into the red the camera into the power jack located on 4PIN DIN male the 60ft video/ connection on the 60ft power wire. video/power wire. CV300 - 4CH... -
Page 11: Connecting Additional Devices
A monitor is required for initial set up and for viewing the DVR footage, without a computer Connect a BNC to RCA Plug the RCA cable into connector to the video the BNC connector. output connection on the back of the DVR. CV300 - 4CH... -
Page 12: Microphone
4 channels. The DVR will the status of the hard drives. It will take a few begin recording automatically and resume moments to load the settings and view recording according to the defined schedule. the cameras. CV300 - 4CH... -
Page 13: Shutting Down
• Record Schedule • Sensor Setup • Hard Drive Setup • Miscellaneous Setup • Network Setup • Language • Reset Menu Note: Enter and select are interchangable terms therefore, Enter (on the front of the DVR) and SEL (on the remote) have the same function. CV300 - 4CH... -
Page 14: Camera Setup
This option allows you to decide which cameras you want to record and which ones you do not want to record. All cameras will still be displayed. If the record setting of the camera is turned OFF, it will not record, if it is set to ON, it will record according to the Record Schedule. CV300 - 4CH... -
Page 15: Record Setup
‘NOCAM’ and you will be unable to select the screen. Record Framerate • There are a total of 60 FPS that can be disbursed throughout the cameras; you have the choice on which cameras have more or less FPS. • This option allows you to choose how many Frames per Second (FPS) you will record each camera with. Example: If you have a camera pointing to a cash register, you might want more FPS for that camera compared a camera that is pointed somewhere else. • The more FPS you have, the smoother the video; however it will take up more space on the hard drive. The less FPS you have the choppier the video but less space taken on your hard drive. CV300 - 4CH... -
Page 16: To Change The Frames Per Second
You have the choice between Highest, High, Normal and Low. The higher the quality, the better the picture; however higher quality also takes up more hard drive space. When the quality is lower, the images are not as impressive, but there is less space used on the hard drive. CV300 - 4CH... -
Page 17: Adjusting Video Quality
• When you instruct the camera to record, it will record using whatever function you have it set to record with based on your schedule • The above photo shows a schedule that an office would possibly use. It is set to sensor record at night and early morning, when the business would be closed, and then set to straight record between 7 a.m. and 6 p.m. when it would be open CV300 - 4CH... -
Page 18: Sensor Record Time
2. With the arrow keys on the remote or DVR move the cursor next to the ‘MOTION DETECTOR SETUP’ option and press enter on the remote or DVR. • This opens up a separate menu • This menu allows you to choose which cameras have motion detection on, what level of motion detection per camera and adjust areas you do/do not want motion detection to trigger recording CV300 - 4CH... -
Page 19: Turning On And Off Motion Detection
5. Move the cursor and press enter on each square of the grid you want to not detect motion until you have completely blocked the area you want. CV300 - 4CH... -
Page 20: Hard Drive Setup
• The alpha-numeric code beneath the ‘ OVERWRITE ENABLED’ option is the serial number of the hard drive. This is just for reference • ‘MASTER HDD SIZE’ is telling you the total capacity of the hard drive. The above picture says 160133MB (160GB) • ‘MASTER HDD USED’ notifies you of how much space on your hard drive has been used in MB and the percentage used • ‘MASTER HDD FORMAT’ will format (erase everything) the hard drive. The password is required to complete this function CV300 - 4CH... -
Page 21: To Enable Overwrite
This menu option allows you to change the password, set the date and time, hide channels from being displayed in the monitor, adjust the camera image parameters (contrast, brightness, hue and saturation), enable the password to view footage, adjust keypad tone, and adjust sequence dwell time. CV300 - 4CH... -
Page 22: To Change The Password
1. From the ‘MISCELLANEOUS MENU’ move the cursor down to ‘IMAGE PARAMETERS’ . 2. Move the arrows on your remote or the fast forward and rewind buttons on your DVR to scroll through the cameras, (CH1 – CH4 = Camera 1 – Camera 4) when you get to the camera you would like to adjust the image on press enter. CV300 - 4CH... -
Page 23: Password Enable
2. On the front of your DVR, press the SEQ button and the cameras will sequence through using your desired sequence time.. Note: If you have the Sequence Dwell time set to ‘OFF’ the cameras will not start to sequence when you press pause or SEQ in live view mode. CV300 - 4CH... -
Page 24: Network Setup
2. At this point you will be asked to input your password. 3. Once you put your password in, the screen will go back to the main menu and all the factory settings will be restored to factory defaults. CV300 - 4CH... -
Page 25: Recording Menu
The above photo shows: • All four cameras are on and recording • The footage that is recording is in Normal Recording mode • The footage is recording to the Master HDD Note: DVR will NOT record while you are in playback mode To View Recorded Video through monitor • Make sure you are in live view mode (by pressing stop on remote or DVR to stop recording) • To view the recorded footage through the monitor press play (on your remote or DVR) • The most recent footage will automatically play • To pause the footage press pause (on remote and DVR) • To rewind or fast forward the footage press the rewind or fast forward buttons (on the remote or DVR) • Each time you press the rewind or fast forward button the speed will increase by one until it is 6x the speed CV300 - 4CH... -
Page 26: View Recording List
(on remote or DVR) • Bring cursor next to event you want to view and press play (on remote or DVR). The video will start playing On the DVR when footage has finished playing the video will automatically pause • To bring monitor back to live view press stop • To bring monitor back to the search video screen press menu The list in the photo shows • That there are 12 recorded events • It was recorded using Normal Record Mode • It was recorded on August 22nd, 2009 • It was recorded at 2:06 pm CV300 - 4CH... -
Page 27: Software Guide
DxClient – HDD Viewer Software • When the program is opened it will automatically start playing the stored footage from the earliest recorded point in quad screen mode • To switch to single camera mode, double click the camera you would like to see fully. To go back to the 4 screen view, double click the camera again Note: The DVR can not record the camera footage or access the main menu when it is connected to a computer. CV300 - 4CH... - Page 28 • To change the FPS you simply click the FPS that you would like to record the video in. When your choice is highlighted and there is a next to it, the video will record in that particular frame rate CV300 - 4CH...
-
Page 29: Video/Sound Controls
Clicking this option will allow you to backup recorded footage in the form of an MCG file. This way you can burn the file to a CD or DVD or backup a large segment of video footage. The DxClient software must be used to view the backup. • Choose the backup start date and time • Choose the backup end date and time • Total size will indicate the expected file size used for this backup • Choose the drive to save the backup to • Set the filename for the file. It is recommended to name the file by the dates for future reference • Total size indicates the amount of HDD space on the target drive CV300 - 4CH... - Page 30 The pause only works when you are viewing footage in real time because the other features pause automatically Volume Control This icon allows you to adjust the volume of the footage you are playing back. • This DVR does not support audio, therefore, this function will not work, however, the following box will still appear, adjusting it will not make any difference to playback and/or backed up footage CV300 - 4CH...
-
Page 31: Side Panel Control Buttons
• The grid on the PTZ functions this grid allows you to decide which PTZ camera you would like to control when viewing the online function (see network setup below) CV300 - 4CH... - Page 32 • Click PlayBack to load your footage and it will appear on your screen paused. You must press the play button to start the video • To begin playing back the footage when PlayBack is clicked, highlight the event and click on Normal Play at event start • Click PlayBack and the event will begin playing automatically CV300 - 4CH...
- Page 33 To change where your pictures are being saved: • Click on the AVI Stream Recording Folder option and scroll through your folders to where you would like the pictures to be stored • Highlight the folder and click OK AVI Folder Lists the current save folder for recorded AVI backups. Language Select English is the only supported language for this software. CV300 - 4CH...
-
Page 34: Network Setup
(To check the version of Internet explorer: Open IE. In the top menu bar select “Help” and then select “about internet explorer”. The version of IE will be displayed.) • A genuine and fully updated version of Windows XP or Vista Note: The computer and DVR need to be connected to the same router. A computer is required at the location to view the DVR for initial setup only. CV300 - 4CH... -
Page 35: Connecting Dvr To Router
If your router does not support DHCP, contact your network administrator to supply you with the proper IP information. If the DVR needs to store PPPoE (DSL/ADSL) settings contact your ISP (Internet Service Provider) for the proper settings. CV300 - 4CH... -
Page 36: Preparing Your Computer For Viewing Dvr
Note: The IP address used in the example above is for internal network viewing. If you are trying to access the DVR from a remote location you will add the “External IP Address” to the trusted sites list. (see Finding your External IP Address). CV300 - 4CH... -
Page 37: Method 2
If the computer and the DVR are connected to the same router you can use the Internal IP address to view the DVR. If the computer is not connected to the same router and is at a remote location you will need to use the External IP address for the DVR to view the DVR from the remote computer. CV300 - 4CH... -
Page 38: Logging Into Dvr
DVR while at a remote location. This process is called Port Forwarding and there is a website with detailed instructions on how to complete the required steps (http://portforward.com). *Port forwarding is required if you want to view the DVR from a computer that is not connected to the same router. CV300 - 4CH... -
Page 39: Port Forwarding
It should be similar to the following: http://74.14.243.111. 3. Press ENTER. Note: If using a port other then the default port 80 (ex. 2000) the port will need to be entered at the end of the IP address. Ex. http://74.14.243.111:2000 CV300 - 4CH... -
Page 40: If You Cannot Connect
Provider (ISP). Consult your ISP for more information on your PPPoE settings NOTE: SVAT technical support cannot troubleshoot modems, since changing these settings can potentially render your modem inoperable. Bridging or any other modifications to the modem will need to be completed by the ISP (Internet Service Provider). -
Page 41: Online Software
2. If you want to use a different viewing program, right click on the image file and select open with. Record Clicking this option records what is currently playing on your computer and saves it to your computer according to your desired settings. • When you click on the record button a separate menu pops up CV300 - 4CH... - Page 42 • To select a particular Stop Condition click the Stop Condition that you would like to record the video in. When your choice is highlighted and there is a next to it, the video will record in that particular FPS rate CV300 - 4CH...
-
Page 43: Side Panel Control Buttons
Tilt, Zoom and are commonly referred to as dome cameras. They allow you to control the camera by panning left/right, tilting up/down, and zooming in on a focus area. *PTZ Cameras are not supported with the CV300-4CH CV300 - 4CH... - Page 44 • Click PlayBack to load your footage and it should appear on your screen paused. You must press the play button to start the video • To begin playing back the footage when PlayBack is clicked, highlight the event and click on Normal play at event start • Click PlayBack and the event will begin playing automatically CV300 - 4CH...
- Page 45 If you do not want to save any changes you made then click cancel. If no changes have been made cancel will be the only option available. Note: The options that appear, but are unable to be accessed are from the software for your computer hookup only. They cannot be changed with the Internet software. CV300 - 4CH...
- Page 46 Not Installed. S/W Sensor Status: This option allows you to view the status of the Software Sensor. This is field will display whether the camera is setup record using the DVR’s built in motion detection. CV300 - 4CH...
-
Page 47: Configuring Dvr To Work With Ddns
DVR. The DVR has many DDNS Provider web addresses built into it. The following instructions are for DYNDNS.org and DDNS.CAMDDNS.COM. The sites are not owned nor operated by SVAT and therefore support for these services will be done through their website. -
Page 48: Provider Information
13. In the IP address field, type in the external IP address of the DVR. This will only need to be done for the initial set up as the DVR will connect and update with its current IP address according to the UPDATE SCHEDULE on the DVR. CV300 - 4CH... - Page 49 2. You should be promted to enter a host name, Port and Password. Host Name: DVR’s external IP Address Port (Default): 80 Password (Default) : 111111 3. The cameras view and online software should appear. (instructions above) CV300 - 4CH...
-
Page 50: Dvr Troubleshooting
The browser keeps freezing/ • Make sure you have an up to date browser to view the footage wont let me play the footage through with the proper ActiveX options • Make sure the browser is Internet explorer, the software will not play on any other browser • Download all Windows Updates to make sure you have the latest version of windows and Internet Explorer CV300 - 4CH... -
Page 51: Recording Mode
I have lost video footage • This could be from lost footage due to tampering of cameras, make sure to check all connections are secure and set properly • This could be because HDD overwrite is enabled. This means that once the HDD is full the DVR will begin overwriting the earliest stored footage • Try unplugging the power to the cameras and/or DVR CV300 - 4CH... - Page 52 DVR connections the alarm will go off. Check your connections and keep the DVR in a safe place where it will not me tampered with or moved around • Disconnect and reconnect all camera connections to make sure they are snug and tight fitting CV300 - 4CH...
-
Page 53: Dvr Specifications
Recording Resolution NTSC: 720 x 240 / PAL: 720 x 288 Recording Method Record as Each, Playback in Quad and Full Screen Recording Qualities low, normal, high, highest Recording Modes Motion Record, Continuous Record, Time Schedule Record CV300 - 4CH... - Page 54 Time/date, Event list Play Speed Pan/Tilt/Zoom Play Mode Full, Quad OSD and System Menu Display OSD Language Display Six Language(English, French, German, Italian, Spanish, Portuguese) Time and Date Stamp Display Password Protection Adjustable Screen Settings File Transfer USB 2.0 CV300 - 4CH...
- Page 55 12V DC 3A Power Consumption 13W~30W Power Adapter Input 100V 50/60HZ~240 50/60HZ Operating Temperature (50o~104o) Operating Humidity Under 90% Dimensions 9.84 X 9.25 X 1.49 in Weight 2.64 lbs USB Port Backup Remote Control Supported Peripherals Remote Control, USB 2.0 CV300 - 4CH...
-
Page 56: Camera Manual
Four to One Power Supply Cable 1. Female 12V Connection 2. Power Supply Ports The four to one power Supply Cable allows you to plug four cameras into one power source, saving you time and space. CV300 - 4CH... -
Page 57: Camera Installation
4. Plug the red adapter from the 60ft video/power wire (G) into one of the ports of the four port power supply (D) 5. Connect the RCA Video from the 60ft video/power wire (H) into the Channel/Camera inputs on your DVR or monitor. 5. Repeat for all cameras. CV300 - 4CH... -
Page 58: Camera Troubleshooting
The area that it is in may have too much light and may not Night Vision is activatethe sensor not working • Cup your hands around the front of the camera and look at the LEDs. They should be glowing red. If they are not, check the power supply Disclaimer: The CV300-4CH has been designed to come equipped with Vu5 cameras. Depending on the product "kit " you have purchased, your camera type or camera specifications may vary. CV300 - 4CH... -
Page 59: Camera Specifications
Signal/Noise Ratio >48dB Camera Bracket Operating Temperature 14°F ~ 122°F Operating Humidity Camera Power Input DC 12V 200mA Power Adapter Input 120V 60Hz LED Power Indicator Dimensions 3 1/8" x 2" x 4 3/8" 0.06lbs (with stand) Weight CV300 - 4CH... - Page 60 SVAT does not endorse any of SVAT products for any illegal activities. SVAT is not responsible or liable in any way shape or form for any damage, vandalism, theft or any other action that may occur while a SVAT product is in use by the consumer.
Need help?
Do you have a question about the CV300 - 4CH and is the answer not in the manual?
Questions and answers