Table of Contents
Advertisement
Quick Links
Download this manual
See also:
Instruction Manual
Advertisement
Table of Contents

Related Manuals for SVAT CV501 - 16CH


Summary of Contents for SVAT CV501 - 16CH
- Page 1 SVAT ELECTRONICS now you can see Web Ready 16 Channel H.264 DVR Security System w/ iPhone & BlackBerry Access and 8 Hi-Res Indoor/Outdoor Night Vision Surveillance Cameras COMPLETE SYSTEM INSTRUCTION MANUAL V1.1 www.svat.com CV501 - 16CH...
- Page 2 HELP? PLEASE DO NOT RETURN THIS PRODUCT TO THE STORE Please contact a SVAT customer support representative first regarding any additional information on product features, specifications or assistance with set-up. You can contact us via one of the methods below:...
-
Page 3: Product Warranty Information
This warranty does not cover the shipping cost, insurance or any other incidental charges. You MUST call SVAT before sending any product back for repair. You will be sent a Return Authorization form with complete return instructions. When returning the product for warranty service, please pack it carefully in the original box with all supplied accessories, and enclose a copy of your original receipt, the completed RA form, and a brief explanation of the problem (include RA #). -
Page 4: Table Of Contents
Screen Viewing ....................17 Pop up Menu Bar ..................... 17 Pop up Menu Icons ................... 17 MAIN MENU ..................18 CAMERA SETUP ..................19 Camera ........................19 Video Adjust ......................19 Camera Title ......................19 Display........................20 Dwell Time ....................... 20 CV501 - 16CH... - Page 5 PPPoE ........................33 DDNS Setup ......................34 RTSP ........................34 Mail Function ......................34 FTP .......................... 36 BACKUP SETUP ..................37 USB Backup ......................37 DVD/CD Backup ......................38 SYSTEM SETUP ..................39 Date/Time ....................... 39 System Type ......................40 CV501 - 16CH...
- Page 6 ActiveX Installation ....................51 VIEWING YOUR DVR OUTSIDE OF YOUR NETWORK ..........52 Port Forwarding ....................... 52 Finding External IP Address ..................52 Testing ........................53 Troubleshooting ...................... 53 DDNS CONFIGURATION ................54 DDNS.org ......................... 54 DDNS Account Setup ....................55 CV501 - 16CH...
-
Page 7: Introduction
H.264 compression allows you to record and store more footage using less space, so you will never miss an important event. This manual was written to ensure that you get the most out of your CV501 - 16CH DVR. -
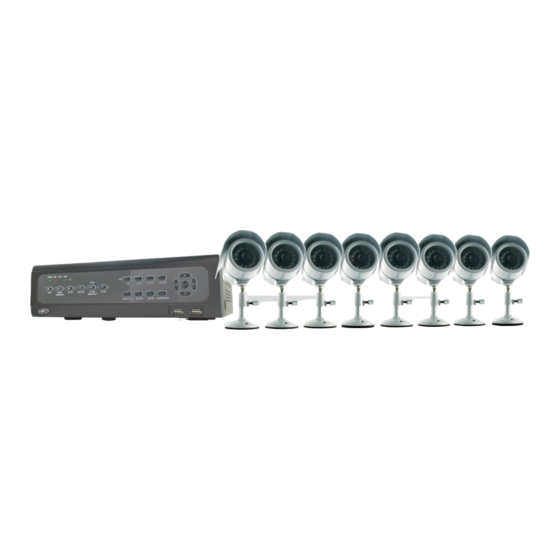
Page 8: What Is Included
Our customer support team can be reached by phone 24/7, or by email and live web chat services so that you will always have access to an expert. CV501 - 16CH... - Page 9 Endless Location Options with 4 Extra Extension Wires We’ve included four extra 60ft extension wires so that you can maximize the distance between your cameras and the DVR. (Wire Model #: CVW62) CV501 - 16CH...
-
Page 10: Additional Accessories
ADDITIONAL ACCESSORIES • CLEARVU7 (LCD Monitor) • CVW62 (60 ft. Camera Extension Cable) • VU301-C (Camera) For more information or accessories please visit: www.svat.com BUTTONS & CONNECTIONS Front Panel 1. Power LED – Indicates the DVR is properly powered on 14. -
Page 11: Back Panel
Pressing it a second time will step back the video footage a few minutes 16. Pause/Step Forward – Pauses playback footage and pressing this button again will step forward the time by a few minutes CV501 - 16CH... -
Page 12: Ptz Connection
2. Insert the wire into the hole below the orange tab while it is still pushed back. 3. Release the orange tab, which will lock the wire into place. Pull lightly on the wire to make sure it is secure. CV501 - 16CH... -
Page 13: Things To Consider Before Installation
60 ft video/ video/power wire. power wire. 4. Attach the BNC to 3. Plug the camera’s RCA connectors to power adapter into an the video inputs on AC outlet or the back of the DVR. power bar. CV501 - 16CH... -
Page 14: Connecting Additional Devices To The Dvr
CONNECTING ADDITIONAL DEVICES TO THE DVR This DVR has multiple connections which allow you to integrate additional SVAT or third party devices to the system. Please note that there are many makes and models of compatible devices and the instructions below may not be applicable to your device. Always refer to the device instruction manual for proper setup and operation. -
Page 15: Rca Monitor
CONNECTING YOUR ALARM SYSTEM TO THE DVR The CV501 - 16CH supports a 2 wire (normally open or normally closed) connection for up to sixteen external alarm devices simultaneously using the included alarm adapter. For more information on setting up the DVR to work with these alarms please see “buttons and connections.” Please see your alarm device manufacturer for further instructions on required connections and settings. -
Page 16: Router
4. The DVR will turn on and display the main viewing area after a few moments of initializing. Note: We recommend using a surge protected power bar and/or Uninterrupted Power Supply (UPS) backup to prevent damage to your DVR system. CV501 - 16CH... -
Page 17: Getting Started
Using the Mouse • The included USB mouse makes using the CV501 - 16CH simple and efficient. Make sure that the mouse is connected to the front right USB port before powering on the DVR •... -
Page 18: Main Menu
1. Press the Menu button the DVR front panel or on the remote control. Option 2: 1. Scroll the mouse to the bottom of the screen to reveal Pop Up Menu Bar. 2. Click the to call up the Main Menu. CV501 - 16CH... -
Page 19: Camera Setup
Below are the functions of the special buttons that have a different purpose. Backspace ENTER Confirms changes and exits keyboard SHIFT Changes from lower case to upper case (allows you to pick between the "+" and the "-") SPACE BAR Puts a space between characters CV501 - 16CH... -
Page 20: Display
This is a camera specific setting defined by the manufacturer. Please consult your PTZ camera manual or manufacturer for details on this setting. Protocol: This is a camera specific setting defined by the manufacturer. Please consult your PTZ camera manual or manufacturer for details on this setting. Supported protocols can be found in the specifications. CV501 - 16CH... -
Page 21: Ptz Controls
The event log will be updated with the motion detection event. Note: Every time motion is detected an icon will appear, and the camera name from which motion is detected will change from white, to yellow. CV501 - 16CH... -
Page 22: Setting Motion
The squared off area shows 2. Clear: Used to mask off certain areas you the area with no detection do not want to trigger motion detection. (would be shaded green) 3. EXIT: Saves changes and exits the MOTION DETECTION SETUP MENU. CV501 - 16CH... -
Page 23: Recording Setup
. The DVR will take a few moments to load the settings. screen to divide the PPS evenly across all of the attached cameras. If no cameras are attached the average option will not distribute the PPS to any camera. CV501 - 16CH... -
Page 24: Alarm Record
2. Use the mouse wheel or directional keys to change how long you want the DVR to record when an alarm is detected. 3. Press ENTER or Click to save changes. 4. Click to exit. 5. DVR may take a few moments to save the settings. CV501 - 16CH... -
Page 25: Record Quality
In the record mode area, use the mouse wheel or directional buttons to scroll through various recording modes: Schedule 1, Schedule 2, Schedule 3, Schedule 4, Schedule 5, or manual. The schedule that is displayed on the Record Setup Screen will be the active recording schedule. See the directions on how to setup a schedule in the Schedule setup section. CV501 - 16CH... -
Page 26: Audio Record
There are 5 different options for schedules, so you can set a separate schedule for long weekends, holidays, when you are on vacation, or for the days you will be away from your home/office and have to leave others in charge. Once the schedules are set, it is easy to switch from one to the other. CV501 - 16CH...
Need help?
Do you have a question about the CV501 - 16CH and is the answer not in the manual?
Questions and answers