Table of Contents
Advertisement
Quick Links
Download this manual
See also:
Installation Manual
Advertisement
Table of Contents
Troubleshooting

Related Manuals for Interlogix UltraView PTZ


Summary of Contents for Interlogix UltraView PTZ
-
Page 1: User Manual
UltraView PTZ User Manual... - Page 2 Examples may include fictitious names of individuals and companies. Any similarity to names and addresses of actual businesses or persons is entirely coincidental. Trademarks and Interlogix name and logo are trademarks of UTC Fire & Security. patents UltraView is a trademark of UTC Fire & Security.
- Page 3 Software, at the sole discretion of UTC Fire & Security. To obtain a repair or replacement of nonconforming Software, contact UTC Fire & Security Customer Service toll-free at 888-437-3287 or online at www.interlogix.com during the Software Warranty Period.
- Page 4 UltraView PTZ User Manual General. Any materials provided to You by UTC Fire & Security shall not be exported or reexported in violation of any export provisions of the USA or any other applicable jurisdiction. Any attempt to sublicense, assign, or transfer any of the rights, duties, or obligations hereunder shall be void.
- Page 5 European Union. For proper recycling, return this product to your local supplier upon the purchase of equivalent new equipment, or dispose of it at designated collection points. For more information, visit www.recyclethis.info. Contact information For contact information, see www.interlogix.com.
- Page 6 UltraView PTZ User Manual...
-
Page 7: Table Of Contents
Contents Preface..............ix Conventions used in this document. - Page 8 UltraView PTZ User Manual...
-
Page 9: Preface
Preface This is the Interlogix UltraView PTZ User Manual. This document includes an overview of the product and detailed instructions explaining: • how to access the menus; and • how to customize the settings. There is also information describing how to contact technical support if you have questions or concerns. - Page 10 UltraView PTZ User Manual...
-
Page 11: Chapter 1. Programming
Chapter 1 Programming This chapter provides an overview of your UltraView PTZ menu system, including steps you may want to perform before you begin using your UltraView PTZ. In this chapter: Introduction ..........2 Menu navigation . -
Page 12: Introduction
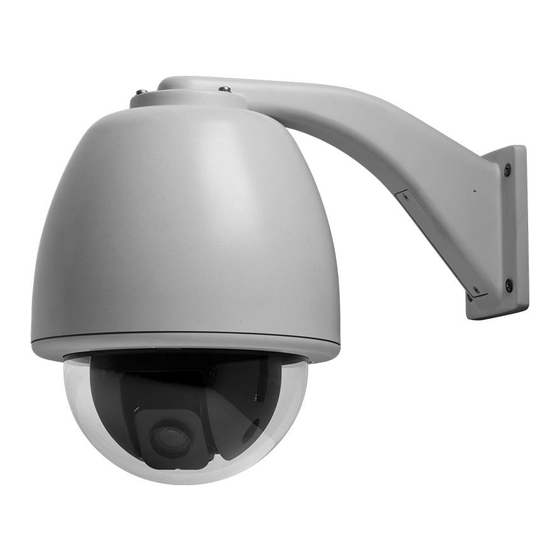
Figure 1. UltraView PTZ dome with wall-mount arm UltraView PTZ supports many protocols to work with various keypad controllers, DVRs, and other video surveillance equipment. Please refer to Appendix B of the UltraView PTZ Installation Manual for the details on supported protocols. -
Page 13: Menu Navigation
When you have navigated to the item you want, use seq, set, or fast forward to select that item. The arrow indicator on the UltraView PTZ menu identifies the property that will be changed. -
Page 14: Programming Shortcuts
4. At the first menu display, press 3. 5. At the Enter camera site number screen, enter the site number of the camera you wish to program. At this point, you have access to the UltraView PTZ programming menus. For more information on the programming menus, see Menu navigation on page 5. -
Page 15: Menu Navigation
Programming Menu navigation The UltraView PTZ menu structure generally follows an alphabetical order (in English) of the functions and features that can be set with a few exceptions. Table 1 shows the order of the menu screens and their relationship to each other, as well as the options and defaults for each screen. -
Page 16: Top-Level Access And Information Screens
UltraView PTZ User Manual Top-level access and information screens When you access the UltraView PTZ series, the following three menus display: Password. The camera will come from the factory with the Figure 3. Password screen default password turned off, but saved in memory. See Passwords on page 42 for details. -
Page 17: Memory Management
Figure 6. Memory flashing menu Note: DIP switch settings on the camera can be set to automatically copy the settings from the housing, or push the settings from the camera to the housing. See the UltraView PTZ Installation Manual for more information. -
Page 18: Program Select
UltraView PTZ User Manual Program select The Program select menu (Figure 7) is where you will find the bulk of the UltraView PTZ configuration menus. Figure 7. Program select menu The submenus on the Program select menu are as follows: •... - Page 19 Chapter 1 Programming 2. To confirm the restoration of factory defaults (Figure 9) Figure 9. Clear memory confirmation for the feature chosen on the previous menu, do one of the following: • Select option 1 to keep the current settings. •...
- Page 20 UltraView PTZ User Manual Auto Return Figure 12.Autoreturn menu Set the camera to automatically return to an activity after a period of inactivity, to a home position (preset 000), a specific preset, a preprogrammed tour, or autopan mode (Figure 12). This feature is disabled by default.
- Page 21 Chapter 1 Programming • To enable the azimuth indicator to show the heading (N, Figure 15.Azimuth indicator menu: Set heading NE, E, SE, S, SW, W, or NW), select option 2 and use the joystick to move through the heading options (Figure 15).
- Page 22 UltraView PTZ User Manual Day/night switch Figure 19.Day/night switch menu Set the method by which the camera’s infrared filter automatically switches in and out at dawn and dusk (Figure 19). • Select option 1, to disable the day/night switch. •...
- Page 23 Chapter 1 Programming Exposure control Figure 22. Exposure control menu Set the method the camera uses to adjust to different light levels (Figure 22). • Select option 1 to enable the camera to automatically adjust to different light levels.The iris + button toggles the shutter speed (see Figure 30 on page 16 and Figure 31 on page 16), and the iris - button toggles backlight compensation for image enhancement.
- Page 24 UltraView PTZ User Manual Lens initialization Figure 25. Lens initialization menu Set the duration between automatic camera lens initializations (Figure 25). During lens initialization 27X and 37X cameras will zoom in and zoom out while displaying "Lens Init" on the video screen.
- Page 25 Chapter 1 Programming Gain optimizes the video’s brightness over long runs of coaxial Figure 27.Changing gain settings cable (Figure 27). Gain increases the video signal’s amplitude to increase the brightness of darkened video and to reduce the noise of weakened video. Use the joystick to adjust the gain. Up increases and down decreases the gain.
- Page 26 Select option 1 to disable quick spin. • Select option 2 to enable quick spin (Default). Serial update Figure 32.Serial update menu This menu lets you update the firmware in your UltraView PTZ camera. For details, contact technical support. (See Contacting on page 40.)
- Page 27 Chapter 1 Programming Shutter speed Figure 33.Shutter speed menu (NTSC) Select the shutter speed by choosing the number that corresponds with the desired speed for either NTSC (Figure 33) or PAL (Figure 34) camera. During pan/tilt operation, shutter speed is controlled automatically by the camera.
- Page 28 UltraView PTZ User Manual Synchronization Figure 36.Synchronization menu Set the video signal to be synchronized either to the AC input frequency (line lock) or to the camera’s internal clock (Figure 36). Select option 1 to select line lock. If you want to enable this feature, press the set button.
- Page 29 Chapter 1 Programming White balance Figure 40.White balance menu Select the method by which the camera shifts its output colors to compensate for the color of a light source. • Select option 1 for automatic white balance (Default is Auto). •...
-
Page 30: Presets
Note: This feature is automatically disabled when setting presets or shadow tours. Presets UltraView PTZ cameras can store up to 129 preset positions (numbered 0 to 128). To enter preset positions, do the following: 1. From the Program select menu, navigate to option 2 and Figure 45.Preset programming menu... -
Page 31: Titles/Areas
Chapter 1 Programming Titles/areas Under the titles/areas menu, you can set titles for preset positions, areas, the camera, and tours. Here are the available characters: (Space), /, up arrow, ), down arrow, (, Z to A, +, ?, >, -, <, ;, :, 9 - 0, z to a Joystick up arrow = counterclockwise Joystick down arrow = clockwise Preset titles... -
Page 32: Area And Titles
UltraView PTZ User Manual 3. Enter the preset number (000 to 128) of the preset title to Figure 48.Title entry menu be edited. The Title entry menu displays (Figure 48). 4. You can move the display location for the title up and down onscreen. - Page 33 Chapter 1 Programming 3. Use the keypad to enter the number (01 to 16) of the area Figure 50. Area 01 programming menu to be programmed and titled. The Area 01 programming menu displays. 4. To define the boundaries of an area, use the joystick to Figure 51.Title entry menu pan/tilt the camera to the upper left corner of the desired area and press the iris + button.
-
Page 34: Camera Title
Tour title UltraView PTZ models do not by default show a title when on a tour. To set a title for a tour, do the following: 1. From the Program select menu, navigate to option 3 and pan right. - Page 35 Chapter 1 Programming 3. Use the keypad to enter the number (1 through 8) of the Figure 54. Tour title entry menu tour to be titled and programmed. The Tour title entry menu displays (Figure 54). 4. Confirm that the cursor (arrow) is under the tour ###. 5.
-
Page 36: Current Status
To review the current settings for your PTZ camera, select option 4 (Current status) from the Program select menu and pan right. UltraView PTZ cameras with preset and area features have status menus that show programmed presets and programmed areas by putting an X next to them in the menu. -
Page 37: Tours
ShadowTours UltraView PTZ cameras have ShadowTour capability. A ShadowTour is a tour that a PTZ camera “learns” by recording up to five minutes of manual PTZ operation. Use a keypad to manually direct your camera through the desired PTZ movements, and the camera stores in memory the movements you performed. - Page 38 UltraView PTZ User Manual 4. Select 2 to edit the tour (Figure 58). Figure 58.Edit ShadowTour 5. The tour will start to play. Use the joystick to edit the tour at any point. From that breakpoint, only the new movements will be saved and all previously saved tour movements will be lost.
-
Page 39: Preset Tours
Preset tours UltraView PTZ cameras have preset tour capability. A preset tour is composed of a group of preset positions that the operator can program to be linked together in a sequence. Each tour consists of a string of up to 64 steps, or presets, which are programmed by the user. - Page 40 UltraView PTZ User Manual 5. For each step programmed, the following information must be entered: • The preset number (0 to 128). • The dwell time at each step (1 to 31 seconds). The default dwell time is 2 seconds.
-
Page 41: Additional Menus
Chapter 1 Programming Additional menus Selecting the Additional menus option from the Program select menu displays the Program select menu 2 screen (Figure 63). Figure 63.Program select additional menus 27X and 37X camera models The Privacy mask, Alarms and relays, and System startup are submenus of Program select menu 2. Privacy masks If you have an 27X or 37X camera, you can set privacy masks that hide certain areas from view. - Page 42 UltraView PTZ User Manual 5. Center the crosshairs on the center of the area you want Figure 65.Privacy mask set to mask off and press the iris + button (Figure 65). 6. Using the joystick, set the size of the mask by pushing up Figure 66.Privacy mask adjust...
-
Page 43: System Startup
Chapter 1 Programming To set alarm reporting, do the following: 1. Select 2 from the alarms and relays menu. The Alarm Figure 68.Alarm reporting menu reporting menu displays (Figure 68). 2. Enter selection 1 to disable (the default) or 2 to enable. To set a relay, do the following: 1. - Page 44 UltraView PTZ User Manual 2. Select 3. The Change password menu displays Figure 71.Change password menu (Figure 71). 3. Using the number selecting line, enter four numbers for your password. 4. Enter those same numbers again when prompted. 5. Password saved is displayed onscreen, and the menu exits back to the Password protection menu (Figure 70 on page 33).
- Page 45 Chapter 1 Programming Power-up action You can program the UltraView PTZ to perform a certain action when it first powers up. The power-up action default is home. To set a power-up action, do the following: 1. From Program select menu 2, select System startup. The Password protection screen displays.
-
Page 46: Exposure Control
UltraView PTZ User Manual Exposure control Exposure control for a UltraView PTZ is controlled through five different menus that affect the image exposure. Automatic slow shutter. This feature only works when the camera is in day (color) mode. It extends the useful range of the color mode in dark situations and keeps the camera in color mode longer before having to switch to night mode. -
Page 47: Chapter 2 Troubleshooting And Support
Chapter 2 Troubleshooting and support This chapter provides information to help you troubleshoot problems and contact technical support in case you need assistance with your Interlogix equipment. In this chapter: Troubleshooting ..........38 Common issues . -
Page 48: Troubleshooting
• I cannot control the camera. This may be due to an incorrect address or a problem with RS-422 data lines. See the UltraView PTZ Installation Manual for information on how to correctly set the PTZ unit’s address. If that does not resolve the matter, check the RS-422 data communication lines to the camera. - Page 49 • I cannot program a preset. The protocol for specific mappings to keypads or functionality may be incorrectly addressed. Check the protocol tables in the UltraView PTZ Installation Manual and check the specific protocol or keypad documentation. You can program up to 128 presets in the UltraView PTZ. See Preset tours on page 29 for instructions.
-
Page 50: Contacting Us
Note: Be ready at the equipment before calling. Online Another great resource for assistance with your Interlogix product is our online publication library. To access the library, go to our website at the following location: http://www.interlogix.com Many Interlogix documents are provided as PDFs (portable document format). To read these documents, you will... -
Page 51: Appendix A Defaults And Hazardous Materials
Appendix A Defaults and hazardous materials This appendix provides a list of default settings. In this appendix: Defaults ..........42 Toxic and hazardous element levels. -
Page 52: Defaults
UltraView PTZ User Manual Defaults The following table lists the defaults for each setting in the Setup menu on UltraView PTZ. Table 3. Setup menu Menu property Default setting Autoreturn Disable Autoslow shutter Disable Autopan speed Medium Azimuth indicator Disable... - Page 53 Table 3. Setup menu Menu property Default setting Zoom speed control Variable speed...
-
Page 54: Toxic And Hazardous Element Levels
UltraView PTZ User Manual Toxic and hazardous element levels The levels for toxic and hazardous elements listed in this table apply to the following SKUs: • CYH-4101, CYH-4201, CYH-4202, CYH-4301, CYH-4401, CYH-4402, CYH-4501, CYH-4502, CYH-4602, CYH-4701, CYH-5101, CYH-5201, CYH-5202, CYH-5301, CYH-5401, CYH-5402, CYH-5501, CYH-5502, CYH-5602, CYH-5701, CYP-1111, CYP-1121, CYP-1301, CYP-1302, CYP- 1311, CYP-1312, CYP-1411, CYP-1412. -
Page 55: Index
Index access and information screens ..............6 gain ......................14 additional menus..................31 alarm programming ................32 alarms and relays ..................32 image freeze ................... 13 areas....................21, 22 Impac RS-485 9600 protocol ..............35 ATW ....................... 19 installation date ..................34 automatic white balance ................. - Page 56 UltraView PTZ User Manual preset ...................... 20 status....................... 26 preset speed..................15 synchronization ..................18 titles....................21 system information ................... 6 privacy mask................... 31 system startup ..................33 product information.................. 6 program select ..................8 programming instructions................. 2 proportional speed .................. 16 temperature display ................
Need help?
Do you have a question about the UltraView PTZ and is the answer not in the manual?
Questions and answers