Table of Contents
Advertisement
Quick Links
Download this manual
See also:
User Manual
Advertisement
Table of Contents

Subscribe to Our Youtube Channel
Related Manuals for InFocus INF7020


Summary of Contents for InFocus INF7020
-
Page 1: Quick Setup Guide
INF7020 Quick Setup Guide Regulatory model: PN-L702B p/n: 009-1422-00... - Page 3 *Keyboard and mouse not included in all countries. For setup purposes, a keyboard and mouse are recommended. Any standard wired or wireless mouse or keyboard, connected through the computer module USB ports is supported. IMPORTANT: A stand or cart is recommended for use with this monitor. INF7020 Quick Setup Guide Page 1...
-
Page 4: Attaching The Hd Video Conferencing Camera
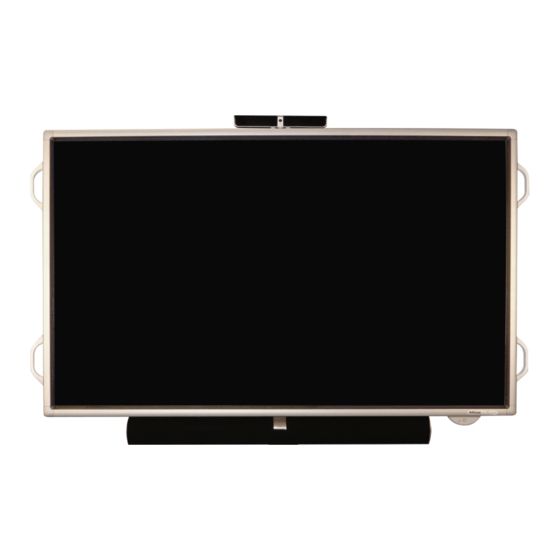
Setup IMPORTANT: Before following these instructions, your monitor must be wall mounted or attached to a stand or cart which meets or exceeds the safety requirements for this monitor and follows all manufacturer safety precautions and instructions. Removing Orange Tape After mounting the INF7020 monitor, carefully remove all orange tape. Attaching the HD Video Conferencing Camera Center the camera along the top edge of the monitor, aligning the camera bracket with the screw hole on the back of the moni- tor. Securely attach the camera bracket to the monitor using the provided screw. -
Page 5: Cable Connection
Connect the power cord to an AC outlet. Press the monitor power switch to the ON position. WARNINGS: • The main power must be turned on and off with the monitor power switch. Do not connect or disconnect the power cord or turn the breaker on and off while the monitor power switch is on. • When switching the monitor power switch or the POWER button off and and back on, always wait for at least 5 seconds. For complete electrical disconnection, pull out the main plug. Turning the INF7020 On/Off The computer module, sound bar and monitor function independently. Each component must be controlled separately. TOUCH PANEL LED POWER BUTTON POWER LED TO TURN THE INF7020 ON Press the computer module POWER button located on the back of the monitor. Press the POWER button located on the front of the monitor (or use the monitor's remote). If installed, press the sound bar POWER button on. The computer module, monitor and sound bar turn on. INF7020 Quick Setup Guide Page 3... - Page 6 NOTE: If the power is not turning on, check the power switch on the back of the monitor and verify that all power cords and power supplies are properly connected and connected to AC. TO PUT THE INF7020 MONITOR INTO STANDBY Press the POWER button on the front of the INF7020 (or use the monitor's remote). If you want to put the computer module into standby mode, press the POWER button located on the back of the monitor. TO COMPLETELY POWER DOWN THE INF7020 Press the POWER button on the front of the INF7020 (or use the monitor's remote). Press the computer module POWER button located on the back of the monitor. Turn off the power switch on the back of the monitor and unplug the power cord from the power outlet. NOTE: When toggling the power switch or the POWER button off and on, wait at least 5 seconds. For More Information about the INF7020 For more information about the INF7020, refer to the INF7020 Hardware Guide and the Mondopad Software Guide on the web at www.infocus.com/INF7020. Page 4...
Need help?
Do you have a question about the INF7020 and is the answer not in the manual?
Questions and answers