Avalue Technology EMX-H61 User Manual
Mini itx motherboard with intel h61 express chipset
Hide thumbs
Also See for EMX-H61:
- Quick installation manual (12 pages) ,
- Quick installation manual (12 pages)

Related Manuals for Avalue Technology EMX-H61


Summary of Contents for Avalue Technology EMX-H61
- Page 1 EMX-H61 Mini ITX Motherboard with Intel® H61 Express Chipset User’s Manual Ed – 9 January 2012 Part No. E2047XH6100R...
- Page 2 Disclaimer Avalue Technology Inc. reserves the right to make changes, without notice, to any product, including circuits and/or software described or contained in this manual in order to improve design and/or performance. Avalue Technology assumes no responsibility or liability for the...
-
Page 3: Table Of Contents
Install Chipset Driver (For Intel H61 Express) ..........37 Install Display Driver (For Intel H61 Express) ..........38 Install Audio Driver (For Realtek) ..............39 Install Ethernet Driver (For Realtek PCIE) ............ 40 Install USB3.0 Driver (For USB3) ..............41 EMX-H61 User’s Manual 3... -
Page 4: Getting Started
Before you begin installing your single board, please make sure that the following materials have been shipped: Rear I/O bracket X 1 Quick Installation Guide X 1 Driver/Utility CD X 1 Serial ATA Signal Cable X 2 4 EMX-H61 User’s Manual... -
Page 5: Specifications
4 SATA II 3.0Gb/s 1 x S/PDIF Out header 2 x 4-pin fan connectors, 1 x 3-pin fan connectors 1 x Front panel high definition audio header 1 x Front System Panel connector 1 x Speaker header EMX-H61 User’s Manual 5... - Page 6 Montherboard with Intel® H61 Express Chipset and VGA ,DVI-D ,HDMI, Audio ,2GbE , 1 PCIex16 , 1 Mini PCIe,4 SATA II, 2 x USB 3.0 , 8 x USB 2.0 , W/SATA Cable , Bracket / CD driver 6 EMX-H61 User’s Manual...
-
Page 7: Hardware Configuration
EMX-H61 User’s Manual 2 Hardware Configuration EMX-H61 User’s Manual 7... -
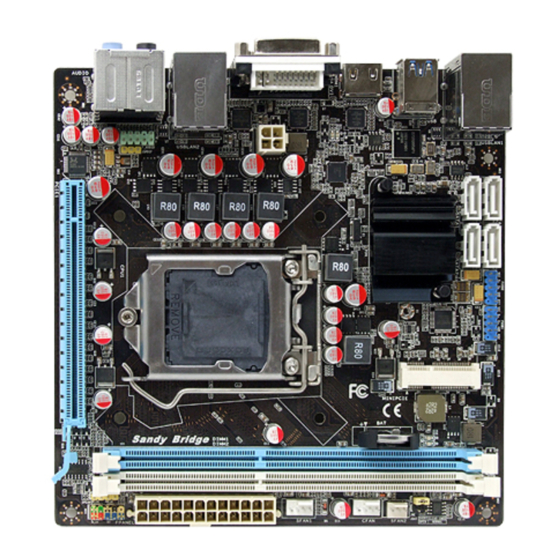
Page 8: Product Overview
EMX-H61 User’s Manual 2.1 Product Overview 2.1.1 Main board layout 2.1.2 Connecting Rear Panel I/O Devices 8 EMX-H61 User’s Manual... -
Page 9: Jumper And Connector List
In addition, the board has a number of jumpers that allow you to configure your system to suit your application. If you have any doubts about the best hardware configuration for your application, contact your local distributor or sales representative before you make any changes. EMX-H61 User’s Manual 9... - Page 10 EMX-H61 User’s Manual 10 EMX-H61 User’s Manual...
-
Page 11: Setting Jumpers & Connectors
EMX-H61 User’s Manual 2.3 Setting Jumpers & Connectors 2.3.1 Additional USB Port Headers (FUSB1/FUSB2) 2.3.2 Can’t refresh the ME Refresh the ME EMX-H61 User’s Manual 11... -
Page 12: Cmos Memory Clearing Header (Jbat)
EMX-H61 User’s Manual 2.3.3 CMOS Memory Clearing Header (JBAT) Normal* Clear CMOS * Default 2.3.4 CPU/System Fan Power Connectors Header (CFAN/SFAN1/SFAN2) CFAN1 SFAN1 12 EMX-H61 User’s Manual... -
Page 13: Atx Power Input Connectors (Pwr12V/Atxpwr)
ATX Power Input Connectors (PWR12V/ATXPWR) ATXPWR (ATX Power) connector PWR12V (+12V Power) connector 2.3.6 Front Panel Switches (FPANEL) HD_LED (Red): Hard Drive LED connector RST (Blue): Reset Switch PWR_ON (Black): Power Switch PWR_LED (Green): Power/Standby LED EMX-H61 User’s Manual 13... -
Page 14: Speaker Headers (Speak)
EMX-H61 User’s Manual 2.3.7 Speaker Headers (SPEAK) 14 EMX-H61 User’s Manual... -
Page 15: Front Panel Audio Connection Header (F_Audio)
EMX-H61 User’s Manual 2.3.8 Front Panel Audio Connection Header (F_AUDIO) EMX-H61 User’s Manual 15... -
Page 16: Bios Setup
EMX-H61 User’s Manual 3. BIOS Setup Note: Installation procedures and screen shots in this section are for your reference and may not be exactly the same as shown on your screen. 16 EMX-H61 User’s Manual... -
Page 17: Starting Setup
If you do not press the keys at the correct time and the system does not boot, an error message will be displayed and you will again be asked to. Press F1 to Continue, DEL to enter SETUP EMX-H61 User’s Manual 17... -
Page 18: Using Setup
Press F1 to pop up a small help window that describes the appropriate keys to use and the possible selections for the highlighted item. To exit the Help Window press <Esc> or the F1 key again. 18 EMX-H61 User’s Manual... -
Page 19: In Case Of Problems
Note: The BIOS setup screens shown in this chapter are for reference purposes only, and may not exactly match what you see on your screen. Visit the Avalue website (www.avalue.com.tw) to download the latest product and BIOS information. EMX-H61 User’s Manual 19... -
Page 20: Advanced Setting
3.5.2 Advanced Setting • Launch PXE OpROMOnboard Lan BootROM Control These items can change Boot ROM of the LAN chipset. • Launch Storage OpROM Setting old equipment storage ROM open and close, optional for Enalbed, Disbaled. 20 EMX-H61 User’s Manual... - Page 21 Select the highest ACPI sleep state the system will enter when the suspend button is pressed. Optional for Suspend Disbled、S1(CPU Stop Clock)、S3(Suspend to RAM). • Lock legacy Resources Enables or disables lock of legacy resources. optional for Enalbed, Disbaled. ・Press <Esc> key to return to "Advanced" menu. EMX-H61 User’s Manual 21...
- Page 22 Hr::min::sec specified. • Wake system with Dynamic Time Enable or disable system wake on alarm event. When enabled, system will wake on the current time + Increase minute(s). ・Press <Esc> key to return to "Advanced" menu. 22 EMX-H61 User’s Manual...
- Page 23 Setting hyper-threading technology open or closed. •Active Processor Cores Setting processor core number. •Limit CPUID Maxinum When set to [Enabled], this item limits the CPUID maximum value to 3, which is usually required for older OS like Windows NT4.0. EMX-H61 User’s Manual 23...
- Page 24 Setting of CPU C energy-saving depth. •Local x2APIC This item enables Local x2APIC. Some OSes do not support this feature. •Press <Esc> key to return to "Advanced" menu. ► USB Configuration Click <Enter> key to enter its submenu. 24 EMX-H61 User’s Manual...
- Page 25 Power switch to boot. Setting "Power On", the supply reply directly boot. Setting "Last State", Power reply recovery system State before power off. The default value as "Power Off". ・Press <Esc> key to return to "Advanced" menu. EMX-H61 User’s Manual 25...
-
Page 26: Chipset Setting
Allows you to determine whether to enable the CPU fan speed control function and adjust the fan speed. Available options: Manual Mode, Smart Mode • Fan PWM Value Available options: 0 – 255 3.5.3 Chipset Setting 26 EMX-H61 User’s Manual... -
Page 27: North Bridge
Select which graphics controller to use as the primary boot device. • IGD Memory IGD share memory size. • Render Standby Enable/Disable Render Standby by Internal Graphics Device. • IGD Multi-Monitor Enable/Disable IGD Multi-Monitor by Internal Graphics Device. ・Press <Esc> key to return to "Chipset" menu. EMX-H61 User’s Manual 27... - Page 28 Sets the HD Audio has Enabled or Disabled state. • Azalia internal HDMI codec Enabled/Disabled internal HDMI codec for Azalia. • USB2.0 Controller Enabled/Disabled All USB Devices. ► SATA Control Click <Enter> key to enter its submenu. 28 EMX-H61 User’s Manual...
- Page 29 Select DVMT Mode used by Internal Graphics Device. • DVMT/FIXED Memory Select DVMT/FIXED Mode Memory size used by Internal Graphics Device. ・Press <Esc> key to return to "Chipset" menu. ► ME Subsystem Click <Enter> key to enter its submenu. EMX-H61 User’s Manual 29...
- Page 30 When set to Enabled, this function allows the option ROMs to trap Interrupt 19. • Boot Option #1 Sets the system boot order. ► Hard Drive BBS Priorities Click <Enter> key to enter its submenu, it will be display specifies the boot sequence from the available devices. 30 EMX-H61 User’s Manual...
- Page 31 Note: Don’t forget your password. If you forget the password, you will have to open the computer case and clear all information in the CMOS before you can start up the system. But by doing this, you will have to reset all previously set options. EMX-H61 User’s Manual 31...
- Page 32 EMX-H61 User’s Manual 3.5.6 OverClock Setting ► CPU Configuration Click <Enter> key to enter its submenu.The following items: setting CPU Multiplier, CPU power consumption limit, power consumption limit, overclocking switch. 32 EMX-H61 User’s Manual...
- Page 33 Click <Enter> key to enter its submenu.The following items: Setting FSB and memory parameters act. ► Graphics Configuration Click <Enter> key to enter its submenu. The following items: setting graphics core ratio limit, graphics voltage, iGFX core current max. EMX-H61 User’s Manual 33...
- Page 34 BIOS setup program. Select "No" or press "ESC" and return to the main menu. • Save Changes and Reset Select "Save Changes and Reset", and select "Yes" and press <Enter> to save the 34 EMX-H61 User’s Manual...
- Page 35 BIOS default values, select "No" or press "ESC" return to the main menu. • Restore User Defaults Select "Restore User Defaults", select "Yes" and press <Enter> allows the user to restore the user's personality BIOS settings, select "No" or press "ESC" and return to the main menu. EMX-H61 User’s Manual 35...
-
Page 36: Drivers Installation
EMX-H61 User’s Manual 4. Drivers Installation Note: Installation procedures and screen shots in this section are for your reference and may not be exactly the same as shown on your screen. 36 EMX-H61 User’s Manual... -
Page 37: Install Chipset Driver (For Intel H61 Express)
4.1 Install Chipset Driver (For Intel H61 Express) Insert the Supporting DVD-ROM to DVD-ROM drive, and it should show the index page of Avalue’s products automatically. If not, locate Index.htm and choose the product from the menu left, or link to \Driver\Chipset\Intel\ H61... -
Page 38: Install Display Driver (For Intel H61 Express)
4.2 Install Display Driver (For Intel H61 Express) Insert the Supporting DVD-ROM to DVD-ROM drive, and it should show the index page of Avalue’s products automatically. If not, locate Index.htm and choose the product from the menu left, or link to \Driver\VGA\H6s. -
Page 39: Install Audio Driver (For Realtek)
4.3 Install Audio Driver (For Realtek) Insert the Supporting DVD-ROM to DVD-ROM drive, and it should show the index page of Avalue’s products automatically. If not, locate Index.htm and choose the product from the menu left, or link to \Driver\Audio\Realtek HD\XP. -
Page 40: Install Ethernet Driver (For Realtek Pcie)
4.4 Install Ethernet Driver (For Realtek PCIE) Insert the Supporting CD-ROM to CD-ROM drive, and it should show the index page of Avalue’s products automatically. If not, locate Index.htm and choose the product from the menu left, or link to \Driver\LAN\Realtek PCIE\XP. -
Page 41: Install Usb3.0 Driver (For Usb3)
4.5 Install USB3.0 Driver (For USB3) Insert the Supporting CD-ROM to CD-ROM drive, and it should show the index page of Avalue’s products automatically. If not, locate Index.htm and choose the product from the menu left, or link to \ Driver\USB3\ NEC.
Need help?
Do you have a question about the EMX-H61 and is the answer not in the manual?
Questions and answers