
Subscribe to Our Youtube Channel
Related Manuals for Avalue Technology EMX-Q87


Summary of Contents for Avalue Technology EMX-Q87
- Page 1 EMX-Q87 Intel® Q87 with Core™ i7/ i5 /i3 mini-ITX Motherboard User’s Manual Ed – 18 February 2014 Part No: E2047MQ8701R...
- Page 2 Disclaimer Avalue Technology Inc. reserves the right to make changes, without notice, to any product, including circuits and/or software described or contained in this manual in order to improve design and/or performance. Avalue Technology assumes no responsibility or liability for the...
-
Page 3: Technical Support
Avalue has come to be known. Your satisfaction is our primary concern. Here is a guide to Avalue’s customer services. To ensure you get the full benefit of our services, please follow the instructions below carefully. -
Page 4: Product Warranty
If any of Avalue’s products is defective, it will be repaired or replaced at no charge during the warranty period. For out-of-warranty repairs, you will be billed according to the cost of replacement materials, service time, and freight. -
Page 5: Table Of Contents
2.7.7 20pin ATX Power Connector (EATXPWR1) ............33 2.7.8 12V ATX Power Connector (ATX12V1) .............. 33 2.7.9 Serial Port 1 Connector (COM1) ................. 34 2.7.10 Serial Port 2 Connector (COM2) ............... 34 2.7.11 Serial Port 3~4 Connectors (COM3~4) ............. 35 EMX-Q87 User’s Manual 5... - Page 6 Using Setup ....................... 43 BIOS Menu Screen ....................44 3.4.1 Main Setup ......................45 3.4.2 Advanced BIOS Setup ................... 46 3.4.3 Chipset ........................65 3.4.4 Boot ........................75 3.4.5 Security ........................76 3.4.6 Save & Exit ......................77 6 EMX-Q87 User’s Manual...
-
Page 7: Getting Started
1.2 Packing List Before you begin installing the single board, make sure that the following materials are included in the package: 1 x EMX-Q87 Mini ITX Motherboard 1 x CD-ROM contains OS drivers/QIG/User’s Manual ... -
Page 8: Document Amendment History
We strongly recommend that you read this manual carefully before attempting to install the EMX-Q87 series or change the standard configurations. Whilst all the necessary information is available in this manual, it is recommend to contact your supplier for guidance for any queries and concern. -
Page 9: System Specifications
Line in,Line Out,Mic-in Ethernet LAN1 Intel I211AT Gigabit Ethernet controller LAN2 Intel I217LM Gigabit Ethernet controller (PHY) Back I/O Port 1 x PS2 KB/MS Back Panel 1 x COM Port (RS-232/422/485 supported) 1 x Display Port EMX-Q87 User’s Manual 9... - Page 10 1 x 20 pin ATX Power connector 1 x 2x2 pin 12V Power connector Mechanical & Environmental AT/ATX Power Type Operating Temperature 0~60°C (32~140°F) Operating Humidity 0%~90% relative humidity, non-condensing Size (L x W) 6.69'' x 6.69'' (170mm x 170mm) 10 EMX-Q87 User’s Manual...
-
Page 11: Architecture Overview - Block Diagram
EMX-Q87 User’s Manual 1.5 Architecture Overview – Block Diagram The following block diagram shows the architecture and main components of EMX-Q87. EMX-Q87 User’s Manual 11... -
Page 12: Hardware Installation
• DirectX® 11.1 & Open GL 4.0 let you enjoy awesome graphics performance, stunning 3D visual effect and dynamic interactivity • Memory support, integrated low voltage DDR3 memory controller 12 EMX-Q87 User’s Manual... -
Page 13: Key Architecture Features
IPv4 and IPv6 Checksum Offload - High Definition Audio - USB: Gen 2.0, up to 6 Ports / Gen 3.0, up to 6 Ports - SMBus 2.0 - LPC Bus Supports SPI devices - Hardware Monitor Fan control (Voltage, Temp) EMX-Q87 User’s Manual 13... -
Page 14: Before You Proceed
Before you install or remove any component, ensure that the ATX power supply is switched off or the power cord is detached from the power supply. Failure to do so may cause severe damage to the motherboard, peripherals, and/or components. 14 EMX-Q87 User’s Manual... -
Page 15: Motherboard Overview
Place four (4) screws into the holes indicated by circles to secure the motherboard to the chassis. Do not over tighten the screws! Doing so can damage the motherboard. Place this side towards the rear of the chassis. EMX-Q87 User’s Manual 15... -
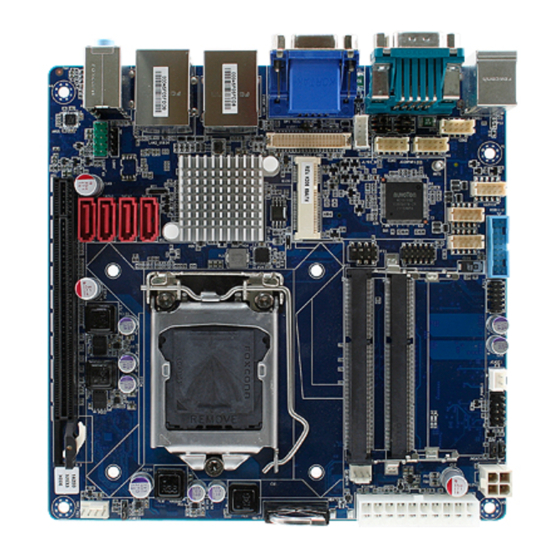
Page 16: Motherboard Layout
EMX-Q87 User’s Manual 2.2.3 Motherboard Layout 16 EMX-Q87 User’s Manual... -
Page 17: Jumper And Connector List
COM2 Ring-In/ +12V/ +5V Select JLVDS_BKL1 LCD Inverter Setting Connector JMSATASW M-SATA/mini PCIe Selection Connectors Label Function Note VGA1 VGA Video Port Gigabit LAN (RJ-45) Connector LAN1/2_USB12/34 USB 3.0 Connector x 4 Line-in port (Light blue) AUDIO1 Line-out port (Lime) EMX-Q87 User’s Manual 17... - Page 18 HDMI Port The on-screen message alerting you about headphones being connected to the computer. The Realtek audio software features an automatic jack sensing option to let you know when something has been inserted into an audio port. 18 EMX-Q87 User’s Manual...
-
Page 19: Central Processing Unit (Cpu)
Contact your retailer immediately if the PnP cap is missing, or if you see any damage to the PnP cap/socket pins/motherboard components. Avalue will shoulder the cost of repair only if the damage is shipment/transit-related. ... -
Page 20: Installing The Cpu
2. Press the load lever with your thumb (A), then move it to the left (B) until it is released from the retention tab. Retention tab Load lever To prevent damage to the socket pins, do not remove the PnP cap unless you are installing a CPU. 20 EMX-Q87 User’s Manual... - Page 21 (A) until it snaps into the retention tab. The CPU fits in only one correct orientation. DO NOT force the CPU into the socket to prevent bending the connectors on the socket and damaging the CPU! EMX-Q87 User’s Manual 21...
-
Page 22: Installing The Cpu Heatsink And Fan
Motherboard hole Orient the heatsink and fan assembly such that the CPU fan cable is closest to the CPU fan connector. Make sure each fastener is oriented as shown, with the narrow groove directed outward. 22 EMX-Q87 User’s Manual... -
Page 23: Uninstalling The Cpu Heatsink And Fan
These are not jumpers! DO NOT place jumper caps on the fan connectors. 2.4.3 Uninstalling the CPU Heatsink and Fan To uninstall the CPU heatsink and fan: 1. Disconnect the CPU fan cable from the connector on the motherboard. 2. Rotate each fastener counterclockwise EMX-Q87 User’s Manual 23... - Page 24 EMX-Q87 User’s Manual 3. Pull up two fasteners at a time in a diagonal sequence to disengage the heatsink and fan assembly from the motherboard. 4. Carefully remove the heatsink and fan assembly from the motherboard. 24 EMX-Q87 User’s Manual...
-
Page 25: System Memory
A DDR3 module has the same physical dimensions as a DDR SODIMM but has a 204-pin footprint compared to the 240-pin DDR2 DIMM. DDR3 SODIMMs are notched differently to prevent installation on a DDR2 SODIMM socket. The following figure illustrates the location of the sockets: 204-Pin DDR3 SODIMM sockets EMX-Q87 User’s Manual 25... -
Page 26: Memory Configurations
3. Align the notch key on the module with the rib on the slot. 4. Firmly press the modules into the socket which will automatically snap into the mounting notch. Do not force the SODIMM module in with extra force as the DIMM module only fits in one direction. 26 EMX-Q87 User’s Manual... -
Page 27: Removing A Ddr3 Sodimm
The DDR3 SODIMM sockets do not support DDR/DDR2 SODIMMs. DO NOT install DDR/DDR2 SODIMMs to the DDR3 SODIMM socket. 2.5.4 Removing a DDR3 SODIMM 1. Press the two ejector tabs on the slot outward simultaneously, and then pull out the DIMM module. EMX-Q87 User’s Manual 27... -
Page 28: Expansion Card
3. Install the software drivers for the expansion card. 2.6.2.1 PCI Express x16 slot This motherboard supports one PCI Express x16 slot that complies with the PCI Express specifications. The following figure shows a graphics card installed on the PCI Express x16 slot. 28 EMX-Q87 User’s Manual... - Page 29 The miniPCIe express slot supports Mini cards for WiFi , Bluetooth, COM, USB modules, and other cards that comply with the mini Card Rev. 1.2 specifications . The figure below shows the type of full size SSD card that can be installed on a miniPCI express slot. EMX-Q87 User’s Manual 29...
-
Page 30: Setting Jumpers & Connectors
EMX-Q87 User’s Manual 2.7 Setting Jumpers & Connectors 2.7.1 Clear CMOS Jumper (JCMOS1) Normal* Clear CMOS Default 2.7.2 ATX/AT Mode Selection (JPSON1) ATX MODE* AT MODE Default 30 EMX-Q87 User’s Manual... -
Page 31: Com2 Ring-In/ +12V/ +5V Select (Jcompwr1)
EMX-Q87 User’s Manual 2.7.3 COM2 Ring-In/ +12V/ +5V Select (JCOMPWR1) +12V * Default 2.7.4 M-SATA/mini PCIe Selection (JMSATASW1) Mini-PCIe* M-SATA Default EMX-Q87 User’s Manual 31... -
Page 32: Lcd Inverter Setting Connector (Jlvds_Bkl1)
EMX-Q87 User’s Manual 2.7.5 LCD Inverter Setting Connector (JLVDS_BKL1) 5V(Pin 1~3)* Linear mode(Pin 2~4)* 3.3V(Pin 3~5)* PWM mode(Pin 4~6) Default 2.7.6 Chassis Intrusion Connector (JCASE1) * Default 32 EMX-Q87 User’s Manual... -
Page 33: 20Pin Atx Power Connector (Eatxpwr1)
EMX-Q87 User’s Manual 2.7.7 20pin ATX Power Connector (EATXPWR1) 2.7.8 12V ATX Power Connector (ATX12V1) EMX-Q87 User’s Manual 33... -
Page 34: Serial Port 1 Connector (Com1)
EMX-Q87 User’s Manual 2.7.9 Serial Port 1 Connector (COM1) 2.7.10 Serial Port 2 Connector (COM2) 34 EMX-Q87 User’s Manual... -
Page 35: Serial Port 3~4 Connectors (Com3~4)
EMX-Q87 User’s Manual 2.7.11 Serial Port 3~4 Connectors (COM3~4) COM4 COM3 2.7.12 LVDS Connector (JLVDS1) EMX-Q87 User’s Manual 35... -
Page 36: Back Light Controller Connector (Jbkl1)
EMX-Q87 User’s Manual 2.7.13 Back Light Controller Connector (JBKL1) 2.7.14 Front Panel Connector (F_PANEL) 36 EMX-Q87 User’s Manual... -
Page 37: Fan Connectors (Cpu_Fan1, Sys_Fan1)
EMX-Q87 User’s Manual 2.7.15 Fan Connectors (CPU_FAN1, SYS_FAN1) SYS_FAN1 CPU_FAN1 2.7.16 SATA Ports (SATA1~4) SATA1 SATA2 SATA3 SATA4 EMX-Q87 User’s Manual 37... -
Page 38: Usb 3.0 Connector (Usb1112)
EMX-Q87 User’s Manual 2.7.17 USB 3.0 Connector (USB1112) 2.7.18 Front USB Headers (USB56, USB78, USB910) USB910 USB56 38 EMX-Q87 User’s Manual... -
Page 39: Front Panel Audio Connector (Fp_Audio1)
EMX-Q87 User’s Manual 2.7.19 Front Panel Audio Connector (FP_AUDIO1) 2.7.20 Amplifier Connector (JAMP1) EMX-Q87 User’s Manual 39... -
Page 40: Digital I/O Connector (Jdio1)
EMX-Q87 User’s Manual 2.7.21 Digital I/O Connector (JDIO1) 2.7.22 LPC Connector (JLPC1) 40 EMX-Q87 User’s Manual... -
Page 41: Spi Connector (Spi1)
EMX-Q87 User’s Manual 2.7.23 SPI Connector (SPI1) EMX-Q87 User’s Manual 41... -
Page 42: Bios Setup
If you do not press the keys at the correct time and the system does not boot, an error message will be displayed and you will again be asked to. Press <F1> skip, <DEL> or <F2> Enter Setup 42 EMX-Q87 User’s Manual... -
Page 43: Using Setup
While moving around through the Setup program, note that explanations appear in the Item Specific Help window located to the right of each menu. This window displays the help text for the currently highlighted field. EMX-Q87 User’s Manual 43... -
Page 44: Bios Menu Screen
To access the menu items, press the up/down/right/left arrow key on the keyboard until the desired item is highlighted, then press [Enter] to open the specific menu. 44 EMX-Q87 User’s Manual... -
Page 45: Main Setup
Use this menu for basic system configurations, such as time, date etc. BIOS Information Displays the auto-detected BIOS information. System Date The date format is <Date>,<Month>,<Day>,<Year>. System Time The time format is <Hour>,<Minute>,<Second>. EMX-Q87 User’s Manual 45... -
Page 46: Advanced Bios Setup
The Advanced BIOS Setup screen is shown below. The sub menus are described on the following pages. Take caution when changing the settings of the Advanced menu items. Incorrect field values can cause the system to malfunction. 46 EMX-Q87 User’s Manual... - Page 47 The PCI PnP menu items allow you to change the advanced settings for PCI/PnP devices. PCI Bus Driver Version Displays the information of PCI Bus Driver Version PCI Latency Timer [32 PCI Bus Clocks] Configuration options: [32 PCI Bus Clocks] ~ [248 PCI Bus Clocks] EMX-Q87 User’s Manual 47...
- Page 48 Configuration options: [Disabled] [Enabled] Wake on PCIE [Disabled] Configuration options: [Disabled] [Enabled] S3 Video Repost [Disabled] Allows you to determine whether to invoke VGA BIOS POST on S3/STR resume. Configuration options: [Disabled] [Enabled] 48 EMX-Q87 User’s Manual...
- Page 49 EMX-Q87 User’s Manual 3.4.2.3 CPU configuration CPU configuration Displays the CPU information EMX-Q87 User’s Manual 49...
- Page 50 Configuration options: [Disabled] [Enabled] EIST [Enabled] Enable or disable speed step. Configuration options: [Disabled] [Enabled] Turbo Mode [Enabled] Configuration options: [Disabled] [Enabled] CPU C States [Enabled] Configuration options: [Disabled] [Enabled] Enhanced C1 States [Enabled] 50 EMX-Q87 User’s Manual...
- Page 51 Use this to enable or disable CPU C7 report to OS. Configuration options: [Disabled] [CPU C7] [CPU C7s] Package C State limit [Auto] Intel TXT(LT) Support [Enable] Configuration options: [Disabled] [Enabled] 3.4.2.4 SATA Configuration EMX-Q87 User’s Manual 51...
- Page 52 EMX-Q87 User’s Manual Serial-ATA Controller(s) [Enabled] Enabled/Disabled Serial-ATA Controller 0 Configuration options: [Disabled] [Enabled] SATA Mode [IDE] Support IDE, AHCI or RAID mode Configuration options: [IDE][AHCI][RAID] 3.4.2.5 PCH-FW Configuration 52 EMX-Q87 User’s Manual...
- Page 53 EMX-Q87 User’s Manual 3.4.2.6 AMT Configuration Intel AMT [Enabled] Configuration options: [Disabled] [Enabled] Un-Configure ME [Disabled] Configuration options: [Disabled] [Enabled] EMX-Q87 User’s Manual 53...
- Page 54 Display how many devices are connected. Legacy USB Support [Enabled] Enables Legacy USB support. AUTO option disables legacy support if no USB devices are connected. Disabled option will keep USB devices available only for EFI applications. Configuration options: [Enabled] [Disabled][Auto] 54 EMX-Q87 User’s Manual...
- Page 55 Super IO Configuration Super IO Chip [NCT6106D] RS232/422/485 Selection [RS232] Configuration options: [RS232][RS422 HALF DUPLEX][RS485/RS422 FULL DUPLEX] Chassis Opened Warning [Disabled] Configuration options: [Enabled] [Disabled] GPIO Group Control [Disabled] Configuration options: [Enabled] [Disabled] EMX-Q87 User’s Manual 55...
- Page 56 Configuration options: [Auto] [IO=3F8h; IRQ=4] [IO=3F8h; IRQ=3, 4, 5, 6, 7, 10, 11, 12] [IO=2F8h; IRQ=3, 4, 5, 6, 7, 10, 11, 12][IO=3E8h; IRQ=3, 4, 5, 6, 7, 10, 11, 12] [IO=2E8h; IRQ=3, 4, 5, 6, 7, 10, 11, 12] 56 EMX-Q87 User’s Manual...
- Page 57 Configuration options: [Auto] [IO=2F8h; IRQ=3][IO=3F8h; IRQ=3, 4, 5, 6, 7, 10, 11, 12] [IO=2F8h; IRQ=3, 4, 5, 6, 7, 10, 11, 12][IO=3E8h; IRQ=3, 4, 5, 6, 7, 10, 11, 12] [IO=2E8h; IRQ=3, 4, 5, 6, 7, 10, 11, 12] EMX-Q87 User’s Manual 57...
- Page 58 Configuration options: [Auto][IO=3E8h; IRQ=5][IO=3E8h; IRQ=3, 4, 5, 6, 7, 10, 11, 12] [IO=2E8h; IRQ=3, 4, 5, 6, 7, 10, 11, 12][IO=2E0h; IRQ=3, 4, 5, 6, 7, 10, 11, 12] [IO=2F0h; IRQ=3, 4, 5, 6, 7, 10, 11, 12] 58 EMX-Q87 User’s Manual...
- Page 59 Configuration options: [Auto][IO=2E8h; IRQ=10][IO=3E8h; IRQ=3, 4, 5, 6, 7, 10, 11, 12] [IO=2E8h; IRQ=3, 4, 5, 6, 7, 10, 11, 12][IO=2E0h; IRQ=3, 4, 5, 6, 7, 10, 11, 12] [IO=2F0h; IRQ=3, 4, 5, 6, 7, 10, 11, 12] EMX-Q87 User’s Manual 59...
- Page 60 EMX-Q87 User’s Manual 3.4.2.9 NCT6106D Hardware Monitor PC Health Status Display system health status 60 EMX-Q87 User’s Manual...
- Page 61 EMX-Q87 User’s Manual 3.4.2.9.1 Smart Fan Smart Fan Function [Enabled] Configuration options: [Disabled] [Enabled] EMX-Q87 User’s Manual 61...
- Page 62 Smart Fan Mode configuration System Fan Mode [Manual Mode] Select system Fan mode Configuration options: [Manual Mode][Thermal Cruise Mode] CPU Fan Mode [Manual Mode] Select CPU Fan mode Configuration options: [Manual Mode][Thermal Cruise Mode] 62 EMX-Q87 User’s Manual...
- Page 63 Enable or Disable Boot Option For Legacy Mass Storage Devices with Option ROM Configuration options: [Do not launch] [UEFI only] [Legacy only] Other PCI Device ROM priority priority [UEFI OpROM] Configuration options: [UEFI OpROM] [Legacy OpROM] EMX-Q87 User’s Manual 63...
- Page 64 EMX-Q87 User’s Manual 3.4.2.11 Intel RC Driver Version Detail 64 EMX-Q87 User’s Manual...
-
Page 65: Chipset
EMX-Q87 User’s Manual 3.4.3 Chipset EMX-Q87 User’s Manual 65... - Page 66 Enable/Disable LAN1 boot option for legacy network devices. Configuration options: [Disabled] [Enabled] Wake on LAN1 from S5 [Disabled] Configuration options: [Disabled] [Enabled] LAN2 Controller [Enabled] Enable/Disable LAN1 Controller Configuration options: [Disabled] [Enabled] LAN2 Option-ROM [Disabled] 66 EMX-Q87 User’s Manual...
- Page 67 EMX-Q87 User’s Manual Enable/Disable LAN2 boot option for legacy network devices. Configuration options: [Disabled] [Enabled] Amplifier GAIN(db) [15.3db] Setting Amplifier GAIN Configuration options:[15.3db][21.2db][27.2db][31.8db] 3.4.3.1.1 PCI Express Configuration EMX-Q87 User’s Manual 67...
- Page 68 EMX-Q87 User’s Manual PCI Express Root Port 1 [Enabled] Configuration options: [Disabled] [Enabled] ASPM Support [Disabled] PCIe Speed [Auto] Detect Non-Compliance Device [Disabled] Configuration options: [Disabled] [Enabled] 68 EMX-Q87 User’s Manual...
- Page 69 EMX-Q87 User’s Manual 3.4.3.1.2 USB Configuration USB3.0 Support [Enabled] Enable/Disable USB 3.0 support Configuration options: [Disabled] [Enabled] USB ports per-port disable cont [Disabled] Configuration options: [Disabled] [Enabled] EMX-Q87 User’s Manual 69...
- Page 70 EMX-Q87 User’s Manual 3.4.3.2 System Agent (SA) Configuration VT-d [Disabled] Set VT-d Enable or Disable Configuration options: [Disabled] [Enabled] 70 EMX-Q87 User’s Manual...
- Page 71 Select DVMT 5.0 Pre-Allocated (Fixed) graphics memory size used by the internal graphics device. Configuration options: [32M]~[512M] DVMT Total Gfx Mem [256M] Select DVMT 5.0 total graphics memory size used by the internal graphics device. Configuration options: [128M][256M][MAX] EMX-Q87 User’s Manual 71...
- Page 72 VGA modes will be supported only on primary display. Configuration options: [VBIOS Default][CRT][DisplayPort][HDMI][LVDS] LCD Panel Type Select Select LCD Panel resolution LVDS Brightness Control [30] Configuration options:[1]~[255] LVDS Back Light PWM Frequency [200 Hz] 72 EMX-Q87 User’s Manual...
- Page 73 Detect Non-Compliance Device [Disabled] Configuration options:[Auto][Enable][Disable] PEG ASPM [Disabled] Control ASPM support for the PEG Device. This has no effect if PEG is not the currently active device. Configuration options: [Disabled] [Auto] [ASPM L0s] [ASPM L1] [ASPM L0sL1] EMX-Q87 User’s Manual 73...
- Page 74 EMX-Q87 User’s Manual 3.4.3.2.3 Memory Information Memory Information Display Memory Information 74 EMX-Q87 User’s Manual...
-
Page 75: Boot
Number of seconds to wait for setup activation key. 65535(0xFFFF) means indefinite waiting. Bootup NumLock State [On] Select the keyboard NumLock state Configuration options: [On] [Off] Quiet Boot [Disabled] Configuration options:[Enable][Disable] Boot mode select [LEGACY] Configuration options:[UEFI][ LEGACY] EMX-Q87 User’s Manual 75... -
Page 76: Security
EMX-Q87 User’s Manual 3.4.5 Security Administrator Password Set setup Administrator Password User Password Set User Password 76 EMX-Q87 User’s Manual... -
Page 77: Save & Exit
Exit system setup without saving the changes. Save changes and Reset Reset system after saving the changes. Discard changes and Reset Reset system without saving the changes. Restore Defaults Restore/Load default values for all the setup option. EMX-Q87 User’s Manual 77...
Need help?
Do you have a question about the EMX-Q87 and is the answer not in the manual?
Questions and answers