Table of Contents
Advertisement
Advertisement
Table of Contents

Related Manuals for Healthstream T401


Summary of Contents for Healthstream T401
- Page 1 T401/501 Foldable Treadmill Owner’s Manual Retain this owner’s manual for future reference. Read and follow all instructions in this owner’s manual. Retain this owner’s manual for future reference. Read and follow all instructions in this owner’s manual. Version A...
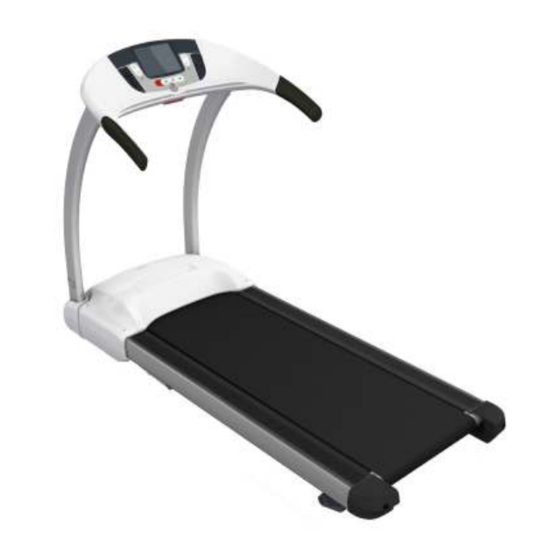
- Page 2 T401/T501 INTRODUCTION Console with LCD display Safety key – treadmill will not activate unless the safety key is secured in place. Handle bar with foam grip Reading rack Upright post AV cable jack input Wide side landing to place your...
- Page 3 KEY FEATURES Congratulations on choosing a state-of-the-art treadmill. You have taken the first step to a healthier and more rewarding lifestyle. CAUTION! Before beginning any This treadmill is especially modern and sleek design to give you reliable performance exercise program, and enjoyable workout in the comforts of your home.
-
Page 4: Table Of Contents
TABLE OF CONTENTS IMPORTANT SAFETY PRECAUTIONS ……..……………………….……. Grounding Instructions Electrical Safety Mechanical Safety Appropriate Attire Children and Pets SETTING UP YOUR TREADMILL ……………………………………….…. Placement in Your Home Leveling the Base Use Dedicated Circuit III. ASSEMBLY INSTRUCTIONS……………………………………………………… Tools and Accessories Hardware Kit Content Step by Step Instruction HANDLING YOUR TREADMILL ……………………….……………………. -
Page 5: Important Safety Precautions
IMPORTANT SAFETY PRECAUTIONS When using an electrical product, basic precautions should always be followed. Read all instructions before using this treadmill. WARNING! GROUNDING INSTRUCTIONS Connect this unit to a properly grounded This product must be grounded! If treadmill should malfunction or break down, outlet only. -
Page 6: Mechanical Safety
This exercise equipment is designed and built for optimum safety for the home use. However, certain precautions always apply whenever you operate any exercise equipment. Be sure to read the entire manual before assembly and operation of this machine. Also, please note the following safety precautions. CAUTION! STOP your workout MECHANICAL SAFETY... -
Page 7: Setting Up Your Treadmill
II. SETTING UP YOUR TREADMILL PLACEMENT IN YOUR HOME CAUTION! Make sure the To make exercise a desirable daily activity for you, the treadmill should be placed in a running deck is level comfortable and convenient setting. This treadmill is designed to use minimal floor to the ground. -
Page 8: Assembly Instructions
III. ASSEMBLY INSTRUCTIONS TOOLS AND ACCESSORIES Description Q’ty When to use Wrench, Hex For assembling steps 1 and step 2 Power cable For operating treadmill Safety key For operating treadmill HARDWARE KIT CONTENT Description Q’ty When to use Screw Step 1 x 8pcs M8x15 Step 2 x 6pcs Washer, flat... -
Page 9: Step By Step Instruction
STEP BY STEP INSTRUCTION 1. ASSEMBLE THE UPRIGHT POST Use Hex wrench to perform this assembly procedure. NOTE 1. Connect the cables (E, F) before you assemble the upright post (C) Take care that the to base frame (K). cables do not get 2. - Page 10 2. ASSEMBLE THE CONSOLE Use Hex wrench to perform this assembly procedure. 1. Connect the cables (E, G) and (H, I) before you assemble the console (M) to upright post (C,D). 2. Secure console (M) to the upright post (C, D) through the upright ring (N) with six M8x15 screw (A) and six flat washers (B).
-
Page 11: Handling Your Treadmill
IV. HANDLING YOUR TREADMILL FOLDING THE TREADMILL Folding and unfolding of this treadmill is made easy with the assistance of gas shock. After the treadmill has come to a complete stop, make sure the elevation is lowered all the way to the ground before folding the treadmill. With caution, fold up the deck slowly with both hands. -
Page 12: Operating The Treadmill
V. OPERATING THE TREADMILL TURN POWER ON The ON/OFF switch for the treadmill is located next to the power supply cord at the back WARNING! of the motor cover. Flip this switch to the “ON” position. NEVER use this treadmill without first securing the safety SAFETY TETHER KEY AND CLIP tether clip to your... -
Page 13: Operating The Console
Increment PULSE 40-240 ELEVATION (%) 0-12 DISTANCE (Miles) XX.X 1-999 DISTANCE (Km) XX.X 1-999 SPEED (Km/H) XX.X 1.0 – 16.0 (T401) XX.X 0.8 – 18.0 (T501) TIME XX:XX 00:01 – 99:59 00.01 CALORIES 1-999 Elevation LCD Display Speed elevation up... - Page 14 LCD Display Speed Menu and data display Elevation increase speed elevation up decrease speed elevation down T501 6 Quick fitness programs Owner’s Manual...
-
Page 15: Pulse Function
SPEED ADJUSTMENTS There are two ways to adjust speed during workout. will adjust speed by increments of 0.1Km/H or you may hold the button to ramp up or down. If the speed adjustment increment is large, it is easier to use the direct speed buttons, which function as direct speed control buttons during the workout. -
Page 16: End Of Workout Stats
If STOP is pressed during the pause mode, the program will end. After three minutes if no button is pressed, the treadmill will automatically end the workout program. END OF WORKOUT STATS When you have completed workout or if you have stopped your workout, the LCD window will display twice the following stats: total time, total distance, total calories and average speed. -
Page 17: Elevation Programs
START/enter key to activate the treadmill. During workout, treadmill will automatically adjust speed according to pre-set program settings. User may still be able to adjust speed if the preset is not appropriate. The entire remaining program will scale up or down accordingly. During workout, user may adjust elevation level at will. -
Page 18: Custom Program
place, you may press ?? to select HEART RATE FAT BURN or Heart Rate Cardio or HEART RATE HILL or HEART RATE INTERVAL. LCD window will prompt user to set up workout step by step. Once you have made your selection, press START/enter button to activate treadmill. -
Page 19: Fitness Test Program
When you have completed your workout or if you have stopped your workout, then you can choose to save or not. 1. Turn power on 2. Check safety key secured to treadmill and clip secured to user clothing 3. Select the CUSTOM PROGRAM, then press START/enter 4. -
Page 20: Exercise Tips And Guidelines
VII. EXERCISE TIPS AND GUIDELINES STRETCH Stretching prior to exercise will improve flexibility and reduce chances of exercise related CAUTION! injury. Ease into each of these stretches with a slow gentle motion. Hold for a count Always consult your of 10. DO NOT bounce. Repeat the stretch exercises again after cool down will help physician before to loosen and relax your muscles to prevent soreness. -
Page 21: How Hard
HOW HARD? CAUTION! How hard you work out is determined by your goal. Regardless of your fitness goals, For your health and always begin an exercise program at low intensity. Aerobic exercise does not have to safety, DO NOT over be painful to be beneficial ! exert yourself. -
Page 22: Maintenance
VIII. MAINTENANCE CLEANING DANGER! Remove dust on the treadmill with vacuum or slightly damp cloth. Fold up the deck and To reduce the risk of clean the floor with vacuum periodically will help to prolong the treadmill product life. electrical shock, always unplug the treadmill NEVER use solvents on the deck or running belt. -
Page 23: Running Belt Tension Adjustment
RUNNING BELT TENSIONING ADJUSTMENT CAUTION! If you place your feet on the belt and feel a slipping sensation, then the belt has Over tightening of the stretched and is slipping across the rollers. All belts will stretch over time. This is a belt will severely normal and common adjustment on any treadmill. -
Page 24: Trouble Shooting
IX. TROUBLE SHOOTING WHEN TO CALL FOR HELP This treadmill is designed with user safety as the number one priority. In the event of electrical failure, the treadmill will shut off automatically to prevent user injury and to prevent damage to expensive components such as the motor. When you encounter unusual behavior from the treadmill, simply go to the front of the treadmill and turn the power switch off and on to reset the treadmill. -
Page 25: Warranty
Wide side Adjust the landing to speed easily place your feet with your before and thumb while X. WARRANTY TERMS AND CONDITIONS This warranty is valid only in accordance with the conditions set forth below. Warranty applies only while the followings three conditions are met. It remains in the possession of the original purchaser and proof of purchase is demonstrated.
Need help?
Do you have a question about the T401 and is the answer not in the manual?
Questions and answers